
1. Introduction
Thank you for choosing the KANDUO Y101 4-Channel Dash Cam. This device is designed to provide comprehensive vehicle surveillance with its four integrated cameras, offering a 360-degree panoramic view. It features simultaneous recording from front, left, right, and rear lenses, WiFi connectivity for mobile app control, G-sensor for emergency recording, loop recording, and infrared night vision. Please read this manual carefully before use to ensure proper installation and operation.

Image 1.1: The KANDUO Y101 4-Channel Dash Cam, showcasing its four lenses (front, left, right, rear) and the central display screen. The image also highlights key features like motion detection, emergency lock, cold resistance, loop recording, starlight night vision, and four lenses.
2. Safety Information
- Installation Safety: Ensure the dash cam is installed in a location that does not obstruct the driver's view or interfere with vehicle safety features. Securely mount the device to prevent it from falling during driving.
- Power Supply: Use only the specified power adapter and cable provided with the device. Using incompatible power sources may damage the dash cam or pose a fire hazard.
- Operating Temperature: The device is designed to operate within a temperature range of -20°C to +70°C. Avoid exposing the dash cam to extreme temperatures outside this range.
- Maintenance: Do not attempt to disassemble, repair, or modify the dash cam yourself. Refer to qualified service personnel for any repairs. Keep the device dry and clean.
- Memory Card: Always use a high-speed memory card (Class 10 or higher) from a reputable brand to ensure stable recording performance.
3. Product Overview
The KANDUO Y101 dash cam features a compact design with a central display and integrated cameras. It includes a front-facing camera, two side cameras (left and right), and supports an external rear camera for comprehensive coverage.
3.1 Components
- Main Dash Cam Unit (with front, left, and right lenses, and 3.16-inch IPS screen)
- Mounting Bracket
- Power Cable (T-PYCE interface)
- Rear Camera (external, if included in package)
- User Manual

Image 3.1: A close-up view of the KANDUO Y101 dash cam, highlighting the central screen and the four integrated camera lenses for multi-directional recording.
3.2 Product Dimensions
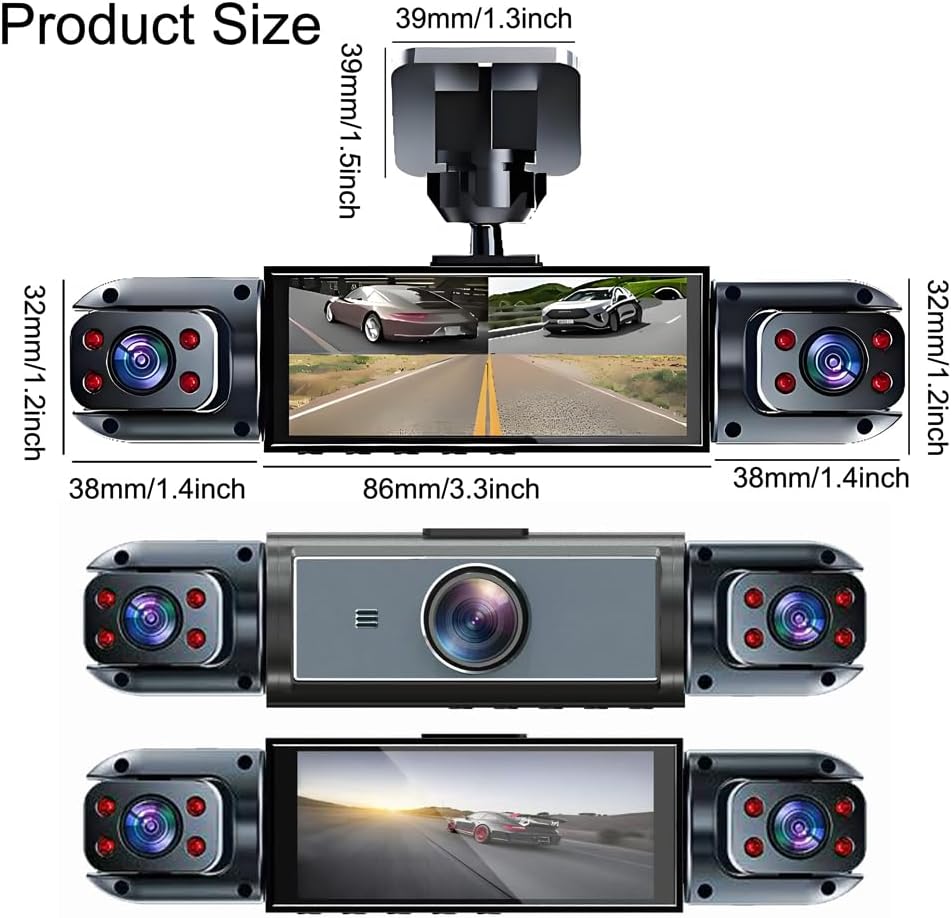
Image 3.2: A diagram illustrating the physical dimensions of the KANDUO Y101 dash cam, including its length, width, and height in both millimeters and inches for precise measurement.
4. Setup
4.1 Memory Card Installation
- Ensure the dash cam is powered off.
- Locate the memory card slot on the device.
- Insert a Class 10 or higher MicroSD card (up to 128GB) into the slot until it clicks into place.
- To remove, gently push the card in until it springs out.
4.2 Mounting the Dash Cam
- Clean the windshield area where you intend to mount the dash cam.
- Attach the mounting bracket to the dash cam.
- Peel off the protective film from the 3M adhesive on the bracket.
- Firmly press the dash cam with the bracket onto the chosen spot on the windshield, ensuring it does not obstruct your line of sight.
- Adjust the camera angle for optimal front view coverage.

Image 4.1: The KANDUO Y101 dash cam installed on a car's windshield, demonstrating that its placement maintains the original appearance of the car and does not obstruct the driver's line of sight, ensuring driving safety.
4.3 Power Connection
- Connect the provided power cable to the T-PYCE power interface on the dash cam.
- Plug the other end of the power cable into your vehicle's 12V power outlet (cigarette lighter socket).
- Route the cable neatly along the windshield and dashboard to avoid interference with driving.
4.4 Rear Camera Installation (Optional)
If your package includes an external rear camera, connect it to the designated port on the main dash cam unit and mount it on the rear windshield or license plate area according to its specific instructions. Ensure the cable is routed safely and discreetly.
5. Operating Instructions
5.1 Automatic Recording
Once powered on and connected to the vehicle's ignition, the dash cam will automatically start recording when the vehicle starts and stop recording when the ignition is turned off.
5.2 Loop Recording
The dash cam supports loop recording. When the memory card is full, the oldest unlocked video files will be automatically overwritten by new recordings. Emergency videos triggered by the G-sensor will not be overwritten.

Image 5.1: An illustration of the loop recording feature, demonstrating how the dash cam continuously records and automatically overwrites the oldest, non-emergency files when the memory card reaches its capacity.
5.3 G-Sensor / Emergency Recording
The built-in G-sensor detects sudden impacts or collisions. In the event of an accident, the current video segment will be automatically locked and saved to prevent it from being overwritten by loop recording. These files are stored in a separate folder.
5.4 Parking Monitoring
The dash cam can provide 24-hour parking monitoring. This feature requires a dedicated voltage reduction line (hardwire kit) to be installed, which is sold separately. When properly installed, the dash cam will automatically record if an impact is detected while the vehicle is parked.

Image 5.2: An infographic detailing several features of the dash cam, including its 3.16-inch IPS screen, 24-hour parking monitoring (note: requires voltage reduction line), loop recording, 146-degree wide-angle view, and AI intelligent chip.
5.5 WiFi Connectivity and Mobile App
The dash cam features built-in WiFi for connection to a mobile application. This allows you to view live footage, download recorded videos, and adjust settings directly from your smartphone or tablet. Refer to the app's instructions for pairing and usage.
5.6 Infrared Night Vision
Equipped with infrared LEDs, the dash cam automatically switches to IR night vision mode in low-light conditions or tunnels. This ensures clear recording even in dark environments, particularly for the interior and side cameras.

Image 5.3: A visual representation of the KANDUO Y101's 4-camera system, depicting the wide coverage provided by the front, internal, and rear cameras, ensuring a comprehensive view around and within the vehicle.
6. Maintenance
- Cleaning Lenses and Screen: Use a soft, lint-free cloth to gently wipe the camera lenses and the IPS screen. Avoid using abrasive cleaners or solvents.
- Memory Card Management: Regularly format the memory card (at least once a month) within the dash cam's settings to maintain optimal performance and prevent data corruption. Replace the memory card if it shows signs of degradation or error.
- Firmware Updates: Check the manufacturer's website or mobile app periodically for any available firmware updates. Follow the provided instructions carefully for updating the device.
7. Troubleshooting
7.1 Dash Cam Not Powering On
- Check if the power cable is securely connected to both the dash cam and the vehicle's power outlet.
- Ensure the vehicle's power outlet is functioning (e.g., by testing with another device).
- Verify that the vehicle's ignition is on, as most dash cams power on with the ignition.
7.2 Recording Errors or Freezing
- Ensure you are using a high-speed (Class 10 or higher) MicroSD card.
- Format the memory card within the dash cam's settings.
- Try using a different, new memory card to rule out card issues.
- Reset the dash cam to factory settings (refer to device menu).
7.3 Poor Video Quality
- Clean the camera lenses with a soft cloth.
- Ensure the protective film has been removed from the lenses.
- Check the video resolution settings in the dash cam menu; ensure it's set to the highest available (e.g., 1080p for front camera).
7.4 WiFi Connection Issues
- Ensure WiFi is enabled on the dash cam and your mobile device.
- Restart both the dash cam and your mobile device.
- Make sure you are within close proximity to the dash cam for a stable connection.
- Reinstall the mobile application.
8. Specifications
| Feature | Specification |
|---|---|
| Brand | KANDUO |
| Model | Y101 |
| Front Camera Pixels | 200W |
| Left/Right/Rear Camera Pixels | 50W each |
| Front Camera Resolution | 1920 x 1080p |
| Left/Right/Rear Camera Resolution | 1280 x 480p |
| Screen | 3.16" IPS |
| Front View Angle | 170° |
| Left/Right/Rear View Angle | 120° each |
| WiFi | Supported |
| G-Sensor | Supported |
| Loop Recording | Supported |
| Motion Detection | Yes |
| Max Memory Card Capacity | 128GB |
| Power Interface | T-PYCE |
| Battery | 150mAh |
| Output | USB 2.0 |
| Operating Temperature | -20°C to +70°C |
| Color | Black |
9. Warranty and Support
For warranty information and technical support, please refer to the documentation provided with your purchase or contact the retailer. Specific warranty terms may vary by region and seller.