
AQUOS Cayman 24V 80LBS 60inch
AQUOS Haswing Black Cayman 24V 80LBS 60-inch Bow Mount Trolling Motor User Manual
Model: Cayman 24V 80LBS 60inch
1. Introduction
This manual provides detailed instructions for the safe and efficient operation, installation, and maintenance of your AQUOS Haswing Black Cayman 24V 80LBS 60-inch Bow Mount Trolling Motor. Please read this manual thoroughly before using the product to ensure proper function and longevity.
1.1 Product Overview
The AQUOS Haswing Black Cayman Bow Mount Trolling Motor is engineered for precise control, quiet operation, and rugged durability in both freshwater and saltwater environments. It features a 24V 80LBS thrust motor with a 60-inch shaft, designed for boats up to 21 feet in length and a maximum load of 4000 LBS.
1.2 Key Features
- Variable Speed Control: Allows for precise speed adjustments and improved battery life.
- Wireless Remote Control: Operates the motor from up to 164 feet away, rechargeable via USB.
- Wired Foot Control: Provides hands-free, precise operation.
- Quick Release Bracket: Facilitates easy installation and removal of the motor.
- Cruise Control: Maintains a desired speed for consistent trolling.
- Durable Construction: Designed for excellent corrosion resistance in saltwater and freshwater.
- Ergonomic Lifting Handle: For comfortable transport.
- Adjustable Depth Collar: Securely sets motor depth.
2. Safety Information
Always observe the following safety precautions to prevent injury or damage to the product.
- Read all instructions before operating the motor.
- Ensure the motor is securely mounted before use.
- Disconnect power to the motor before performing any maintenance or propeller inspection.
- Keep hands, feet, and clothing clear of the propeller when the motor is in operation.
- Do not operate the motor if the propeller is obstructed or damaged.
- Always wear a personal flotation device (PFD) when on the water.
- Be aware of your surroundings and other watercraft.
- Do not exceed the maximum boat length (21 ft) or load (4000 LBS) recommended for this motor.
3. Package Contents
Verify that all components are present before beginning installation:
- AQUOS Haswing Black Cayman Trolling Motor (60-inch shaft)
- Wireless Remote Control
- Wired Foot Control (14.7 ft cable)
- Quick Release Bracket
- Propeller (11.4 inch two-blade)
- Mounting Hardware
- User Manual (this document)
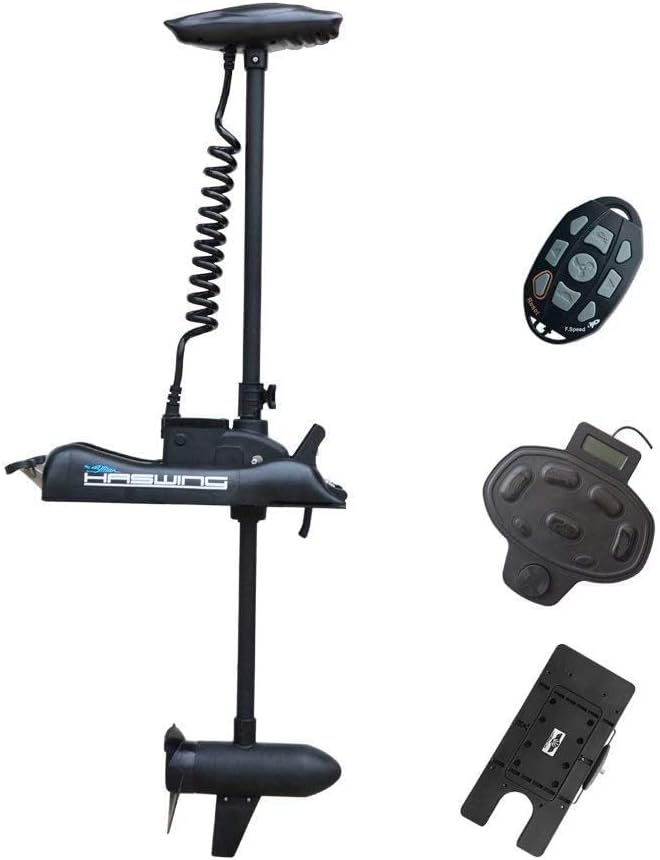
Image: The AQUOS Haswing Black Cayman Trolling Motor shown with its included wireless remote control, wired foot control, and quick release bracket.
4. Setup
4.1 Mounting the Trolling Motor
The quick release plate has a footprint of 4.6 inches x 9 inches. Choose a suitable location on the bow of your boat for mounting. Ensure the mounting surface is flat and strong enough to support the motor's weight and thrust.
- Position the quick release bracket on the bow, ensuring it is aligned correctly for motor deployment.
- Mark the drilling points for the mounting hardware.
- Drill appropriate holes and secure the quick release bracket using the provided hardware.
- Attach the trolling motor to the quick release bracket. The design allows for easy installation and removal.

Image: A bow-mounted trolling motor securely installed on the front of a boat, ready for operation.
4.2 Battery Connection
This motor operates on a 24V system. Ensure you have two 12V deep cycle marine batteries connected in series, or a single 24V battery, capable of providing sufficient amperage.
- Connect the positive (+) terminal of the motor to the positive (+) terminal of your 24V battery system.
- Connect the negative (-) terminal of the motor to the negative (-) terminal of your 24V battery system.
- Ensure all connections are tight and corrosion-free.
- It is recommended to install an appropriate circuit breaker or fuse (not included) in the positive line close to the battery for protection.
5. Operating Instructions
5.1 Deploying and Stowing the Motor
The motor features a stow and deploy pedal for quick transitions.
- To deploy: Depress the pedal with a single hand or foot and lower the motor into the water.
- To stow: Depress the pedal and lift the motor out of the water, securing it in the stowed position.

Image: The trolling motor shaft and propeller submerged in water, indicating it is in the deployed position for operation.
5.2 Wireless Remote Control
The wireless remote control allows for convenient operation from up to 164 feet away. It can be held in hand or worn with a lanyard.
- Power On/Off: Press the designated button to activate or deactivate the motor.
- Speed Adjustment: Use the speed up/down buttons to precisely dial in your desired speed.
- Steering: Use the left/right buttons to control the motor's direction.
- Recharging: The remote can be recharged via a USB cable, even with a power bank.
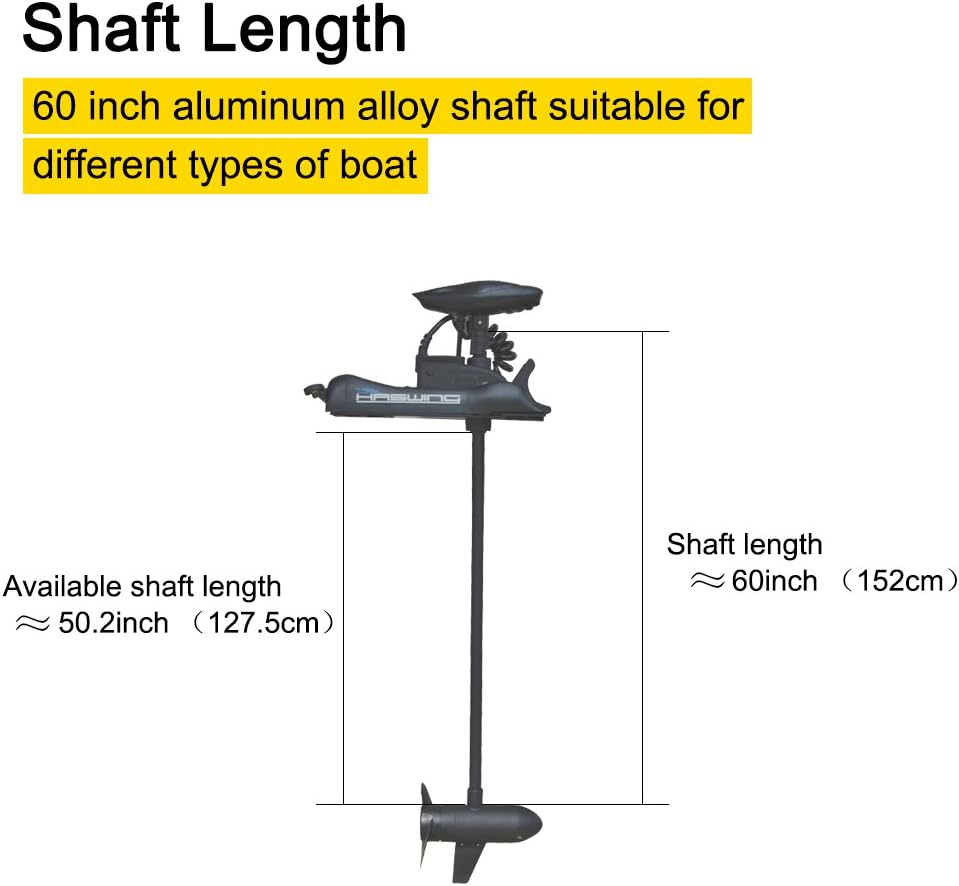
Image: A close-up view of the wireless remote control, showing its various buttons for speed and direction control.
5.3 Wired Foot Control
The 14.7 ft wired foot control provides hands-free operation, allowing you to focus on fishing.
- Power On/Off: Press the central power button.
- Speed Adjustment: Use the "Speed Up" and "Speed Down" buttons.
- Steering: Use the "Turn Left" and "Turn Right" buttons. The spinning footrest also aids in directional control.
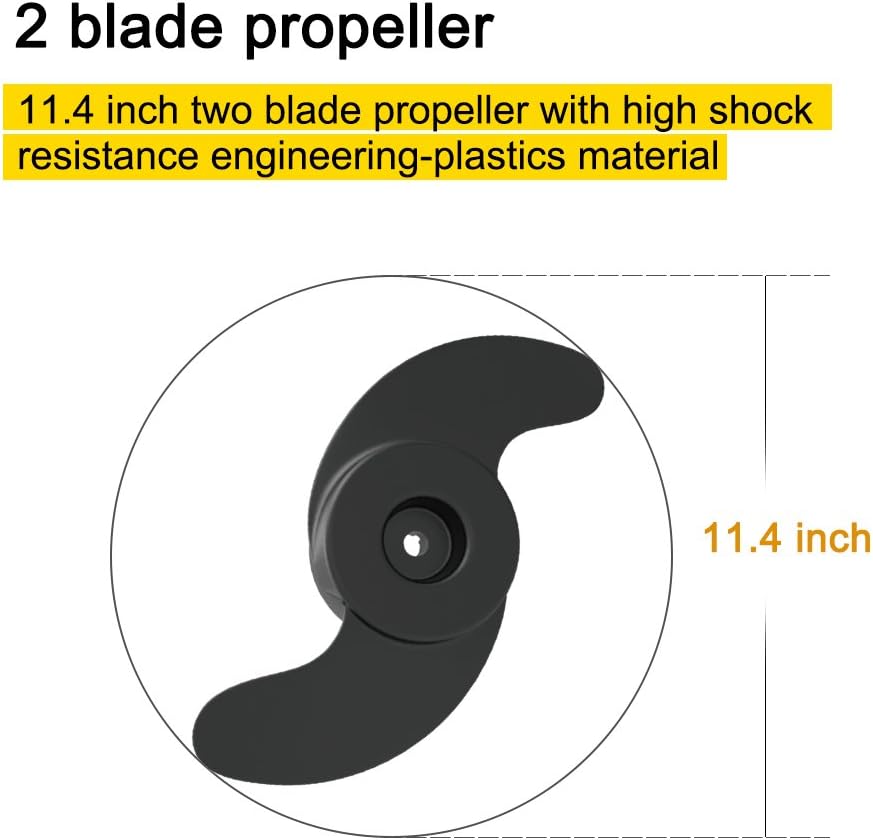
Image: A detailed view of the wired foot control, highlighting buttons for speed adjustment, turning, and power, along with a control display.
5.4 Variable Speed Control
The variable speed feature allows for precise adjustments to your boat's speed, optimizing for different fishing conditions and conserving battery life. Adjust speed using either the remote or foot control.

Image: An aerial view of a boat with a trolling motor, illustrating the concept of variable speed control with circular arrows indicating adjustable movement.
5.5 Cruise Control
To activate cruise control, use the remote control to set your desired speed. The motor will maintain this speed, allowing you to focus on fishing. Note that you may need to manually correct direction due to wind or current.

Image: A boat on the water with a trolling motor, depicting the cruise control feature which helps maintain a constant speed for fishing.
5.6 Depth Adjustment
The easy-to-use depth collar allows you to quickly, simply, and securely change the motor's depth.
- Loosen the depth collar.
- Adjust the motor shaft to the desired depth. Hold the motor shaft firmly to prevent it from sliding.
- Tighten the depth collar securely to lock the motor in place.

Image: A close-up of hands adjusting the depth collar on the trolling motor shaft, demonstrating how to change the motor's operating depth.
6. Maintenance
Regular maintenance ensures the longevity and optimal performance of your trolling motor.
6.1 After Each Use
- Rinse: Thoroughly rinse the motor with fresh water, especially after saltwater use, to prevent corrosion.
- Inspect Propeller: Check the propeller for any fishing line, weeds, or debris. Remove any obstructions.
- Wipe Down: Wipe down the motor and shaft with a clean cloth.
6.2 Propeller Care
The motor is equipped with an 11.4-inch two-blade propeller made of high shock-resistance engineering plastics.
- Periodically inspect the propeller for nicks, cracks, or bends. Replace if damaged.
- To remove the propeller: Disconnect power, then remove the propeller nut and washer. Carefully slide the propeller off the shaft.
- To install the propeller: Align the propeller with the shear pin on the shaft, then secure with the washer and nut. Do not overtighten.

Image: A close-up of the 11.4-inch two-blade propeller, highlighting its design for high shock resistance.
6.3 Storage
- Store the motor in a dry, cool place away from direct sunlight.
- If storing for an extended period, disconnect the battery.
- The ergonomic lifting handle makes carrying and storing the motor effortless.
7. Troubleshooting
| Problem | Possible Cause | Solution |
|---|---|---|
| Motor does not turn on. | Low or dead battery; Loose battery connections; Blown fuse/breaker. | Check battery charge; Tighten battery terminals; Check and replace fuse/reset breaker. |
| Motor runs slowly or with reduced thrust. | Low battery charge; Propeller fouled with debris; Damaged propeller. | Recharge battery; Clear propeller of debris; Inspect and replace propeller if damaged. |
| Remote control not responding. | Remote battery low; Out of range; Interference. | Recharge remote control; Move closer to the motor; Reduce potential interference sources. |
| Motor makes unusual noise. | Propeller damaged or loose; Debris in motor housing. | Inspect and tighten/replace propeller; Disconnect power and check for debris around the motor head. |
If you experience issues not listed here, please contact AQUOS customer support.
8. Specifications
- Brand: AQUOS
- Model: Haswing Black Cayman
- Voltage: 24 Volts (DC)
- Thrust: 80 LBS
- Shaft Length: 60 inches (Adjustable 50.2 inches)
- Engine Type: Electric
- Material: Stainless Steel (Shaft), Engineering Plastics (Propeller)
- Color: Black
- Mounting Type: Bow Mount
- Max Boat Length: 21 ft
- Max Boat Load: 4000 LBS
- Remote Control Range: Up to 164 ft
- Foot Control Cable Length: 14.7 ft
- Propeller Type: 11.4 inch two-blade
- ASIN: B0F2MKJ5P4
9. Warranty and Support
For warranty information and customer support, please refer to the official AQUOS website or contact their customer service department directly. Keep your purchase receipt as proof of purchase for any warranty claims.
AQUOS Official Store: Visit the AQUOS Store on Amazon
Related documentsCayman 24V 80LBS 60inch

Ask a question about this manual
Ask about setup, troubleshooting, compatibility, parts, safety, or missing instructions. Manuals+ will review the question and use this page’s manual context to help answer it.