1. Introduction
This manual provides detailed instructions for the installation, operation, and maintenance of your Walfront 1000W Solar Power Inverter. This device is designed to convert DC power from solar panels into AC power for various applications, including RVs and grid-tie systems. It features remote monitoring capabilities via the Tuya APP and advanced heat dissipation for optimal performance and longevity.
2. Safety Instructions
Please read all safety instructions carefully before installing or operating the inverter. Failure to follow these instructions may result in electric shock, fire, or serious injury.
- Ensure all electrical connections are secure and correctly polarized.
- Do not operate the inverter in wet conditions or expose it to water.
- Only qualified personnel should perform installation and maintenance.
- Disconnect all power sources before performing any service or cleaning.
- Keep children away from the inverter during operation.
- Ensure adequate ventilation around the inverter to prevent overheating.
3. Package Contents
Verify that all items listed below are included in your package:
- 1 x Solar Power Inverter
- 1 x Circuit Breaker
- 3 x Connecting Cables
- 1 x Antenna
- 3 x Terminal Connectors
- 1 x User Manual

Figure 3.1: Contents of the Walfront 1000W Solar Power Inverter package, including the inverter unit, circuit breaker, connecting cables, antenna, terminal connectors, and user manual.
4. Product Overview
The Walfront 1000W Solar Power Inverter is designed for efficient and reliable power conversion. Below are key components and their functions.

Figure 4.1: Top view of the inverter, highlighting the DC input terminals (red and black), AC output terminals, and antenna connection point.
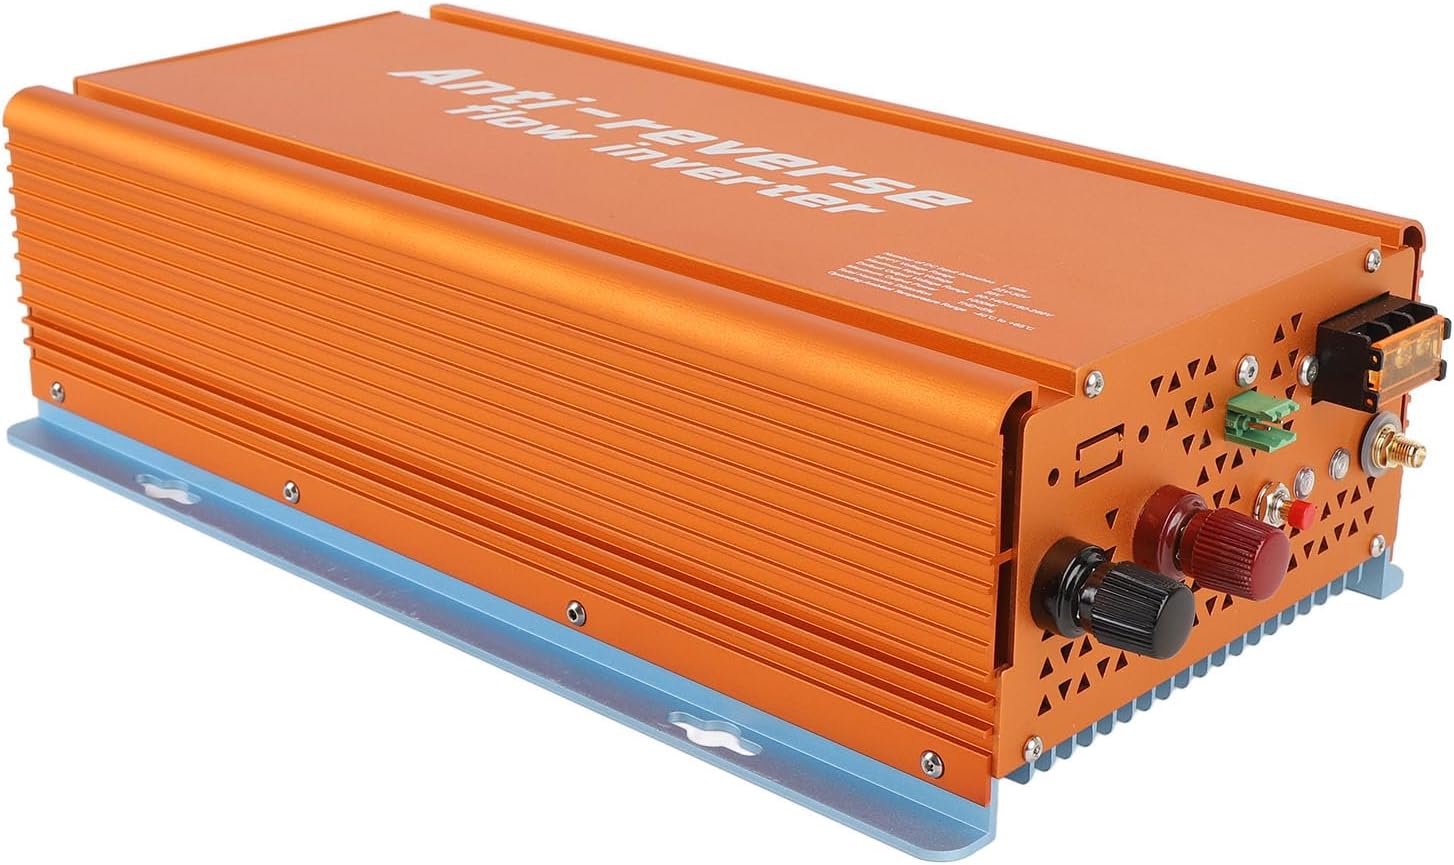
Figure 4.2: Front-side perspective of the inverter, showing the robust aluminum alloy casing and heat dissipation fins.

Figure 4.3: Rear view of the inverter, illustrating the cooling vents designed for efficient heat dissipation.
5. Specifications
| Category | Parameter | Value |
|---|---|---|
| Input Data (DC, PV) | DC Input Branches | 1 set |
| MPPT Voltage Range | 22V-50V | |
| Operating Voltage Range | 20V-50V | |
| Maximum Input Voltage | 50V | |
| Start Up Voltage | 20V | |
| Maximum Input Power | 1050W | |
| Maximum Input Current | 30A | |
| Output Data (AC) | Rated Output Power | 1000W |
| Maximum Output Power | 1000W | |
| Default Output Frequency Range | 48-62 Hz | |
| Power Factor | >0.98% | |
| Efficiency | Peak Efficiency | 95% |
| Nominal MPPT Efficiency | 99.5% | |
| Night Power Consumption | <50mW | |
| Mechanical & Environmental | Operating Ambient Temperature Range | -40℃ to +65℃ |
| Storage Temperature Range | -40℃ to +85℃ | |
| Rain Proof Rating | IP22 | |
| Cooling Method | Nature Cooling, Fan Assistance | |
| Item Weight | 5.5 pounds | |
| Other Features | Communication | WiFi (Cloud Monitoring) |
| Transformer Design | HF Transformer | |
| Integrated Grounding | Device grounding provided by PE in AC Cable |
6. Setup and Installation
Proper installation is crucial for the safe and efficient operation of your inverter. Follow these steps carefully.
6.1 Mounting the Inverter
- Choose a suitable location: Select a cool, dry, and well-ventilated area, away from direct sunlight, flammable materials, and moisture. Ensure sufficient clearance around the inverter for air circulation.
- Secure mounting: Use appropriate screws and anchors to securely mount the inverter to a solid surface. The inverter can be mounted vertically or horizontally.
6.2 Electrical Connections
Before making any electrical connections, ensure all power sources are disconnected.
- DC Input Connection (Solar Panels):
- Connect the positive (+) cable from your solar panel array to the red DC input terminal on the inverter.
- Connect the negative (-) cable from your solar panel array to the black DC input terminal on the inverter.
- Ensure the DC input voltage from your solar panels is within the inverter's MPPT voltage range (22V-50V) and does not exceed the maximum input voltage (50V).
- AC Output Connection (Grid/Load):
- Connect the AC output cables from the inverter to your electrical panel or load, ensuring correct phase, neutral, and ground connections.
- Install the provided circuit breaker in the AC output line as a protective measure.
- The inverter provides integrated grounding via the PE wire in the AC cable.
- Antenna Installation:
- Screw the provided antenna onto the designated antenna port on the inverter for WiFi communication.

Figure 6.1: Side view of the inverter, indicating the locations for DC input, AC output, and antenna connections.
7. Operating Instructions
Once installed, the inverter is ready for operation. This section covers basic startup and monitoring.
7.1 Initial Startup
- Verify Connections: Double-check all DC and AC connections to ensure they are secure and correct.
- Apply DC Power: Connect the solar panels to the inverter. The inverter will automatically start when sufficient DC voltage is detected.
- Apply AC Power: Turn on the circuit breaker connected to the inverter's AC output. The inverter will synchronize with the grid and begin power generation.
7.2 Tuya APP Remote Monitoring
The inverter supports remote monitoring via the Tuya APP, allowing you to track performance and manage settings from your smartphone.
- Download the Tuya APP: Search for "Tuya Smart" or "Smart Life" in your mobile app store (iOS or Android) and install it.
- Register/Log In: Create a new account or log in to your existing Tuya account.
- Add Device:
- Ensure your smartphone is connected to a 2.4GHz Wi-Fi network.
- Open the Tuya APP, tap the "+" icon to add a device.
- Select "Electrical Engineer" or "Power Strip" (or similar category for inverters/power devices).
- Follow the in-app instructions to connect the inverter to your Wi-Fi network. This typically involves putting the inverter into pairing mode (refer to the inverter's display or indicator lights for specific instructions, if available).
- Monitor and Control: Once connected, you can view real-time power generation, energy consumption, historical data, and adjust operational modes (e.g., grid-tied, reverse termination) directly from the app.
8. Maintenance
Regular maintenance ensures the longevity and optimal performance of your inverter.
- Cleaning: Periodically clean the exterior of the inverter with a dry, soft cloth. Do not use liquid cleaners or solvents. Ensure cooling vents are free from dust and debris.
- Connection Check: Annually inspect all electrical connections (DC and AC) for tightness and signs of corrosion. Tighten any loose connections.
- Ventilation: Ensure the area around the inverter remains clear to allow for proper airflow and heat dissipation.
- Software Updates: Check the Tuya APP for any available firmware updates for the inverter to ensure you have the latest features and bug fixes.
9. Troubleshooting
This section addresses common issues you might encounter with your inverter.
| Problem | Possible Cause | Solution |
|---|---|---|
| Inverter not powering on | No DC input from solar panels; DC input voltage too low; Loose DC connections. | Check solar panel connections and ensure sufficient sunlight. Verify DC input voltage is within operating range (20V-50V). Tighten DC terminals. |
| No AC output | AC circuit breaker tripped; Grid power unavailable; Inverter not synchronized with grid; Loose AC connections. | Check and reset the AC circuit breaker. Verify grid power supply. Ensure AC connections are secure. Allow time for inverter to synchronize. |
| Low power output | Insufficient sunlight; Dirty solar panels; Shading on panels; DC input voltage too low/high. | Ensure panels are clean and free from shading. Check solar panel performance. Verify DC input voltage. |
| APP monitoring not working | Inverter not connected to Wi-Fi; Incorrect Wi-Fi password; Router issues; APP not updated. | Ensure inverter is in Wi-Fi range. Reconfigure Wi-Fi settings in the Tuya APP. Restart router. Update Tuya APP to the latest version. |
| Overheating | Poor ventilation; Ambient temperature too high; Blocked cooling vents. | Ensure adequate clearance around the inverter. Clean cooling vents. Relocate inverter to a cooler environment if necessary. |
10. Warranty and Support
Walfront products are designed for reliability and performance. For specific warranty details, please refer to the warranty card included with your product or visit the official Walfront website.
If you encounter any issues not covered in this manual or require technical assistance, please contact Walfront customer support:
- Website: Walfront Official Store on Amazon
- Email: Refer to product packaging or website for contact email.
- Phone: Refer to product packaging or website for contact number.
Please have your model number (WALFRONTt47girfynh-11) and purchase date ready when contacting support.


