
Introduction
This manual provides essential information for the safe installation, operation, and maintenance of your ELEGRP 15 Amp Self-Test GFCI Outlet. Please read all instructions carefully before beginning installation or use. This GFCI outlet is designed to provide ground fault protection, automatically performing a self-test every 5 seconds to ensure continuous safety.

The ELEGRP GFCI outlet is suitable for use in kitchens, bathrooms, and laundry rooms, providing enhanced electrical safety.
Safety Information
WARNING: Risk of electric shock or electrocution. Installation requires basic electrical knowledge. If you are unsure, consult a qualified electrician.
- Always turn off power at the circuit breaker or fuse box before installing or servicing the GFCI outlet.
- Use only copper wire. Do not use with aluminum wiring.
- Ensure proper grounding.
- Do not install in wet locations unless protected by a weatherproof enclosure.
- This device is for indoor use unless specified as weather-resistant (WR).
- Do not paint the device.

The GFCI outlet provides protection against electrical surges and ground faults.
Package Contents
Verify that all components are present before beginning installation:
- 1 x ELEGRP GFCI Outlet
- 1 x Wall Plate
- 1 x Installation Instruction Manual (this document)
Setup and Installation
Follow these steps for safe and correct installation of your GFCI outlet.
1. Prepare for Installation
- Turn off power: Locate the circuit breaker or fuse that controls the outlet you are replacing and turn it off. Verify power is off using a voltage tester.
- Remove old outlet: Unscrew and carefully pull the old outlet from the wall box. Disconnect the wires.
2. Wiring the GFCI Outlet
The ELEGRP GFCI outlet features a thinner design (1.22 inches depth) to fit easily into standard electrical boxes, reducing wire cramming.
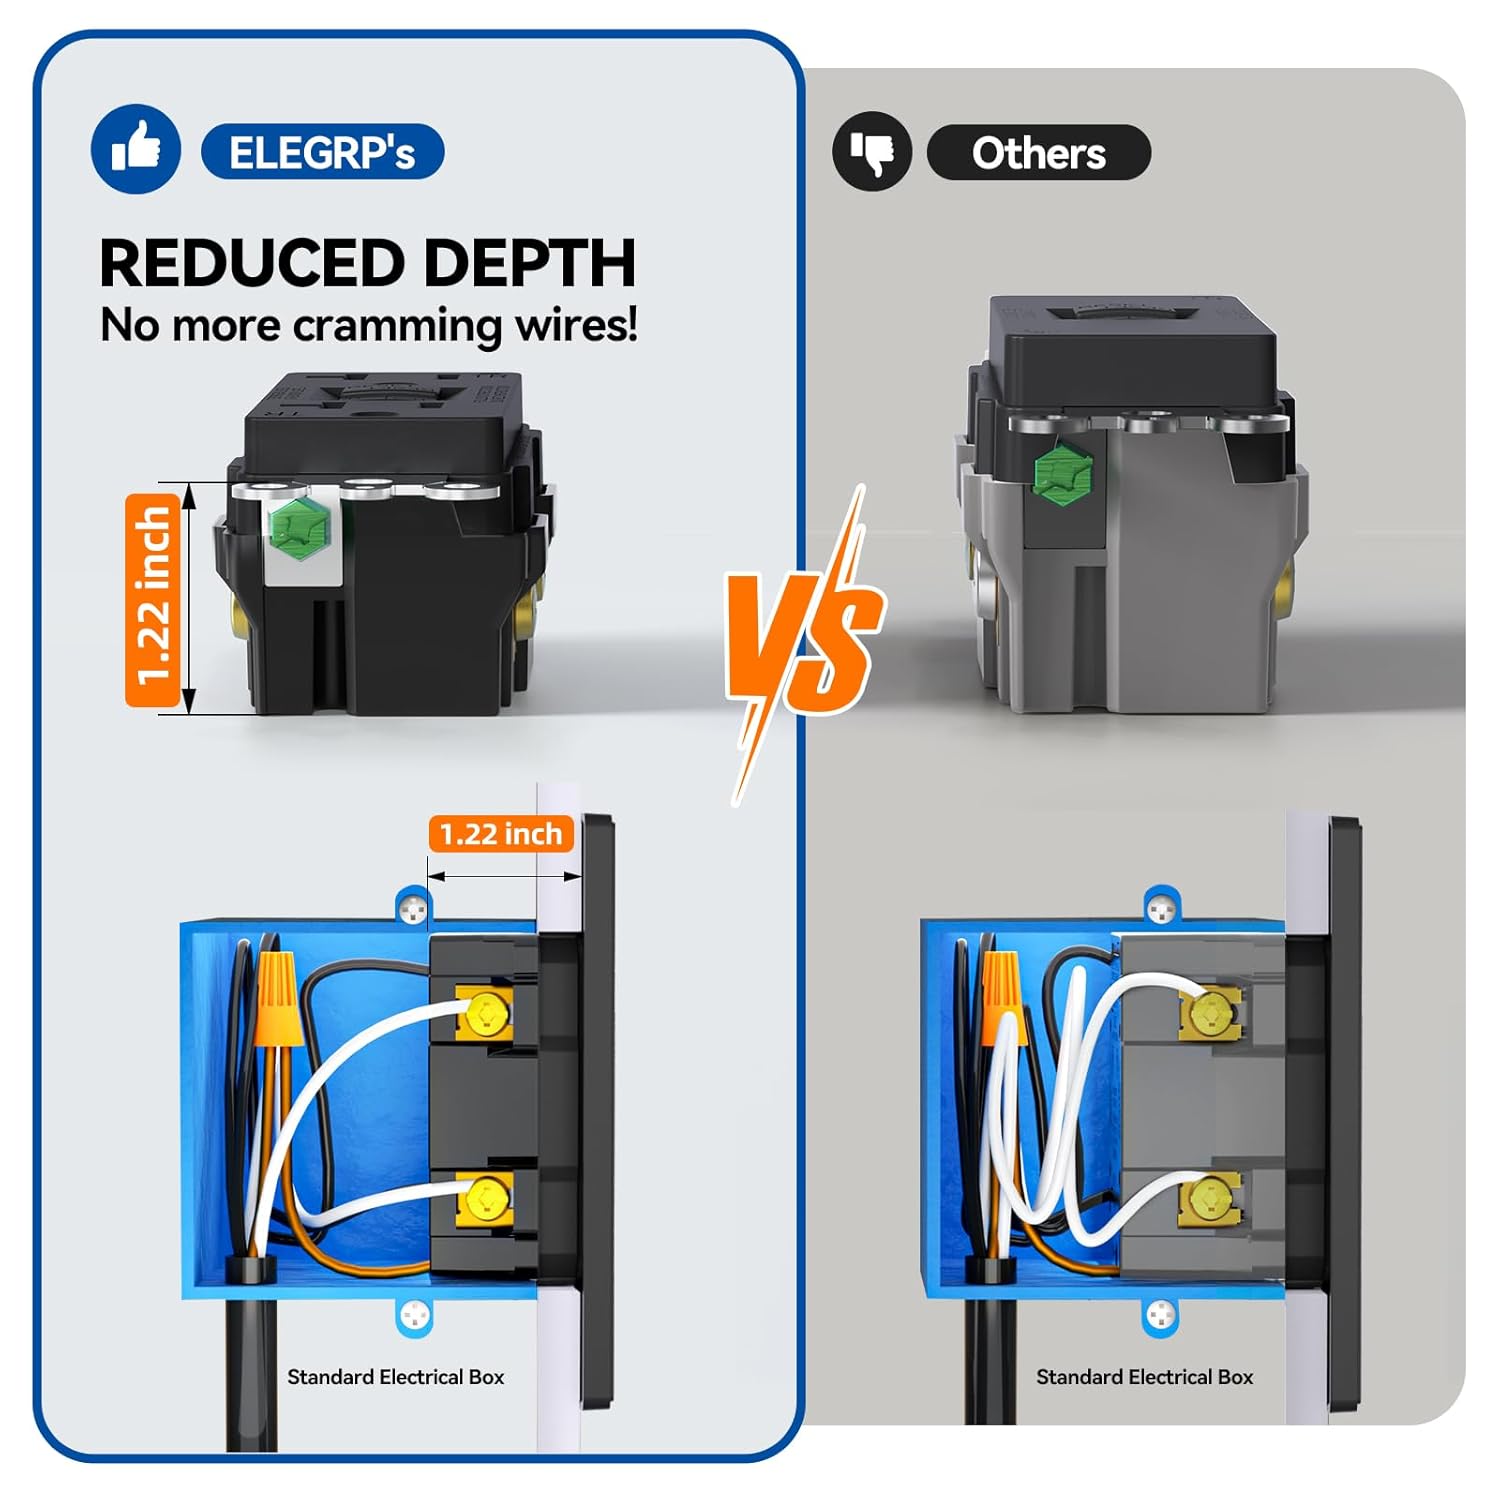
The thinner design of the ELEGRP GFCI outlet allows for easier installation in tight spaces.
Identify the LINE and LOAD wires. The LINE wires bring power from the circuit breaker, and the LOAD wires carry power to other outlets downstream. The GFCI will protect all outlets connected to its LOAD terminals.

Wiring diagrams for single and multiple cable installations. Ensure LINE connection is on the GROUND SCREW SIDE.
- Connect the hot (black) LINE wire to the brass LINE terminal.
- Connect the neutral (white) LINE wire to the silver LINE terminal.
- If connecting downstream outlets, connect the hot (black) LOAD wire to the brass LOAD terminal and the neutral (white) LOAD wire to the silver LOAD terminal.
- Connect the ground (green or bare copper) wire to the green ground screw.
3. Secure the Outlet and Wall Plate
Step-by-step guide for installing the screwless wall plate.
- Carefully push the wired GFCI outlet back into the wall box.
- Secure the outlet to the wall box with the mounting screws.
- Attach the inner plate to the outlet with screws.
- Align the decorative wall plate cover (slots down) and snap it onto the inner plate.
4. Restore Power and Test
- Turn the power back on at the circuit breaker or fuse box.
- Press the RESET button on the GFCI outlet. The green LED indicator should turn on.
- Press the TEST button. The GFCI should trip, and the green LED should turn off.
- Press the RESET button again. The green LED should turn on, restoring power.
- If the GFCI does not reset or the LED does not light up, refer to the Troubleshooting section.
Installation Video
Official ELEGRP video demonstrating how to install a GFCI outlet. This video provides a visual guide to the installation process.
Operating Instructions
Your ELEGRP GFCI outlet is designed for simple and safe operation.

Key components of the GFCI outlet: Green LED, RESET button, and TEST button.
Green LED Indicator
- LED On and Outlet Powered: Indicates normal operation.
- LED On But Outlet Not Powered: Indicates line and load wires are reversed.
- LED Off: Indicates GFCI is in a tripped state or has a malfunction.
RESET Button
Press this button to restore power after the GFCI has tripped due to a fault or ground leakage.
TEST Button
Press this button to check if the GFCI is working properly by intentionally tripping it. The GFCI should trip, and the green LED should turn off.
Self-Test Feature
This GFCI outlet automatically performs a self-test every 5 seconds, significantly more frequently than the UL standard of every 3 hours. This ensures the device is continuously ready to protect against electrical shock. In the event of a ground fault, it cuts power in approximately 0.025 seconds.

The GFCI outlet performs a self-test every 5 seconds for continuous protection.
Maintenance
Regular maintenance ensures the continued safety and performance of your GFCI outlet.
- Monthly Test: Press the TEST button, then the RESET button. The GFCI should trip and reset. If it does not, replace the unit.
- Cleaning: Clean the surface of the GFCI outlet and wall plate with a soft, damp cloth. Do not use abrasive cleaners or solvents.
- Inspection: Periodically inspect the outlet for any signs of damage, such as cracks, discoloration, or loose connections. If damage is found, turn off power and replace the unit.
Troubleshooting
If you encounter issues with your GFCI outlet, refer to the following guide:

Troubleshooting steps for common GFCI outlet issues.
| Problem | Possible Cause | Solution |
|---|---|---|
| No power at GFCI outlet after RESET | Green LED indicator is ON, but no power. | Miswired LINE/LOAD. Please reverse the LINE/LOAD wires and reset again. |
| The GFCI keeps tripping | The Green LED indicator is OFF. | Ground fault occurrence in the circuit. For your safety, please consult a professional electrician to solve the issues. |
Specifications

Detailed dimensions and electrical specifications of the GFCI outlet.
| Feature | Detail |
|---|---|
| Rated Voltage | 125VAC |
| Rated Frequency | 60Hz |
| GFCI Rated Current | 15 A |
| Working Temperature | -35°C to +66°C |
| Residual Operating Current | 4mA~6mA |
| Residual Current Operating Time | T<(20/I)*1.5mS |
| Endurance | ≥6000 times (UL requires 3000 times) |
| Face Output Receptacle | 5-15R |
| Wire Gauge | #14 - #12 AWG |
| Safety Certification | UL, cUL Certification (UL943 & UL498 standards) |
| Material | High-impact resistant thermoplastic |
| Color | Matte Black |
| Model | G1915T-BL |
Warranty and Support
ELEGRP stands behind the quality of its products.
- Product Support: This GFCI outlet is backed by 3 years of product support.
- UL Certified: Rigorously tested to meet or exceed UL943 & UL498 standards for safety and reliability.
Customer Support
For any questions or assistance, please contact ELEGRP customer support:
Phone: 833-267-3272
Available 10 hours a day / 365 days a year, 9:00 AM - 7:00 PM EST.
