1. Introduction
This manual provides detailed instructions for the installation, operation, and maintenance of your KBSYNT 4K Dash Cam (Model A). Please read this manual thoroughly before using the product to ensure proper functionality and safety. This dash cam is designed to integrate seamlessly into specific Audi models, offering high-quality video recording for your vehicle.

Image: KBSYNT 4K Dash Cam (Model A) seamlessly integrated into an Audi's interior.
2. Product Overview
2.1 Key Features
- OEM-Style Design: Custom-fit for Audi 2019-2026 models (A3/A4/A5/A6/A7/A8; Q3/Q5/Q7/Q8/TT/e-tron) without an original camera behind the rearview mirror.
- 4K Ultra HD Video: Captures explicit 2160P/30fps video with an f/1.6 aperture lens and CMOS sensor.
- HDR Technology: Enhances night vision and provides sharp video and images in low-light conditions.
- Loop Recording: Automatically overwrites oldest footage when the TF card is full, ensuring continuous recording.
- G-Sensor: Detects sudden impacts and locks current video files to prevent overwriting during collisions.
- Wi-Fi & App Control: Connects to the 'fuvymyt' app for live viewing, footage download, editing, and sharing.
- GPS Tracking: Records driving route and speed, providing vital evidence.
2.2 Package Contents
- Front 4K Dash Cam (Model A)
- 64GB TF Card
- Card Reader
- Installation Tool (Crowbar)
- Instruction Manual

Image: Contents of the KBSYNT 4K Dash Cam package.
3. Compatibility
The KBSYNT 4K Dash Cam (Model A) is specifically designed for certain Audi models. Please verify your vehicle's compatibility using the table below and the provided images.
| Car Model | Generation/Platform |
|---|---|
| Audi A3/S3/RS3 | 8Y (4th Gen) |
| Audi A4/S4/Allroad | B9 (5th Gen) Facelift, 8W6 (2nd Gen) Facelift |
| Audi A5/RS5/S5 | B9 (5th Gen) Facelift, 8W6 (2nd Gen) Facelift |
| Audi A6/S6/RS6/Allroad | C8 (5th Gen) |
| Audi A7/S7/RS7 | 4K8 (2nd Gen) |
| Audi A8/S8 | D5 (4th Gen) Facelift |
| Audi TT | 8S (3rd Gen) Facelift |
| Audi Q3 | 2nd Gen (F3) |
| Audi Q5 | 2nd Gen (80A) Facelift |
| Audi Q7 | 2nd Gen (4M) |
| Audi Q8 | 1st Gen (4M) |
| Audi e-tron | 1st Gen (GE) |
Important Note: Your car must NOT have an original camera (ADAS) behind the rearview mirror for this dash cam to fit. Please check carefully before ordering.
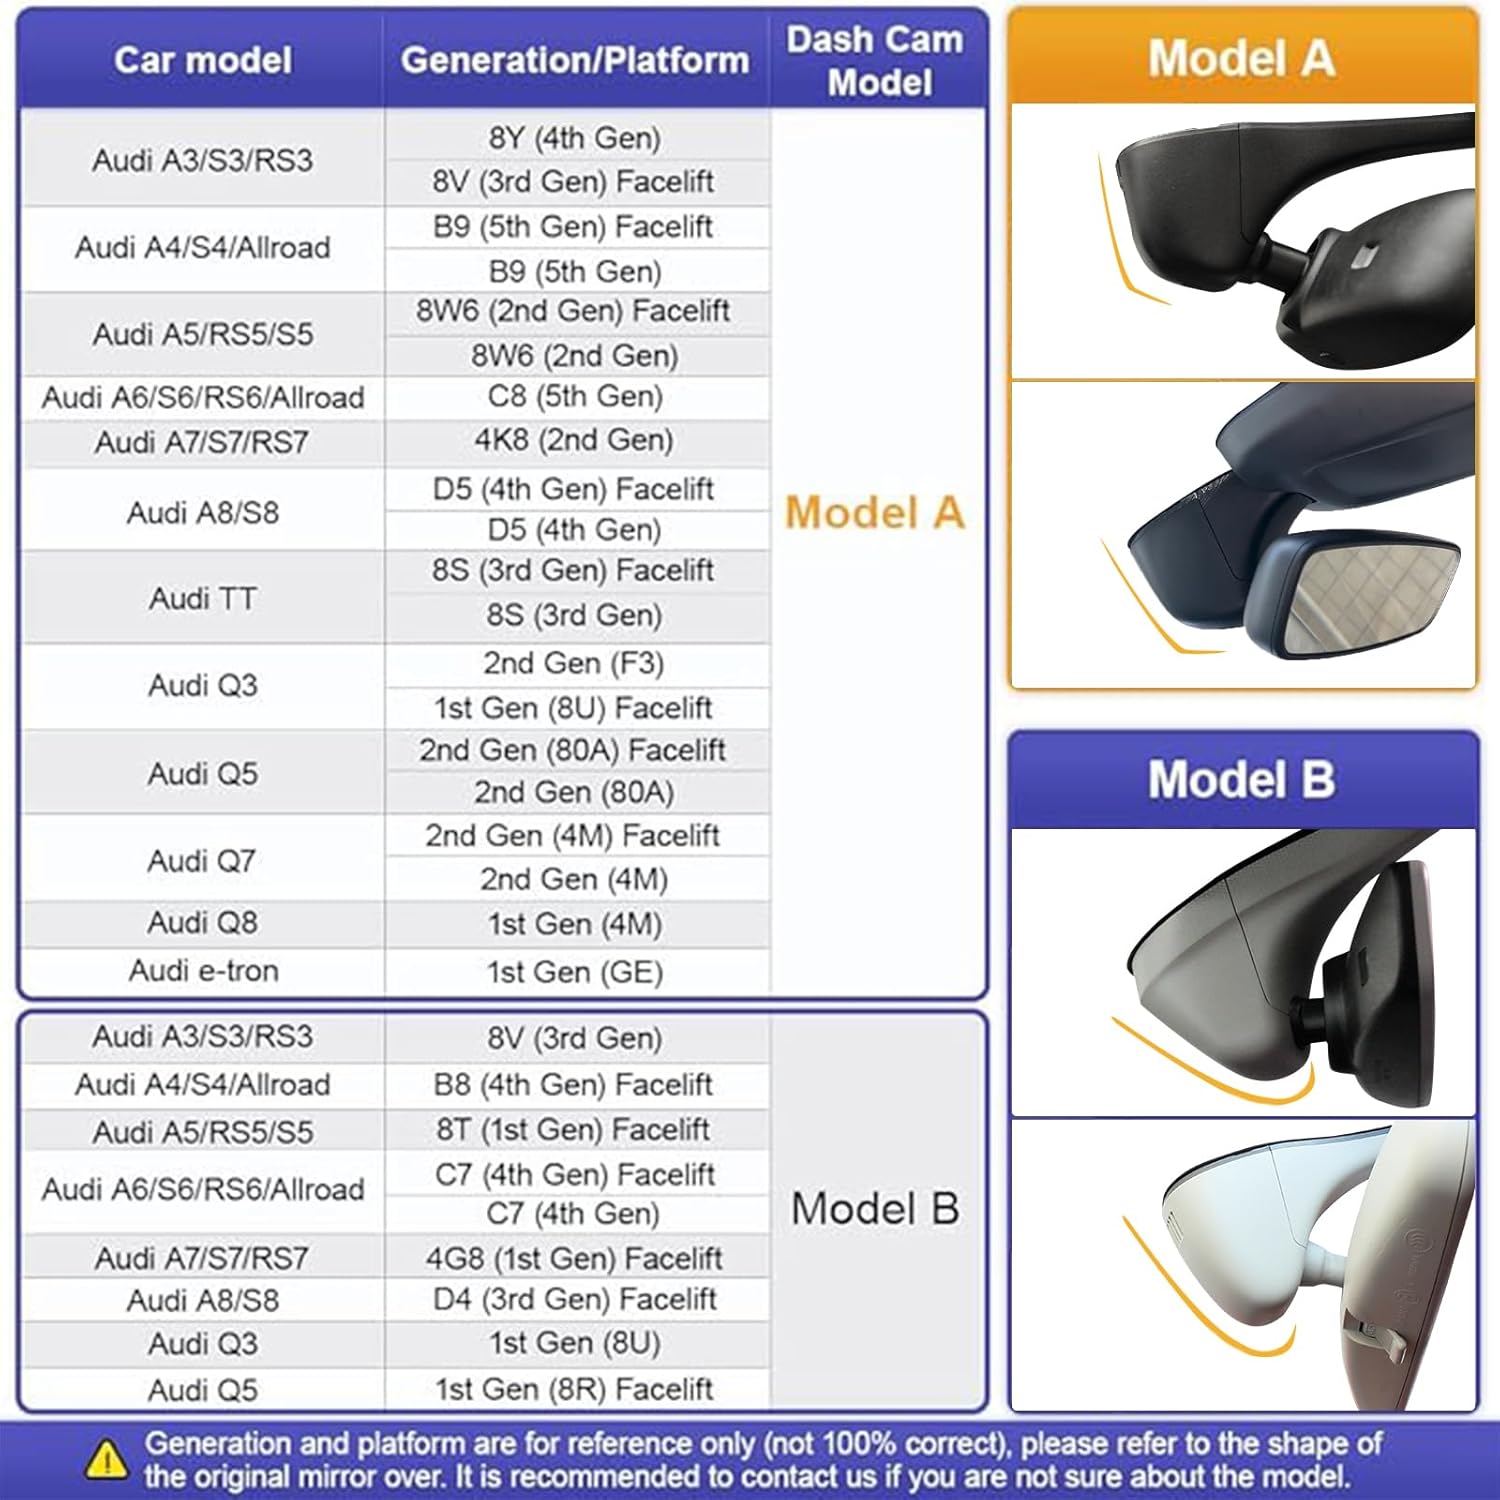
Image: Detailed compatibility chart for Audi models.
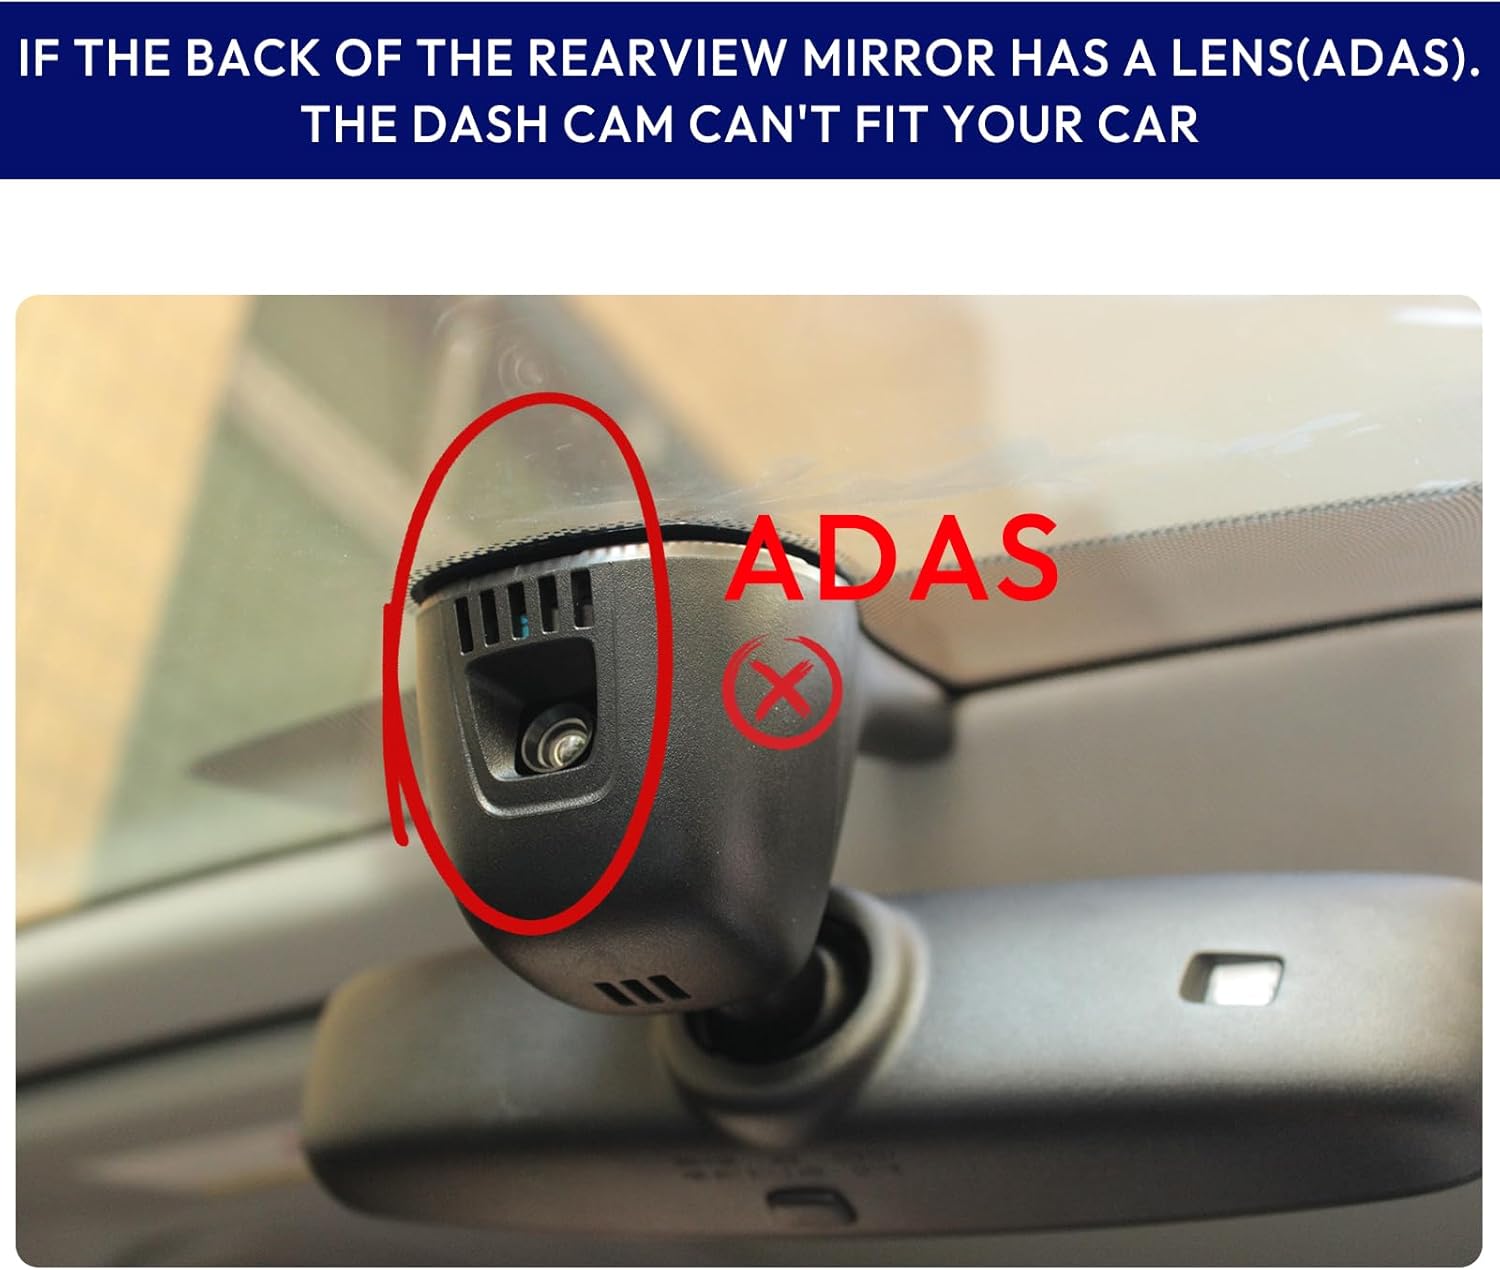
Image: Warning against installation if an ADAS camera is present.

Image: Visual comparison of Model A and Model B dash cam designs.
4. Installation Guide
Follow these steps for a seamless installation of your KBSYNT 4K Dash Cam. It is recommended to watch the installation video for a visual guide.
4.1 General Installation Steps
- Take off the original rear cover of the rearview mirror assembly.
- Take off the original front cover.
- Disconnect the power supply of the rain-fall sensor.
- Fix the dash cam onto the rearview mirror bracket.
- Connect the dash cam's power supply to the vehicle's power source.
- Connect the dash cam to the rain-fall sensor.
- Install the original rear cover back into place.
- Finish the installation by securing all covers.

Image: Installation steps for the dash cam (small cover variant).
4.2 Installation for Vehicles with Large Cover
For some Audi models, a larger cover might need to be removed. The process is similar but involves an additional step for the larger cover.
- Take off the big cover of the rearview mirror assembly.
- Take off the rear cover.
- Take off the front cover.
- Take off the rain-fall sensor cable.
- Connect the Y-type cable to the rain-fall sensor cable.
- Connect the Y-type cable to the rain-fall sensor.
- Push forward to install the dash cam.
- Install the original cover.
- Push forward to install the original big cover and finish.

Image: Installation steps for the dash cam (big cover variant).
4.3 Installation Videos
Video: Detailed installation guide for the Audi Dash Cam. This video demonstrates the process of removing vehicle trim, connecting the dash cam, and reassembling the components.
Video: Installation guide specifically for Audi dash cams with a large cover. This video provides visual instructions for handling larger trim pieces during installation.
5. Operation Guide
5.1 Basic Controls
The dash cam features simple controls for recording and capturing photos.
- Power Button: Press once to start/stop recording. Press and hold for 10 seconds to turn off the dash cam. Press again to turn it back on.
- Photo Button: Press once to take a picture. The picture will be saved to the SD card. Press and hold for 10 seconds to reset the dash cam to factory settings (this will format the SD card).
- Reset Button: Use a tool to press the reset button to restore default settings without formatting the SD card.
Video: Introduction to the functions of the dash cam's buttons. This video explains how to use the power, photo, and reset buttons.
5.2 Recording Features
- Loop Recording: When the TF card is full, the dash cam automatically overwrites the oldest footage with new recordings. Locked videos are protected from being overwritten.
- G-Sensor: In the event of a sudden collision or impact, the built-in G-sensor detects the event and automatically locks the current video file to prevent it from being deleted.
- 24H Parking Monitor: This feature provides continuous protection for your car while parked. An extra hardwire kit (B0F26LDFZW) is required for this function.
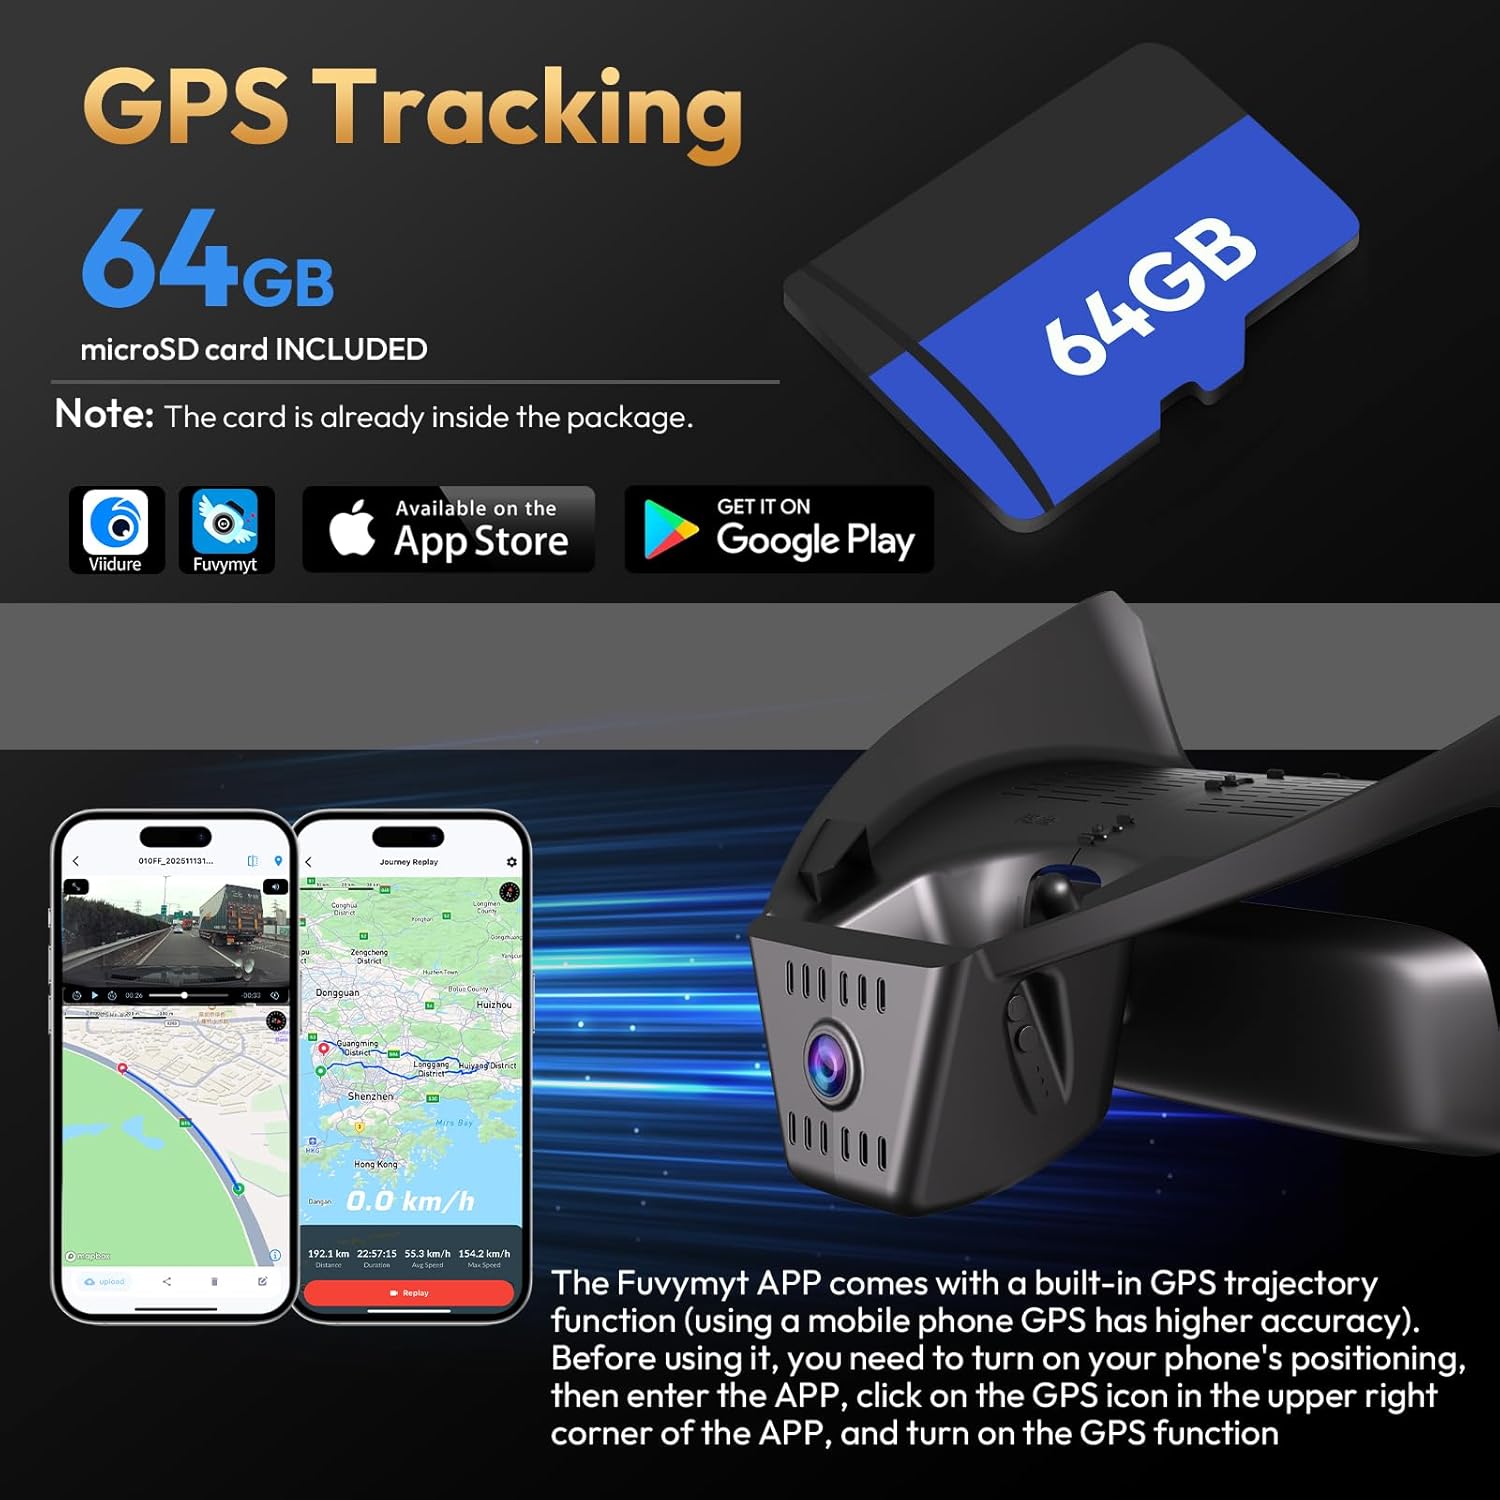
Image: Visual representation of G-Sensor, 24H Parking Monitor, and Loop Recording features.
6. App Usage (Fuvymyt App)
The 'fuvymyt' app allows you to control your dash cam, view live footage, download recordings, and track GPS data.
6.1 Connecting to the App
- Ensure your dash cam is powered on.
- On your smartphone, go to Wi-Fi settings and connect to the Wi-Fi network named 'DVR_xxxx' (the original password is 12345678).
- Open the 'fuvymyt' app. The app should detect the camera.
- Click to enter the dash cam's main page within the app.
6.2 App Functions
- Live View: Stream real-time video from your dash cam to your phone.
- Record/Capture: Start/stop recording or take photos directly from the app.
- Footage Management: Browse and download videos/photos from the SD card to your phone.
- GPS Function: View your journey history, including location, speed, and time. This function needs to be manually enabled every time.
- Parking Function: Enable this after parking to help locate your car.
- Settings: Adjust dash cam settings through the app.
Video: User manual for the 'fuvymyt' app. This video demonstrates app connection, live view, and various app functions including GPS.

Image: Fuvymyt app interface demonstrating GPS tracking and other features.
7. Maintenance
- SD Card Management: Regularly check the SD card for errors or corruption. Format the SD card periodically (e.g., once a month) to maintain optimal performance. Back up important footage before formatting.
- Cleaning: Use a soft, dry cloth to clean the dash cam lens and body. Avoid using harsh chemicals or abrasive materials.
- Temperature: Avoid exposing the dash cam to extreme temperatures for prolonged periods.
8. Troubleshooting
- App Cannot Show Live View or Download Videos:
The dash cam's Wi-Fi does not provide internet access; it is for transmitting videos. If you experience issues, try turning off cellular data or Bluetooth on your phone. If the problem persists, contact customer support. - Cannot Link CarPlay at the Same Time:
The dash cam uses the car's Wi-Fi connection, which may conflict with CarPlay if your phone relies on the car's Wi-Fi for CarPlay. This is a design choice to protect privacy. - Dash Cam Stopped Working:
Try pressing the reset button (using a tool) to restore default settings. If the issue continues, ensure the power connection is secure. - SD Card Formatting:
Pressing and holding the photo button for 10 seconds will reset the dash cam to factory settings and format the SD card. Be aware that this will erase all data on the card. - 24H Parking Monitor Not Working:
This feature requires an additional hardwire kit. Ensure the kit is correctly installed. Search for B0F26LDFZW for details on the required fuse box power cable.
9. Specifications
| Feature | Detail |
|---|---|
| Product Dimensions | 4.7 x 3 x 7.6 inches |
| Item Weight | 14 ounces |
| Item Model Number | Model A Front 4k |
| Batteries | 1 Lithium Metal batteries required (included) |
| Connectivity Technologies | Wi-Fi |
| Special Features | App Control |
| Color | Black |
| Manufacturer | Shenzhen XingShengHe Electronic Technology Co., Ltd |
| Video Capture Resolution | 2160p |
| Mounting Type | Windshield Mount |
| Field Of View | 170 Degrees |
10. Warranty and Support
Your KBSYNT 4K Dash Cam (Model A) comes with:
- 18 Months Protection: For manufacturing defects.
- 7 Days Return Policy: For eligible returns.
For any questions, technical assistance, or warranty claims, please contact KBSYNT customer support via Amazon. We are committed to providing excellent service.


