1. Product Overview
The KBSYNT 4K Dash Cam (Model A) is an OEM-style car video recorder designed specifically for select Audi models from 2019 to 2026. It captures high-resolution 2160P/30fps video with an f/1.6 aperture lens and CMOS sensor, ensuring clear recordings day and night. Key features include loop recording, G-sensor for collision detection, Wi-Fi connectivity with a dedicated app, and support for up to a 256GB TF card (a 64GB card is included).

Image: KBSYNT 4K Dash Cam, Model A, designed for seamless integration.
2. Compatibility
This dash cam (Model A) is exclusively customized for specific Audi models from 2019-2026. Please verify your vehicle's compatibility before installation. It is crucial that your car does NOT have an original camera behind the rearview mirror (ADAS system), as this dash cam will not fit in such cases.

Image: Compatibility chart for Audi models, indicating Model A fitment.
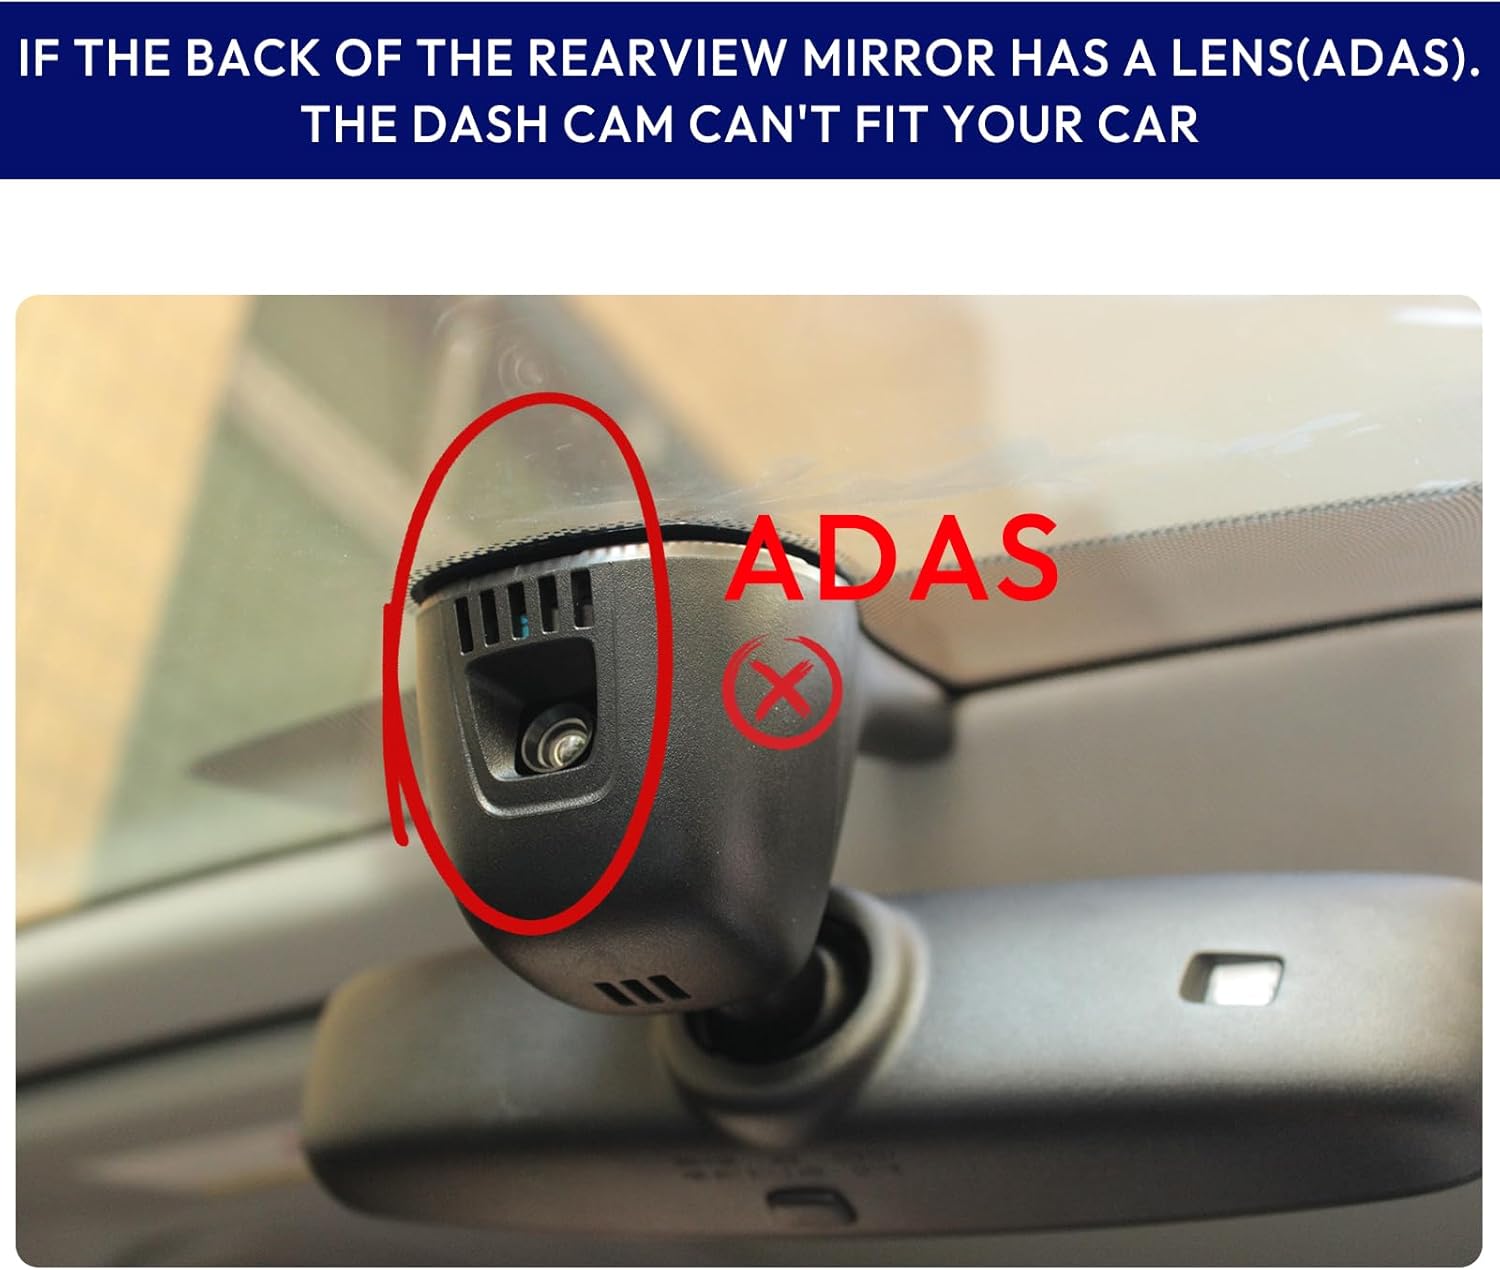
Image: Warning indicating that the dash cam cannot fit if an ADAS lens is present behind the rearview mirror.
3. What's in the Box
The package includes the following components:
- Front Dash Cam (Model A)
- Card Reader
- 64GB TF Card
- Installation Tool (Crowbar)
- Instruction Manual

Image: Visual representation of the items included in the product package.
4. Installation Guide
Follow these steps for proper installation of your KBSYNT 4K Dash Cam. It is recommended to watch the provided installation videos for visual guidance.
4.1. General Installation Steps
- Carefully take off the original rear cover of your rearview mirror assembly.
- Remove the original front cover.
- Disconnect the power supply cable from the rain-fall sensor.
- Fix the dash cam onto the rearview mirror bracket.
- Connect the dash cam's power supply cable to the vehicle's power source (typically the rain-fall sensor's power supply).
- Connect the dash cam to the rain-fall sensor.
- Install the original rear cover back into place.
- Ensure all connections are secure and covers are properly reinstalled.

Image: Visual steps for installing the dash cam by removing and reattaching covers and connecting cables.
4.2. Installation Video Resources
Video: Detailed installation guide for the Audi Dash Cam, demonstrating each step visually.
Video: Installation guide specifically for Audi models with a larger cover, showing the process of connecting the Y-type cable.
5. Operating Instructions
5.1. Basic Button Functions
- Power Button: Press once to stop recording. The blue indicator light will turn on. Press again to restart recording (blue light shines). Press and hold for 10 seconds to turn off the dash cam (indicator light extinguishes). Press again to turn on.
- Photo Button: Press once to take a picture. The picture will be saved on the SD card. Press and hold for 10 seconds to reset the dash cam to factory settings (this action will format the SD card).
- Indicator Light: Displays the current status of the dash cam.
- Reset Button: Use a tool to press this button to reset the dash cam to its default settings. This action will not format the SD card.
Video: Introduction to the functions of the dash cam's buttons, including power, photo, and reset.
5.2. Using the Fuvymyt App
The Fuvymyt app provides a user-friendly interface for managing your dash cam. It offers faster connection speeds and lower latency for live viewing, editing, and sharing features.
- Connect to Wi-Fi: On your smartphone, connect to the dash cam's Wi-Fi network (named DVR_xxxx). The default password is 12345678.
- Open App: Launch the Fuvymyt app.
- Access Main Page: Click to enter the dash cam's main page within the app.
- Settings: Access dash cam settings.
- Capture: Take a picture.
- Record: Start/stop recording.
- Mute: Turn audio recording on/off.
- PIP: Change display mode.
- Screenshot: Take a screenshot.
- SD Card Footage: View and download footage from the SD card.
- Phone Footage: Access images downloaded to your phone.
- App Settings: Configure app-specific settings.
Video: User manual for the Fuvymyt app, demonstrating connection and various functions.

Image: Overview of the Fuvymyt app interface, showing live view, recording controls, and media access.
5.3. Loop Recording and G-Sensor
The dash cam features continuous loop recording, which automatically overwrites the oldest footage when the TF card is full. The G-sensor detects sudden impacts or collisions and automatically locks the current video file to prevent it from being overwritten, ensuring critical evidence is preserved.

Image: Illustration of the G-Sensor locking video footage upon impact.

Image: Explanation of automatic loop recording and storage capacity for different TF card sizes.
5.4. 4K Image and Night Vision
The dash cam records in Ultra HD 2160P/30fps, providing clear and detailed video. High Dynamic Range (HDR) technology enhances night vision, automatically adjusting exposure in low-light conditions for optimal visibility and sharp images.

Image: Example of 4K UHD video quality captured by the front dash cam.
5.5. GPS Tracking
The built-in GPS functionality records your driving route and speed directly into your video footage. This provides vital evidence in case of an accident. You can track vehicle location, speed, and time when viewing videos on the app.

Image: Illustration of GPS trajectory tracking and parking location features within the app.
6. 24-Hour Parking Monitor
For 24-hour parking monitoring, an additional hardwire kit is required. This function provides continuous protection for your parked car. Please search for B0F26LDFZW to obtain the necessary fuse box power cable.

Image: Visual representation of the 24-hour parking monitor feature, highlighting the need for an additional hardwire kit.
7. Troubleshooting
- App Live View/Preview/Download Issues: If the app cannot show live view, preview, or download videos, try turning off cellular data or Bluetooth on your phone. The dash cam's Wi-Fi is for video transmission only and does not provide internet access.
- CarPlay/Bluetooth Conflict: The dash cam uses the car's Wi-Fi connection. If you are using Apple CarPlay or Bluetooth that relies on the car's Wi-Fi, your phone may not be able to connect to the dash cam simultaneously.
- Camera Stopped Working: If the camera stops working, try performing a reset using the reset button (requires a tool). This will restore default settings without formatting the SD card. If the issue persists, contact customer support.
- Installation Difficulty: While designed for easy installation, some users may find routing wires challenging. Refer to the installation videos and ensure all connections are secure.
8. Specifications
| Product Dimensions | 4.7 x 3 x 7.6 inches |
| Item Weight | 14 ounces |
| Item Model Number | Model A Front 4k |
| Batteries | 1 Lithium Metal battery (included) |
| Connectivity Technologies | Wi-Fi |
| Special Features | App Control |
| Color | Black |
| Video Capture Resolution | 2160p |
| Mounting Type | Windshield Mount |
| Field Of View | 170 Degrees |
9. Warranty and Support
KBSYNT offers an 18-month protection period for this product. A 7-day return policy is available for defects. For any issues or inquiries, please contact customer support. 24-hour support is available via email or phone.

Image: Details on service plan including 18-month protection and customer support contact options.


