1. Introduction
Welcome to the user manual for your MagicRaven Portable Monitor Screen Extender. This device is designed to enhance your productivity and viewing experience by providing additional display real estate for your laptop. Please read this manual carefully to ensure proper setup, operation, and maintenance of your new screen extender.
This manual covers essential information regarding installation, usage, and troubleshooting to help you get the most out of your MagicRaven Portable Monitor.
2. Product Overview
Key Features
- Multiple Display Modes: Supports duplicated, extended, and mirror modes for versatile use in business meetings, multitasking, entertainment, and gaming.
- Plug and Play: Requires no drivers or installation applications.
- Wide Compatibility: Compatible with 14-16 inch laptops and various operating systems including Windows, MAC (M1, M2, M3 Pro/Max chip), Android, Chrome, Linux, PS, and Switch.
- Thoughtful Design: Features an adjustable kickstand and 180° rotation for optimal viewing comfort. Easy clip-on installation with anti-slip protective pads.
- Portable and Efficient: Slim, lightweight design for easy transport, ideal for on-the-go productivity.
What's in the Box
- MagicRaven Portable Monitor Screen Extender (Model Z140Y21D)
- USB-C to USB-C Cable (for data and power)
- HDMI Cable (for video)
- USB-A to USB-C Cable (for power when using HDMI)
- User Manual
3. Setup Instructions
Follow these steps to set up your MagicRaven Portable Monitor Screen Extender.
3.1 Attaching the Screen Extender to Your Laptop
- Gently open the buckle on the back plate of the screen extender.
- Carefully clip the extender onto the top edge of your laptop screen. Ensure the anti-slip protective pads are securely positioned to prevent damage to your laptop.
- Adjust the extender's position to align with your laptop screen. The extendable back panel supports laptop sizes from 14 to 16.5 inches.

Image: The MagicRaven Portable Monitor Screen Extender attached to a laptop, showcasing its dual-screen capability with 1080P FHD IPS displays.

Image: Illustration demonstrating how the screen extender fits laptops between 14 and 16.5 inches, highlighting the adjustable length of the back panel.
3.2 Connecting to Your Laptop
The connection method varies slightly depending on your laptop's operating system and available ports.
For Windows Laptops
If your Windows laptop has a full-featured USB-C port (which supports video transmission and charging), you only need one USB-C to USB-C cable.
- Connect one end of the USB-C to USB-C cable to the full-featured Type-C port on the screen extender.
- Connect the other end to your laptop's full-featured USB-C port.
- The screen extender should automatically detect and display the extended screen.
Note: If your laptop does not have a full-featured USB-C port, you may need to use an HDMI cable for video and a USB-A to USB-C cable for power. Connect the HDMI cable for video and the USB-A to USB-C cable for power to the respective ports on the extender and your laptop.

Image: Connection diagram for Windows laptops, illustrating the use of a single USB-C cable for both power and video.
For Mac OS Laptops
For Mac OS laptops, two USB-C cables are typically required for dual screen extension.
- Connect the first USB-C to USB-C cable from the screen extender's full-featured Type-C port to a USB-C port on your MacBook.
- Connect the second USB-C to USB-C cable from the screen extender's dedicated video Type-C port (for Mac OS) to another USB-C port on your MacBook.
- Ensure your MacBook supports dual screen connection. (Note: M1/M2/M3/M4 Pro/Max chips may only extend one screen).

Image: Connection diagram for Mac OS laptops, showing the requirement for two USB-C cables to enable dual screen extension.
3.3 Understanding Ports and Buttons
Familiarize yourself with the ports and control buttons on your screen extender:
- Full-featured Type-C Port: Supports power, video, and audio transmission.
- Mac OS Video Type-C Port: Specifically for video input from Mac OS devices.
- Menu/Power Button: Press to access the On-Screen Display (OSD) menu or long-press to power on/off.
- Plus (+) Button: Navigate up in OSD menu or increase values.
- Minus (-) Button: Navigate down in OSD menu or decrease values.

Image: Detailed view of the screen extender's ports (full-featured Type-C, Mac OS video Type-C) and control buttons (Menu/Power, Plus, Minus).
4. Operating Instructions
4.1 Display Modes
The MagicRaven Portable Monitor supports various display modes to suit your needs:
- Extended Mode: Each screen displays independent content, expanding your workspace.
- Mirror Mode: All screens display the same content, ideal for presentations or sharing.
- Duplicated Mode: Similar to Mirror Mode, duplicating the main display.
- Portrait Mode: One or both extended screens can be rotated to a vertical orientation.
- Collaboration Mode: Screens can be rotated up to 180 degrees to face an audience or collaborator.
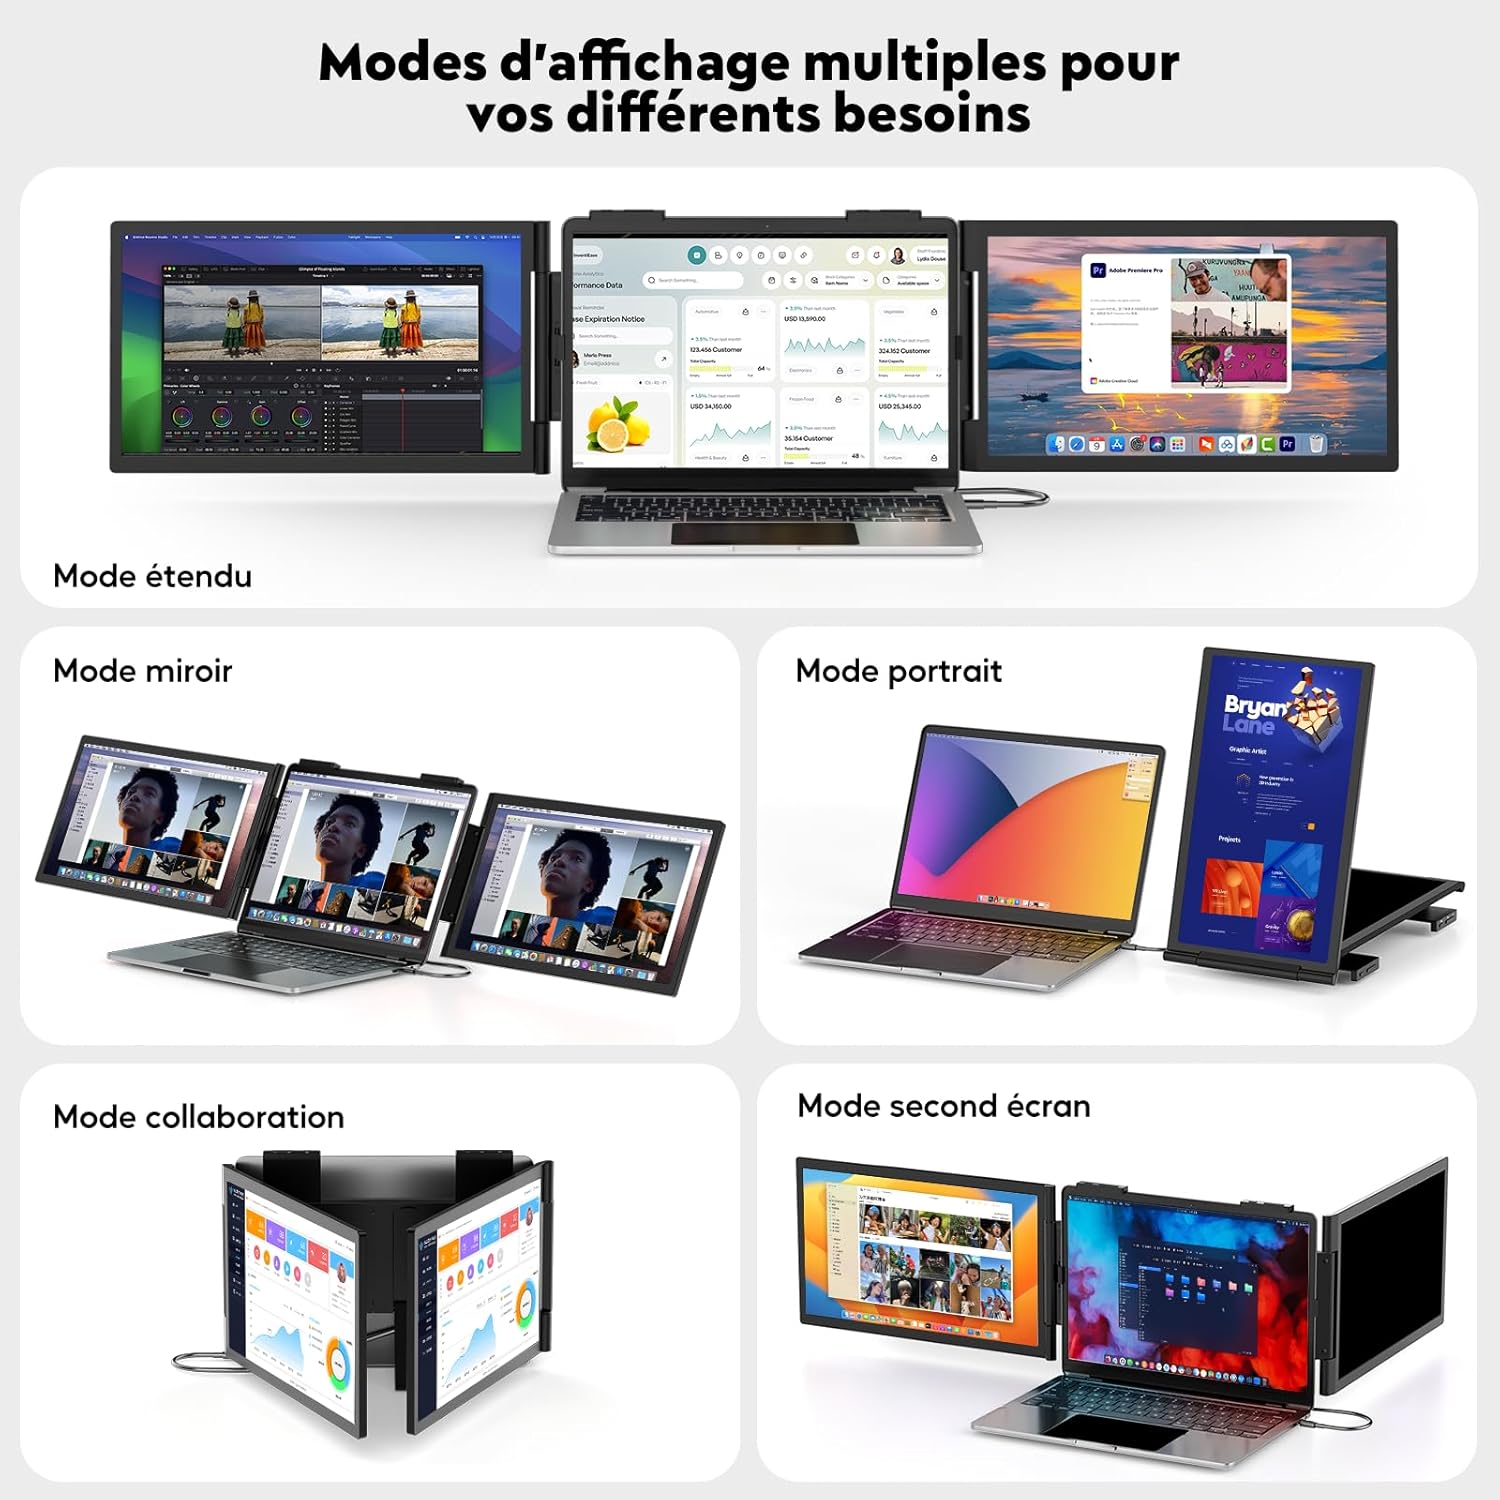
Image: Visual examples of the different display modes supported by the MagicRaven screen extender, including extended, mirror, portrait, and collaboration modes.

Image: The screen extender configured in Extended Mode, demonstrating an expanded desktop across three displays.

Image: The screen extender configured in Mirror Mode, displaying identical content across all three screens.

Image: One of the extended screens rotated into Portrait Mode, suitable for viewing documents or web pages.
4.2 On-Screen Display (OSD) Settings
Each extended screen has individual OSD buttons for quick adjustments:
- Press the Menu/Power button to open the OSD menu.
- Use the Plus (+) and Minus (-) buttons to navigate through menu options.
- Press the Menu/Power button again to select an option or confirm a setting.
- Adjust settings such as brightness, contrast, color temperature, and input source.

Image: Demonstration of individual OSD settings for each screen, allowing separate adjustments like brightness.
4.3 Adjusting Screen Angle and Support
The screen extender features a 270° adjustable angle and an integrated 120° adjustable support stand for optimal viewing flexibility.
- Gently rotate the screens to achieve your desired viewing angle.
- Extend the integrated kickstand from the back of the unit and adjust its angle to provide stable support.

Image: The screen extender demonstrating its 270-degree adjustable angle, allowing for flexible screen positioning.

Image: The integrated adjustable support stand, capable of 120-degree adjustment, providing stability for the monitor.
5. Compatibility
The MagicRaven Portable Monitor Screen Extender is designed for broad compatibility:
- Laptop Size: Compatible with laptops ranging from 14 to 16.5 inches.
- Operating Systems: Supports Windows, Mac OS (including M1, M2, M3 Pro/Max chips), Android, Chrome OS, Linux.
- Gaming Consoles: Compatible with PlayStation (PS4/PS5) and Nintendo Switch.
- Connectivity: Requires a full-featured USB-C port or a combination of HDMI and USB-A ports on your host device.

Image: A visual representation of the wide compatibility of the MagicRaven screen extender with various operating systems and gaming consoles.
6. Maintenance
To ensure the longevity and optimal performance of your MagicRaven Portable Monitor Screen Extender, follow these maintenance guidelines:
- Cleaning: Use a soft, lint-free cloth to gently wipe the screen and exterior surfaces. For stubborn smudges, slightly dampen the cloth with water or a screen-safe cleaning solution. Avoid harsh chemicals or abrasive materials.
- Storage: When not in use, store the screen extender in a cool, dry place, preferably in its original packaging or a protective case to prevent dust accumulation and scratches.
- Handling: Always handle the device with care. Avoid dropping it or subjecting it to strong impacts. Do not place heavy objects on top of the screen extender.
- Cables: Inspect cables regularly for any signs of wear or damage. Replace damaged cables immediately to prevent connectivity issues or electrical hazards.
7. Troubleshooting
If you encounter issues with your MagicRaven Portable Monitor Screen Extender, refer to the following common problems and solutions:
| Problem | Possible Cause | Solution |
|---|---|---|
| No signal / Blank screen | Incorrect cable connection, insufficient power, incompatible port. | Ensure all cables are securely connected. Verify your laptop's USB-C port is full-featured (supports video). If using HDMI, ensure USB-A to USB-C power cable is also connected. Check display settings on your laptop. |
| Screen flickering | Loose cable, power fluctuations, driver issue (rare for plug-and-play). | Check cable connections. Try a different USB-C port or cable. Ensure adequate power supply. |
| Cannot extend to dual screens on Mac OS | Only one USB-C cable connected, Mac OS version limitation, M1/M2/M3/M4 chip limitation. | Ensure both required USB-C cables are connected as per instructions. Verify your MacBook model and OS version support dual external displays. Some M-series chips may only support one external display. |
| Image is distorted or wrong resolution | Incorrect display settings on laptop. | Adjust the display resolution and scaling settings in your laptop's operating system. The optimal resolution is 1920x1080. |
| OSD menu not responding | Buttons stuck or malfunction. | Ensure buttons are not physically obstructed. Try powering off and on the screen extender. |
If the problem persists after trying these solutions, please contact customer support.
8. Specifications
| Feature | Detail |
|---|---|
| Brand | MAGICRAVEN |
| Model Number | Z140Y21D |
| Screen Size | 14 Inches (each screen) |
| Resolution | FHD 1080p (1920 x 1080 Pixels) |
| Aspect Ratio | 16:9 |
| Refresh Rate | 60 Hz |
| Contrast Ratio | 1000:1 |
| Screen Surface | Matte |
| Connectivity Technology | HDMI, USB Type A, USB Type C |
| Special Features | Portable, Adjustable Angle (270°), Integrated Adjustable Support (120°) |
| Compatible Devices | Laptop, Smartphone, PS4/PS5, Nintendo Switch |
| Color | Black |
9. Warranty and Support
9.1 Manufacturer's Warranty
The MagicRaven Portable Monitor Screen Extender comes with a 1-Year Manufacturer's Warranty. This warranty covers defects in materials and workmanship under normal use. It does not cover damage caused by misuse, accidents, unauthorized modifications, or external causes.
Please retain your proof of purchase for warranty claims.
9.2 Customer Support
If you have any questions, require technical assistance, or need to make a warranty claim, please contact MagicRaven customer support through the retailer's platform or the official MagicRaven website. Provide your product model number (Z140Y21D) and a detailed description of the issue to expedite support.
