Introduction
The EziMedPil Automatic Pill Dispenser is designed to assist with medication management, ensuring users take the correct dosage at the right time. This device features visual and audio alerts, an easy-to-read LCD display, and a secure locking mechanism. It supports up to 6 alarms per day and includes 9 dosage templates for flexible scheduling. This manual provides detailed instructions for setup, operation, and maintenance.
Package Contents
Before you begin, please ensure all items are present in the package:
- 1 x EziMedPil Automatic Pill Dispenser with Clear Lid
- 1 x Medication Tray
- 6 x Dosage Rings
- 2 x Metal Keys
- 1 x User Manual (this document)
- 4 x AA Batteries
Setup Instructions
1. Inserting Batteries
The dispenser requires 4 AA batteries for operation. These are included in your package.
- Locate the battery compartment on the bottom of the unit.
- Slide the battery door latch to the open position and remove the battery door.
- Insert 4 fresh AA batteries, ensuring correct polarity (+/-) as indicated inside the compartment.
- Replace the battery door and close the latch securely.

Image: EziMedPil Automatic Pill Dispenser with Frosted and Clear Lids. The clear lid version is shown on the right, displaying various pills inside.
Video: Demonstrates inserting batteries, opening and locking the top cover, cleaning the removable tray, placing the dosage ring, and filling the dispenser. This video provides a comprehensive visual guide to the initial setup and filling process.
2. Opening and Locking the Top Cover
The dispenser features a secure locking mechanism to prevent unauthorized access and accidental spills.
- If the top cover is locked, locate the cover lock on the bottom of the unit.
- Insert the included key and turn clockwise to unlock.
- Place the pill dispenser on a stable surface. Press the "PRESS" button on the cover handle to release the cover latch.
- Lift the cover handle to open the cover.

Image: Close-up of the EziMedPil Automatic Pill Dispenser's LCD display, showing time, alarm settings, volume options, and a built-in magnifier for dosage information.
3. Cleaning and Preparing the Removable Tray
For hygiene, clean the removable tray before first use and periodically thereafter.
- With the top cover open, gently lift the removable tray straight out of the pill dispenser.
- Wash the removable tray with warm, soapy water.
- Allow the tray to dry completely before re-inserting.
- Important: Do NOT submerge the pill dispenser base in water. Do not clean any part of the pill dispenser in a dishwasher.

Image: A hand removing the clear, removable pill tray from the EziMedPil Automatic Pill Dispenser, showing the 28 spacious compartments.
4. Placing the Dosage Ring
The dispenser includes 9 dosage rings to customize your medication schedule.
- Insert the removable tray back into the pill dispenser, aligning the arrows.
- Select a dosage ring that matches your medication schedule (e.g., 1x, 2x, 3x, 4x, 5x, or 6x per day).
- Place the selected dosage ring into the removable tray with the tab resting in the slot indicated by the arrows.
- Fold the tab downwards to secure the ring in place.

Image: A chart illustrating the 9 included dosage rings and their corresponding daily doses and programmable time periods (e.g., 1 dose per day for 28 days, 3 doses per day for 9 days).
5. Filling the Dispenser
Carefully place your medications into the appropriate compartments.
- Place pills in correct dosages in each compartment, following your selected dosage ring.
- The dosage in the slot immediately to the right of the tab on the dosage ring will be your starting dose.
- Do not place pills in compartments corresponding to red markings on the dosage ring, as these are not dispensing slots for your chosen schedule.
- Once filled, close the cover securely. You may lock it with the key for extra security if desired.

Image: Close-up showing the moisture-proof bubble ring and the key lock mechanism of the EziMedPil Automatic Pill Dispenser, highlighting easy setup buttons.
Operating Instructions
Setting Time and Alarms
The EziMedPil dispenser features a large LCD display and simple 3-button programming for time, alarms, volume, and beep tunes (12HR or 24HR format).
- Refer to the detailed instructions in the included user manual for specific steps on setting the current time, programming up to 6 daily alarms, adjusting alarm volume (3 levels), and selecting alarm tones (2 options).
- The LCD display will show the current time, current alarm number, alarm volume, and time format.
- A low battery alert will also be displayed when batteries need replacement.
Dispensing Medication
When it is time to take your medication, the dispenser will activate visual and audio alerts.
- An alarm will sound and lights will flash for up to 30 minutes to remind you.
- To dispense, open the small dispensing door on the cover and pour the medications into your hand or a suitable container.
- This motion will automatically deactivate the alarm and lights.
- The dispenser will then rotate to the next scheduled dose compartment.
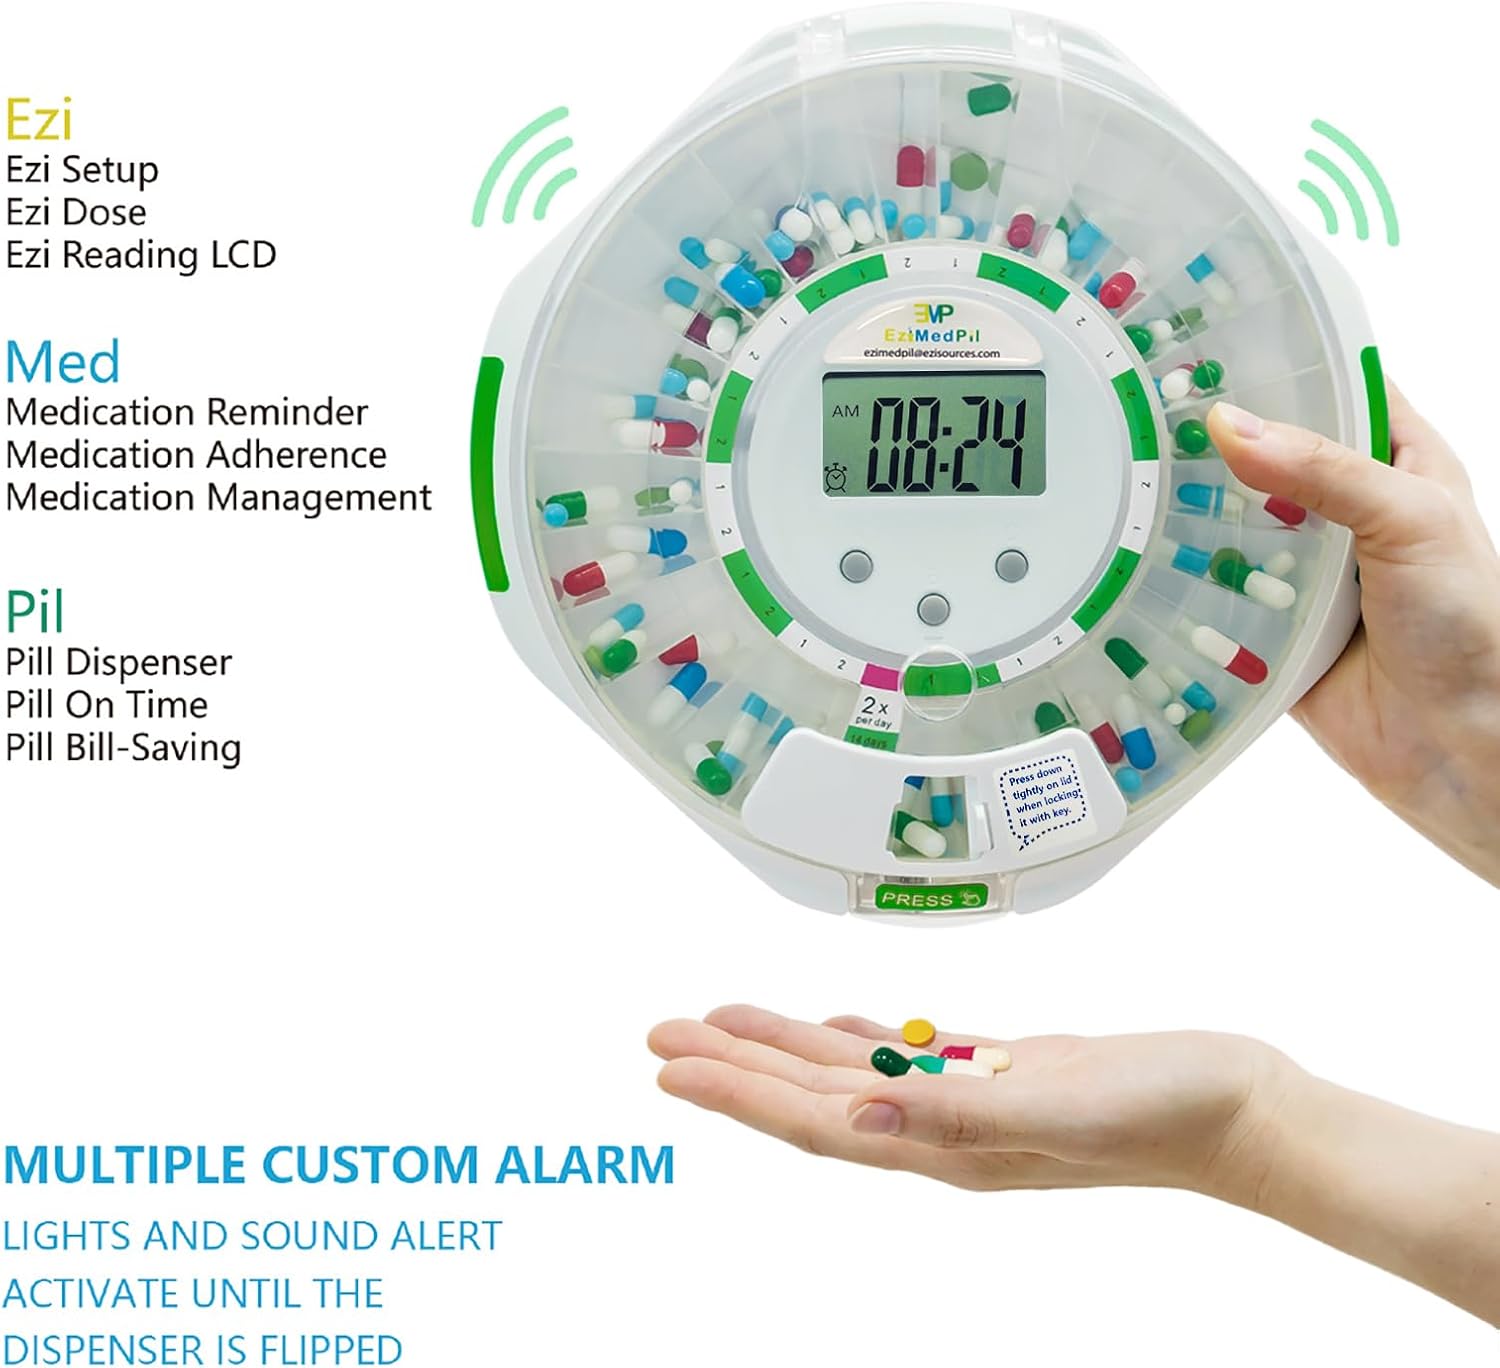
Image: A hand receiving dispensed pills from the EziMedPil Automatic Pill Dispenser, demonstrating the dispensing action.
Maintenance
Proper maintenance ensures the longevity and hygienic operation of your EziMedPil dispenser.
- Cleaning: Regularly clean the removable tray with warm, soapy water. Ensure it is completely dry before re-inserting. Wipe the exterior of the dispenser with a damp cloth. Do not use abrasive cleaners or submerge the main unit in water.
- Battery Replacement: Replace all 4 AA batteries when the low battery alert appears on the LCD display. Ensure new batteries are inserted with correct polarity. The dispenser retains programming memory for approximately 30 seconds during battery changes.
- Storage: When not in use for extended periods, remove the batteries and store the dispenser in a cool, dry place.
Troubleshooting
If you encounter issues with your EziMedPil Automatic Pill Dispenser, refer to the following common problems and solutions:
| Problem | Possible Cause | Solution |
|---|---|---|
| Dispenser not turning on or LCD blank. | Dead or incorrectly inserted batteries. | Check battery polarity. Replace all 4 AA batteries with fresh ones. |
| "ERR" message on display. | Internal error or time setting issue. | Remove and re-insert batteries to reset the unit. Re-set the time and alarms. If the issue persists, contact customer support. |
| Alarm sounds but pills are not dispensed. | Dispensing door not opened, or tray is stuck. | Ensure the dispensing door is fully opened when the alarm sounds. Check if the removable tray is properly seated and not obstructed. |
| Pills are not rotating to the next compartment. | Obstruction in the tray or mechanism. | Open the lid and check for any pills or debris blocking the rotation mechanism. Ensure the tray is correctly installed. |
| Lid cannot be opened or closed. | Lid is locked or latch is jammed. | Use the key to unlock the lid if it's locked. Ensure no foreign objects are obstructing the latch mechanism. |
Specifications
- Product Dimensions: 8.66 x 8.66 x 2.68 inches
- Item Weight: 1.9 Pounds (0.86 Kilograms)
- Material Type: Acrylonitrile Butadiene Styrene
- Color: Green + Clear
- Item Shape: Octagonal
- Number of Compartments: 28
- Unit Count: 1 Count
- Power Source: 4 x AA Batteries (included)
- Special Features: Lockable, Visual & Audio Alerts, Easy-Read LCD Display, 9 Dosage Templates
- Manufacturer: EZIMEDPIL
Safety Information
Please read and adhere to the following safety guidelines:
- May contain small parts; keep away from children.
- Do not use if the device is damaged.
- The locking mechanism prevents unauthorized access to medication.
- Batteries should be replaced by an adult.
- Avoid direct contact with pills to prevent contamination.
- Dispose of used batteries and expired medications responsibly according to local regulations.
- Statements regarding dietary supplements have not been evaluated by the FDA and are not intended to diagnose, treat, cure, or prevent any disease or health condition.
Warranty and Support
This product is manufactured by EZIMEDPIL. For warranty information and customer support, please refer to the contact details provided with your purchase documentation or visit the official EZIMEDPIL website. A standard return policy of 30 days applies for refunds or replacements.
For further assistance, you may also contact the seller directly through the platform where the product was purchased.


