1. Introduction
Thank you for choosing the Nilox 1D Barcode Reader. This device is engineered for efficient and accurate reading of 1D barcodes, making it an indispensable tool for various work environments. Its advanced laser technology ensures quick identification and scanning, while its ergonomic design and continuous reading functionality provide comfort and ease of use during prolonged operations.
This manual provides detailed instructions on how to set up, operate, maintain, and troubleshoot your barcode reader to ensure optimal performance and longevity.
2. Product Features
- 1D Barcode Compatibility: Specifically designed to read 1D barcode types.
- Laser Technology: Utilizes a precise laser sensor for rapid and accurate barcode scanning.
- Ergonomic Design: Comfortable and easy to hold for extended periods, reducing user fatigue.
- Continuous Reading Configuration: Supports continuous scanning for high-volume operations.
- Plug-and-Play Connectivity: Connects via USB cable for straightforward setup.
3. Package Contents
Please verify that all items are present in the package:
- Nilox 1D Barcode Reader (Model: NXSC1D)
- Stand
- 180cm USB Cable
- 1 AAAA Battery (pre-installed or included)
4. Product Overview
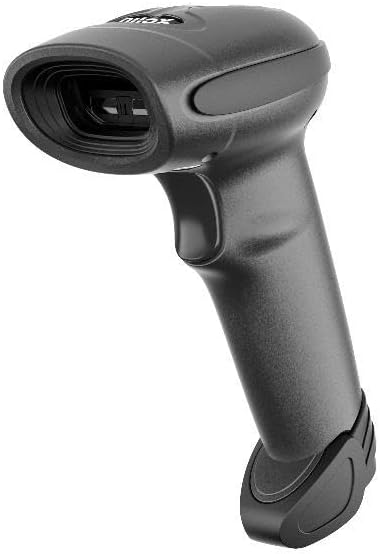
This image displays the Nilox 1D Barcode Reader, a sleek black handheld device. The top features the laser scanning window, designed for efficient barcode reading. Below the scanning window, the ergonomic handle includes a trigger button for activation. The base of the handle is designed for stability, allowing the scanner to be placed upright or used with its included stand.
Familiarize yourself with the main components of your Nilox Barcode Reader:
- Scanning Window: The area through which the laser beam is emitted to read barcodes.
- Trigger Button: Activates the laser for scanning.
- USB Port: Located at the base of the handle for connecting the USB cable.
- Indicator Light: Provides feedback on scanning status (e.g., successful scan, error).
5. Setup Guide
Follow these steps to set up your Nilox Barcode Reader:
- Unpack the Device: Carefully remove the barcode reader, USB cable, and stand from the packaging.
- Battery Installation (if not pre-installed): The device requires 1 AAAA battery. If not already installed, open the battery compartment (usually at the base of the handle) and insert the battery, ensuring correct polarity.
- Connect the USB Cable: Insert the smaller end of the 180cm USB cable into the USB port on the barcode reader.
- Connect to Host Device: Plug the larger end of the USB cable into an available USB port on your computer or POS system.
- Driver Installation (Plug & Play): The barcode reader is typically plug-and-play. Your operating system should automatically detect and install the necessary drivers. Wait for the installation to complete.
- Place on Stand (Optional): If using the stand, place the barcode reader securely on it. The stand allows for hands-free operation in continuous reading mode.
6. Operating Instructions
Using your Nilox Barcode Reader is straightforward:
6.1. Basic Scanning
- Ensure the barcode reader is connected to your host device and powered on.
- Open an application where you want the scanned data to appear (e.g., a text editor, spreadsheet, or POS software).
- Point the scanning window of the reader at the 1D barcode you wish to scan.
- Press and hold the trigger button. A laser line will appear.
- Position the laser line across the entire barcode. Once successfully scanned, you will typically hear a beep and/or see the indicator light flash. The barcode data will then appear in your active application.
- Release the trigger button.
6.2. Continuous Reading Mode
The Nilox Barcode Reader supports continuous reading, ideal for high-volume scanning without repeatedly pressing the trigger.
- To activate continuous reading, refer to the programming barcodes in the separate programming guide (if provided with your device) or consult the Nilox support website.
- Once activated, the scanner will continuously emit the laser beam, allowing you to simply pass barcodes in front of the scanning window for automatic reading.
- This mode is particularly effective when the scanner is placed on its included stand.
7. Maintenance and Care
To ensure the longevity and optimal performance of your barcode reader, follow these maintenance guidelines:
- Cleaning: Regularly clean the scanning window with a soft, lint-free cloth. For stubborn smudges, slightly dampen the cloth with water or a mild, non-abrasive cleaner. Do not use harsh chemicals or abrasive materials.
- Storage: Store the device in a cool, dry place away from direct sunlight and extreme temperatures.
- Handling: Avoid dropping the scanner or subjecting it to strong impacts. While designed for durability, excessive force can damage internal components.
- Cable Care: Do not bend or crimp the USB cable excessively. Always grasp the plug, not the cable, when disconnecting.
- Battery Replacement: If the scanner's performance degrades or it fails to power on, replace the AAAA battery. Ensure proper disposal of old batteries according to local regulations.
8. Troubleshooting
If you encounter issues with your Nilox Barcode Reader, try the following solutions:
| Problem | Possible Cause | Solution |
|---|---|---|
| Scanner does not power on. | No power; loose cable; dead battery. | Ensure USB cable is securely connected. Replace AAAA battery. Try a different USB port. |
| Scanner does not read barcodes. | Barcode damaged/unreadable; incorrect symbology; dirty scanning window; scanner not in correct mode. | Try scanning a different, known-good barcode. Clean the scanning window. Ensure the scanner is in the correct reading mode (e.g., not in configuration mode). |
| Scanned data appears incorrectly. | Keyboard language mismatch; incorrect data formatting. | Ensure your computer's keyboard language matches the scanner's output settings. Refer to the programming guide for data formatting options. |
| Scanner beeps but no data appears. | Application not active; focus issue; driver issue. | Ensure the cursor is in the desired input field of your application. Restart the application or computer. Reinstall scanner drivers if necessary. |
If the problem persists after trying these solutions, please contact Nilox customer support.
9. Technical Specifications
| Model Number | NXSC1D |
| Barcode Compatibility | 1D Barcodes |
| Scanning Technology | Laser |
| Reading Area Width | 752 x 480 mm (as per product description) |
| Connectivity | USB Cable |
| Cable Length | 180 cm |
| Power Source | Battery Powered |
| Battery Type | 1 AAAA battery (included) |
| Item Weight | 15.8 ounces |
| Package Dimensions | 7.95 x 7.83 x 5.08 inches |
| Manufacturer | Nilox |
10. Warranty and Support
For warranty information, please refer to the warranty card included with your product or visit the official Nilox website. Nilox products are designed for quality and reliability, reflecting the "Tech it easy!" philosophy.
If you require technical assistance, have questions about product functionality, or need to report an issue, please contact Nilox customer support through their official channels. Be prepared to provide your product model number (NXSC1D) and a detailed description of the issue.
Online Support: Visit the official Nilox website for FAQs, driver downloads, and contact information.
Contact Information: Specific contact details (phone, email) can typically be found on the Nilox website or in the product packaging.


