1. Introduction
This manual provides detailed instructions for the installation, operation, and maintenance of your iCarSEPTON 9-inch Android car stereo. Please read this manual thoroughly before installation and use to ensure proper function and to maximize your experience with the device. Keep this manual for future reference.
2. Vehicle Compatibility
This car stereo is designed for specific Dodge Ram models and years:
- Dodge Ram 1500 (2013-2018)
- Dodge Ram 2500 (2013-2018)
- Dodge Ram 3500 (2013-2018)
It is compatible with vehicles equipped with both manual AC and automatic AC systems.

Figure 2.1: Vehicle Compatibility Overview. This image illustrates the stereo's fitment for Dodge Ram models from 2013 to 2018, showing both automatic and manual air conditioning panel options.
3. Package Contents
Verify that all components are present in the package:
- iCarSEPTON 9-inch Android Car Stereo Unit
- Back Camera
- Harness Cable
- Canbus Box
- GPS Antenna
- RCA Cable
- USB Cables (x2)
- Radio Adapter
- Reverse Cable
- Microphone (Wheat head)
- Installation Tool (Gift)
- Instructions and Installation Guide
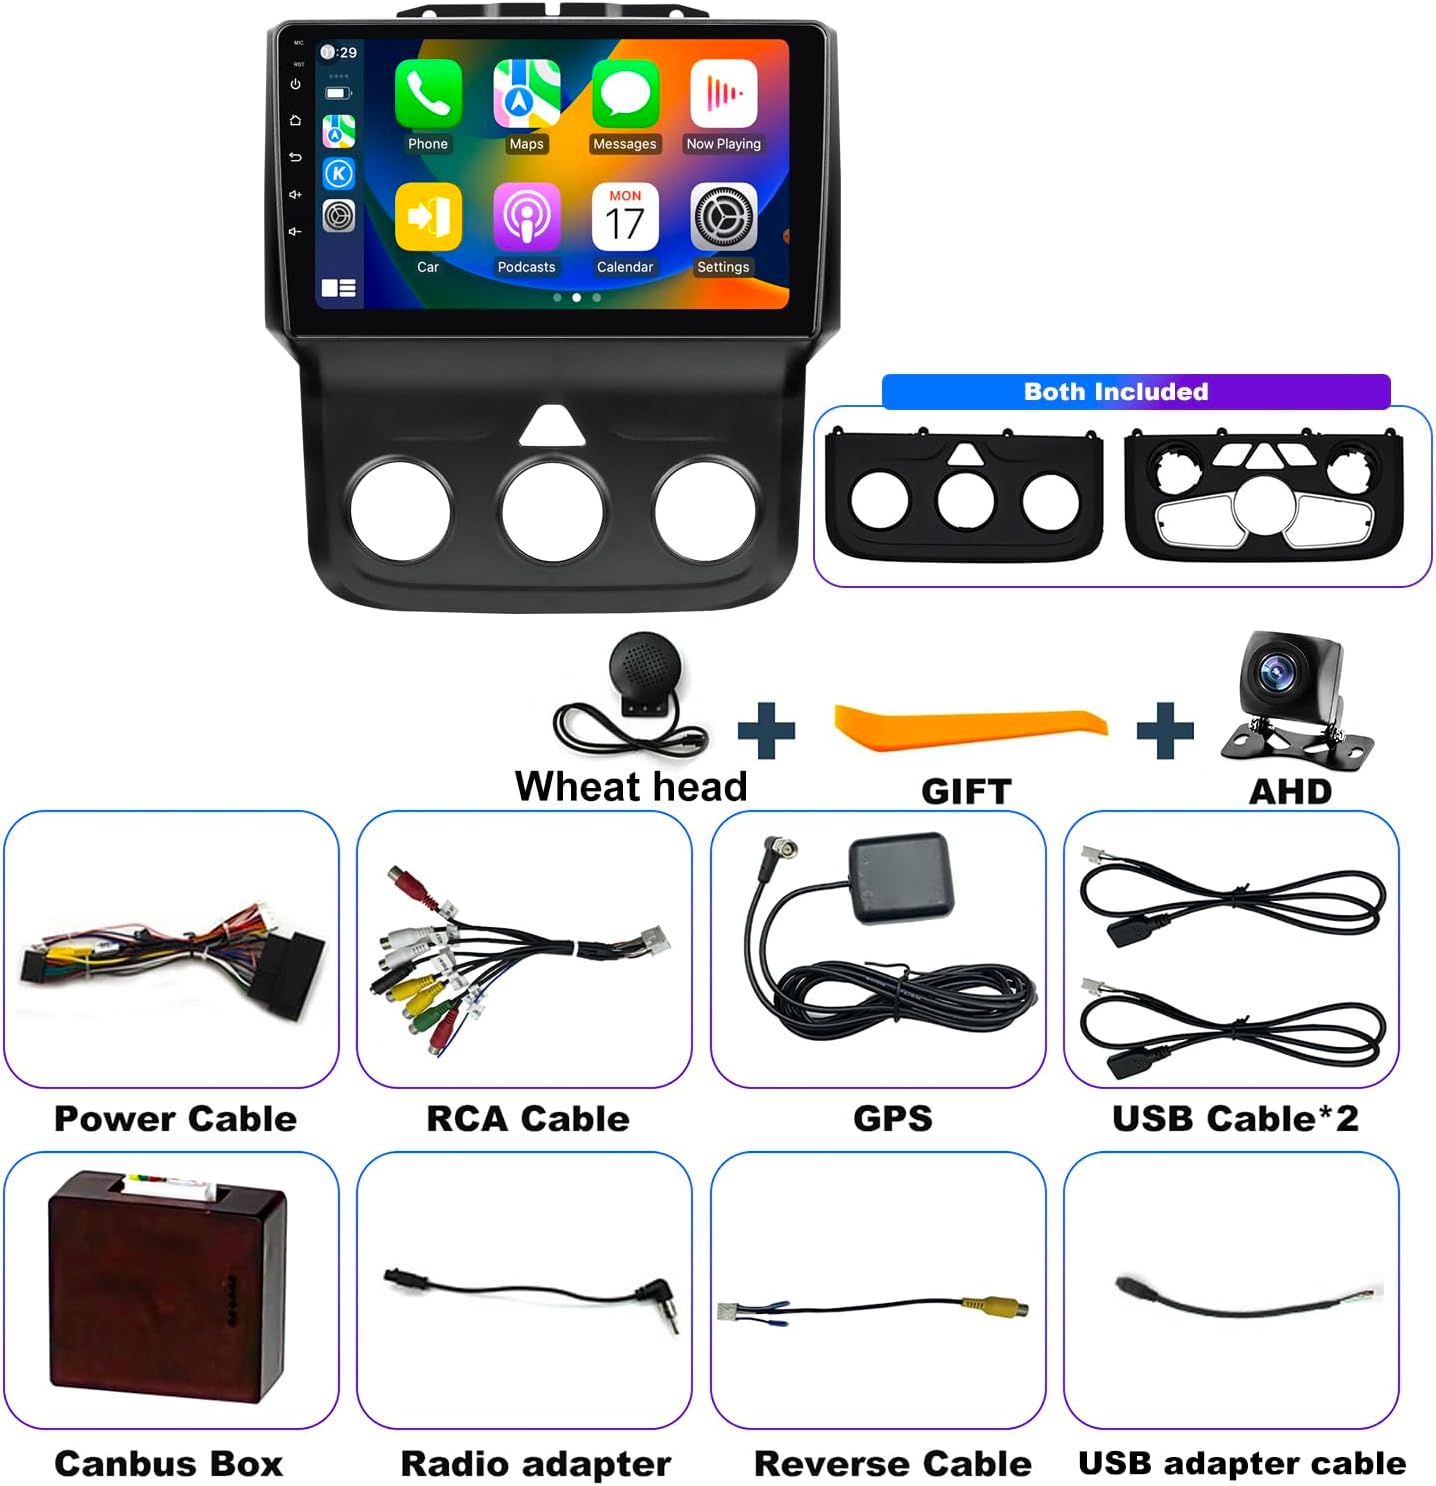
Figure 3.1: Included Components. This image displays all items typically found in the product package, including the main head unit, wiring harnesses, camera, and accessories.
4. Installation Guide
Installation of this car stereo is designed to be a direct plug-and-play process for compatible vehicles. No wire cutting is typically required. However, professional installation is recommended to ensure correct wiring and functionality.
General Steps:
- Preparation: Disconnect the vehicle's battery before beginning any electrical work.
- Remove Old Unit: Carefully remove the factory radio and trim panels. Refer to your vehicle's service manual for specific instructions.
- Connect Wiring: Connect the provided harness cable, Canbus box, GPS antenna, and other accessories to the new stereo and the vehicle's existing wiring. Ensure all connections are secure.
- Install Camera (Optional): If installing the backup camera, route the camera cable to the rear of the vehicle and connect it to the stereo's reverse input.
- Test Functionality: Before fully reassembling, reconnect the battery and power on the stereo to test basic functions (power, audio, touch screen, camera, steering wheel controls).
- Reassemble: Once confirmed working, carefully reassemble the dashboard and trim panels.

Figure 4.1: Plug & Play Installation. This image demonstrates the simplicity of connecting the stereo's wiring harness directly to the vehicle's existing connectors.
5. Setup and Initial Configuration
5.1. Power On and Initial Boot
After installation, turn on your vehicle's ignition. The stereo will boot up, displaying the Android operating system interface.
5.2. Wi-Fi Connectivity
To access online features, connect the stereo to a Wi-Fi network (e.g., mobile hotspot).
- Go to Settings > Network & Internet > Wi-Fi.
- Select your desired Wi-Fi network and enter the password.

Figure 5.1: Wi-Fi Connectivity. This image shows the stereo's screen with various applications and a visual representation of Wi-Fi signal, indicating internet access.
5.3. Wireless CarPlay & Android Auto
Connect your smartphone for seamless integration.
- For iOS (Wireless CarPlay):
- Connect your iPhone to the player via Bluetooth.
- Open the "Zlink" application on the stereo and wait for a few seconds. It will automatically connect.
- For Android (Wireless & Wired Android Auto):
- Connect your Android phone to the player with a USB cable for wired connection, or via Bluetooth for wireless.
- Open the "Zlink" application on the stereo and wait for a few seconds. It will automatically connect.

Figure 5.2: Wireless CarPlay & Android Auto. This image illustrates the integration of smartphone interfaces onto the stereo screen, enabling voice control and app access.
6. Operating Instructions
6.1. Touch Screen Operation
The 9-inch capacitive touch screen allows for intuitive control of all functions. Use gestures such as tap, swipe, and pinch-to-zoom similar to a smartphone.
6.2. GPS Navigation
The stereo supports both online and offline navigation. With Wi-Fi connectivity, you can use real-time navigation apps. For offline use, download map data in advance.

Figure 6.1: GPS Navigation. This image shows the stereo displaying navigation maps, highlighting both online and offline map capabilities.
6.3. Bluetooth Functionality
Connect your phone via Bluetooth for hands-free calling and audio streaming.
- Pairing: Go to Settings > Bluetooth, enable Bluetooth on both devices, and select your phone from the list to pair.
- Hands-Free Calls: Make and receive calls directly from the stereo interface.
- Audio Streaming: Play music from your phone through the car's speakers.

Figure 6.2: Bluetooth Interface. This image displays the stereo's Bluetooth dialing screen and music control, emphasizing hands-free communication.
6.4. FM Radio
Access your favorite radio stations with the built-in FM tuner.
- Scanning: Use the auto-scan function to find available stations.
- Presets: Save up to 18 of your preferred stations for quick access.

Figure 6.3: FM Radio Interface. This image shows the stereo's screen displaying the FM radio tuner with frequency selection and station presets.
6.5. Steering Wheel Control (SWC)
The stereo supports integration with your vehicle's existing steering wheel controls for safe operation.
- Learning Function: Access the "SWC Learning" or "Steering Wheel Study" menu in the stereo settings to map your vehicle's steering wheel buttons to specific stereo functions.

Figure 6.4: Steering Wheel Control Learning. This image illustrates the on-screen interface for configuring steering wheel buttons to control the stereo functions.
6.6. Rear View Camera
When the vehicle is shifted into reverse, the stereo automatically displays the rear view from the connected camera, aiding in safe parking and maneuvering.
- Settings: Ensure the camera input is correctly configured in the system settings if the image does not appear automatically.

Figure 6.5: Rear View Camera Display. This image shows the stereo screen displaying the live feed from the backup camera with parking assist lines.
6.7. Split Screen Functionality
The split-screen feature allows you to run two applications simultaneously, such as navigation and music playback.
- Activation: Typically, long-press the recent apps button or drag an app to one side of the screen to activate split-screen mode.

Figure 6.6: Split Screen Mode. This image demonstrates the stereo's ability to display two applications concurrently, such as music and navigation.
7. Specifications
| Feature | Specification |
|---|---|
| Operating System | Android |
| Display Size | 9 Inches |
| RAM | 4GB |
| Internal Storage | 64GB |
| Connectivity | Bluetooth, USB, Wi-Fi (5G) |
| Special Features | Wireless/Wired CarPlay & Android Auto, Split Screen, Backup Camera Support, Steering Wheel Controls, GPS Navigation, FM Radio |
| Audio Output Mode | Stereo |
| Mounting Type | Dashboard Mount |
| Item Weight | 3.75 pounds |
| Package Dimensions | 14.17 x 10.24 x 4.72 inches |
8. Troubleshooting
If you encounter issues, refer to the following common troubleshooting steps:
- No Power: Check all power connections and vehicle fuses. Ensure the battery is properly connected.
- No Sound: Verify speaker connections. Check volume levels on the stereo and any connected devices. Ensure the mute function is not active.
- Touch Screen Unresponsive: Try restarting the stereo. If the issue persists, a factory reset might be necessary (note: this will erase all user data).
- GPS Not Working: Ensure the GPS antenna is properly installed and has a clear view of the sky. Check GPS settings in the system.
- Bluetooth/CarPlay/Android Auto Connection Issues: Ensure Bluetooth is enabled on both devices. Forget and re-pair devices. Check the "Zlink" app for connection status.
- Rear Camera Not Displaying: Check the camera's power and video connections. Ensure the reverse trigger wire is correctly connected to the vehicle's reverse light circuit.
For persistent issues, contact customer support.
9. Maintenance
To ensure the longevity and optimal performance of your car stereo:
- Cleaning: Use a soft, dry cloth to clean the screen and exterior. Avoid abrasive cleaners or solvents.
- Software Updates: Periodically check for system software updates to improve performance and add new features.
- Temperature: Avoid exposing the unit to extreme temperatures for extended periods.
10. Warranty and Support
The iCarSEPTON car stereo comes with a 12-month warranty from the date of purchase.
For technical support, warranty claims, or any questions regarding your product, please contact iCarSEPTON customer service. Refer to the contact information provided with your purchase or visit the official iCarSEPTON website.


