1. Introduction
Thank you for purchasing the vidaXL Black Oak TV Stand with LED Lights. This manual provides essential information for the safe assembly, operation, and maintenance of your new TV stand. Please read these instructions carefully before beginning assembly and retain them for future reference.

Image 1.1: The vidaXL Black Oak TV Stand with LED Lights in a typical living room setup.
2. Safety Information
- Always assemble the product on a soft, clean surface to prevent scratches.
- Ensure all parts are present and undamaged before assembly. Do not proceed if any parts are missing or broken.
- Use only the provided hardware. Substituting parts may compromise the structural integrity of the stand.
- Do not overtighten screws, as this can damage the material.
- Keep small parts away from children during assembly to prevent choking hazards.
- Position the TV stand on a level, stable surface to prevent tipping.
- Do not exceed the maximum weight capacity of the stand. Refer to the 'Specifications' section for details.
- For LED lights, ensure the power supply is compatible with local electrical standards.
3. Package Contents
Before assembly, verify that all components listed below are included in your package. If any items are missing or damaged, please contact customer support.
- TV Cabinet Panels (various sizes)
- Hardware Pack (screws, dowels, hinges, cam locks, etc.)
- LED Strip Lights with Power Adapter
- Instruction Manual (this document)

Image 3.1: Example of TV stand panels, illustrating the material and design elements.
4. Setup and Assembly
Assembly is required for this TV stand. It is recommended that two adults perform the assembly. Please follow the steps carefully.
4.1. Required Tools
- Phillips Head Screwdriver
- Hammer (optional, for dowels)
4.2. Assembly Steps
- Unpack and Identify Parts: Carefully unpack all components and lay them out on a clean, soft surface. Refer to the parts list in your hardware pack to identify each piece.
- Assemble Base Structure: Begin by connecting the side panels to the bottom panel using the provided dowels and cam locks. Ensure the cam locks are securely tightened.
- Install Internal Dividers and Shelves: Insert the internal divider panels and shelves into their designated slots. Secure them with cam locks or screws as indicated in the detailed assembly diagram.
- Attach Back Panel: Carefully align and attach the back panel to the assembled structure. Use the small nails or screws provided to secure it. Ensure any cable management cutouts are correctly positioned.
- Mount Door Hinges: Attach the hinges to the doors and the corresponding cabinet sections using the provided screws. Adjust hinges as necessary for proper door alignment.
- Install Doors: Mount the doors onto the hinges. Test the doors to ensure they open and close smoothly.
- Attach LED Strip Lights: Carefully adhere the LED strip lights into the designated groove within the open compartment. Ensure the strip is clean and dry before application.
- Connect LED Power: Connect the LED strip to the power adapter and plug it into a suitable power outlet.

Image 4.1: Interior view of the TV stand, illustrating storage and hinge placement.
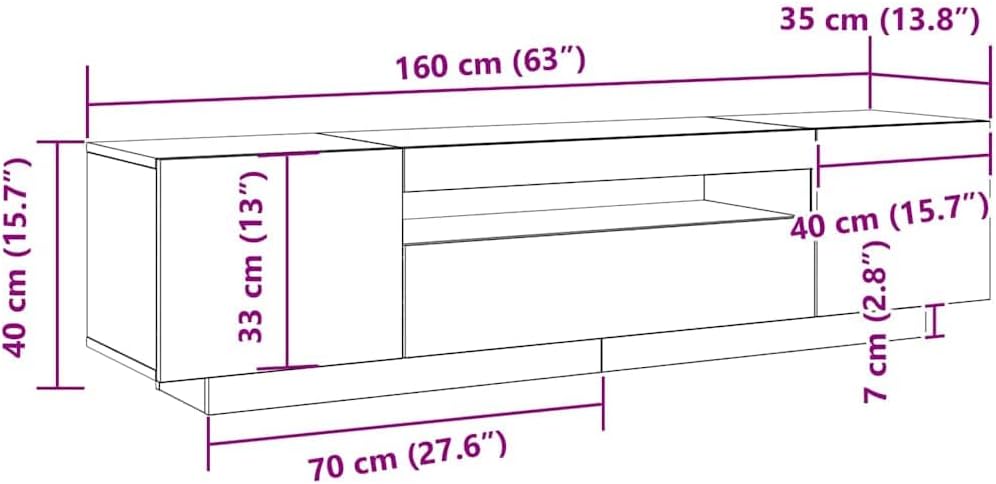
Image 4.2: Dimensional diagram of the TV stand for planning placement.
5. Operating Instructions (LED Lights)
The integrated LED strip lights provide ambient lighting for your living space.
- Power On/Off: Plug the LED power adapter into a wall outlet to turn on the lights. Unplug to turn off.
- Color Change: If your LED strip includes a remote control (sold separately or included depending on package), use it to cycle through available colors and lighting modes.

Image 5.1: The TV stand with its LED lights activated.
6. Maintenance
To ensure the longevity and appearance of your TV stand, follow these maintenance guidelines:
- Cleaning: Wipe surfaces with a soft, damp cloth. Avoid abrasive cleaners or harsh chemicals, which can damage the finish.
- Dusting: Regularly dust with a dry, soft cloth.
- Spills: Clean spills immediately to prevent staining or damage to the wood finish.
- LED Lights: Ensure the LED strip and power adapter are kept dry. Do not attempt to repair damaged LED strips; contact customer support for replacement.
- Hardware: Periodically check all screws and fittings to ensure they remain tight. Retighten if necessary.
7. Troubleshooting
| Problem | Possible Cause | Solution |
|---|---|---|
| Stand is wobbly | Loose screws or uneven floor. | Check and tighten all assembly screws. Ensure the stand is on a level surface. Use furniture pads if needed. |
| Doors do not align properly | Hinges are not adjusted correctly. | Adjust the screws on the hinges to align the doors. Refer to the hinge manufacturer's instructions if available. |
| LED lights do not turn on | Power adapter unplugged, faulty outlet, or damaged LED strip. | Ensure the power adapter is securely plugged into a working outlet. Test the outlet with another device. If the issue persists, contact customer support. |
8. Specifications
- Brand: vidaXL
- Model Number: 861103
- Product Dimensions (L x W x H): 62.99 x 13.78 x 15.75 inches (160 x 35 x 40 cm)
- Item Weight: Approximately 65.7 pounds (29.86 Kilograms)
- Material: Engineered wood with matte black oak finish
- Assembly Required: Yes
- Lighting: Integrated LED strip lights
9. Warranty and Support
vidaXL products are manufactured with quality and durability in mind. For specific warranty details, please refer to the warranty card included with your purchase or visit the official vidaXL website. If you encounter any issues or require assistance, please contact vidaXL customer support through their official channels.
Contact Information: Please refer to the contact details provided on the vidaXL website or your purchase documentation.


