1. Introduction
This manual provides detailed instructions for the installation, operation, and maintenance of your DEWENWILS PTW03 Outdoor WiFi Pool Pump Timer. This heavy-duty timer box is designed for controlling pool pumps, water heaters, and other high-power outdoor appliances, offering smart control via Wi-Fi, voice commands, and various scheduling options. Please read this manual thoroughly before installation and use to ensure safe and efficient operation.
1.1 Safety Information
- WARNING: Risk of Electric Shock. More than one disconnect switch may be required to de-energize the device before servicing.
- Installation must be performed by a qualified electrician in accordance with all local and national electrical codes.
- Always turn off power at the circuit breaker before installing or servicing the timer.
- Use copper conductors only. Always close the door after use.
- This device is for outdoor use and is rated IP44 waterproof. Do not immerse in water.
- Ensure the timer's electrical ratings (40A, 120VAC, 2HP) match the requirements of the connected appliance.
2. Package Contents
Please check the package for the following items:
- DEWENWILS PTW03 Outdoor WiFi Pool Pump Timer
- Instruction Manual
- Mounting Hardware (screws, anchors)
3. Product Overview
Familiarize yourself with the components of your DEWENWILS PTW03 timer box.

Image: The DEWENWILS PTW03 timer box with its cover open, showing internal components labeled as Wi-Fi Antenna, Power Indicator, Power & Programming Button, Load Indicator, Wi-Fi Indicator, Knockouts, and Terminal Blocks. The inside cover displays specifications and wiring diagrams.
- Wi-Fi Antenna: For wireless communication.
- Power Indicator: Illuminates when the device is powered.
- Power & Programming Button: Used for manual control and Wi-Fi pairing.
- Load Indicator: Shows the status of the connected load.
- Wi-Fi Indicator: Displays Wi-Fi connection status.
- Terminal Blocks: For electrical wiring connections.
- Knockouts: Pre-drilled holes for conduit entry.
- IP44 Weatherproof Rated: Indicates protection against splashing water and solid objects larger than 1mm.
4. Specifications

Image: The DEWENWILS PTW03 timer box mounted outdoors, with an overlay listing its key specifications: 40A, 2HP, 120VAC, and ETL certification.
| Parameter | Value |
|---|---|
| Model Number | PTW03 |
| Input Voltage | 120VAC, 60Hz |
| Output | 40A Resistive, 120VAC; 2HP, 120VAC |
| Wi-Fi Frequency | 2.4GHz only |
| Operating Temperature | -40°F to 140°F (-40°C to 60°C) |
| Protection Rating | IP44 Weatherproof |
| Certifications | ETL, FCC |
| Material | Polycarbonate |
| Product Dimensions | 4 x 6 x 7 inches |
5. Installation and Wiring
This section provides instructions for physically installing and wiring the DEWENWILS PTW03 timer box. Ensure all safety precautions are followed.
5.1 Mounting the Timer Box
- Choose a suitable outdoor location for mounting, ensuring it is within range of your 2.4GHz Wi-Fi network.
- Use the provided mounting hardware to securely attach the timer box to a wall or post.
5.2 Wiring Instructions
IMPORTANT: Turn off power at the circuit breaker before beginning any wiring.
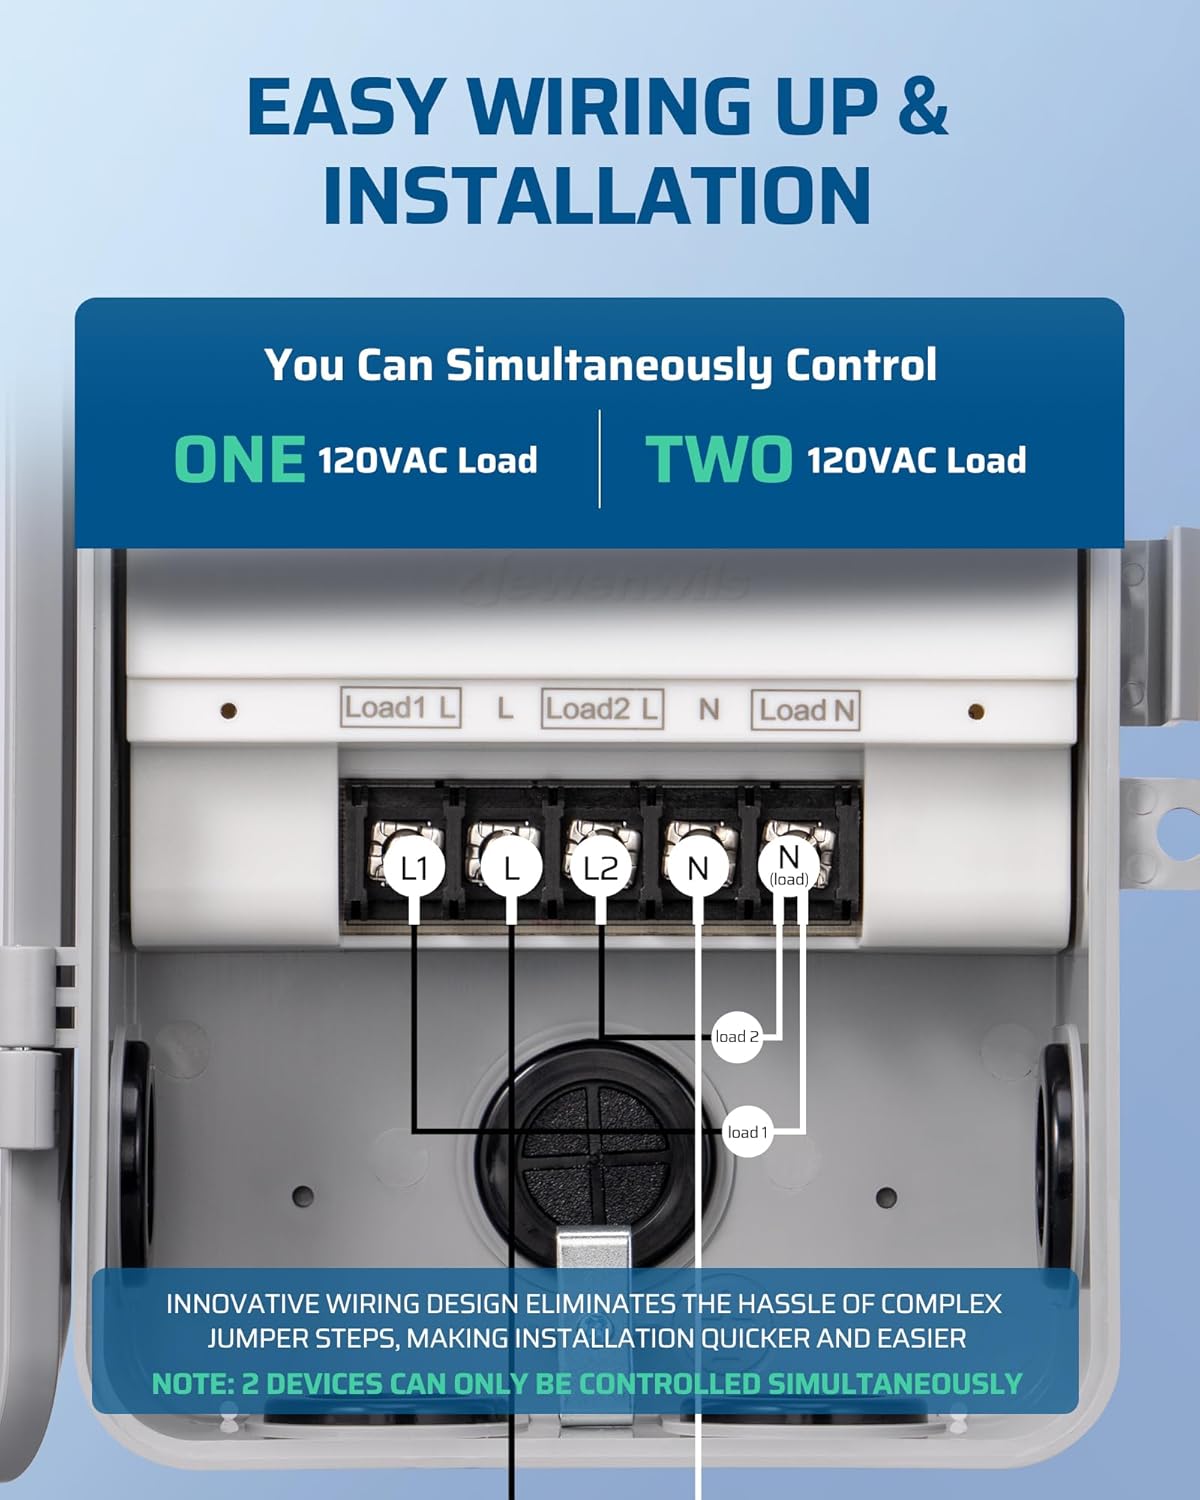
Image: Detailed wiring diagrams for the DEWENWILS PTW03 timer box. The top diagram shows wiring for controlling one 120VAC load, connecting Load1 L, L, Load2 L, N, and Load N terminals. The bottom diagram illustrates wiring for simultaneously controlling two 120VAC loads, utilizing Load1 L, L, Load2 L, N, and Load N terminals with separate load connections.
The PTW03 features a simplified wiring system. You can control either one 120VAC load or two 120VAC loads simultaneously.
5.2.1 Controlling One 120VAC Load
- Connect the incoming Power Line (L) to the terminal labeled 'L'.
- Connect the incoming Power Neutral (N) to the terminal labeled 'N'.
- Connect the Load Line from your appliance to the terminal labeled 'Load1 L'.
- Connect the Load Neutral from your appliance to the terminal labeled 'Load N'.
- Ensure all connections are secure.
5.2.2 Simultaneously Controlling Two 120VAC Loads
Note: Two devices can only be controlled simultaneously. They will operate on the same schedule.
- Connect the incoming Power Line (L) to the terminal labeled 'L'.
- Connect the incoming Power Neutral (N) to the terminal labeled 'N'.
- Connect the Load Line from your first appliance to the terminal labeled 'Load1 L'.
- Connect the Load Line from your second appliance to the terminal labeled 'Load2 L'.
- Connect the Load Neutral from both appliances to the terminal labeled 'Load N'.
- Ensure all connections are secure.
After wiring, replace the insulating panel and close the timer box door securely. Restore power at the circuit breaker.
6. Setup (App & Connectivity)
The DEWENWILS PTW03 timer works with the DEWENWILS app and Smart Life app, and supports voice control via Alexa and Google Assistant. This device requires a 2.4GHz Wi-Fi network.
6.1 Downloading the App
- Scan the QR code on the product label or search for "DEWENWILS" or "Smart Life" in your mobile app store (App Store for iOS, Google Play for Android).
- Download and install the app.
- Register for a new account or log in if you already have one.
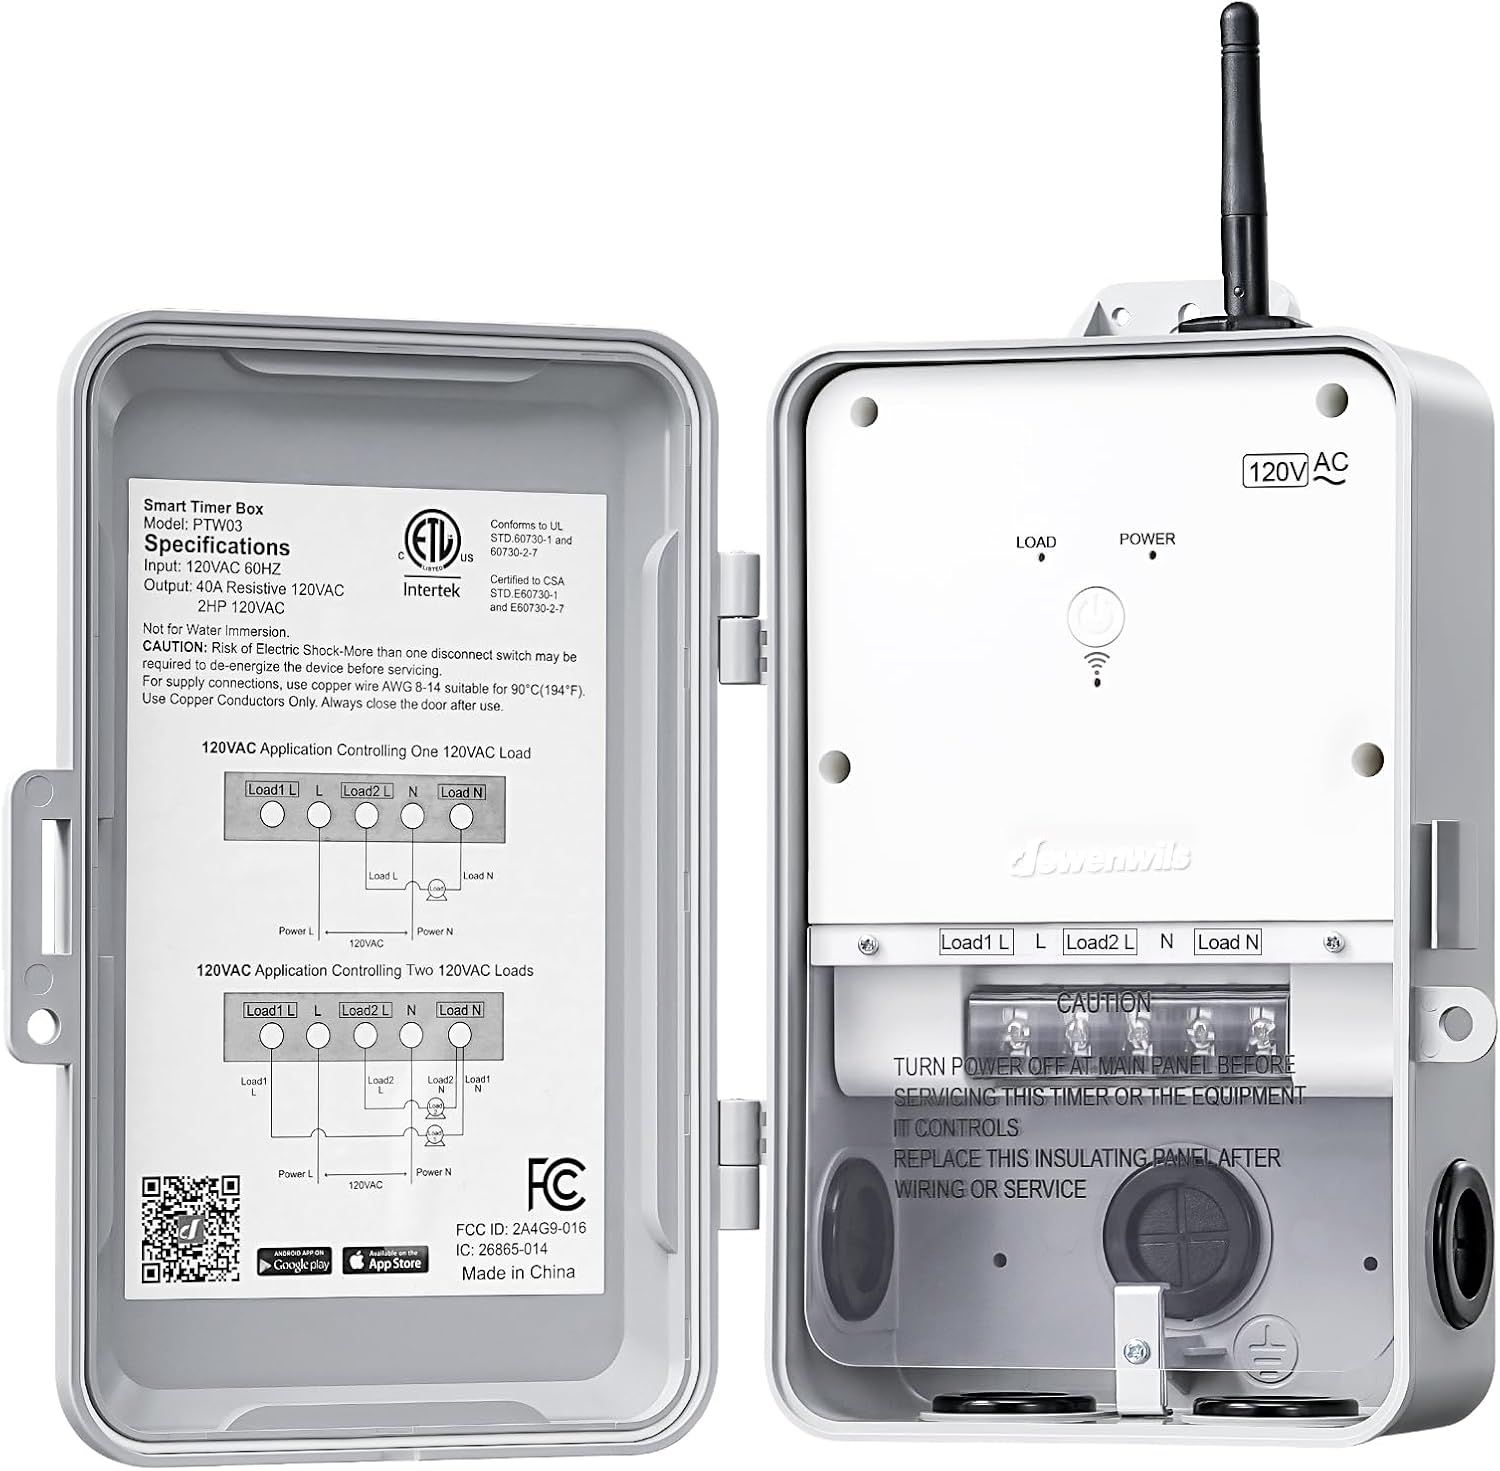
Image: The DEWENWILS PTW03 timer box with its cover open, showing a QR code on the inside panel. This QR code links to the DEWENWILS Smart IoT app for download on Google Play and the App Store. Download the DEWENWILS Smart IoT App
6.2 Pairing with Wi-Fi
- Ensure your mobile device is connected to a 2.4GHz Wi-Fi network.
- Open the DEWENWILS or Smart Life app.
- Press and hold the Power & Programming button on the timer box for 5-7 seconds until the Wi-Fi indicator light blinks rapidly. This indicates pairing mode.
- In the app, tap '+' to add a device. Select the appropriate device type (e.g., 'Electrical Outlet' or 'Switch').
- Follow the on-screen instructions to connect the timer to your Wi-Fi network. You may need to confirm the blinking status of the indicator light.
- Once successfully paired, the Wi-Fi indicator light will stop blinking and remain solid.
6.3 Connecting to Voice Assistants (Alexa/Google Assistant)
After successfully pairing the timer with the DEWENWILS or Smart Life app, you can link it to your voice assistant.
- Open the Alexa or Google Home app.
- Navigate to the 'Skills & Games' (Alexa) or 'Works with Google' (Google Home) section.
- Search for and enable the 'Smart Life' skill.
- Link your Smart Life account with your voice assistant account.
- Discover devices. Your DEWENWILS timer should now appear and be controllable via voice commands.
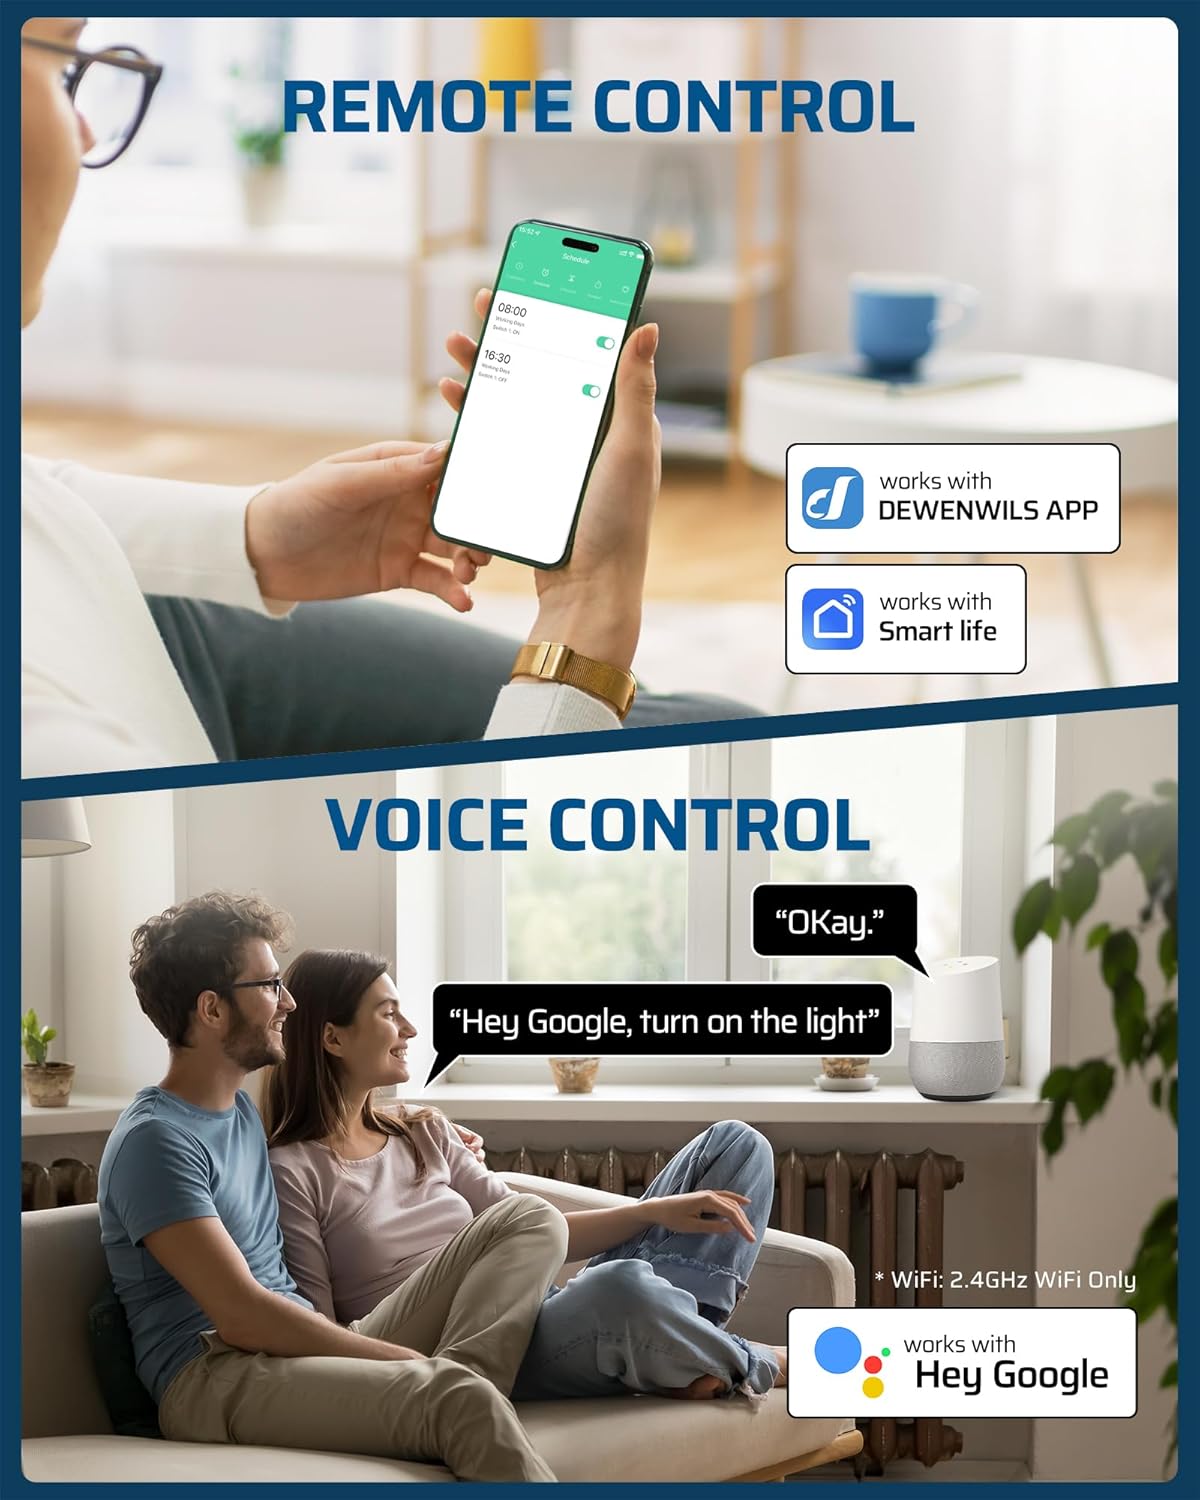
Image: A split image demonstrating remote control via the DEWENWILS app on a smartphone and voice control using Google Assistant. The app shows a scheduling interface, and a person is shown interacting with a Google Home device.
7. Operating Instructions
The DEWENWILS PTW03 offers versatile control options.
7.1 Manual Control
Press the Power & Programming button on the timer box to manually turn the connected appliance ON or OFF.
7.2 App Control
Use the DEWENWILS or Smart Life app on your smartphone to remotely turn the connected appliance ON or OFF from anywhere with an internet connection.
7.3 Scheduling and Timer Modes
The app provides multiple scheduling options to automate your appliances.

Image: A smartphone screen displaying the scheduling interface of the DEWENWILS app, with options to set ON/OFF times for connected devices, such as a pool pump. The timer box is visible in the background near a pool.
- Programmable Timer: Set specific ON/OFF times for daily or weekly schedules.
- Countdown: Set a timer for the appliance to turn ON or OFF after a specified duration.
- Random: Create schedules that vary slightly each day, useful for security lighting.
- Astronomical: Automatically adjust ON/OFF times based on local sunrise and sunset.
Refer to the in-app help section for detailed instructions on setting up each timer mode.
7.4 Voice Control
Once linked to Alexa or Google Assistant, use simple voice commands to control your connected appliance. Examples:
- "Alexa, turn on the pool pump."
- "Hey Google, turn off the water heater."
8. Maintenance
The DEWENWILS PTW03 is designed for durability and outdoor use. Regular maintenance is minimal.
- Cleaning: Wipe the exterior of the timer box with a damp cloth as needed. Do not use abrasive cleaners or immerse the device in water.
- Weather Protection: The IP44 rating provides protection against splashing water. Ensure the door is always securely closed to maintain its weatherproof integrity.
- Temperature Range: The device is designed to operate in temperatures from -40°F to 140°F.

Image: The DEWENWILS PTW03 timer box shown in both cold (-40°F) and hot (140°F) environments, emphasizing its weatherproof and temperature-resistant design with an IP44 rating.
9. Troubleshooting
If you encounter issues with your DEWENWILS PTW03 timer, refer to the following common problems and solutions:
| Problem | Possible Cause | Solution |
|---|---|---|
| Device not powering on | No power to the unit; incorrect wiring. | Check circuit breaker. Verify wiring connections are secure and correct. |
| Cannot connect to Wi-Fi | Incorrect Wi-Fi frequency (not 2.4GHz); weak Wi-Fi signal; incorrect password; device not in pairing mode. | Ensure your router is broadcasting a 2.4GHz network. Move the timer closer to the router. Re-enter Wi-Fi password carefully. Put the device back into pairing mode (rapidly blinking Wi-Fi indicator). |
| Appliance not turning ON/OFF as scheduled | Incorrect schedule settings in the app; Wi-Fi disconnection. | Review and adjust schedules in the app. Check Wi-Fi connection status (solid Wi-Fi indicator light). |
| Voice control not working | Smart Life skill not enabled; account not linked; incorrect device name. | Ensure the 'Smart Life' skill is enabled and linked in your Alexa/Google Home app. Use the exact device name set in the Smart Life app. |
10. Warranty and Support
DEWENWILS products are designed and manufactured to the highest quality standards. For warranty information, technical support, or customer service, please contact DEWENWILS directly through their official website or the contact information provided with your purchase. Please have your model number (PTW03) and purchase date ready when contacting support.
11. Compliance Information
This device complies with Part 15 of the FCC Rules. Operation is subject to the following two conditions: (1) This device may not cause harmful interference, and (2) this device must accept any interference received, including interference that may cause undesired operation.
This product is ETL Listed, confirming its compliance with North American safety standards.


