Introduction
This manual provides detailed instructions for the installation, operation, and maintenance of your SIXWIN 4+64G Android 13 Car Radio. Please read this manual thoroughly before using the product to ensure proper function and safety. This unit is designed for Suzuki Splash Ritz and Opel Agila models manufactured between 2004 and 2014.
Product Overview
The SIXWIN Car Radio is an advanced multimedia system featuring a 9-inch touchscreen display. It operates on Android 13 with 4GB RAM and 64GB ROM, providing a responsive user experience. Key functionalities include:
- Wireless CarPlay and Android Auto for seamless smartphone integration.
- Mirror Link function for displaying smartphone content.
- Built-in GPS navigation with support for online and offline maps.
- Integrated WiFi module for internet connectivity and app downloads.
- Bluetooth 5.0 for hands-free calling, music streaming, and file transfer.
- FM/RDS radio with clear audio quality and 18 preset stations.
- 32-band Equalizer (EQ) for customizable audio settings.
- Steering wheel control compatibility.
- Includes an HD reversing camera for enhanced parking safety.
Package Contents
Verify that all items listed below are present in your package:
- 1 x Car Radio Unit
- 1 x Power Cable
- 1 x RCA Cable
- 1 x Rear Camera Input Cable
- 2 x USB Cables
- 1 x GPS Antenna
- 1 x Microphone
- 1 x Rear Camera
- 1 x Mounting Bracket
- 1 x Screwdriver
- 1 x User Manual (this document)

Figure 1: Package Contents and Component Identification
Installation (Setup)
Professional installation is recommended. Ensure the vehicle's power is disconnected before beginning installation.
1. Pre-Installation Check
Before installing the unit into the dashboard, connect all cables to the car radio and test its functionality (power on, radio, Bluetooth, etc.) to ensure all components are working correctly.
2. Wiring Diagram
Refer to the wiring diagram provided with the unit for specific connections. Ensure all cables are securely connected to their corresponding ports.
Figure 2: Rear Panel Connections
3. Rear Camera Installation
The included HD rear camera enhances parking safety. Follow these steps for connection:
- Red Cable (1): Connect to the positive pole of the car's reversing light cable.
- Black Cable (2): Connect to the negative pole of the car's reversing light cable.
- The two other red extension cables (3 & 4) do not need to be connected.
- The white plug must be connected to the main device. This connection is essential for Bluetooth and WiFi functionality, even if the reversing camera is not actively used.

Figure 3: Rear Camera Wiring Instructions
4. Mounting the Unit
Once all connections are made and tested, carefully mount the car radio into the dashboard opening using the provided mounting bracket and screwdriver. Ensure it is securely fastened.

Figure 4: Installation Display (Before and After)
Operation
1. Initial Power On
After installation, turn on your vehicle's ignition. The car radio should power on automatically. Follow any on-screen prompts for initial setup, such as language selection and time zone.
2. Wireless CarPlay / Android Auto
Connect your iPhone or Android phone wirelessly to the unit. This allows you to access mobile apps, make calls, send messages, play music, and navigate using voice commands or the touchscreen.

Figure 5: Wireless CarPlay and Android Auto Interface
3. Mirror Link
To use Mirror Link, connect your smartphone to the device via WiFi (for iOS) or WiFi/USB (for Android). This feature mirrors your phone's screen onto the car radio display, allowing you to interact with your smartphone's apps, music, and videos directly from the unit.
4. GPS Navigation
The unit comes with a pre-installed map application. It also supports other online map services. The GPS module provides accurate navigation, including voice guidance and real-time traffic information when connected to the internet.

Figure 6: GPS Navigation Interface
5. WiFi Connectivity
Connect the unit to a WiFi hotspot to access the internet. This enables web browsing, online content streaming, and downloading additional applications from the app store.
6. Bluetooth 5.0
Pair your mobile phone or other Bluetooth devices to the car radio for hands-free calling, wireless music streaming, and contact synchronization. Access the Bluetooth menu on the unit to manage connections.
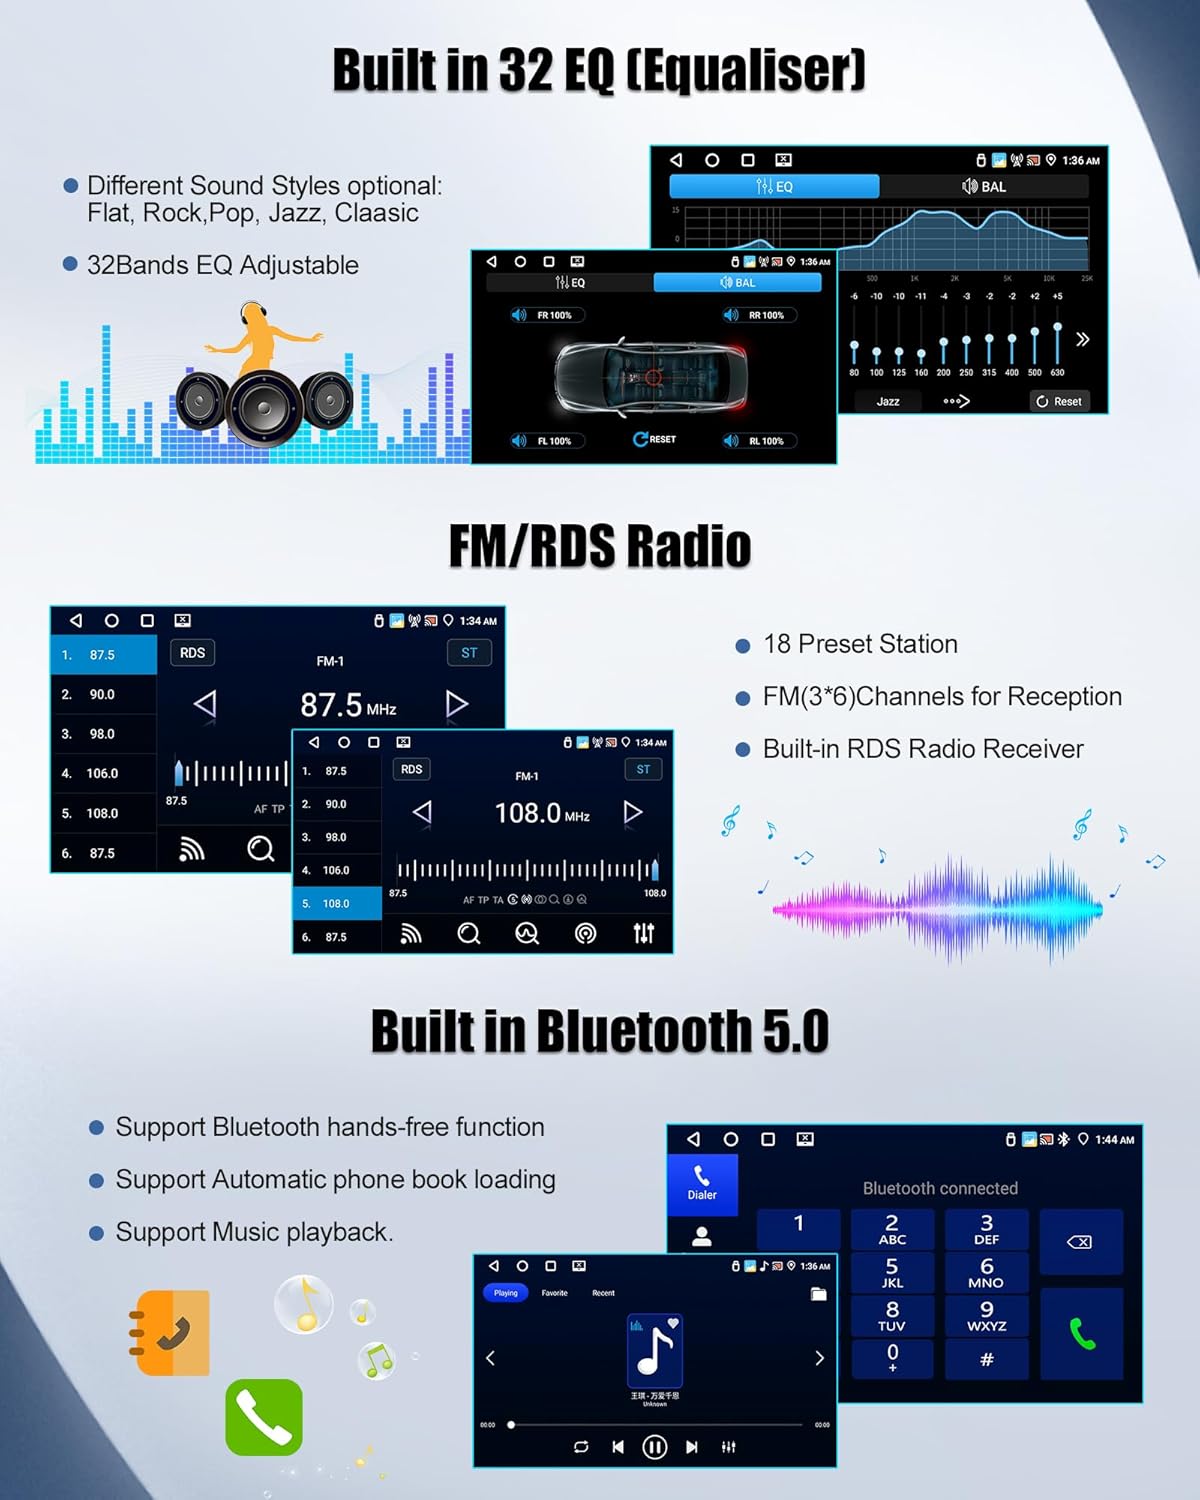
Figure 7: Bluetooth 5.0 Interface
7. FM/RDS Radio
Tune into your favorite radio stations. The built-in RDS (Radio Data System) provides additional information such as station name and program type. You can save up to 18 preset stations.
8. 32-Band Equalizer (EQ)
Customize your audio experience using the 32-band equalizer. Select from various sound styles (e.g., Jazz, Classic, Rock) or manually adjust frequencies to achieve your preferred sound profile.

Figure 8: 32-Band Equalizer Settings
9. Steering Wheel Control
If your vehicle supports it, you can configure the car radio to work with your existing steering wheel controls. This allows you to manage audio and other functions without taking your hands off the wheel. Refer to the unit's settings for steering wheel control mapping.

Figure 9: Steering Wheel Control Configuration
10. Reversing Camera Function
When the vehicle is shifted into reverse gear, the display will automatically switch to the rear camera view, providing a clear, wide-angle image for safer parking. The camera is IP67 waterproof for reliable performance.

Figure 10: Reversing Camera View
Maintenance
- Screen Cleaning: Use a soft, lint-free cloth to clean the touchscreen. Do not use abrasive cleaners or solvents.
- Software Updates: Periodically check for software updates through the unit's settings menu to ensure optimal performance and access to new features.
- General Care: Avoid exposing the unit to extreme temperatures, direct sunlight for prolonged periods, or excessive moisture.
Troubleshooting
| Problem | Possible Cause | Solution |
|---|---|---|
| Unit does not power on. | Loose power connection, blown fuse, vehicle ignition off. | Check power cable connections. Inspect vehicle fuses. Ensure ignition is on. |
| No sound. | Volume too low, mute activated, speaker wiring issue. | Increase volume. Check mute status. Verify speaker connections. |
| GPS signal lost or inaccurate. | GPS antenna obstructed or improperly connected. | Ensure GPS antenna has a clear view of the sky and is securely connected. |
| Bluetooth not connecting. | Device not in pairing mode, incorrect pairing code, Bluetooth off. | Ensure both devices are in pairing mode. Re-enter pairing code. Turn Bluetooth on for both devices. |
| Rear camera not displaying. | Incorrect wiring, camera malfunction, vehicle not in reverse. | Verify camera wiring (refer to Installation section). Check camera functionality. Ensure vehicle is in reverse. |
Specifications
- Model: 1
- Operating System: Android 13
- RAM: 4GB
- ROM: 64GB
- Display Size: 9 Inches
- Display Type: Touch Screen
- Connectivity: Bluetooth 5.0, USB, Wi-Fi
- Special Features: Wireless CarPlay, Wireless Android Auto, Mirror Link, Built-in GPS, FM/RDS Radio, 32-Band EQ, Steering Wheel Control Support, Rear Camera Input.
- Product Dimensions: 32 x 22.5 x 9.5 cm
- Item Weight: 1.28 Kilograms
- Applicable Vehicle Models: Suzuki Splash Ritz / Opel Agila (2004-2014)

Figure 11: Core System Specifications
Warranty and Support
For any questions regarding our products, both before and after sale, we provide 24-hour customer service.
Please contact us at: SIXWINVIP@126.com

Figure 12: Customer Support Contact Information


