Product Overview
This manual provides detailed instructions for the assembly, operation, and maintenance of your new Airynee Corner Bar Cabinet. Designed to maximize space, this 5-tier cabinet features a built-in power outlet with USB ports, dynamic RGB LED lighting, and ample storage for your bar essentials. Its industrial design and robust construction ensure both functionality and durability.

Figure 1: The Airynee Corner Bar Cabinet, showcasing its integrated LED lighting and storage capabilities.
Important Safety Information
Please read and understand all safety warnings before assembly and use. Failure to follow these instructions may result in injury or damage to the product.
- Proper Installation: Ensure proper installation to prevent tipping. Always use the included anti-toppling fittings to secure the cabinet to a wall, especially in households with children or pets.
- Moving Parts & Edges: Keep fingers and hands away from moving parts or sharp edges during assembly and adjustment.
- Electrical Safety: Ensure the area is dry before plugging in the power outlet. Avoid overloading the power outlet. Do not use damaged cords or plugs.
- Weight Capacity: Do not exceed the recommended weight capacity for each shelf. Refer to the specifications section for details.
- Cleaning: Disconnect power before cleaning electrical components. Use only dry or slightly damp cloths for cleaning surfaces.
Setup and Assembly
Assembly of the Airynee Corner Bar Cabinet requires basic household tools and can typically be completed by one or two adults. Please ensure all parts are present before beginning.
1. Unpacking and Part Identification
- Carefully unpack all components from the packaging. Lay them out on a clean, soft surface to prevent scratches.
- Identify all parts against the provided parts list (not included in this manual, refer to your product packaging). Ensure all hardware (screws, dowels, cam locks, etc.) is accounted for.
2. Assembly Steps
- Base Assembly: Begin by assembling the base frame of the cabinet. Attach the legs and ensure they are stable.
- Lower Cabinet Construction: Assemble the lower cabinet section, including the side panels and the bottom shelf. Attach the magnetic transparent doors.
- Upper Frame Assembly: Construct the upper open shelving unit, connecting the vertical supports and horizontal shelves. Note the X-braced supports for added stability.
- Combine Sections: Carefully align and attach the upper shelving unit to the lower cabinet base.
- Install Wine Glass Holder: Securely attach the wine glass holder to the designated area on the upper section.
- Install Power Outlet and LED Strip: Integrate the power outlet and USB charging station into its designated slot. Install the LED light strip along the interior edges of the shelves as per instructions.
- Adjustable Feet: Adjust the leg pads at the bottom of the cabinet to ensure it is level and stable on uneven flooring.
- Anti-Tipping Kit: Crucially, install the anti-tipping fittings to a sturdy wall stud using appropriate hardware. This prevents accidental tipping.

Figure 2: Key features such as the wine glass holder, LED light strip, adjustable leg pads, anti-tipping kits, and waterproof countertop, which are integrated during assembly.
Operating Instructions
1. Using the Charging Station
The cabinet is equipped with a convenient charging station featuring 3 standard AC power outlets and 2 USB ports. The power cord is 4.9 feet long.
- Power Connection: Plug the cabinet's power cord into a standard 120V wall outlet.
- AC Outlets: Use the 125V/12A AC outlets for small appliances such as coffee makers, blenders, or other bar accessories.
- USB Ports: Use the 5V/2.1A USB ports to charge mobile phones, tablets, or other USB-powered devices.
- Overload Protection: Avoid plugging in high-power appliances simultaneously to prevent overloading the circuit.

Figure 3: The integrated charging station with AC and USB ports for convenient power access.
2. Controlling the LED Lighting
The integrated RGB LED lights offer a wide range of customization options to enhance your space.
- Color Selection: Choose from over 60,000 colors to match your mood or decor.
- Flashing Modes: Select from multiple dynamic flashing modes for party settings or ambient effects.
- App Control: Download the dedicated mobile application (refer to the LED light kit instructions for app name and QR code) to control the lights directly from your smartphone.
- Music Sync: Utilize the built-in music sync feature to make the lights change color and intensity in rhythm with your favorite music.
- Timing Function: Set schedules for the lights to turn on or off automatically.

Figure 4: The RGB LED lighting system offers extensive color options and smart control features.
3. Utilizing Storage Space
The cabinet is designed for efficient storage and display of your bar and kitchen items.
- Open Countertops: The three open countertops on the top section are ideal for placing juicers, coffee machines, fruit plates, or decorative items.
- Wine Glass Holder: The top wine rack is capable of holding up to 6 tall glasses securely.
- Lower Storage Cabinet: The double-layer storage cabinet with two magnetic transparent doors provides enclosed storage for bottles, glasses, or other accessories, protecting them from dust.
- Pentagon Shelves: The unique pentagon-shaped shelves offer increased storage space compared to traditional triangular designs.

Figure 5: The transparent doors of the lower cabinet provide both display and dust protection, and are easy to clean.
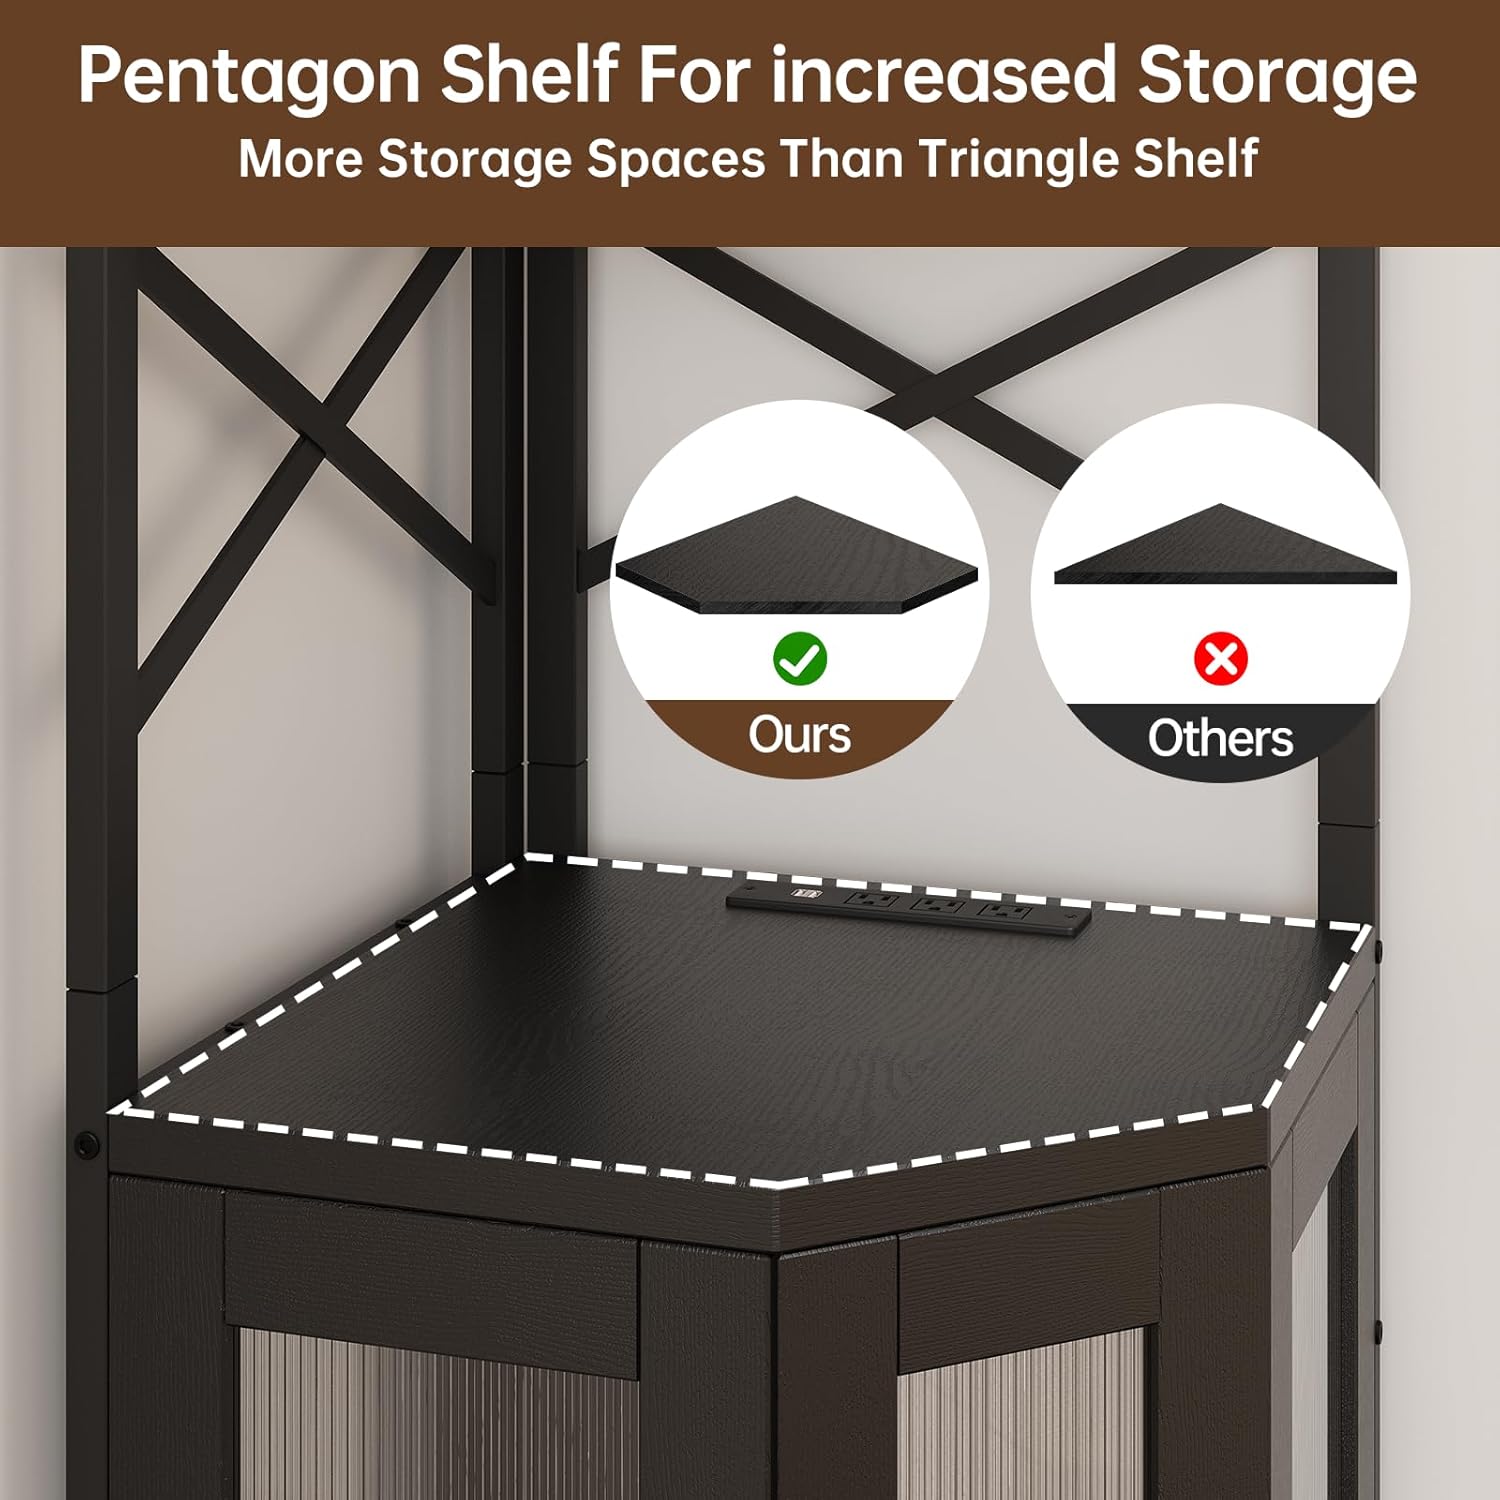
Figure 6: The pentagon shelf design maximizes usable storage area within the corner unit.
Care and Maintenance
Regular care will help maintain the appearance and longevity of your corner bar cabinet.
- Cleaning Surfaces: Wipe down all surfaces with a soft, dry cloth. For stubborn marks, a slightly damp cloth with mild soap can be used, followed immediately by drying. Avoid harsh chemicals or abrasive cleaners.
- Glass Doors: Clean the transparent doors with a glass cleaner and a lint-free cloth.
- Electrical Components: Before cleaning the power outlet or LED strip, ensure the cabinet is unplugged from the wall outlet. Wipe these components with a dry cloth only.
- Stability Check: Periodically check all screws and connections to ensure they remain tight. Re-tighten if necessary. Verify that the anti-tipping fittings are securely attached to the wall.
- Waterproof Countertop: While the countertop is designed to be waterproof, promptly wipe up any spills to prevent potential damage or staining.
Troubleshooting Guide
This section addresses common issues you might encounter with your corner bar cabinet.
| Problem | Possible Cause | Solution |
|---|---|---|
| LED lights not turning on or flickering. |
|
|
| Charging station (AC/USB) not providing power. |
|
|
| Cabinet feels unstable or wobbly. |
|
|
| Doors not closing properly. |
|
|
Product Specifications
| Feature | Detail |
|---|---|
| Brand | Airynee |
| Model Number | B0F29KV6DP |
| Color | Black |
| Product Dimensions (D x W x H) | 17.5"D x 17.5"W x 63.7"H |
| Item Weight | 46.9 pounds |
| Material | Oak Wood (Frame), MDF Board (Construction) |
| Number of Tiers | 5 |
| Number of Shelves | 3 (open shelves) |
| Power Outlet | 3 x 125V/12A AC Outlets |
| USB Ports | 2 x 5V/2.1A USB Ports |
| Power Cord Length | 4.9 feet |
| LED Lighting | RGB, 60,000+ colors, multiple modes, music sync, app control, timing function |
| Mounting Type | Freestanding with Anti-Tipping Kit |
| Assembly Required | Yes |

Figure 7: Detailed dimensions and weight capacities for the Airynee Corner Bar Cabinet.
Warranty and Customer Support
Airynee is committed to providing high-quality products. While specific warranty details are typically provided with your purchase documentation, general support is available for product inquiries, assembly assistance, or troubleshooting.
For any questions or assistance, please contact Airynee customer support through the retailer's platform where you purchased the product, or visit the official Airynee brand store online. Please have your model number (B0F29KV6DP) and purchase date ready when contacting support.
Online Resources: