1. Introduction
This manual provides detailed instructions for the installation, operation, and maintenance of your POWLSOJX 60A MPPT Solar Charge Controller. Please read this manual thoroughly before using the product to ensure proper function and safety. This controller is designed to efficiently manage power from your solar panels to charge various battery types in 12V/24V systems.
2. Product Features
- Efficient MPPT Charging: Achieves 99% Maximum Power Point Tracking (MPPT) efficiency, improving solar energy system power generation by 15%-20% compared to conventional PWM methods.
- Battery Compatibility: Supports automatic recognition of battery voltage (12V/24V) and offers various charging programs for gel, sealed, open, and customized battery types.
- Comprehensive Security: Includes safety protection measures such as limited current charging, temperature compensation, and over-temperature protection.
- Intuitive LCD Display: Features a large LCD for real-time monitoring of battery and solar panel status, mode control, load output status, and various parameters.
- Efficient Heat Dissipation: Designed with high-quality engineering heat dissipation aluminum motherboards and dual fans for effective cooling, ensuring device safety and longevity.
3. Safety Precautions
The POWLSOJX MPPT Solar Charge Controller incorporates multiple protection features to ensure safe operation. Always adhere to electrical safety guidelines during installation and use.

Image: Certified Protection features of the POWLSOJX MPPT Solar Charge Controller.
This image displays the solar charge controller and icons representing its safety features, including Reverse Current Protection, Protection Against Reverse Polarity, Short-circuiting Protection, Overtemperature Protection, Overpower Protection, Overcharging Protection, Overload Protection, Over-discharging Protection, and TVS Lightning Protection.
- Reverse Current Protection: Prevents current from flowing back to the solar panels at night.
- Reverse Polarity Protection: Protects the controller and battery from damage if connected incorrectly.
- Short-circuiting Protection: Safeguards against short circuits in the solar panel, battery, or load circuits.
- Overtemperature Protection: Shuts down or reduces charging current if the controller's internal temperature exceeds safe limits.
- Overpower Protection: Prevents damage from excessive power input.
- Overcharging Protection: Stops charging when the battery reaches its full capacity to prevent damage.
- Overload Protection: Protects the load circuit from excessive current draw.
- Over-discharging Protection: Disconnects the load when the battery voltage drops below a safe level.
- TVS Lightning Protection: Provides protection against lightning strikes.
4. Product Overview
The POWLSOJX MPPT Solar Charge Controller features a compact design with an intuitive LCD display for easy monitoring and control.

Image: Physical dimensions of the solar charge controller.
This image illustrates the dimensions of the 50A/60A model, which is 186mm wide and 230mm high, compared to the smaller 30A/40A model (186mm wide, 196mm high).
The 60A model measures approximately 186mm (width) x 230mm (height). It is equipped with an LCD screen and control buttons (ESC, Up, Down, SET) for user interaction.
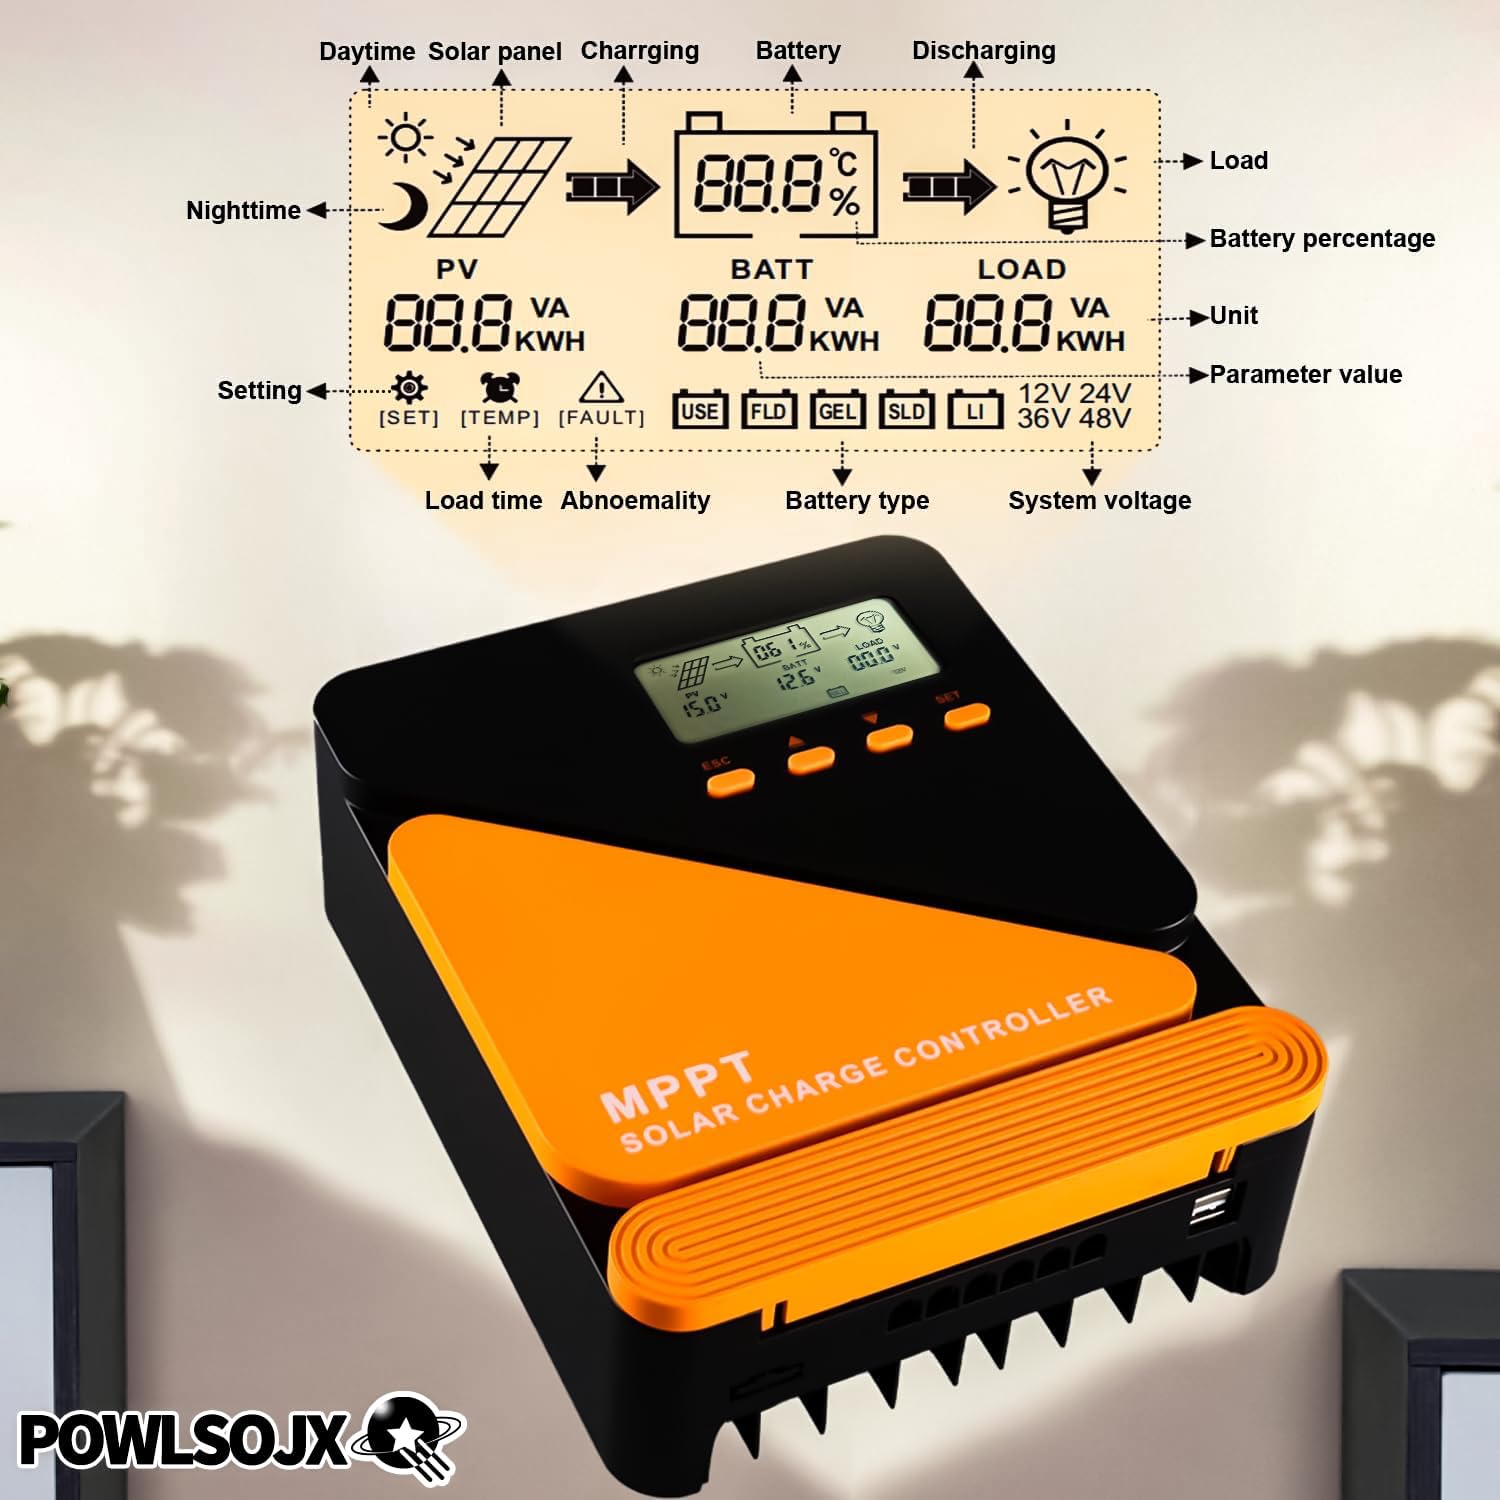
Image: Detailed LCD display and control buttons.
This image highlights the LCD display, showing various parameters such as PV voltage, battery voltage, load status, battery percentage, and system voltage. It also indicates the control buttons: ESC, Up, Down, and SET, used for navigation and parameter adjustment.
5. Setup and Installation
Proper installation is crucial for the safe and efficient operation of your solar charge controller. Follow the connection diagram carefully.
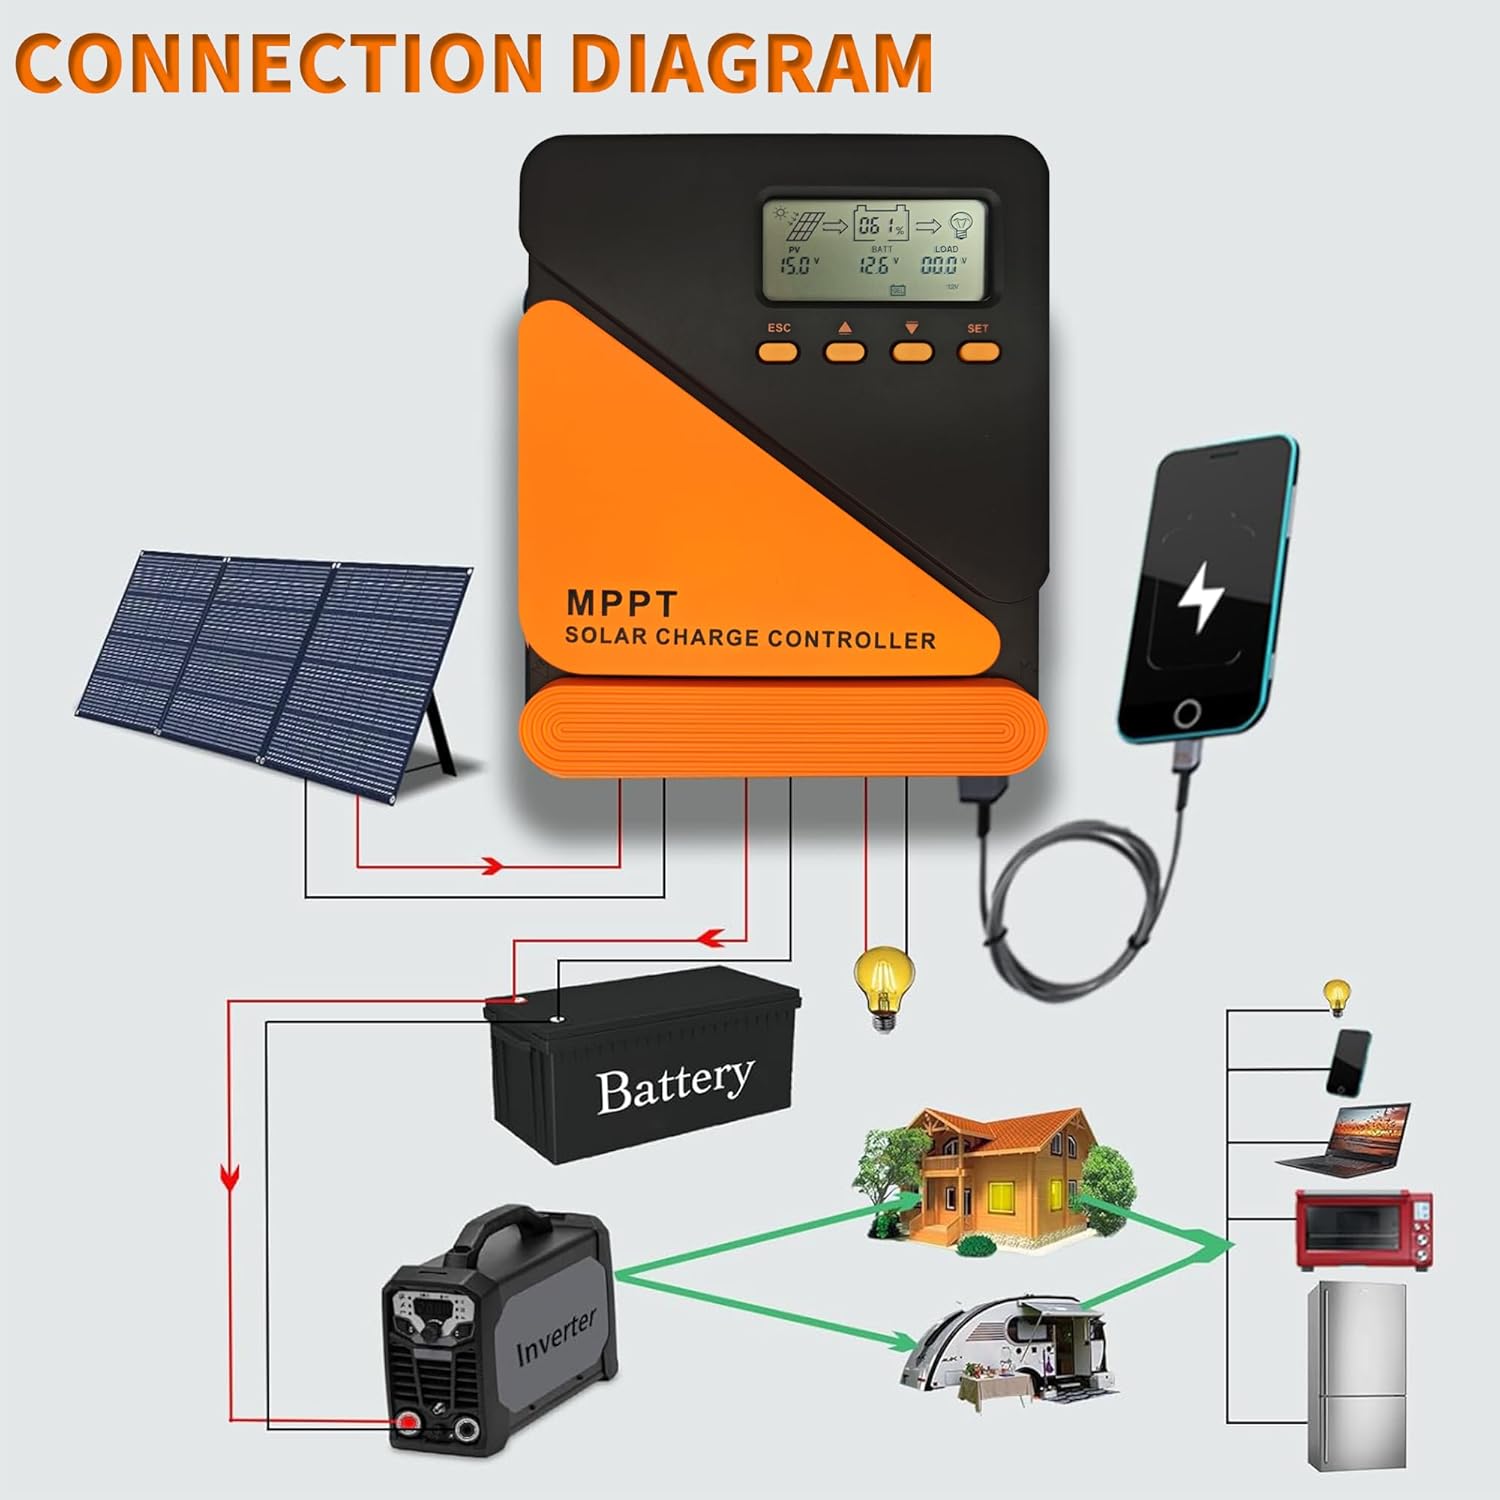
Image: Connection Diagram.
This diagram illustrates the correct wiring sequence: connect the battery first, then the solar panel, and finally the load. It shows solar panels connected to the controller, the controller connected to a battery, and the battery supplying power to an inverter, which then powers household appliances, as well as directly powering a light bulb.
- Connect the Battery: Connect the battery to the charge controller first. Ensure correct polarity (positive to positive, negative to negative). The controller will automatically detect the battery voltage (12V or 24V).
- Connect the Solar Panel: Connect the solar panels to the charge controller. Ensure correct polarity. The controller will begin charging the battery.
- Connect the Load: Connect your DC loads to the charge controller's load terminals. Do not exceed the maximum rated current for the load output.
Important: Always connect the battery first and disconnect it last. This sequence prevents potential damage to the controller from voltage surges.
6. Operating Instructions
6.1. LCD Display and Buttons
The LCD display provides real-time system information. Use the four buttons (ESC, Up, Down, SET) to navigate menus and adjust settings.
- ESC: Exit current menu or cancel setting.
- Up/Down Arrows: Navigate through menu options or adjust parameter values.
- SET: Enter menu, confirm selection, or save setting.
6.2. Battery Type Selection
The controller supports various battery types. It is essential to select the correct battery type for optimal charging and battery longevity.
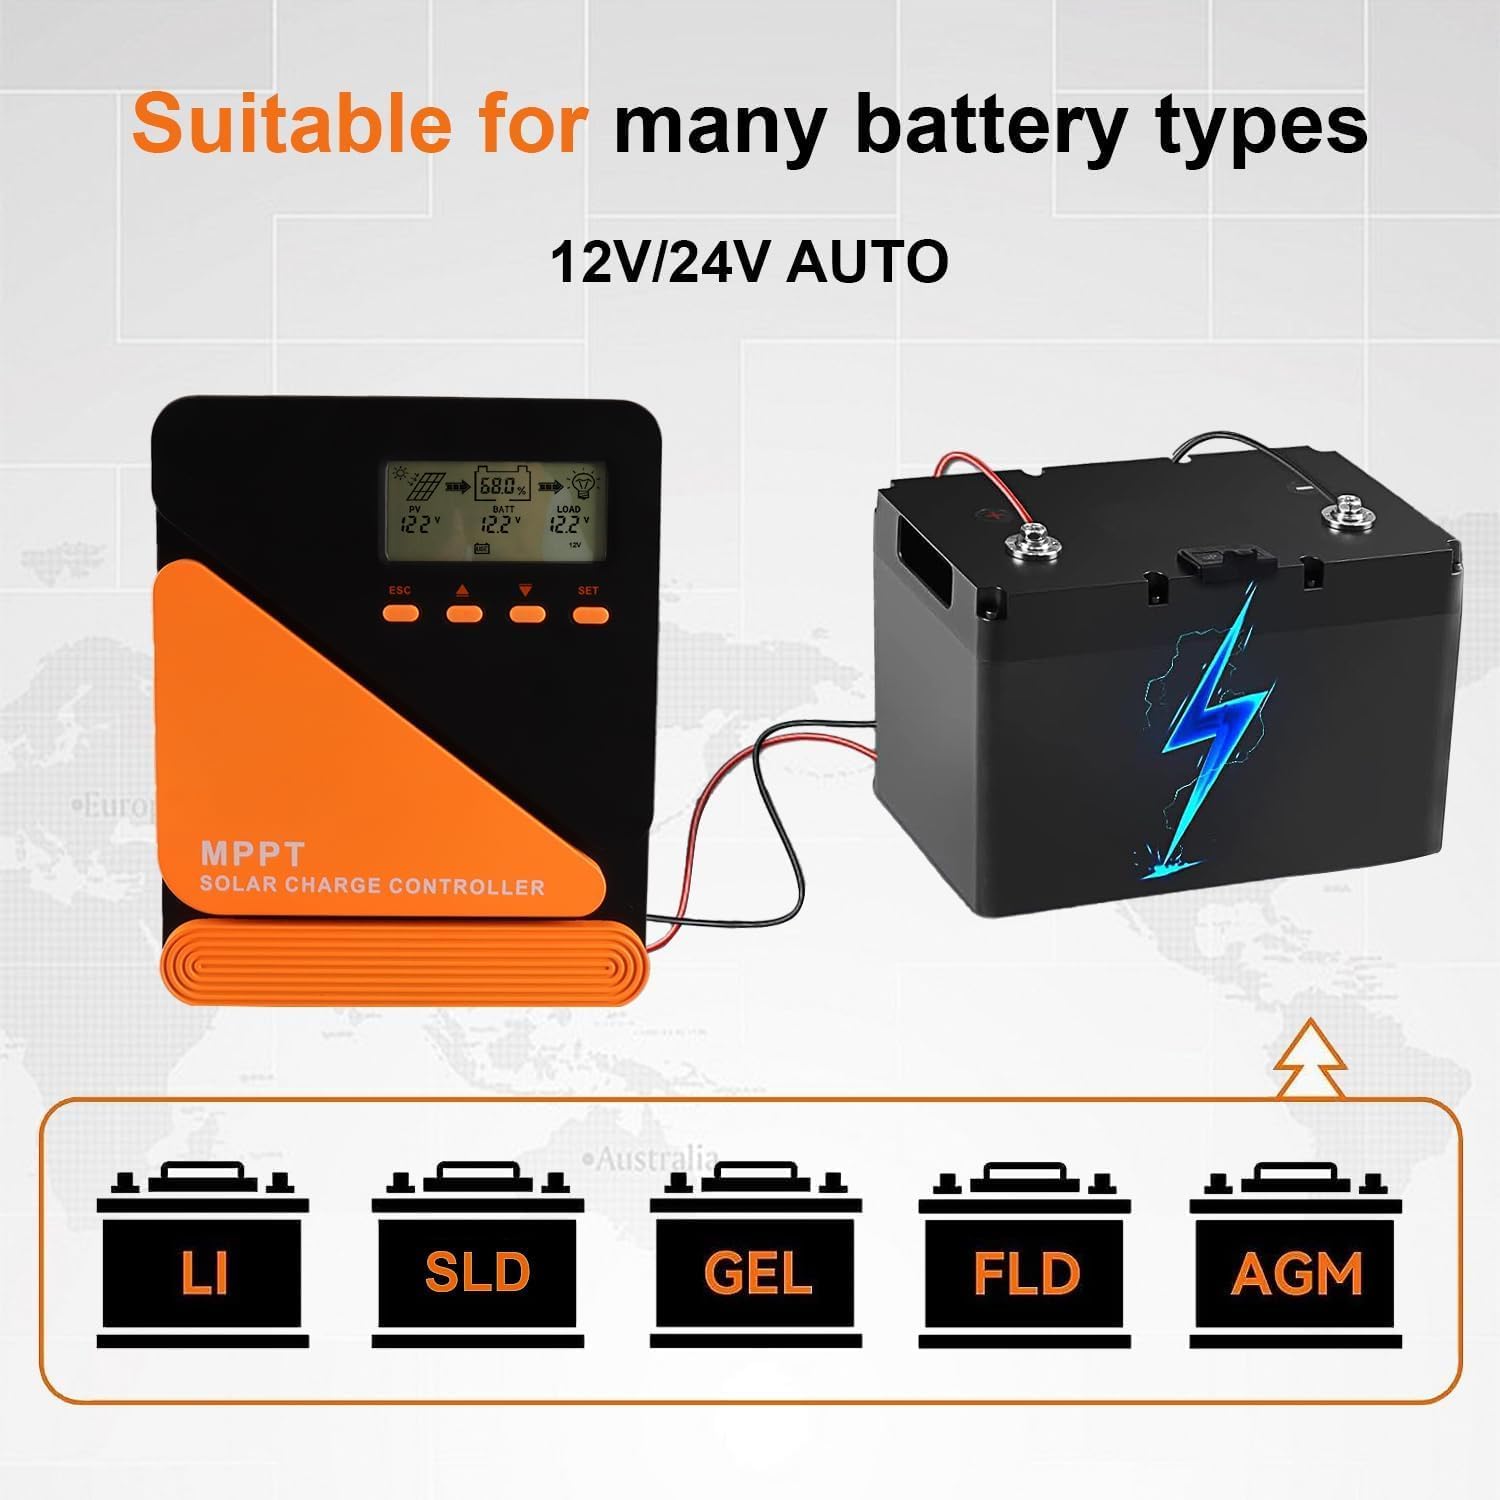
Image: Supported Battery Types.
This image shows the controller connected to a battery, with icons indicating support for Lithium (LI), Sealed Lead-Acid (SLD), Gel, Flooded (FLD), and AGM battery types. The controller automatically detects 12V/24V systems.
To select the battery type:
- Press the SET button to enter the main menu.
- Use the Up/Down arrows to navigate to the battery type setting.
- Press SET to select, then use Up/Down to choose your battery type (e.g., LI for Lithium, SLD for Sealed, GEL, FLD for Flooded, AGM).
- Press SET again to confirm and save.
7. Maintenance
Regular maintenance ensures the longevity and optimal performance of your solar charge controller.
7.1. Heat Dissipation
The controller features an efficient heat dissipation design with dual fans to maintain optimal operating temperature.

Image: Efficient Heat Dissipation Design with Dual Fan Cooling.
This image shows the solar charge controller and a close-up of its dual cooling fans. The text indicates that powerful fans quickly cool the controller and operate effectively even in hot weather, starting automatically when the temperature is high.
- Ensure the controller is installed in a well-ventilated area, free from obstructions that could block airflow to the fans.
- Periodically check the fan vents for dust accumulation and clean them gently with a soft brush or compressed air.
- Avoid installing the controller in direct sunlight or enclosed spaces where heat can build up.
7.2. General Care
- Keep the controller clean and dry. Wipe the exterior with a soft, damp cloth. Do not use harsh chemicals or abrasive cleaners.
- Regularly inspect all wiring connections to ensure they are secure and free from corrosion.
- Monitor the LCD display for any error codes or unusual readings.
8. Troubleshooting
If you encounter issues with your POWLSOJX MPPT Solar Charge Controller, consider the following general troubleshooting steps:
- No Display/Power: Check all battery connections. Ensure the battery is charged above the minimum operating voltage. Verify that the battery fuse (if installed) is intact.
- No Charging: Check solar panel connections and ensure they are receiving adequate sunlight. Verify solar panel voltage is within the controller's operating range. Ensure the battery type is correctly selected.
- Load Not Working: Check load connections and ensure the load is not exceeding the controller's rated output current. Verify that the load output is enabled in the controller settings. Check for short circuits in the load wiring.
- Error Codes: Refer to the specific error code displayed on the LCD (if any) and consult the manufacturer's support for detailed explanations and solutions.
- Overheating: Ensure proper ventilation around the controller. Clean any dust from the cooling fans and vents. Reduce the load or solar input if operating in extremely hot conditions.
For persistent issues, please contact POWLSOJX customer support.
9. Specifications
| Feature | Specification |
|---|---|
| Model Number | GM-60A |
| Brand | POWLSOJX |
| Current Rating | 60A (as per product title) |
| System Voltage | 12V/24V Automatic Identification |
| Display Type | LCD |
| Product Dimensions | 10.63 x 8.66 x 3.93 inches (27 x 22 x 10 cm) |
| Item Weight | 3.5 pounds (1.59 kg) |
| Material | Plastic |
| Batteries Required | No (for controller operation) |
| Included Components | Solar Charge Controller |
| UPC | 053701184876 |
10. Warranty and Support
For warranty information and technical support, please contact POWLSOJX directly through their official channels or the retailer from whom you purchased the product. Keep your purchase receipt as proof of purchase.


