
KAER 23-25
KAER 23-25 Biometric Gun Safe Instruction Manual
Model: 23-25
1. Introduction
This manual provides essential instructions for the safe and effective use of your KAER 23-25 Biometric Gun Safe. Please read this manual thoroughly before operating the safe and retain it for future reference. Proper installation and operation are crucial for ensuring the security of your firearms and valuables.

Image: The KAER 23-25 Biometric Gun Safe, showing its exterior design and interior capacity for rifles and pistols.
2. Important Safety Information
- Always store firearms unloaded and locked.
- Keep emergency keys in a secure location away from the safe and out of reach of children.
- Do not store the safe's keys or digital password near the safe.
- Ensure the safe is securely mounted to a wall or floor to prevent unauthorized removal or tipping.
- Keep children and unauthorized individuals away from the safe.
3. Package Contents
Verify that all components are present before proceeding with installation and setup:
- 1 x Assembled KAER Biometric Gun Safe
- 1 x User Manual (this document)
- 2 x Emergency Keys
- 3 x Removable Gun Racks
- 4 x Expansion Screws (for mounting)
4. Setup and Installation
The KAER 23-25 Biometric Gun Safe comes fully assembled, simplifying the setup process. Securely mounting the safe is critical for preventing unauthorized removal and ensuring stability.
4.1 Mounting the Safe
It is highly recommended to secure the safe to a wall or floor using the provided expansion bolts.
- Step 1: Position the Safe. Choose a suitable location for the safe. Mark the drilling points on the wall or floor through the pre-drilled holes at the back or bottom of the safe.
- Step 2: Drill Holes. Using an appropriate drill bit for your wall/floor material, drill holes at the marked positions.
- Step 3: Insert Expansion Bolts. Align the safe with the drilled holes and insert the expansion bolts. Tighten them securely to firmly anchor the safe.

Image: Visual guide for securing the safe to a wall or floor using expansion bolts.
5. Operating Instructions
5.1 Initial Access and Battery Installation
Before first use, you will need to install 4 AAA batteries (not included) into the battery compartment located behind the lock cover. Use the emergency key to open the safe for the first time.
- Open Lock Cover: Press the button under the lock cover upwards, then rotate it to the left to remove the cover.
- Insert Emergency Key: Insert one of the emergency keys into the keyhole and rotate it clockwise.
- Turn Handle: While the key is turned, rotate the handle to open the safe door.
- Install Batteries: Locate the battery box inside the door and insert 4 AAA batteries, observing polarity.

Image: Steps for emergency key access and battery installation.
5.2 Unlocking Methods
The safe offers three methods for quick access:
- Biometric Fingerprint: Fast 0.1-second recognition. Supports up to 30 fingerprints.
- Digital Password: Set a 3-12 digit PIN code.
- Emergency Keys: For manual override.

Image: Overview of the biometric, digital, and key unlocking options.
5.3 Setting Fingerprints
You can register up to 30 unique fingerprints for quick access.
- Step 1: Install Batteries. Ensure 4 AAA batteries are correctly installed.
- Step 2: Press Setup Button. With the safe door open, press the green setup button located inside the safe.
- Step 3: Scan Fingerprint. Place your finger on the fingerprint recognition area and press it 4 times, lifting your finger slightly between each press.
- Step 4: Confirmation. After hearing a "beep, beep" sound, the fingerprint is successfully registered. Repeat for additional fingerprints.

Image: Detailed steps for registering a new fingerprint.
5.4 Setting Digital Passwords
You can set up to two digital passwords (3-12 digits each).
- To Set First Password: Press "00", then press the green button inside the safe. Input your desired 3-12 digit password and press "#" to confirm.
- To Set Second Password: Press "11", then press the green button inside the safe. Input your desired 3-12 digit password and press "#" to confirm.

Image: Instructions for setting primary and secondary digital passwords.
5.5 Anti-Theft Alarm and Silent Mode
- Alarm Activation: The safe will activate a 30-second alarm and lock for 3 minutes if 5 incorrect fingerprints or 3 incorrect passwords are entered consecutively, or if violent vibration is detected.
- Silent Mode: To toggle silent mode (mute/unmute keypad sounds), press "11#".
6. Key Features
- Solid Alloy Steel Construction: Features premium 14-gauge steel door and body, with 3x 20mm high-strength solid locking bolts for enhanced security.
- Interior Organization: Includes a removable shelf, removable gun racks, pistol holders, and a storage case for ammunition and accessories.
- No Assembly Required: The safe arrives fully assembled.
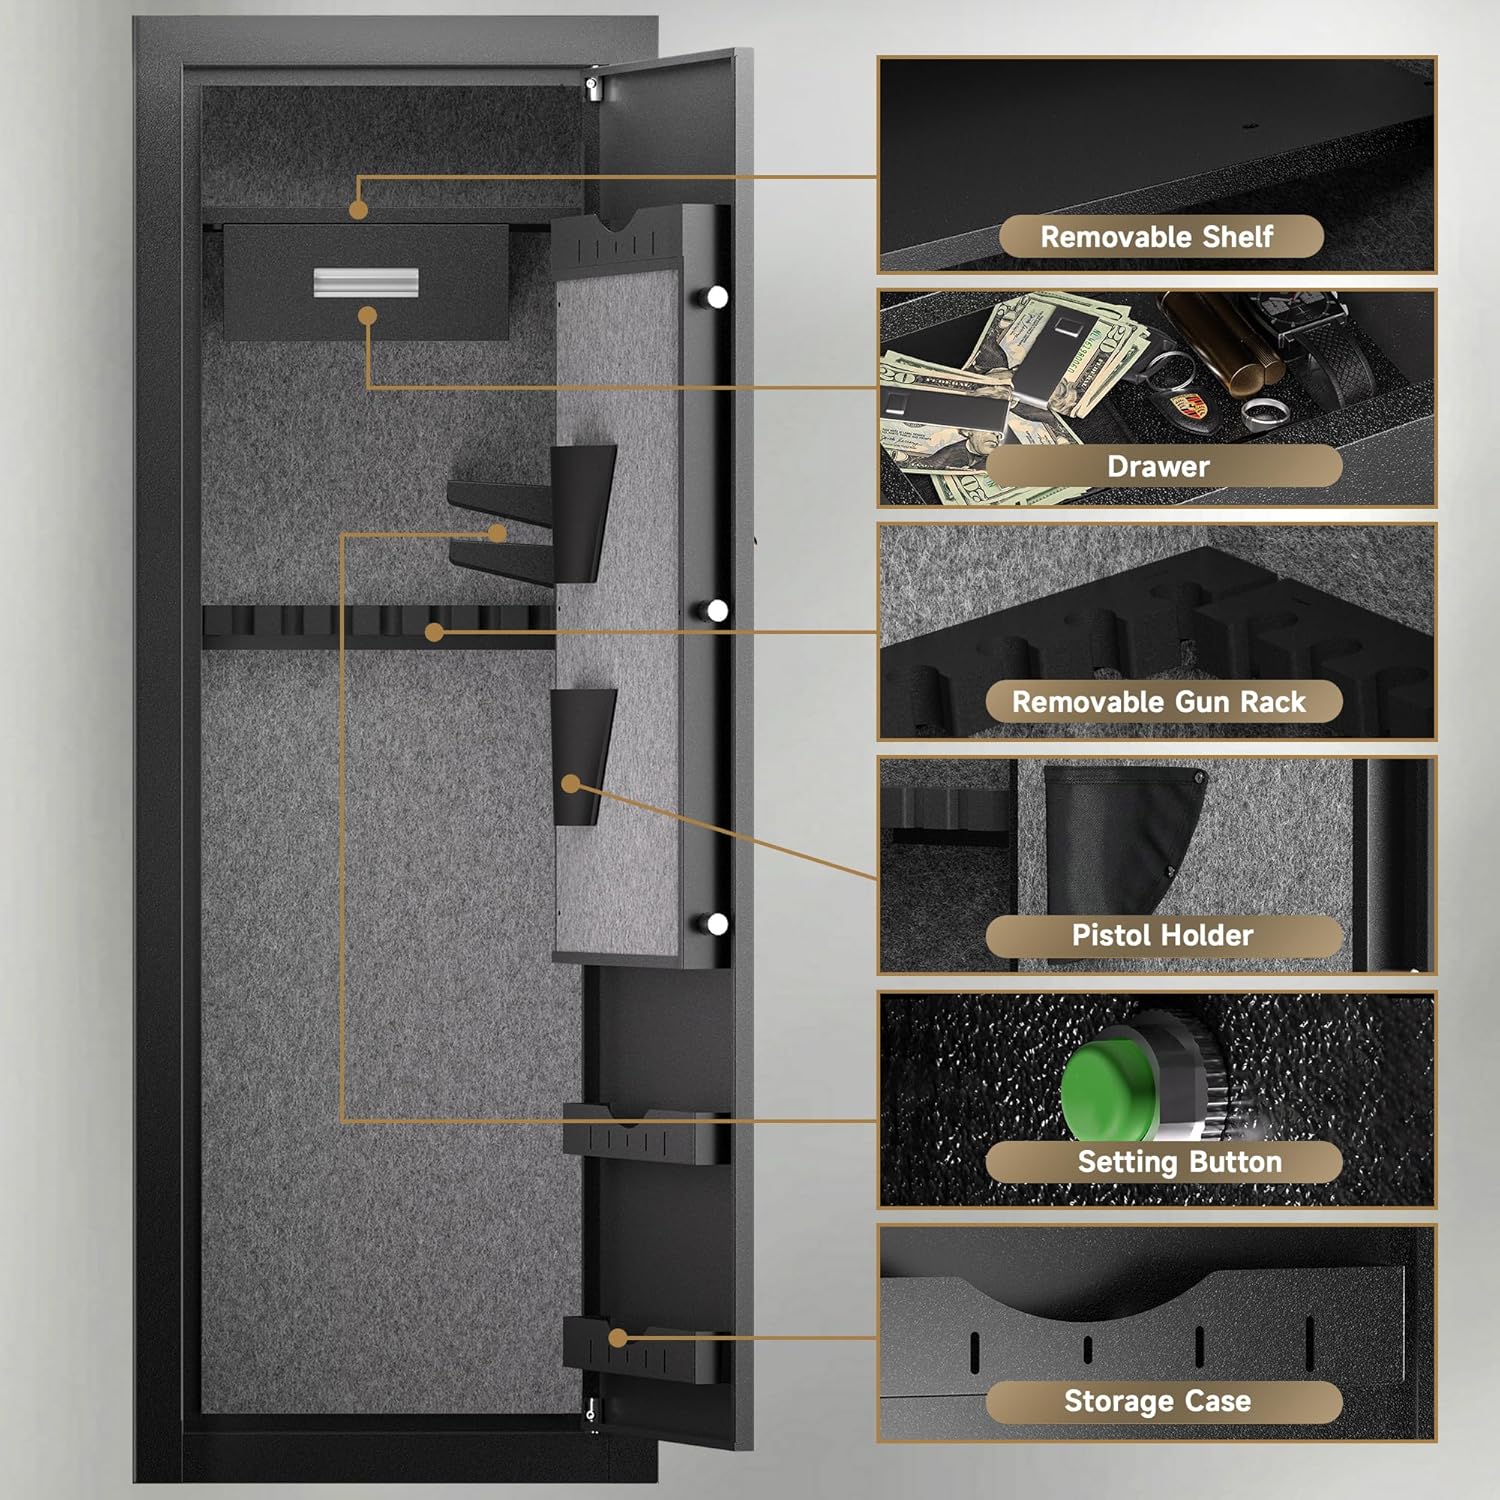
Image: Internal features of the safe, highlighting storage and organizational components.

Image: Example of firearm storage capacity within the safe.
7. Maintenance
- Battery Replacement: Replace AAA batteries annually or when the low battery indicator appears.
- Cleaning: Wipe the exterior with a soft, damp cloth. Avoid abrasive cleaners.
- Lock Mechanism: Do not lubricate the lock mechanism. If issues arise, contact customer support.
8. Troubleshooting
| Problem | Possible Cause | Solution |
|---|---|---|
| Safe does not open with fingerprint. | Fingerprint not registered, dirty sensor, or incorrect scanning technique. | Ensure finger is clean and dry. Re-register fingerprint if necessary. Try different registered finger. |
| Safe does not open with digital password. | Incorrect password entered, low batteries. | Verify password. Replace batteries. |
| No power/keypad unresponsive. | Dead or incorrectly installed batteries. | Replace all 4 AAA batteries, ensuring correct polarity. Use emergency key to open. |
| Alarm sounds unexpectedly. | Tampering attempt or accidental vibration. | Check for signs of tampering. Ensure safe is stable. |
9. Specifications
- Brand: KAER
- Model: 23-25 (Item Model Number: 43cfecc4-dba4-47c4-9d79-b280f3298cc4)
- Product Dimensions: 14.96"D x 20.47"W x 57.09"H
- Item Weight: 110 pounds
- Material: Alloy Steel (14-gauge steel door & body)
- Lock Type: Biometric + Digital
- Special Features: Anti-Theft Alarm, Biometric Fingerprint, Removable Shelf, Silent Mode
- Mounting Type: Floor Mount / Wall Mount
- UPC: 717621245627

Image: Detailed dimensions of the KAER 23-25 Biometric Gun Safe.

Image: Illustration of the solid construction layers of the safe.
10. Warranty and Customer Support
Warranty: The KAER 23-25 Biometric Gun Safe comes with a 1-Year Manufacturer's Warranty.
Customer Support: If you encounter any issues or have questions regarding your product, please contact the KAER professional after-sales team. They are available to assist you 24 hours a day.
For support, please refer to the contact information provided with your purchase documentation or visit the official KAER website.
Related documents23-25


Ask a question about this manual
Ask about setup, troubleshooting, compatibility, parts, safety, or missing instructions. Manuals+ will review the question and use this page’s manual context to help answer it.