1. Introduction
This manual provides essential information for the installation, operation, and maintenance of your Varstrom TSDZ2B, TSDZ8, or TSDZ16 mid-drive ebike conversion kit. Please read this manual thoroughly before attempting installation or operation to ensure proper function and safety.

Image 1.1: Overview of the Varstrom Mid Drive Ebike Conversion Kit, including the motor, battery options, and display unit.
2. Safety Information
Always prioritize safety when working with electrical components and bicycles. Failure to follow safety instructions may result in injury or damage to the product.
- Ensure the battery is disconnected before performing any installation or maintenance.
- Wear appropriate safety gear, including gloves and eye protection, during installation.
- Do not modify the motor or battery components. Unauthorized modifications can lead to malfunction and void the warranty.
- Keep all electrical connections dry and secure. The kit has an IPX5/IPX6 waterproof rating, but extreme exposure to water should be avoided.
- Regularly inspect all components for wear, damage, or loose connections.
- Always follow local regulations regarding ebike usage, speed limits, and power output.
3. Product Overview
The Varstrom mid-drive ebike conversion kits (TSDZ2B, TSDZ8, TSDZ16) are designed to transform standard bicycles into electric-assist bikes. These kits feature a torque-sensing motor for a natural riding experience.
3.1. Model Comparison
The kits are available in different power outputs and torque specifications. Refer to the table below for a comparison of the TSDZ2B, TSDZ8, and TSDZ16 models.

Image 3.1: Detailed comparison of TSDZ2B, TSDZ8, and TSDZ16 motor specifications, including power, voltage, torque, and waterproof ratings.
| Feature | TSDZ2B | TSDZ8 | TSDZ16 |
|---|---|---|---|
| Power | 500W | 750W | 1000W |
| Voltage | 48V | 48V | 48V |
| Max Torque | 80 N.m | 120 N.m | 160 N.m |
| Waterproof Grade | IPX5 | IPX5 | IPX6 |
| Bottom Bracket Length | 68-73mm | 68-73mm | 68-73mm |
3.2. Upgraded Features (TSDZ2B vs. TSDZ2)
The TSDZ2B model features several upgrades compared to the older TSDZ2 version, enhancing durability and performance.

Image 3.2: Visual comparison highlighting upgrades in the TSDZ2B model, including new appearance, bidirectional free-wheeling clutch, and integrated reduction gear kit.
- New Appearance: Modernized motor casing design.
- Bidirectional Free-wheeling Clutch: Allows the bike to be pedaled normally without resistance when the motor is off or power is lost.
- Integrated Reduction Gear Kit: Improved internal gear design for better reliability.
4. Compatibility
These mid-drive kits are designed for broad compatibility with various bicycle types, provided the bottom bracket dimensions meet the requirements.
4.1. Bottom Bracket Requirements
The motor is compatible with bicycles featuring a bottom bracket shell width of 68-73mm and an inner diameter between 33.5-36mm. Accurate measurement is crucial for proper fitment.

Image 4.1: Instructions for measuring your bike's bottom bracket to ensure compatibility with the mid-drive motor. It also shows examples of incompatible chainring and coaster brake setups.
4.2. Bicycle Types
The kit is suitable for a wide range of bicycles, including:
- Mountain Bikes
- Road Bikes
- City Bikes
- Foldable Bikes
- Cargo Tricycles
- Recumbent Bikes

Image 4.2: Examples of different bicycle types, such as mountain bikes, road bikes, and cargo tricycles, that are compatible with the conversion kit.
5. Packing List
Verify that all components listed below are included in your package. The specific items may vary slightly based on the chosen kit configuration (e.g., display type, battery option).

Image 5.1: A visual representation of the components included in the Varstrom mid-drive motor kit, such as the motor, brake levers, throttle, display, and various cables and tools.
- Mid-mounted motor (TSDZ2B, TSDZ8, or TSDZ16)
- Brake Levers (or brake sensors)
- Thumb Throttle
- Display Unit (e.g., EKD01, VD18MT, M58, DZ40)
- Speed Sensor
- Crank Arms
- Chainring
- Motor Extension Cable
- Cable Ties
- Installation Screws
- Wrench
- User Manual (this document)
- Optional: Battery (various types available), Quick Charger
6. Installation (Setup)
The installation process involves mounting the motor, connecting electrical components, and installing the display and sensors. While the kit is designed for plug-and-play, some mechanical aptitude is beneficial.
6.1. General Installation Steps
- Prepare Your Bicycle: Remove the existing bottom bracket, crank arms, and chainring. Clean the bottom bracket shell.
- Mount the Motor: Insert the mid-drive motor into the bottom bracket shell. Secure it using the provided locking nuts and plates. Ensure the motor is oriented correctly and does not interfere with the frame.
- Install Crank Arms and Chainring: Attach the new crank arms and chainring to the motor spindle.
- Install Speed Sensor: Mount the speed sensor on the chainstay and attach the magnet to a spoke on the rear wheel. Ensure a small gap (approx. 1.5mm) between the sensor and magnet.
- Install Brake Levers/Sensors and Throttle: Replace your existing brake levers with the ebike-compatible ones or install brake sensors. Mount the thumb throttle on the handlebar.
- Mount Display: Attach the display unit to your handlebar in a visible and accessible location.
- Wiring Connections: Connect all components (motor, display, throttle, brake sensors, speed sensor) to the main wiring harness. Ensure all connectors are fully seated and secure.
- Install Battery: Mount your chosen battery (downtube or rear rack) securely to the bicycle frame. Connect the battery to the main wiring harness.
- Cable Management: Use cable ties to neatly route and secure all cables, preventing them from snagging or interfering with moving parts.

Image 6.1: A simplified wiring diagram illustrating the connections between the motor, battery, display, and other components of the ebike conversion kit.
For detailed visual instructions, it is recommended to search for installation videos specific to TSDZ2B, TSDZ8, or TSDZ16 mid-drive kits on online video platforms.
7. Operating Instructions
Your Varstrom ebike kit offers multiple riding modes and a user-friendly display for monitoring your ride.
7.1. Powering On/Off
- To Power On: Ensure the battery is connected and switched on (if it has a separate switch). Press and hold the power button on the display unit for a few seconds.
- To Power Off: Press and hold the power button on the display unit until the screen turns off.
7.2. Riding Modes
The kit supports four distinct riding modes:
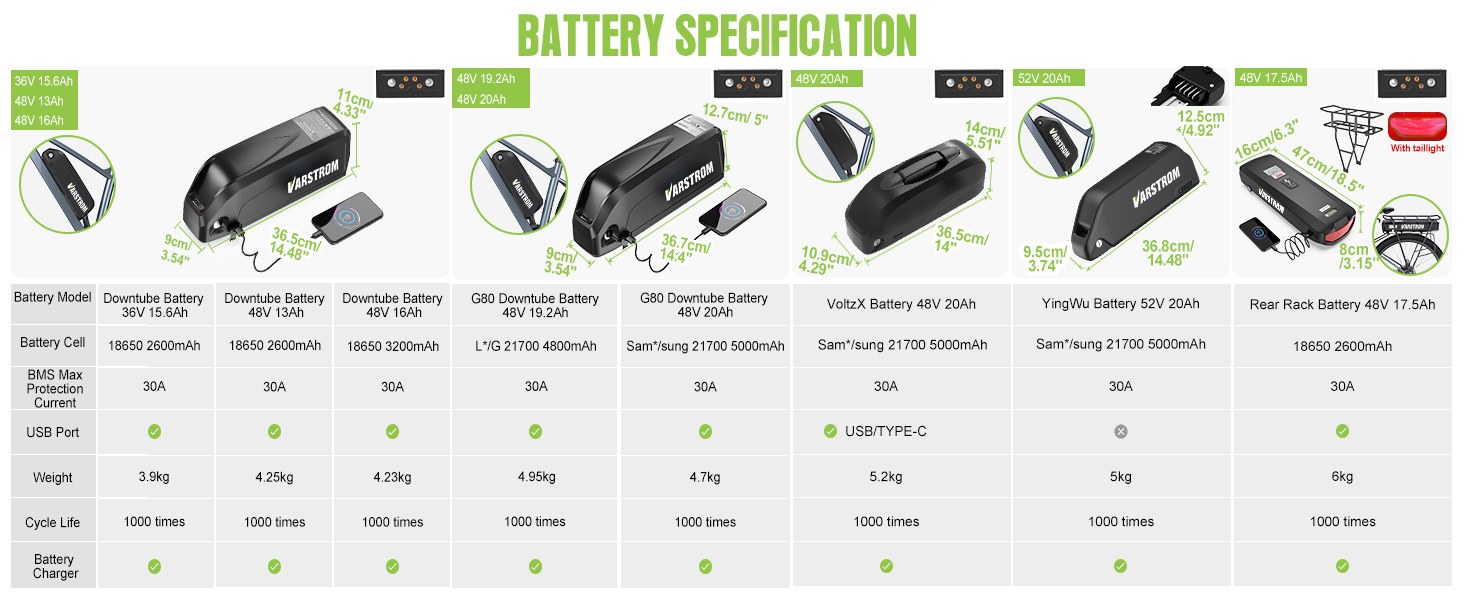
Image 7.1: Visual representation of the four available cycling modes: Pedal-only, Pedal-assist, Throttle, and Walk-assist, demonstrating the versatility of the ebike kit.
- Pedal-only Mode: The motor provides no assistance. The bike functions as a traditional bicycle.
- Pedal Assist Mode (PAS): The motor provides assistance proportional to your pedaling effort, detected by the torque sensor. You can adjust the assist level (usually 1-5) via the display.
- Throttle Mode: The motor provides power directly via the thumb throttle, without requiring pedaling. This mode is often limited by local regulations.
- Walk Assist Mode: Provides low-speed motor assistance (typically 6 km/h) to help you push the bike while walking. Activate this mode via the display or a dedicated button.
7.3. Display Functions
The display unit provides real-time information and allows you to control the kit's functions. Common display types include EKD01, VD18MT, M58, and DZ40.

Image 7.2: Comparison of different display units available for the kit, including EKD01, VD18MT, M58, and DZ40, showing their screen sizes, features, and language support.
Typical information displayed:
- Current Speed
- Assist Level
- Battery Level Indicator
- Trip Distance / Odometer
- Riding Time
- Error Codes (if any)
The EKD01 display offers advanced features like Bluetooth connectivity for navigation and ride analytics via a smartphone app.
8. Battery Options
Various battery configurations are available to suit different range and mounting preferences. All batteries feature anti-theft locks, USB ports for charging devices, certified safety systems, and clear charge indicators.

Image 8.1: A detailed table outlining specifications for various Varstrom ebike batteries, including model, cell type, BMS current, USB port availability, weight, and cycle life.
8.1. Charging the Battery
- Use only the charger provided or approved by Varstrom.
- Connect the charger to the battery's charging port, then plug it into a power outlet.
- The indicator light on the charger will show the charging status (e.g., red for charging, green for fully charged).
- Do not leave the battery charging unattended for extended periods.
8.2. Battery Care
- Store the battery in a cool, dry place, away from direct sunlight and extreme temperatures.
- Avoid fully discharging the battery. Recharge it regularly, especially if storing for long periods.
- Do not expose the battery to water or moisture.
9. Maintenance
Regular maintenance ensures the longevity and optimal performance of your ebike conversion kit.
- Cleanliness: Keep the motor, battery, and electrical connections clean and free from dirt and debris. Use a damp cloth; avoid high-pressure washing directly on electrical components.
- Cable Inspection: Periodically check all cables and connectors for signs of wear, fraying, or damage. Ensure they are securely plugged in.
- Fastener Check: Verify that all mounting bolts and screws for the motor, battery, and accessories are tight.
- Chain and Drivetrain: Maintain your bicycle's chain and drivetrain as you would a regular bike (cleaning, lubrication, tension adjustment).
- Battery Health: Follow battery care guidelines (Section 8.2) to maximize battery life.
10. Troubleshooting
This section addresses common issues you might encounter. For more complex problems, contact customer support.
| Problem | Possible Cause | Solution |
|---|---|---|
| Motor not providing assist | Battery low or off; loose connections; display error; brake sensor engaged | Check battery charge and power switch; inspect all cable connections; check display for error codes; ensure brake levers are not engaged. |
| Display not turning on | Battery off or disconnected; loose display cable | Ensure battery is on and connected; check display cable connection to the main harness. |
| Inaccurate speed reading | Speed sensor/magnet misalignment or distance | Adjust the speed sensor and magnet to ensure proper alignment and a gap of approximately 1.5mm. |
| Unusual noises from motor | Loose motor mounting; internal issue | Check motor mounting bolts for tightness. If noise persists, contact customer support. |
11. Specifications
General specifications applicable to the Varstrom mid-drive ebike conversion kits.
- Brand: Varstrom
- Models: TSDZ2B, TSDZ8, TSDZ16
- Motor Type: Mid-drive, Torque Sensor
- Power Output: 500W (TSDZ2B), 750W (TSDZ8), 1000W (TSDZ16)
- Voltage: 48V
- Max Torque: Up to 160 N.m (TSDZ16)
- Waterproof Rating: IPX5 (TSDZ2B, TSDZ8), IPX6 (TSDZ16)
- Operating Temperature: -20°C to 45°C
- Bottom Bracket Compatibility: 68-73mm shell width, 33.5-36mm inner diameter
- Material: Aluminum
12. Warranty and Support
Varstrom products typically come with a manufacturer's warranty covering defects in materials and workmanship. Specific warranty terms and duration may vary. Please retain your proof of purchase.
12.1. Customer Support
For technical assistance, warranty claims, or inquiries regarding your Varstrom ebike conversion kit, please contact the seller or Varstrom customer service through the platform where the product was purchased. Provide your order number and a detailed description of the issue for efficient support.


