
1. Product Overview
The AIRMSEN 20 Bar Espresso Machine is designed for home use, offering a versatile 3-in-1 brewing experience for espresso, cappuccino, and latte. It features an automatic milk frother, a powerful 20 bar Italian pump for optimal extraction, and a dual boiler system for efficient heating. The intuitive touchscreen interface simplifies operation, making it easy to prepare your favorite coffee beverages.

Image 1.1: The AIRMSEN Espresso Machine showcasing its high-pressure extraction, digital display, and stainless steel design.
- 3-in-1 Functionality: Prepare espresso, cappuccino, or latte with a single touch.
- Automatic Milk Frother: Creates rich, delicate foam for milk-based drinks, with a detachable design for easy cleaning.
- 20 Bar High-Pressure Extraction: Ensures full coffee saturation and extracts richer oils for a more aromatic and flavorful coffee.
- Dual Boiler System: Separate 1350W boiler for coffee extraction and 1000W boiler for milk frothing, allowing quick preparation (15 seconds for espresso).
- Full Touchscreen Control: Simplifies the brewing process with an easy-to-use LED panel.
- Durable Design: Elegant stainless steel finish, compact dimensions (20.1 cm L x 25.9 cm W x 30.5 cm H), and a large 1.8L removable water tank and 500ml milk reservoir.
2. Initial Setup
Before first use, follow these steps to ensure proper operation and hygiene.
- Unpack and Position: Carefully remove the machine from its packaging. Place it on a stable, flat, heat-resistant surface near a power outlet. Ensure adequate ventilation around the machine.
- Clean Components: Wash the water tank, milk reservoir, portafilter, and filter basket with warm, soapy water. Rinse thoroughly and dry.
- Fill Water Tank: Remove the water tank from the back of the machine. Fill it with fresh, cold water up to the MAX line. Reinsert the tank securely.
- Prime the Machine: Plug in the machine and turn it on. Place a large cup under the coffee spout. Select the 'Espresso' function without coffee in the portafilter. Allow water to run through until the tank is about half empty. This primes the pump and flushes out any manufacturing residue. Repeat for the milk frother by selecting a milk-based drink without milk in the reservoir, allowing water to run through the frother.
- Prepare Portafilter: Insert the desired filter basket into the portafilter.

Image 2.1: Detachable water tank for easy filling.

Image 2.2: Visual guide to the four-step preparation process.
3. Operating Instructions
3.1. Brewing Espresso
- Prepare Coffee Grounds: Use freshly ground coffee. For optimal results, a fine grind suitable for espresso is recommended.
- Fill Portafilter: Place the appropriate filter basket (single or double shot) into the portafilter. Fill the basket with ground coffee.
- Tamp Coffee: Use a tamper to press the coffee grounds firmly and evenly. Wipe any excess grounds from the rim of the portafilter.
- Attach Portafilter: Insert the portafilter into the group head and turn it firmly to the right until it is securely locked.
- Place Cup: Position your espresso cup(s) on the drip tray directly under the portafilter spouts.
- Select Espresso: On the touchscreen, select either the single or double espresso icon. The machine will begin brewing.
- Enjoy: Once brewing is complete, remove your cup(s).

Image 3.1: Portafilter with filter basket.

Image 3.2: High-pressure 20 bar extraction for rich espresso.
3.2. Preparing Cappuccino or Latte
- Fill Milk Reservoir: Fill the detachable milk reservoir with cold milk (dairy or non-dairy) up to the desired level. Attach the reservoir to the machine.
- Prepare Espresso: Follow steps 1-5 from "3.1. Brewing Espresso" to prepare your espresso shot(s).
- Select Drink: On the touchscreen, select either the 'Cappuccino' or 'Latte' icon. The machine will automatically froth and dispense milk into your cup, followed by the espresso.
- Enjoy: Once complete, remove your cup.

Image 3.3: Automatic milk frothing for perfect cappuccino and latte.
3.3. Touchscreen Controls
The machine features a full touchscreen interface for easy selection of functions.
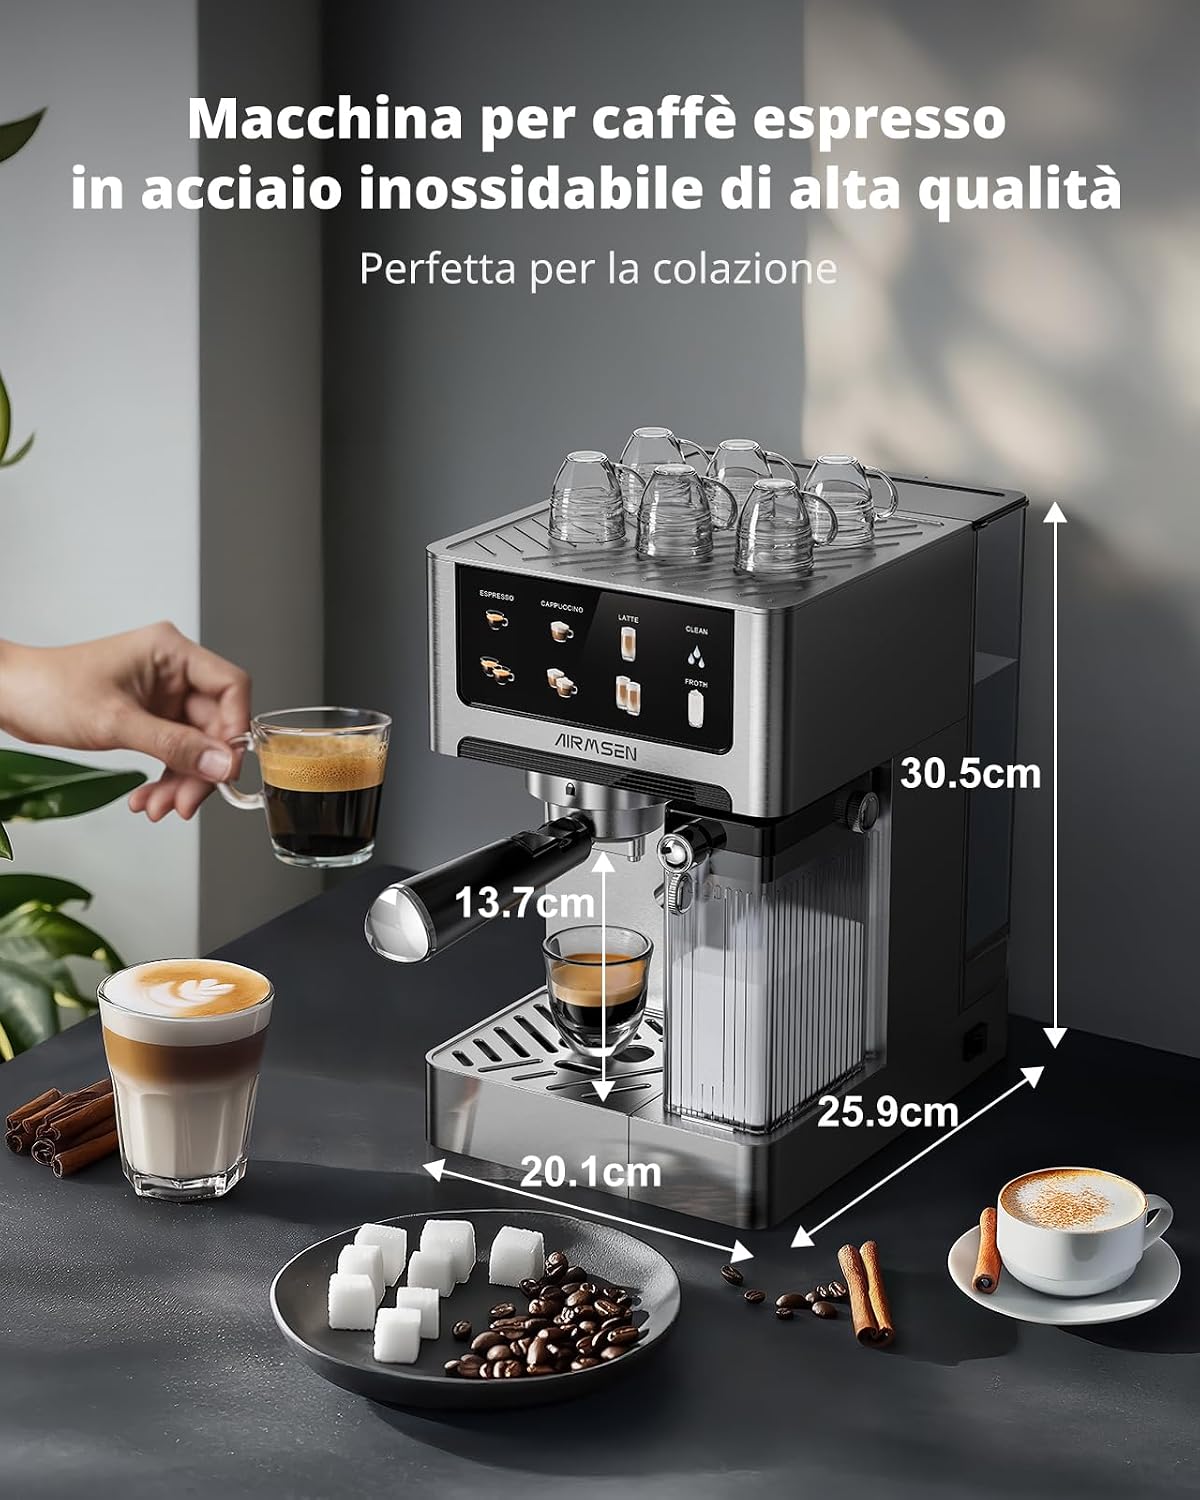
Image 3.4: Touchscreen panel with options for Espresso, Cappuccino, Latte, Clean, and Froth.
- Espresso: For single or double espresso shots.
- Cappuccino: Automatically brews espresso and froths milk for a cappuccino.
- Latte: Automatically brews espresso and froths milk for a latte.
- Clean: Initiates an automatic cleaning cycle for the milk frothing system.
- Froth: Activates the milk frother for manual frothing.
3.4. Dual Heating System
The machine is equipped with two independent heating systems for optimal performance.

Image 3.5: The dual heating system with 1350W for espresso and 1000W for milk frothing.
- 1350W Boiler: Dedicated for rapid coffee extraction.
- 1000W Boiler: Dedicated for quick milk frothing and steaming.
4. Maintenance
Regular cleaning and maintenance ensure the longevity and optimal performance of your espresso machine.
4.1. Daily Cleaning
- Drip Tray: Empty and clean the drip tray after each use or when the indicator shows it is full.
- Portafilter and Filter Basket: Remove spent coffee grounds and rinse the portafilter and filter basket under running water.
- Milk Frother System: After preparing milk-based drinks, run the automatic 'Clean' cycle on the touchscreen to flush milk residue from the frother. The milk reservoir is detachable for thorough cleaning.
- Exterior: Wipe the exterior of the machine with a damp cloth. Do not use abrasive cleaners.

Image 4.1: The removable drip tray for easy cleaning.
4.2. Descaling
Descaling should be performed regularly (e.g., every 2-3 months, depending on water hardness) to prevent mineral buildup.
- Empty the water tank and fill it with a descaling solution mixed according to the manufacturer's instructions.
- Place a large container under the coffee spout and milk frother.
- Run several cycles of espresso and milk frothing (without coffee or milk) to allow the descaling solution to flow through the internal components.
- After the descaling solution has run through, rinse the water tank and fill it with fresh water. Run several more cycles with fresh water to flush out any remaining descaling solution.
4.3. Cup Warming Tray
The top surface of the machine acts as a cup warming tray, helping to keep your cups warm for optimal coffee temperature.

Image 4.2: The integrated cup warming tray.
5. Troubleshooting
Refer to this section for common issues and their solutions.
| Problem | Possible Cause | Solution |
|---|---|---|
| No coffee dispensed | Water tank empty; machine not primed; portafilter clogged. | Fill water tank; prime the machine (see Setup); clean portafilter and filter basket. |
| Weak or watery espresso | Insufficient coffee grounds; coffee too coarsely ground; improper tamping. | Increase coffee amount; use finer grind; tamp more firmly and evenly. |
| No milk froth or poor quality froth | Milk reservoir empty; frother clogged; milk not cold enough; wrong type of milk. | Fill milk reservoir; run 'Clean' cycle; use cold milk; ensure milk is suitable for frothing. |
| Machine not turning on | Power cord not properly connected; power outlet issue. | Check power cord connection; try a different power outlet. |
| Display unresponsive | Temporary software glitch. | Unplug the machine for 30 seconds, then plug it back in and restart. |
6. Technical Specifications

Image 6.1: Product dimensions for placement reference.
| Feature | Detail |
|---|---|
| Brand | AIRMSEN |
| Model Number | BCM2308 |
| Pressure | 20 Bar |
| Coffee Extraction Power | 1350W |
| Milk Frothing Power | 1000W |
| Water Tank Capacity | 1.8 Liters |
| Milk Reservoir Capacity | 500 ml |
| Dimensions (D x W x H) | 30 cm x 20 cm x 35 cm |
| Material | Stainless Steel, Plastic |
| Input Interface | Touchscreen |
| Coffee Type Used | Ground Coffee |
| Special Features | Automatic Milk Frother, Dual Boiler, Auto-Cleaning, Cup Warmer, Permanent Filter |
7. Warranty and Customer Support
For warranty information, claims, or any technical assistance, please refer to the warranty card included with your product or contact AIRMSEN customer support directly. Keep your proof of purchase for warranty validation.
Note: No official product videos were provided in the product data for embedding in this manual.


