1. Introduction
Thank you for choosing the XJ-HOME H01 All-in-One Vinyl Record Player. This manual provides essential information for the proper setup, operation, and maintenance of your new turntable. Please read it thoroughly before use and retain it for future reference.
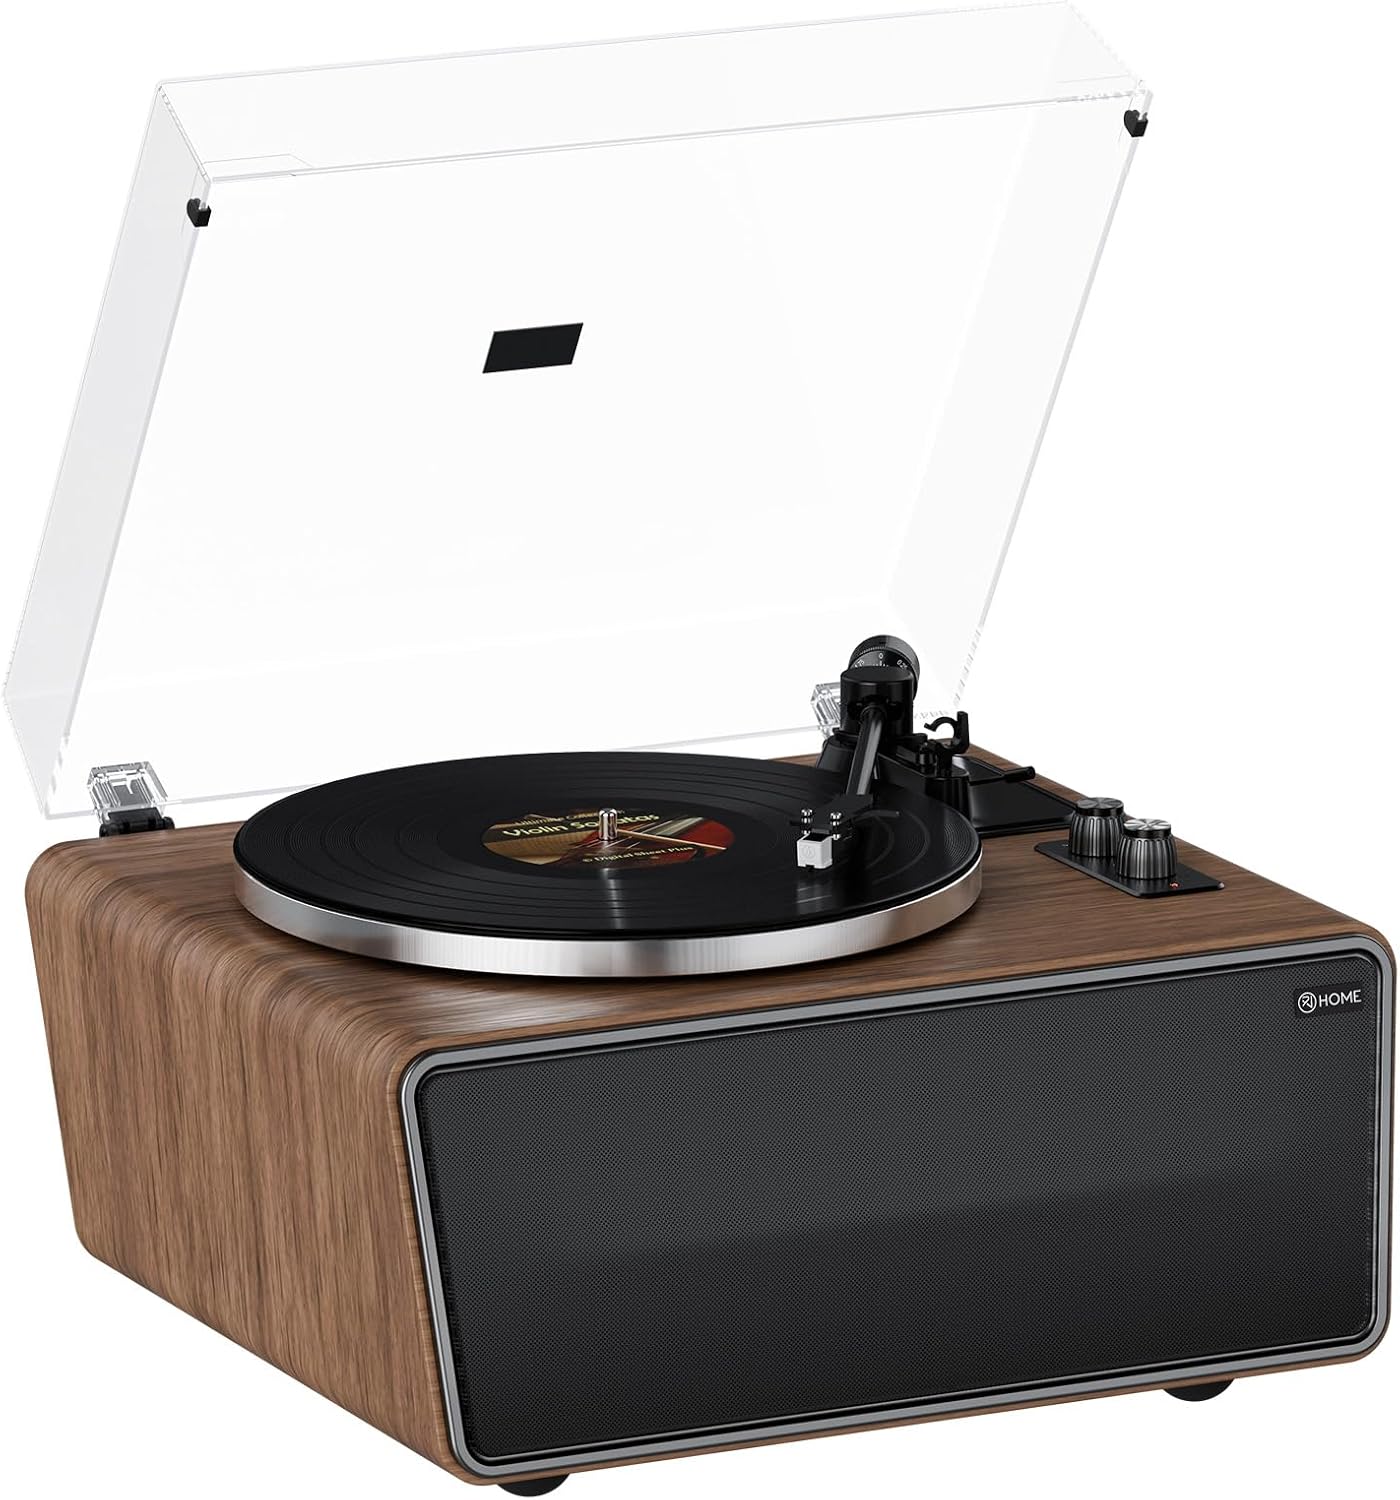
Figure 1: XJ-HOME H01 All-in-One Vinyl Record Player
Product Overview Video
Video 1: General overview and demonstration of the XJ-HOME H01 Vinyl Record Player's features and design.
2. Safety Instructions
- Read all instructions carefully before operating the unit.
- Keep the manual for future reference.
- Do not use this apparatus near water.
- Clean only with a dry cloth.
- Do not block any ventilation openings. Install in accordance with the manufacturer's instructions.
- Do not install near any heat sources such as radiators, heat registers, stoves, or other apparatus (including amplifiers) that produce heat.
- Protect the power cord from being walked on or pinched, particularly at plugs, convenience receptacles, and the point where they exit from the apparatus.
- Only use attachments/accessories specified by the manufacturer.
- Unplug this apparatus during lightning storms or when unused for long periods of time.
- Refer all servicing to qualified service personnel. Servicing is required when the apparatus has been damaged in any way, such as power-supply cord or plug is damaged, liquid has been spilled or objects have fallen into the apparatus, the apparatus has been exposed to rain or moisture, does not operate normally, or has been dropped.
3. Package Contents
Ensure all items listed below are present in the packaging:
- XJ-HOME H01 Vinyl Record Player
- Power Adapter
- USB-to-PC Cable
- Dust Cover
- Instruction Manual (this document)
4. Product Overview
The XJ-HOME H01 is an all-in-one vinyl record player designed for high-fidelity audio playback and modern connectivity. Key features include:
- 2-Speed Belt Drive: Supports 33 and 45 RPM records.
- Built-in 4 Stereo Speakers: Two 4" bass speakers (4Ω 30W) and two 2" treble speakers (8Ω 10W) for rich, warm audio.
- Magnetic Cartridge Stylus (AT-3600L MM): Provides precise tracking for high-definition sound. Universal headshell allows for easy stylus changes.
- Adjustable Counterweight: Ensures optimal tracking force, reducing noise and distortion.
- Bluetooth 5.0: Wirelessly stream music from compatible devices.
- USB-to-PC Recording: Convert vinyl audio to MP3 files for digital storage.
- Phono and Line Outputs: Connect to external speakers or audio systems via RCA.
- AUX-in Port: Connect other audio devices.
- Removable Dust Cover: Protects the turntable from dust.
Component Identification

Figure 2: Top view of the turntable with key components labeled.

Figure 3: Close-up views of the AT-3600L cartridge, control panel, tonearm balance, and rear output connections.

Figure 4: Rear panel showing Power switch, USB-PC port, DC IN 15V, PHONO/LINE OUT switch, AUX IN, and RCA AUX OUT ports.

Figure 5: Anti-vibration feet for enhanced sound stability.
5. Setup
Follow these steps to set up your XJ-HOME H01 Vinyl Record Player:
- Unpack: Carefully remove all components from the packaging.
- Place the Platter: Gently place the aluminum platter onto the turntable spindle.
- Install the Belt:

Figure 6: Installation steps 1-6 for the belt and felt pad.
- Wrap the belt around the raised circle on the back of the master platter.
- Tear off the tape and remove the red belt.
- Put the red belt between the belt and the master, and pull up the belt.
- Align the master with the center axis of the record player and install it, using the red belt to pull up the belt and put the belt on the gold pulley.
- Place the Felt Pad: Put the felt pad on the platter.
- Install the Dust Cover: Attach the clear dust cover to the hinges at the back of the turntable.
- Connect Power: Plug the power adapter into the DC IN 15V port on the rear panel and then into a wall outlet.

Figure 7: Installation steps 7-12 for power connection, stylus cover removal, and tonearm operation.
- Remove Stylus Protective Cover: Carefully remove the clear protective cover from the stylus.
- Adjust Counterweight: The counterweight scale should be adjusted to 3.5g for best results. Rotate the counterweight until the tonearm is balanced, then set the tracking force to 3.5g using the numbered dial.

Figure 8: Adjustable counterweight for precise tracking.
6. Operating Instructions
6.1 Playing Vinyl Records
- Power On: Flip the POWER switch on the rear panel to the 'ON' position.
- Select Mode: Turn the Function Knob to select the desired speed (33 or 45 RPM). The indicator light will turn red for record playback mode.
- Place Record: Place a vinyl record on the platter. The turntable supports 7", 10", and 12" records.

Figure 9: Turntable supporting various record sizes and speeds.
- Unlock Tonearm: Release the tonearm lock.
- Position Tonearm: Gently lift the tonearm using the cueing lever and position the stylus over the desired track of the record.
- Lower Tonearm: Slowly lower the tonearm using the cueing lever. The stylus will descend onto the record, and playback will begin.
- Adjust Volume: Use the Volume knob to adjust the audio output.
- End of Playback: At the end of the record, lift the tonearm using the cueing lever and return it to the tonearm rest. Secure the tonearm lock.
6.2 Bluetooth Streaming
The XJ-HOME H01 can receive audio wirelessly from your Bluetooth-enabled devices.
- Power On: Ensure the record player is powered on.
- Select Bluetooth Mode: Turn the Function Knob to the Bluetooth position. The indicator light will turn blue and flash, indicating it's ready for pairing.
- Pair Device: On your smartphone, tablet, or other Bluetooth device, search for "XJ-HOME H01" in the Bluetooth settings and select it to pair. Once connected, the blue indicator light will stop flashing and remain solid.
- Play Music: Start playing music on your paired device. The audio will stream through the record player's built-in speakers.

Figure 10: Bluetooth 5.0 connectivity for wireless audio streaming.
- Adjust Volume: Control the volume using both your device and the record player's Volume knob.
6.3 USB-to-PC Recording
Convert your vinyl records to digital MP3 files using the USB-to-PC cable.
- Connect to PC: Connect one end of the USB-to-PC cable to the USB-PC port on the rear of the record player and the other end to an available USB port on your computer.
- Software: You will need third-party audio recording software (not included) on your computer to capture the audio. Follow the software's instructions for recording.
- Start Playback: Begin playing your vinyl record as described in section 6.1.
- Record: Use your computer's recording software to capture the audio playback.
6.4 External Audio Connections
- AUX IN: Connect external audio sources (e.g., CD player, MP3 player) to the AUX IN port using a 3.5mm audio cable.
- RCA AUX OUT: Connect the record player to an external amplifier or powered speakers using RCA cables. Use the PHONO/LINE OUT switch on the rear panel to select the appropriate output level (PHONO for phono input on an amplifier, LINE for line-level input).
7. Maintenance
- Cleaning the Dust Cover: Use a soft, dry cloth to wipe the dust cover. For stubborn marks, use a slightly damp cloth and then dry thoroughly. Avoid harsh chemicals.
- Cleaning the Stylus: Use a soft brush designed for stylus cleaning, brushing gently from back to front. Replace the stylus approximately every 300-500 hours of playback or if sound quality deteriorates.
- Cleaning the Cabinet: Wipe the wooden cabinet with a soft, dry cloth. Avoid using liquid cleaners or polishes directly on the surface.
- Record Care: Keep your records clean and free of dust. Store them vertically in their sleeves to prevent warping.
8. Troubleshooting
| Problem | Possible Cause | Solution |
|---|---|---|
| No power | Power adapter not connected; Power switch off | Ensure power adapter is securely connected and switch is ON. |
| No sound from speakers | Volume too low; Incorrect mode selected; Stylus not on record | Increase volume; Select correct mode (Record or Bluetooth); Ensure stylus is properly placed on record. |
| Bluetooth not connecting | Not in Bluetooth mode; Device too far; Device already paired elsewhere | Ensure turntable is in Bluetooth mode (blue light flashing); Move device closer; Disconnect from other Bluetooth devices. |
| Skipping or distorted sound during vinyl playback | Record dirty/damaged; Stylus worn/dirty; Incorrect counterweight setting; Turntable not level | Clean record; Clean or replace stylus; Adjust counterweight to 3.5g; Place turntable on a stable, level surface. |
| Record speed incorrect | Incorrect speed selected | Ensure 33 RPM or 45 RPM is selected according to the record. |
9. Specifications
| Feature | Detail |
|---|---|
| Model Name | XJ-HOME H01 Vinyl Record Player |
| Product Dimensions | 13.78 x 17.72 x 9.45 inches |
| Item Weight | 23.9 pounds |
| Brand | XJ-HOME |
| Maximum Rotational Speed | 45 RPM (supports 33 RPM also) |
| Included Components | Dust Cover, Instruction Manual, Power Adapter, USB-to-PC Cable, Vinyl Record Player |
| Special Features | AUX Input, Adjustable Counterweight, Adjustable Speed, Adjustable Tone Control, Anti-Resonance, Automatic Belt Drive Design, Built-In Preamp, Built-In Speaker, Built-In Bluetooth Receiver, Built-In Cartridge, Detachable Headshell, Die-Cast Aluminum Platter, Digital Recorder, Dust Cover, RCA Output, Volume Control |
| Material | Aluminum, Plastic, Wood |
| Color | Walnut Wood |
| Motor Type | DC Motor |

Figure 11: Product dimensions in centimeters and inches.
10. Warranty and Support
XJ-HOME provides a three-year quality guarantee and lifetime parts support for this product. For any technical assistance, troubleshooting beyond this manual, or warranty claims, please contact XJ-HOME customer service. Details for contacting support can typically be found on the product packaging or the official XJ-HOME website.