1. Introduction
Thank you for choosing the Coolfiqu 6L Humidifier. This device is designed to improve air quality and comfort in your home by providing optimal humidity levels. It features both cool and warm mist options, a large capacity, and user-friendly controls, making it suitable for various room sizes and needs. Please read this manual thoroughly before operation to ensure proper use, maintenance, and safety.

Figure 1: Coolfiqu 6L Humidifier
2. Key Features
- Warm and Cool Mist Options: Provides versatile humidification for different preferences and seasons.
- 6L Large Capacity: Operates for up to 60 hours on a single fill, reducing the need for frequent refills.
- Top-Fill Design: Simplifies water refilling directly into the tank.
- 360° Rotating Nozzle: Allows for precise mist direction control.
- 3 Levels of Mist Adjustment: Customize mist output from light to heavy.
- Adjustable Humidity Control: Set desired humidity levels between 40% and 90% RH.
- Sleep Mode: Turns off the LED screen for undisturbed rest while maintaining humidity.
- Anti-Dry Burn Safety: Automatically shuts off when water levels are too low, indicated by a red light.
- Essential Oil Diffuser: Integrated tray for adding essential oils to enhance room ambiance.

Figure 2: Humidifier Features Overview
3. Package Contents
Please check the package contents to ensure all items are present:
- Coolfiqu 6L Humidifier Unit
- User Manual
- Cleaning Brush
- Water Purification Device
- Aromatherapy Pads (extra)
- Power Cord with External Temperature/Humidity Module
4. Setup Instructions
Follow these steps for initial setup of your humidifier:
- Unpack: Carefully remove the humidifier from its packaging. Remove all protective tape and internal foam pieces. Ensure the white foam from the base is removed before use.
- Assemble Nozzle: Align the nozzle cap with the humidifier cup lid and press them firmly to assemble.
- Install Water Purification Device: Locate the designated slot inside the water tank. Gently press the water purification device into place until it is secure.
- Install Water Filter: Insert the water filter into its slot at the bottom of the water tank. Give it a few wiggles to ensure it's snugly in place.
- Connect External Module: Plug the external temperature/humidity module into the port on the back of the humidifier. Position the module as far away from the humidifier as possible for accurate readings.
- Fill Water Tank: The humidifier features a top-fill design. Simply pour purified or distilled water directly into the top opening of the tank. Do not inject water beyond the maximum water level line (6L). Do not add water directly into the base chamber or mist tube.
- Power On: Plug the power cord into a suitable electrical outlet.
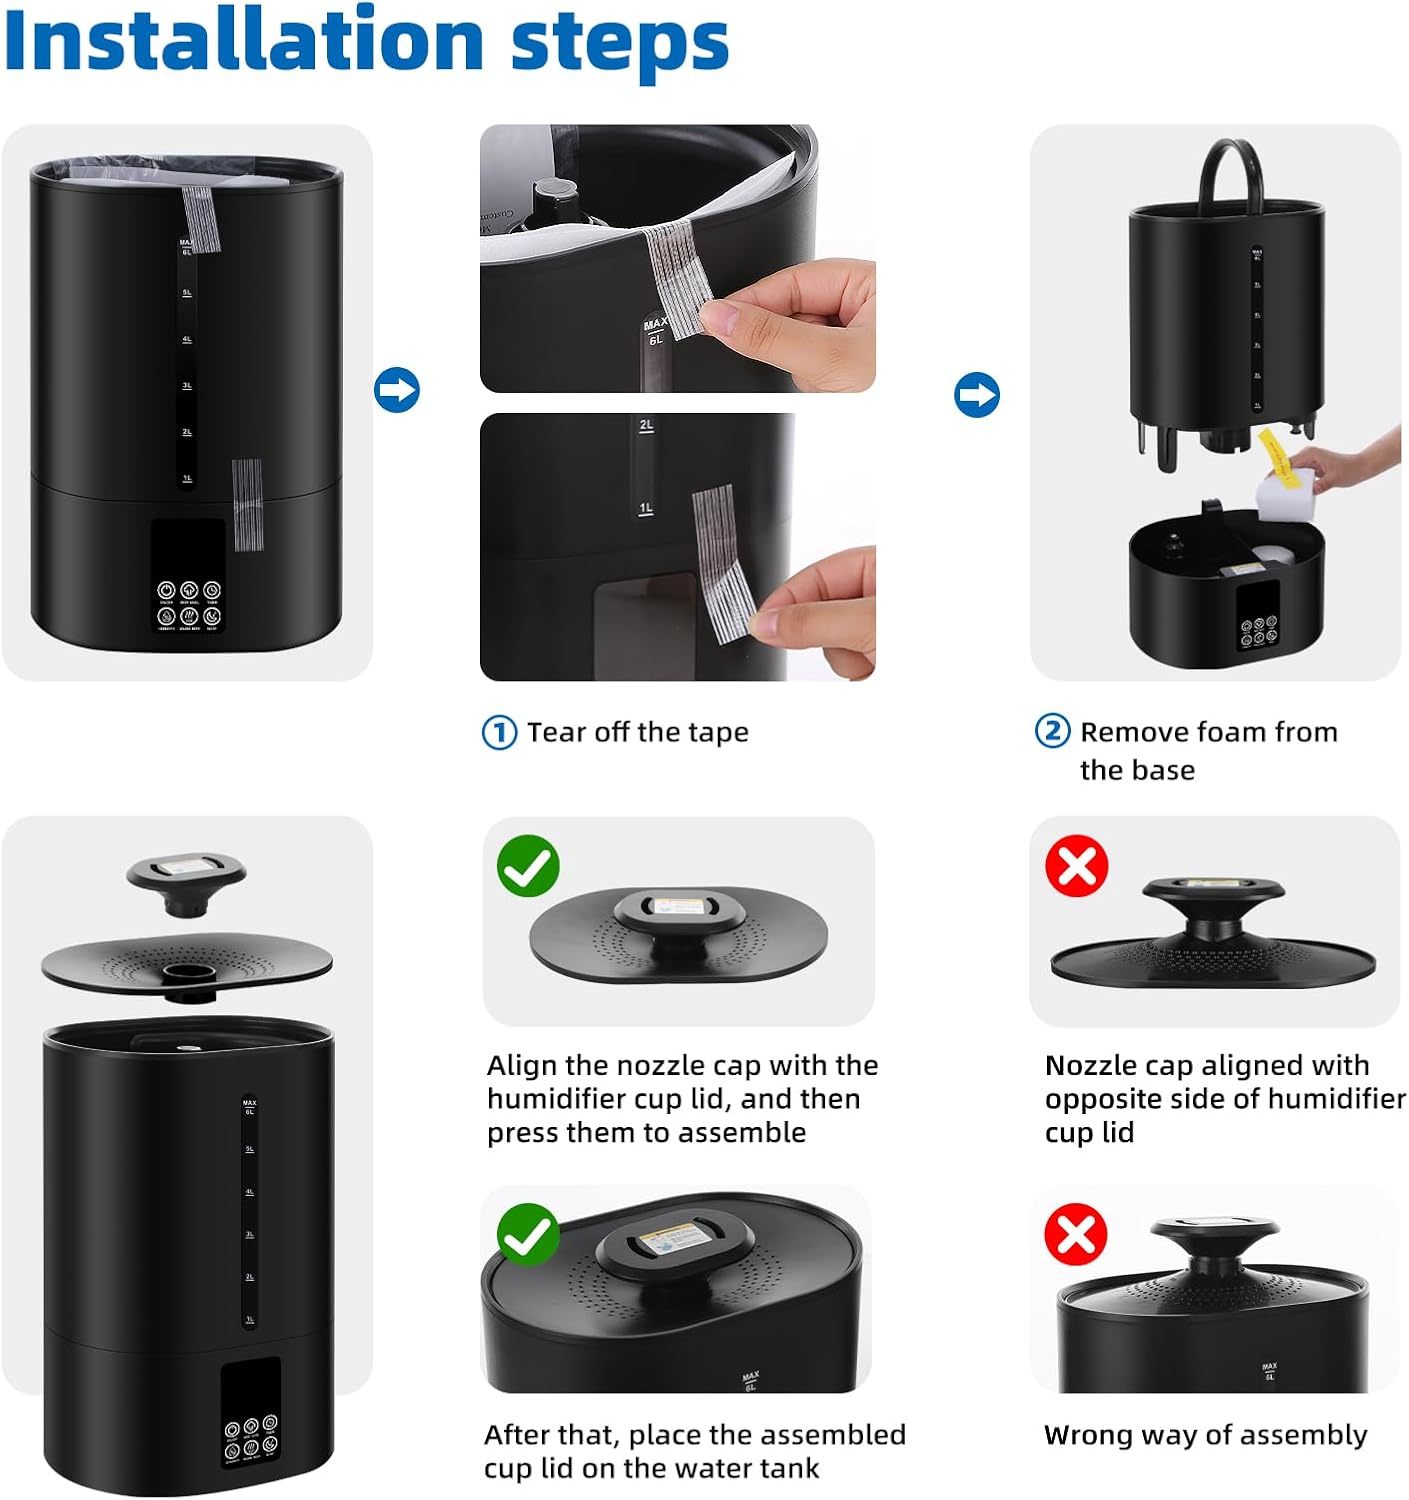
Figure 3: Installation Steps
Video 1: Setup and Operation Overview (Seller Content)
5. Operating Instructions
Your Coolfiqu humidifier offers intuitive controls for personalized comfort:
- Power On/Off: Press the power button (⏻) on the control panel to turn the humidifier on or off.
- Mist Level Adjustment: Press the mist level button (💧) to cycle through three different mist output levels (low, medium, high).
- Warm/Cool Mist Selection: Press the warm mist button (♨️) to switch between cool mist and warm mist modes.
- Humidity Control: Press the humidity button (RH%) to set your desired relative humidity (RH) target from 40% to 90%. The humidifier will automatically adjust its output to maintain this level.
- Timer Function: Press the timer button (⏱️) to set an automatic shut-off timer from 2 to 96 hours.
- Sleep Mode: Press the sleep mode button (🌙) to turn off the LED display for undisturbed sleep. The humidifier will continue to operate normally.
- 360° Nozzle: Rotate the top nozzle to direct the mist in any desired direction.
- Essential Oil Diffuser: Locate the essential oil tray on the back of the unit. Press to release the tray, add a few drops of your preferred essential oil to the aromatherapy pad, and reinsert the tray. Do not add essential oils directly into the water tank or mist tube, as this can damage the unit.

Figure 4: Convenient Top Filling
Video 2: Mist Output Demonstration (Seller Content)
6. Maintenance
Regular cleaning is essential to ensure optimal performance and longevity of your humidifier. Use purified or distilled water to minimize mineral buildup.
- Daily Cleaning: Flush the water tank and base chamber with fresh water daily.
- Weekly Cleaning:
- Clean corners and gaps of the base and tank with the provided cleaning brush.
- Lift the filter clockwise to remove and clean it.
- Clean the gaskets once a week to prevent leaking due to clogs.
- For the atomizing sheet, use a soft brush to wipe gently.
- Deep Cleaning (Spring-Loaded Valve): If necessary, you can disassemble the spring-loaded valve for thorough cleaning. Press the pin with one hand while removing the rubber gasket from the inside with the other. Clean both components and reassemble.
- Essential Oil Tray: Clean the essential oil tray regularly by wiping it with a damp cloth.

Figure 5: How to Clean

Figure 6: Installation of Accessories (for deep cleaning)
Video 3: Precautions and Troubleshooting (Seller Content)
7. Troubleshooting
If you encounter any issues with your humidifier, please refer to the following common problems and solutions:
| Problem | Possible Cause | Solution |
|---|---|---|
| Red water shortage indicator flashes or screen displays "E2" | Water level in the tank is too low (anti-dry burn device activating). | Refill the water tank immediately. The device will restart automatically after adding water. |
| No mist or weak mist output | Insufficient water, clogged atomizing sheet, improper assembly, or mineral buildup. | Check water level and refill. Clean the atomizing sheet gently with a soft brush. Ensure all parts are correctly assembled and clean the unit thoroughly. |
| Unusual noise during operation | Humidifier not placed on a flat surface, or normal operation noise in warm mist mode. | Ensure the humidifier is on a stable, flat surface. Note that warm mist mode may produce slightly more noise due to the heating element. |
| Water leakage | Clogged gaskets or improper assembly of the water tank. | Clean the gaskets regularly as per maintenance instructions. Ensure the water tank is correctly seated and assembled. |

Figure 7: Important Notes for Operation
8. Specifications
| Feature | Detail |
|---|---|
| Brand | Coolfiqu |
| Model Name | 6L Humidifiers (LP-2113) |
| Capacity | 6 Liters |
| Mist Type | Cool and Warm Mist |
| Operation Time | Up to 60 hours per fill |
| Special Features | Adjustable Humidity Control, Low Water Indicator, Auto Shut Off, Aroma Diffuser, 360° Nozzle |
| Color | A-Black |
| Product Dimensions | 9.05"D x 6.29"W x 12.2"H |
| Material | BPA-Free, ABS plastic |
| Voltage | 120 Volts (AC) |
| Item Weight | 4.91 pounds |
| Room Type | Office, Kids Room, Living Room, Bedroom, Nursery |
9. Warranty & Support
Coolfiqu is committed to providing high-quality products and excellent customer service. If you encounter any issues with your product or require assistance, please contact our customer support team. Our team is ready to help with any defective products or operational questions.
For further assistance, please refer to the contact information provided on the product packaging or visit the official Coolfiqu store on Amazon.
Thank you for choosing Coolfiqu!


