1. Introduction
Thank you for choosing the Hothope Commercial Ice Maker Machine. This appliance is designed for efficient and reliable ice production, suitable for various settings including homes, offices, parties, restaurants, and bars. It features a powerful compressor, a large storage capacity, and user-friendly controls. This manual provides essential information for the safe installation, operation, and maintenance of your ice maker.
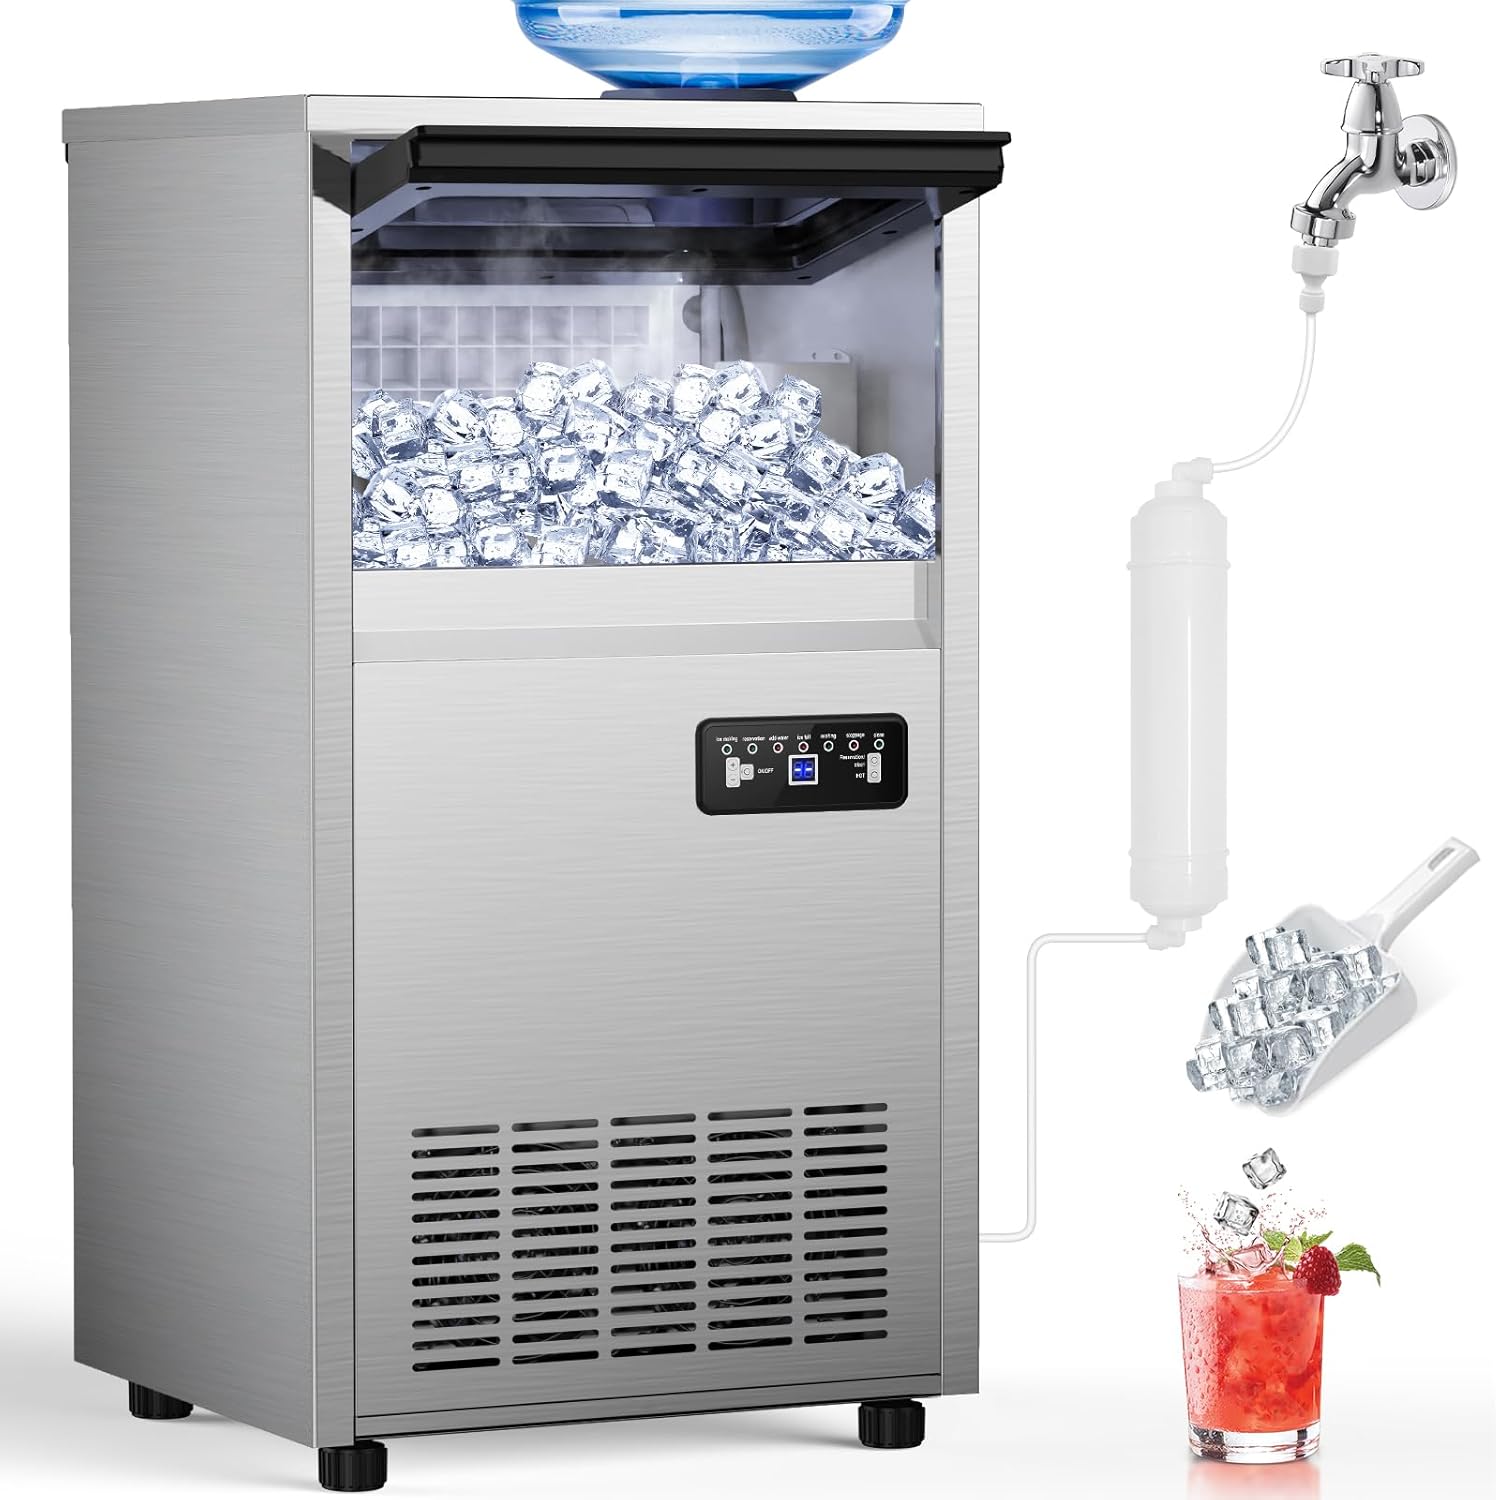
Figure 1: Hothope Commercial Ice Maker Machine overview, showing connections for water supply and ice output.
2. Important Safety Instructions
- Read all instructions before using the appliance.
- Ensure the power supply matches the voltage specified on the rating label.
- Do not operate the appliance with a damaged cord or plug.
- Keep the machine upright for at least 24 hours before initial use to allow refrigerant to settle.
- Do not immerse the appliance, power cord, or plug in water or other liquids.
- Unplug the appliance before cleaning, servicing, or when not in use.
- This appliance is not intended for use by persons (including children) with reduced physical, sensory, or mental capabilities, or lack of experience and knowledge, unless they have been given supervision or instruction concerning use of the appliance by a person responsible for their safety.
- Use only potable water for ice production.
- Do not block ventilation openings.
- Do not store explosive substances such as aerosol cans with a flammable propellant in this appliance.
3. Setup and Installation
3.1 Unpacking
Carefully remove the ice maker from its packaging. Inspect for any shipping damage. Remove all packing materials, including tape and protective films. Ensure all accessories (ice scoop, water filter, hoses) are present.
3.2 Placement
Place the ice maker on a flat, stable surface capable of supporting its weight when full of ice and water. Ensure adequate ventilation around the unit. Maintain at least 5 inches (12.7 cm) of space from walls or other objects to allow for proper airflow. The unit can be used freestanding or under a counter.
3.3 Water Inlet Modes
Your Hothope ice maker supports two water inlet methods: direct tap water connection or gallon bottled water supply.
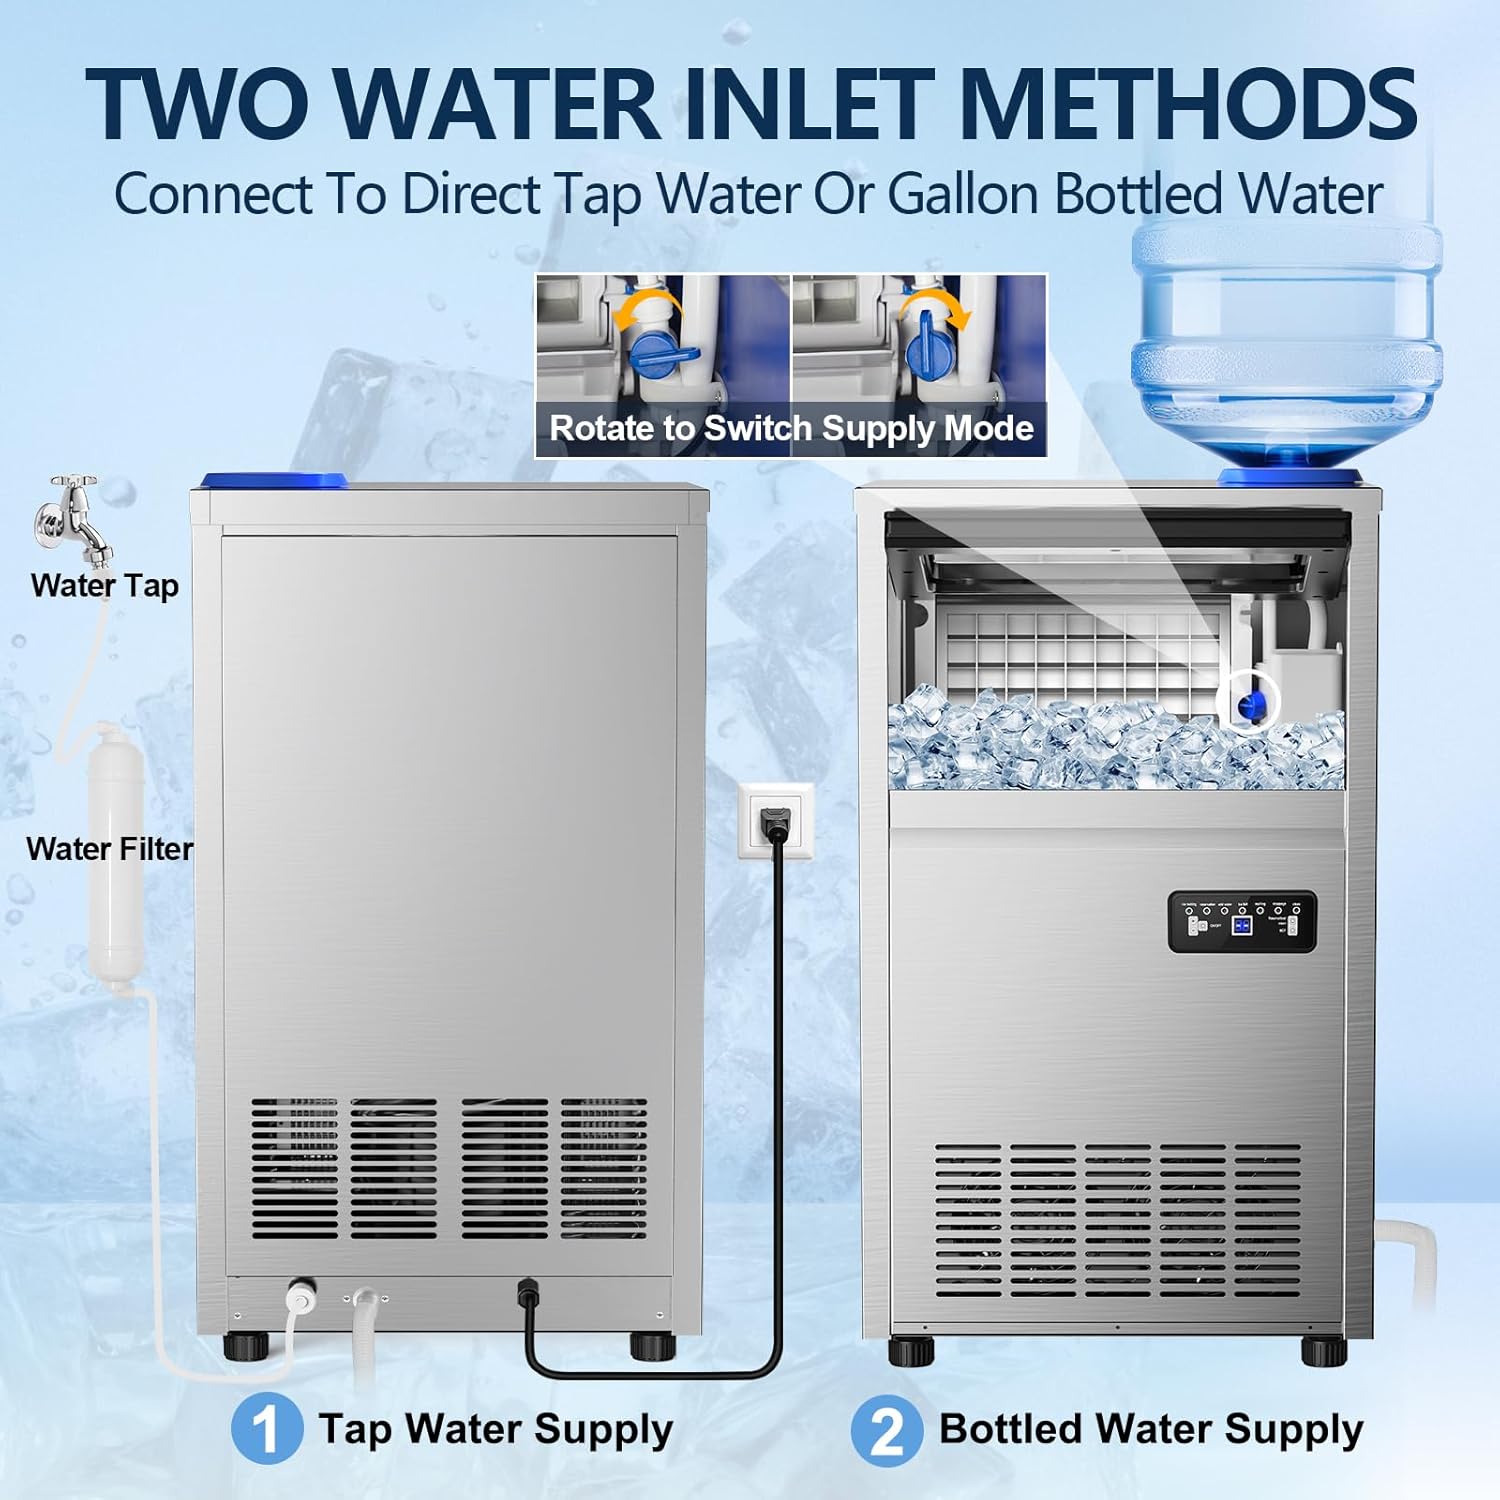
Figure 2: Illustration of the two water inlet options for the ice maker.
- Tap Water Supply: Connect the provided water inlet hose to a potable water tap. Ensure the connection is secure to prevent leaks.
- Bottled Water Supply: Place a standard gallon bottled water on top of the machine, ensuring it is properly seated in the water dispenser.
Rotate the switch on the unit to select the desired water supply mode.
3.4 Water Filter Installation
The ice maker includes a premium water filter to ensure crystal-clear ice. Connect the water filter in-line with your chosen water supply method as shown in Figure 3. Ensure the filter is installed correctly according to the flow direction indicated on the filter housing.

Figure 3: Connection points for water supply, filter, power, and drainage.
3.5 Initial Cleaning
Before first use, it is recommended to perform an initial cleaning cycle. Refer to the "Automatic Cleaning Function" in the Operation section.
3.6 Power Connection
Plug the power cord into a grounded electrical outlet. Ensure the outlet meets the electrical requirements of the appliance.
4. Operation
4.1 Control Panel Overview
The ice maker is equipped with an intuitive LCD control panel for easy operation. Familiarize yourself with the buttons and indicators:

Figure 4: Detailed view of the intelligent operation panel.
- ON/OFF Button: Powers the unit on or off.
- (+) and (-) Buttons: Adjust ice-making time (and thus ice thickness) or set reservation timing.
- 24h Appointment ON/OFF: Long press to enter the self-clean program.
- HOT Button: Long press for defrosting.
- Indicators: Ice Making, Reservation, Add Water, Ice Full, Melting, Stoppage, Clean.
4.2 Starting Ice Production
- Ensure the water supply is connected and active.
- Press the ON/OFF button to start the ice-making cycle.
- The "Ice Making" indicator will illuminate.
- The machine will automatically produce clear ice cubes within 8-15 minutes per cycle.
4.3 Adjusting Ice Cube Thickness
You can adjust the ice cube thickness by modifying the ice-making time using the (+) and (-) buttons. Longer cycles result in thicker ice.

Figure 5: Ice cube thickness options and their typical production times.
- Thin Ice (5-8 minutes): Suitable for quick chilling or delicate items.
- Medium Ice (8-11 minutes): Standard ice for drinks.
- Thick Ice (11-15 minutes): Ideal for prolonged cooling or commercial use.
4.4 Automatic Cleaning Function
The ice maker features an auto-cleaning function for hygiene and convenience.
- Ensure the unit is connected to a water supply and the drain hose is properly positioned.
- Long press the 24h Appointment ON/OFF button to initiate the self-clean program.
- The "Clean" indicator will illuminate, and the machine will perform a cleaning cycle.
- Once complete, the unit will return to standby mode.
4.5 Defrosting
If ice accumulates excessively or the unit requires defrosting, long press the HOT button. The machine will enter a defrosting cycle.
5. Maintenance and Care
Regular maintenance ensures optimal performance and longevity of your ice maker.
5.1 External Cleaning
Wipe the exterior of the machine with a soft, damp cloth. For stubborn stains, use a mild detergent. Avoid abrasive cleaners or solvents that could damage the stainless steel finish.
5.2 Internal Cleaning
In addition to the automatic cleaning function, periodically clean the ice storage bin and water reservoir. Use a solution of water and mild detergent, then rinse thoroughly with clean water. Ensure all detergent residue is removed before resuming ice production.

Figure 6: Internal components and features, including the 360° auto-cleaning system.
5.3 Water Filter Replacement
The water filter should be replaced every 3-6 months, or more frequently depending on water quality and usage, to maintain optimal ice quality and prevent mineral buildup.
5.4 Drainage
Ensure the drain hose is always clear and properly positioned to allow for efficient water drainage, especially during cleaning cycles or when emptying the unit.
6. Troubleshooting
Before contacting customer support, please refer to the following common issues and solutions:
| Problem | Possible Cause | Solution |
|---|---|---|
| Ice maker does not turn on. | No power supply. | Check power cord connection and wall outlet. Ensure the ON/OFF button is pressed. |
| "Add Water" indicator is on. | Insufficient water supply. | Check tap water connection or replace bottled water. Ensure water inlet mode is correctly selected. |
| No ice production or very little ice. | Water supply issue, ambient temperature too high, or refrigerant issue. | Verify water supply. Ensure unit is in a cool, well-ventilated area. If problem persists, contact support. |
| "Ice Full" indicator is on, but bin is not full. | Ice sensor obstruction or malfunction. | Clear any ice blocking the sensor. Clean the sensor if dirty. |
| Ice cubes are too thin or too thick. | Ice-making time setting. | Adjust ice-making time using the (+) and (-) buttons on the control panel. |
7. Specifications
| Feature | Detail |
|---|---|
| Brand | Hothope |
| Model Name | IM-S2-X |
| Ice Production Capacity | Up to 150 lbs (68 kg) per 24 hours |
| Ice Storage Capacity | 45 lbs (20.4 kg) |
| Ice Making Cycle Time | 8-15 minutes per cycle (for 50 clear ice cubes) |
| Product Dimensions (D x W x H) | 14.57\" x 16.34\" x 31.3\" (37 cm x 41.5 cm x 79.5 cm) |
| Weight | Approximately 50 lbs (22.7 kg) |
| Wattage | 250 watts |
| Refrigerant | R290 (CFC-free) |
| Water Inlet Modes | Tap Water, Gallon Bottled Water |
8. Warranty and Customer Support
For warranty information and customer support, please refer to the documentation included with your purchase or contact Hothope customer service directly. Keep your purchase receipt as proof of purchase for warranty claims.
Manufacturer: Hothope
For further assistance, please visit the Hothope Store on Amazon.