
1. Introduction
Thank you for choosing the CUSHYBITE PCLST01K 18V 10-inch Cordless String Trimmer/Edger. This lightweight and powerful tool is designed for efficient small yard maintenance. It features an auto-feed head for continuous line advancement and an easy twist-to-edge shaft for seamless transitions between trimming and edging tasks. This manual provides essential information for safe operation, assembly, maintenance, and troubleshooting to ensure optimal performance and longevity of your tool.
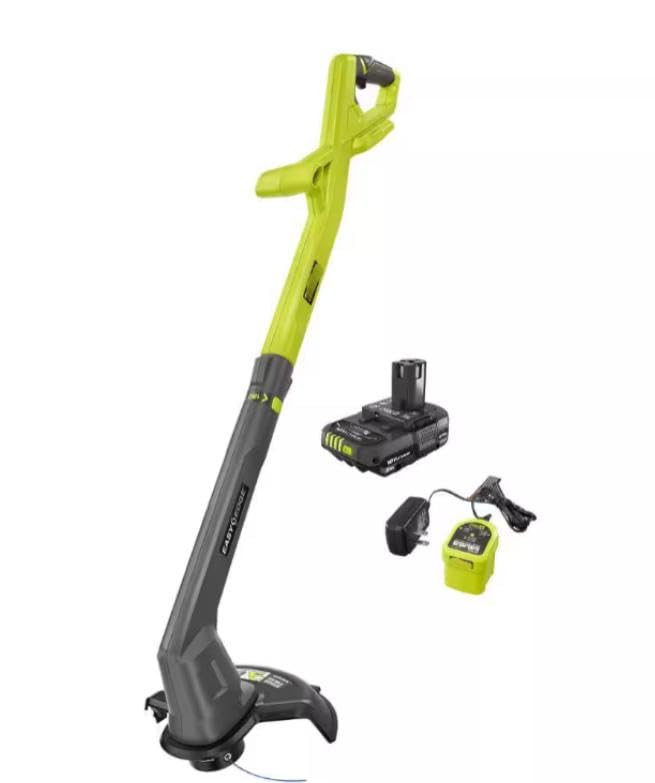
Figure 1: CUSHYBITE PCLST01K Cordless String Trimmer/Edger overview.
2. Important Safety Information
Always read and understand all safety warnings, instructions, illustrations, and specifications provided with this power tool. Failure to follow all instructions listed below may result in electric shock, fire, and/or serious injury.
- Wear Eye Protection: Always wear safety glasses or goggles when operating the trimmer.
- Wear Appropriate Clothing: Do not wear loose clothing or jewelry. Wear heavy long pants, long sleeves, boots, and gloves.
- Keep Area Clear: Ensure bystanders, children, and pets are at a safe distance (at least 50 feet/15 meters) from the operating area.
- Inspect Work Area: Before starting, clear the area of any objects that could be thrown by the cutting line, such as rocks, broken glass, nails, wire, or string.
- Avoid Wet Conditions: Do not operate the trimmer in wet grass or rain.
- Battery Safety: Use only the specified battery and charger. Do not charge batteries in damp or wet locations.
- Maintain Control: Always maintain proper footing and balance. Do not overreach.
- Disconnect Battery: Always remove the battery pack when not in use, before cleaning, or when changing accessories.
3. Package Contents
Carefully unpack all items and inspect for any damage. If any parts are missing or damaged, do not operate the tool. Contact customer support.
- 10-inch Cordless String Trimmer/Edger
- 2.0Ah 18V Battery
- Battery Charger
- Operator's Manual (this document)

Figure 2: Included components: 10" String Trimmer/Edger, 2.0Ah Battery, and Charger.
4. Setup and Assembly
4.1 Charging the Battery
- Connect the charger to a standard 120V AC outlet.
- Slide the 2.0Ah battery pack onto the charger. Ensure it clicks into place.
- The charger indicator light will show the charging status. Refer to the charger's specific instructions for light patterns.
- Once fully charged, remove the battery from the charger.
4.2 Attaching the Guard
The guard must be installed before operating the trimmer to protect against thrown debris.
- Align the guard with the mounting slots on the trimmer head.
- Push the guard firmly until it snaps securely into place.
- Ensure the guard is properly seated and cannot be easily removed.
4.3 Installing the Battery
- Ensure the trimmer is turned off.
- Slide the charged battery pack into the battery port on the trimmer handle until it clicks securely.
- To remove, press the release button on the battery pack and slide it out.
5. Operating Instructions
5.1 Starting and Stopping
- To Start: Ensure the battery is installed. Press the safety lock-out button, then squeeze the trigger switch.
- To Stop: Release the trigger switch.
5.2 Trimming Operation
Hold the trimmer firmly with both hands. Maintain a comfortable stance. Swing the trimmer from side to side, keeping the cutting head slightly above the ground. The auto-feed head will advance the line as needed with each trigger pull.
5.3 Edging Operation
To convert to edging mode, twist the shaft of the trimmer. The head will rotate 90 degrees, allowing for vertical cutting along sidewalks and driveways. Walk slowly and steadily, guiding the trimmer along the edge.

Figure 3: Key features including the twisting shaft for edging and auto-feed head.
6. Maintenance
Regular maintenance ensures the longevity and optimal performance of your string trimmer.
6.1 Cleaning
- Always remove the battery pack before cleaning.
- Wipe the exterior of the tool with a clean, damp cloth. Do not use strong detergents or solvents.
- Clear any grass clippings or debris from the guard and cutting head.
6.2 Replacing the Cutting Line
When the cutting line becomes too short or breaks, it needs to be replaced. This model uses an auto-feed head, which typically requires a specific type and diameter of line (e.g., 0.065 inches).
- Remove the battery pack.
- Locate the spool cap on the trimmer head.
- Press the tabs on the spool cap and remove it, then remove the old spool.
- Insert a new pre-wound spool or manually wind new line onto the existing spool, following the directional arrows.
- Thread the line through the eyelets on the trimmer head.
- Replace the spool cap, ensuring it clicks securely into place.

Figure 4: Trimmer head showing the spool area for line replacement.
7. Troubleshooting
| Problem | Possible Cause | Solution |
|---|---|---|
| Trimmer does not start. | Battery not charged or improperly installed. Safety lock-out not engaged. | Ensure battery is fully charged and securely installed. Press safety lock-out button before squeezing trigger. |
| Cutting line does not advance. | Line is tangled or too short. Spool is empty. | Remove battery, inspect spool for tangles, or replace the cutting line spool. |
| Motor runs but line does not spin. | Spool is not properly seated. Debris is jamming the head. | Remove battery, check that the spool cap is securely fastened. Clear any debris from the cutting head. |
| Reduced cutting performance. | Line is worn or incorrect type. Battery charge is low. | Replace cutting line with recommended diameter. Recharge battery. |
8. Specifications
- Model: PCLST01K
- Voltage: 18V DC
- Cutting Swath: 8-10 inches (adjustable)
- Line Diameter: 0.065 inches (recommended)
- Battery Type: Lithium-Ion (2.0Ah included)
- Weight: Under 4 lbs (tool only)
- Runtime (with 2.0Ah battery): Over 30 minutes
- Features: Auto-feed head, Twist-to-edge shaft, Ergonomic overmold handle
9. Warranty and Support
CUSHYBITE products are manufactured to high-quality standards. For information regarding warranty coverage, technical support, or replacement parts, please refer to the warranty card included with your purchase or visit the official CUSHYBITE website. Please have your model number (PCLST01K) and purchase date available when contacting support.