1. Introduction
This manual provides detailed instructions for the installation, operation, and maintenance of the ZDMTDKXT X99M Motherboard. This motherboard is designed to support Intel LGA 2011-3 socket processors, including Xeon E5 V3 and V4 series, and features DDR3 ECC RAM support. Please read this manual thoroughly before proceeding with installation to ensure proper setup and optimal performance.
2. Key Features
- CPU Socket: LGA 2011-3, supporting Intel Xeon E5 V3 and V4 series processors.
- Memory: 4 x DDR3 memory slots, supporting up to 128GB ECC RAM in quad-channel configuration.
- Expansion Slots: Multiple PCIe slots including 1 x PCIe x16, 1 x PCIe x4, 1 x PCIe x1, and 2 x M.2 ports for NVMe storage.
- Storage: Multiple SATA 3.0 ports for traditional storage devices.
- Connectivity: Integrated Gigabit Ethernet (RTL8111) and various USB 2.0 and USB 3.0 ports.
- Audio: 6-Channel HD Audio Codec for high-quality sound.
- Form Factor: M-ATX (24.5CM x 19CM) for compact system builds.
3. Motherboard Layout and Components
Familiarize yourself with the motherboard's layout and key components before installation.

Figure 3.1: Labeled diagram of the ZDMTDKXT X99M Motherboard, highlighting the CPU socket, DDR3 RAM slots, various PCIe expansion slots, SATA ports, USB headers, and power supply connections. This view provides an overview of all major components and their locations.
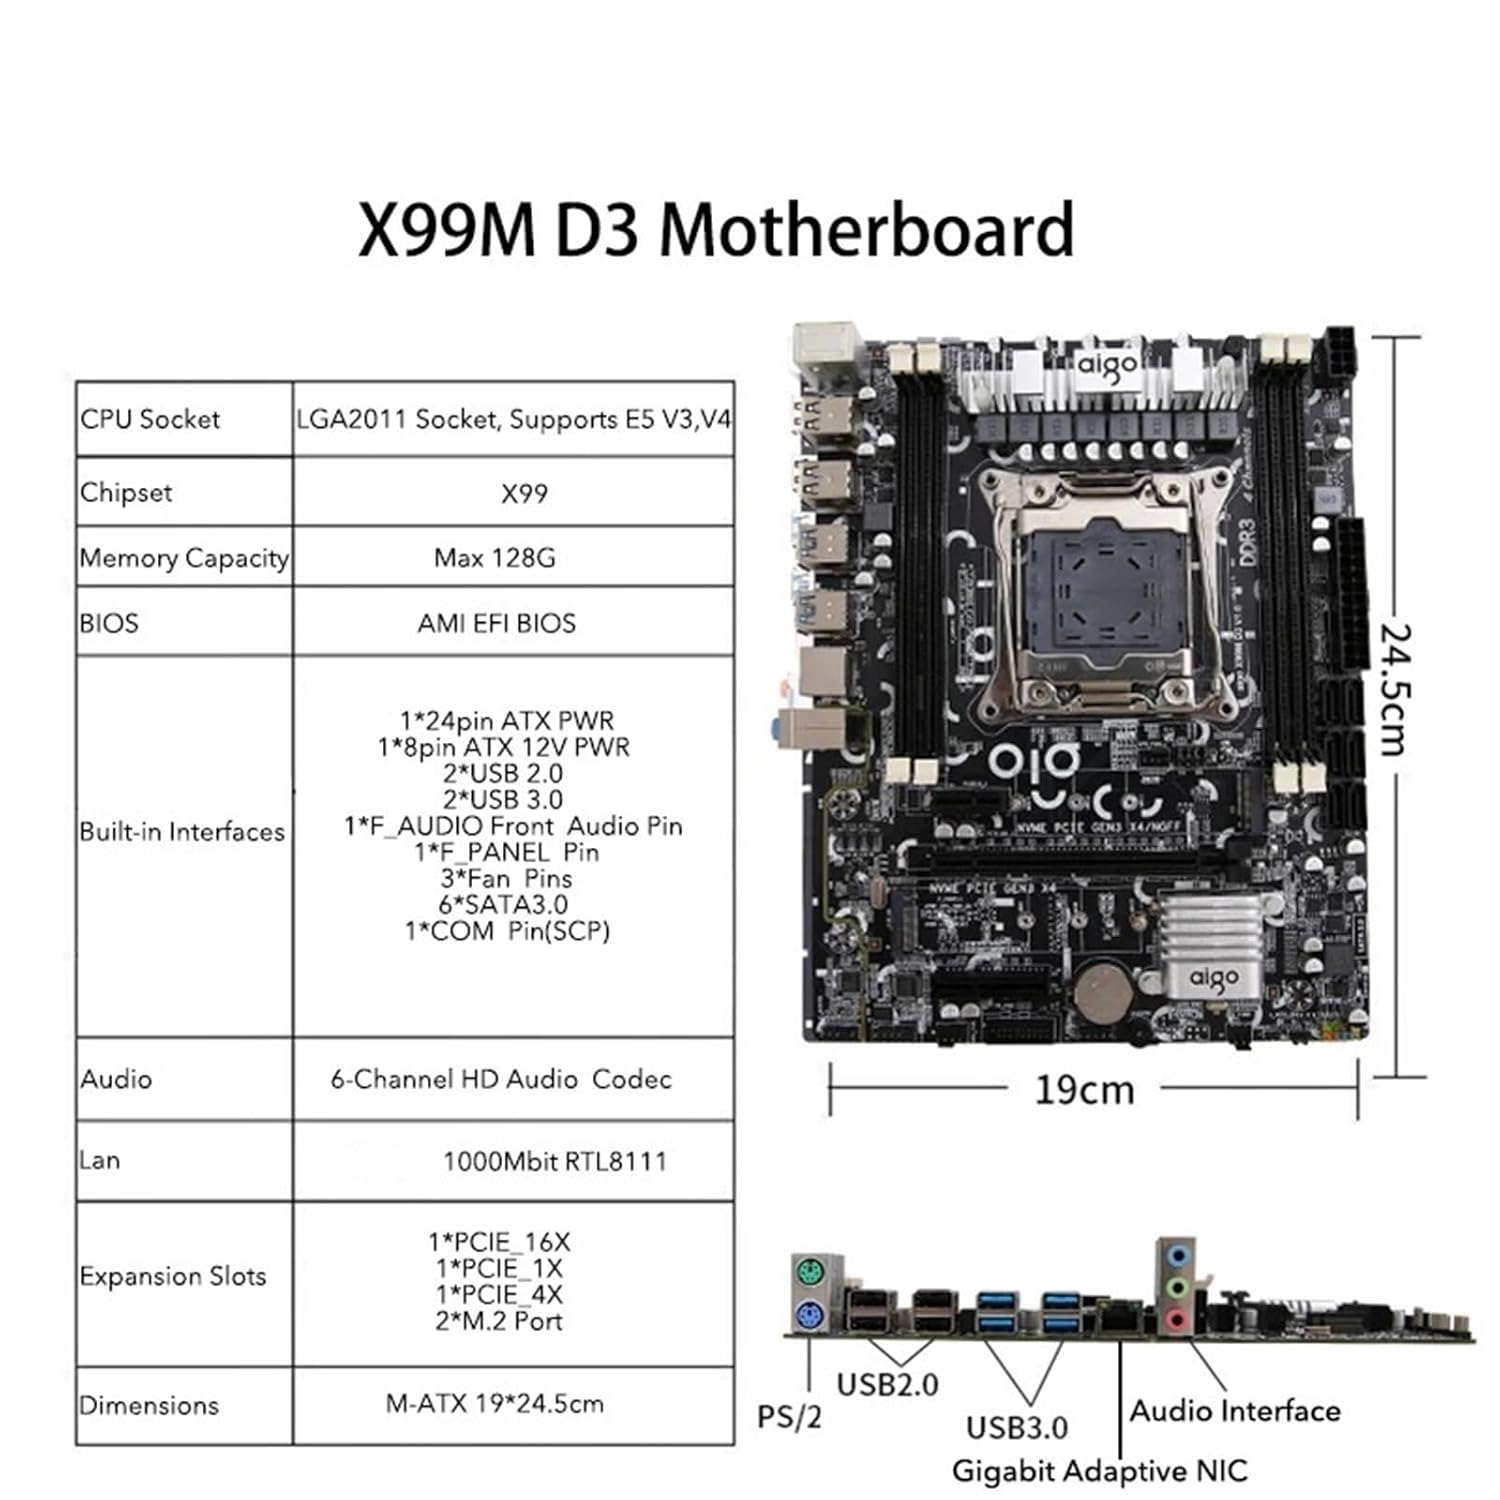
Figure 3.2: Overview of the ZDMTDKXT X99M Motherboard, accompanied by a table summarizing its key specifications including CPU socket type (LGA2011 Socket, Supports E5 V3,V4), Chipset (X99), Max Memory Capacity (128G), BIOS type (AMI EFI BIOS), Built-in Interfaces, Audio, LAN, Expansion Slots, and Dimensions (M-ATX 19*24.5cm).

Figure 3.3: A detailed close-up of the LGA 2011-3 CPU socket and the four DDR3 memory slots on the ZDMTDKXT X99M Motherboard. This image emphasizes the robust design around the processor area.

Figure 3.4: This image provides another close-up of the CPU socket and RAM area, specifically noting the motherboard's support for four-channel DDR3 memory and its capability for overclocking, indicating performance-oriented features.
4. Setup and Installation
4.1 Safety Precautions
- Always disconnect the power supply before installing or removing any components.
- Wear an anti-static wrist strap to prevent electrostatic discharge (ESD) damage to components.
- Handle components by their edges, avoiding contact with pins or circuitry.
4.2 CPU Installation
- Locate the LGA 2011-3 socket on the motherboard.
- Gently push down the load lever and pull it away from the socket to open the CPU retention mechanism.
- Carefully align the CPU with the socket, ensuring the gold triangle on the CPU matches the triangle on the socket. Do not force the CPU into place.
- Lower the load plate and push the load lever back into its locked position.
4.3 RAM Installation
- Open the clips at both ends of the DDR3 memory slots.
- Align the memory module with the slot, ensuring the notch on the module matches the key in the slot.
- Press down firmly on both ends of the memory module until the clips snap into place.
4.4 Power Connections
- Connect the 24-pin ATX main power connector from your power supply to the corresponding port on the motherboard.
- Connect the 8-pin ATX 12V CPU power connector to the port near the CPU socket.
4.5 Storage Device Installation
- SATA Drives: Connect SATA data cables from your storage drives (HDDs/SSDs) to the SATA 3.0 ports on the motherboard. Connect power cables from your power supply to the drives.
- NVMe M.2 Drives: Insert the M.2 drive into one of the M.2 slots, securing it with the provided screw.
4.6 Expansion Cards
Insert graphics cards or other PCIe expansion cards into the appropriate PCIe slots (e.g., PCIe x16 for graphics cards), ensuring they are fully seated and secured with a screw to the chassis.
5. Operating Instructions
5.1 First Boot
- After all components are installed and connected, connect your monitor, keyboard, and mouse.
- Connect the power cord to the power supply and turn on the power switch.
- Press the power button on your computer case.
- The system should power on and display the BIOS/UEFI splash screen.
5.2 BIOS/UEFI Setup
To enter the BIOS/UEFI setup utility, press the designated key (usually DEL or F2) during the boot process. From here, you can configure boot order, system time, and other advanced settings. The X99M uses an AMI EFI BIOS.
5.3 Operating System Installation
Once in the BIOS, set your preferred boot device (e.g., USB drive or DVD-ROM with OS installer) as the primary boot option. Save changes and exit BIOS to begin the operating system installation process.
6. Maintenance
- Dust Removal: Regularly clean dust from inside your computer case using compressed air. Pay special attention to CPU heatsinks, fan blades, and motherboard surfaces to prevent overheating.
- Cable Management: Ensure all cables are neatly routed to improve airflow and prevent accidental disconnections.
- BIOS Updates: Periodically check the manufacturer's website for BIOS updates. Updates can improve stability, compatibility, and performance. Follow update instructions carefully.
- Component Checks: Ensure all components (RAM, expansion cards, storage drives) are securely seated in their respective slots.
7. Troubleshooting
7.1 No Power / No Boot
- Check all power connections: 24-pin ATX, 8-pin CPU, and power supply cable to the wall outlet.
- Ensure the power supply switch is in the 'ON' position.
- Verify that the front panel power button cable is correctly connected to the motherboard header.
- Test the power supply with another system or a power supply tester if available.
7.2 No Display
- Ensure the monitor is powered on and connected to the correct video output (graphics card or integrated graphics, if applicable).
- Reseat the graphics card in its PCIe slot.
- Try a different video cable or monitor.
- If using multiple RAM sticks, try booting with only one stick installed, rotating through them to identify a faulty module.
7.3 System Instability / Crashes
- Check CPU and GPU temperatures using monitoring software. Overheating can cause instability.
- Ensure all drivers (chipset, graphics, etc.) are up to date.
- Run memory diagnostic tools to check for RAM errors.
- Verify that your power supply provides sufficient wattage for all components.
8. Specifications
| Feature | Specification |
|---|---|
| Brand | ZDMTDKXT |
| Model | X99M (hongxkai) |
| CPU Socket | LGA 2011-3 |
| Supported CPUs | Intel Xeon E5 V3/V4 Series |
| Chipset | X99 |
| Memory Slots | 4 x DDR3 |
| Max Memory Capacity | 128GB (4 x 32GB DDR3 ECC RAM) |
| BIOS | AMI EFI BIOS |
| VGA Slot | 1 x PCIe x16 |
| Expansion Slots | 1 x PCIe x16, 1 x PCIe x4, 1 x PCIe x1, 2 x M.2 Ports |
| Storage Interfaces | Multiple SATA 3.0 ports, 2 x NVMe M.2 ports |
| LAN | 1000Mbit Gigabit Ethernet (RTL8111) |
| Audio | 6-Channel HD Audio Codec |
| Power Port | 24-Pin ATX, 8-Pin ATX 12V |
| Built-in Interfaces | 2*USB 2.0, 2*USB 3.0, F. AUDIO Front Audio Pin, PANEL Pin, Fan Pins, SATA3.0, COM Pin (SCP) |
| Motherboard Size | M-ATX (24.5CM x 19CM) |
9. Warranty and Support
For warranty information and technical support, please refer to the documentation provided with your purchase or contact your retailer. Keep your proof of purchase for warranty claims.