1. Introduction
This manual provides detailed instructions for the setup, operation, and maintenance of your Geevon Atomic Clock (Model US-25282). This device features a large display, automatic time synchronization, indoor and outdoor temperature monitoring, and an alarm function. Please read this manual thoroughly before use to ensure proper functionality and longevity of your product.

Figure 1: Geevon Atomic Clock with Wireless Outdoor Sensor and AC Adapter.
2. Package Contents
Verify that all items are present in the package:
- 1 x Geevon Atomic Clock (Model US-25282)
- 1 x Wireless Outdoor Sensor
- 1 x AC Power Adapter
- 1 x User Manual (this document)
Note: 2 AA batteries for the clock and 2 AAA batteries for the outdoor sensor are not included and must be purchased separately. Rechargeable batteries are not recommended for optimal performance.
3. Product Overview
The Geevon Atomic Clock is designed for clarity and ease of use, featuring a large 10.8-inch display with 2.4-inch digits for excellent visibility. It includes an array of functions for daily convenience.

Figure 2: Overview of key features including RCC function, time zone, DST, AC adapter, adjustable backlight, indoor/outdoor temperature, calendar, alarm, C/F selection, and 12/24-hour format.
3.1 Display Layout and Dimensions
The clock's display is organized for quick readability, showing time, date, day of the week, and both indoor and outdoor temperatures. The main time digits are 2.4 inches tall.
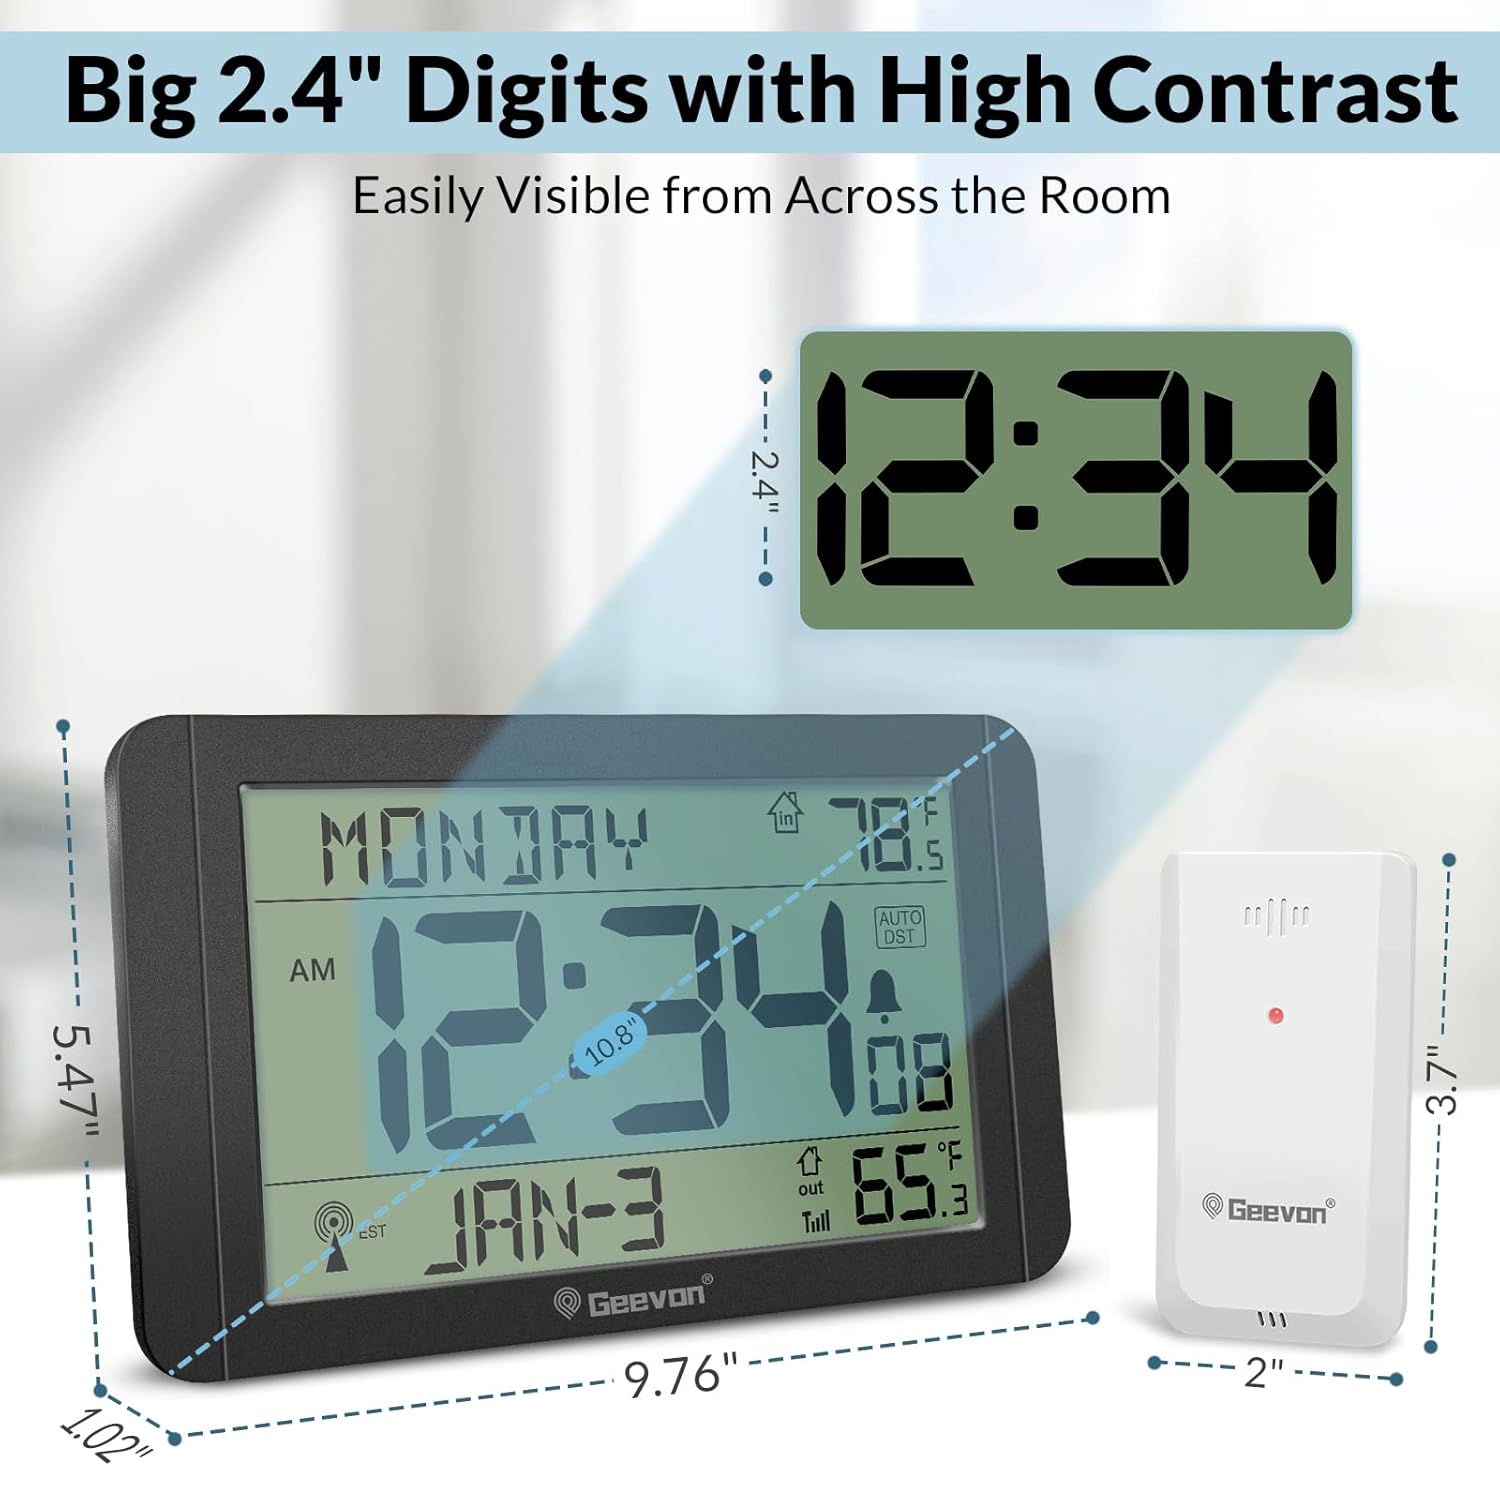
Figure 3: Detailed view of the clock display and its dimensions (10.8 inches wide, 5.47 inches high, 1.02 inches deep). The wireless sensor measures 3.7 inches high and 2 inches wide.
4. Setup
4.1 Powering the Atomic Clock
The clock can be powered by the included AC adapter or by batteries for backup.
- AC Power: Connect the provided AC adapter to the DC port on the back of the clock and plug it into a standard electrical outlet. This is recommended for continuous backlight.
- Battery Backup: For backup during power outages or for portable use, insert 2 new AA batteries (not included) into the battery compartment on the back of the clock. Ensure correct polarity (+/-).
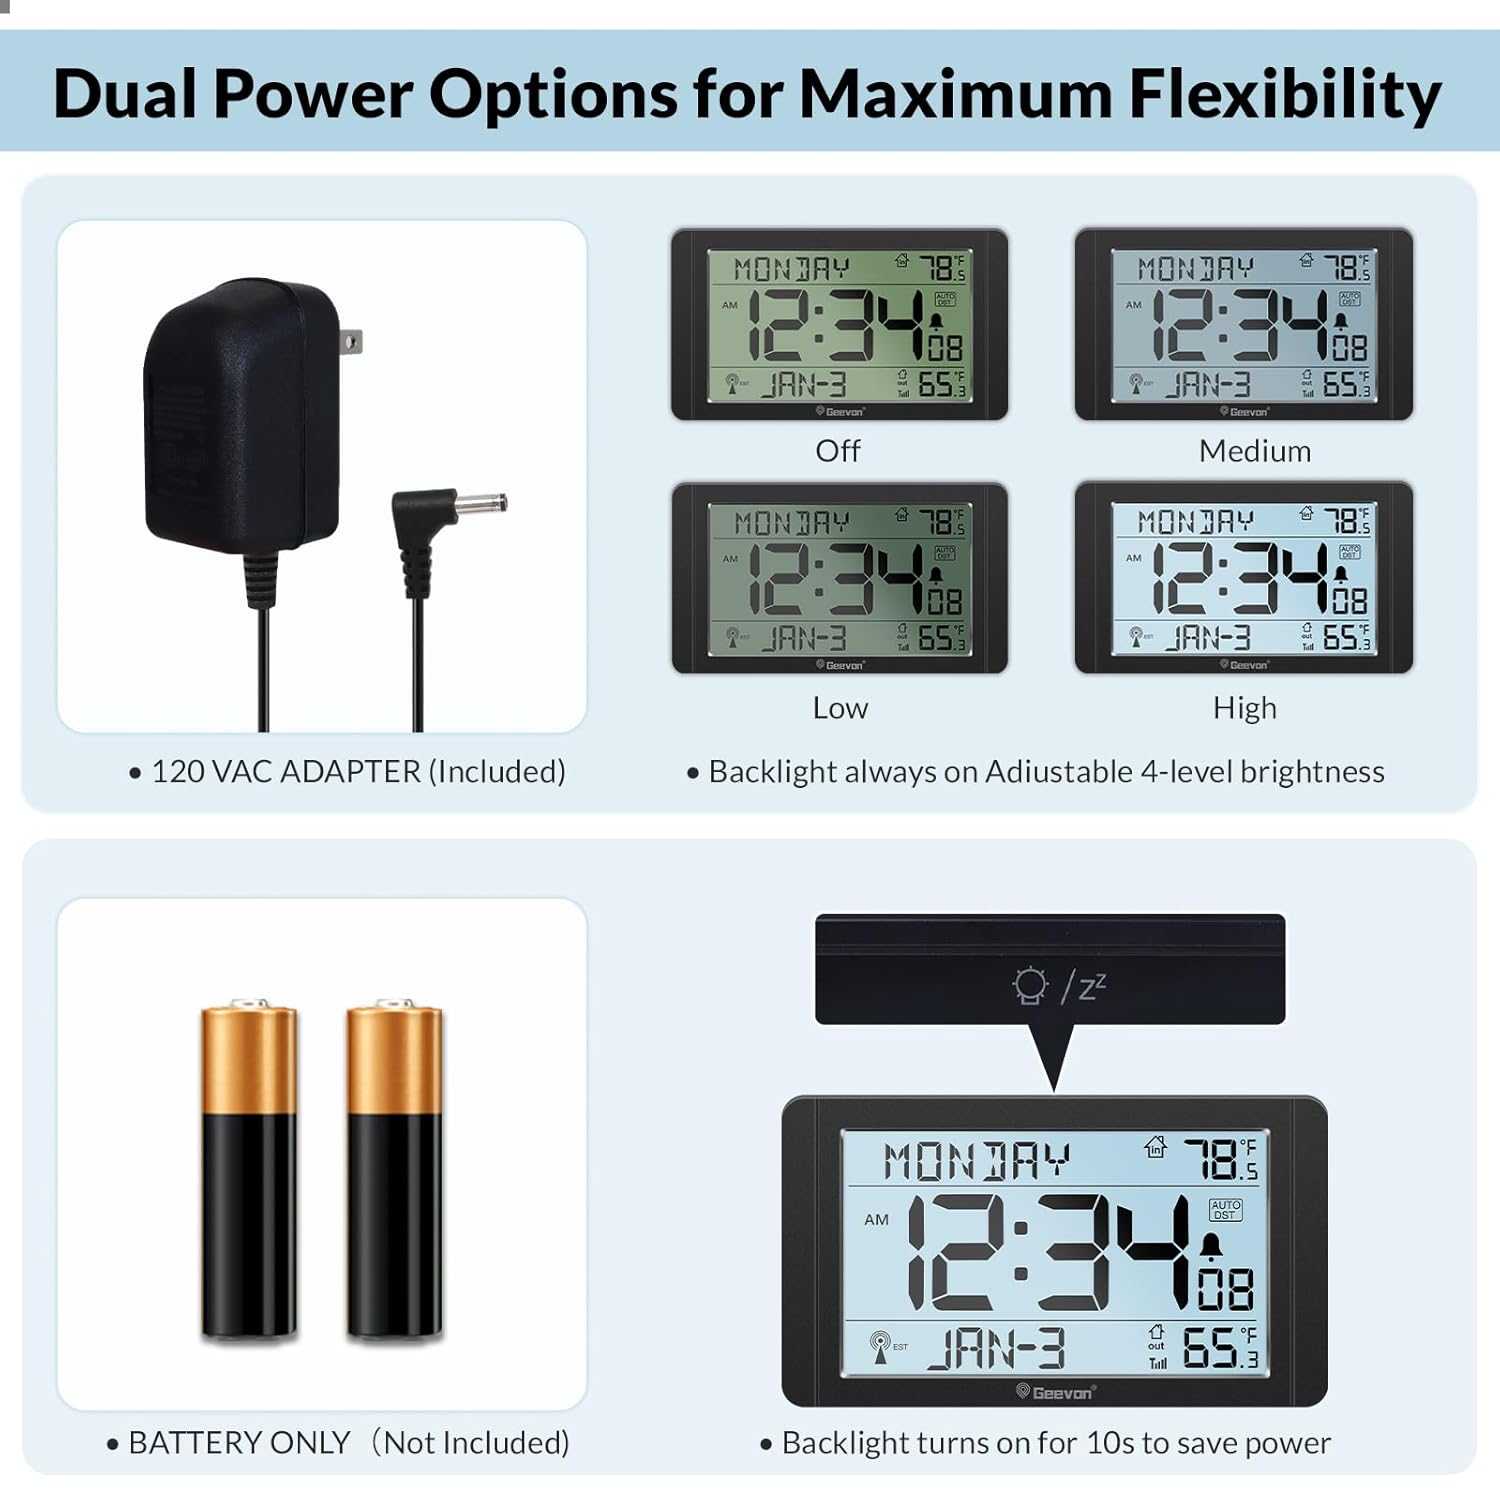
Figure 4: The clock supports both AC power (adapter included) and 2 AA batteries (not included) for backup.

Figure 5: Rear view of the clock showing the battery compartment for 2 AA batteries and the wireless sensor's compartment for 2 AAA batteries.
4.2 Setting up the Wireless Outdoor Sensor
The outdoor sensor transmits temperature data to the main clock unit.
- Open the battery compartment on the back of the wireless sensor.
- Insert 2 new AAA batteries (not included), observing correct polarity (+/-).
- Close the battery compartment securely.
- Place the sensor outdoors in a shaded, dry location, protected from direct sunlight and precipitation, within 200 feet (60 meters) of the main clock unit.
4.3 Initial Time Synchronization (Atomic Time)
The clock automatically attempts to synchronize with the WWVB atomic time signal.
- After powering on, the clock will display a default time and begin searching for the WWVB signal. An antenna icon will flash on the display.
- Set Time Zone: Before the clock receives the atomic signal, it is crucial to set your local time zone. Refer to Section 5.1 for instructions on setting the time zone. The clock supports US time zones (EST to Hawaii).
- The clock automatically attempts to receive RCC signals at 1:00 AM, 2:00 AM, 3:00 AM, 4:00 AM, and 5:00 AM daily. During signal reception, the screen backlight may temporarily turn off to avoid interference.
- Once synchronized, the antenna icon will appear solid on the display, indicating successful atomic time reception.
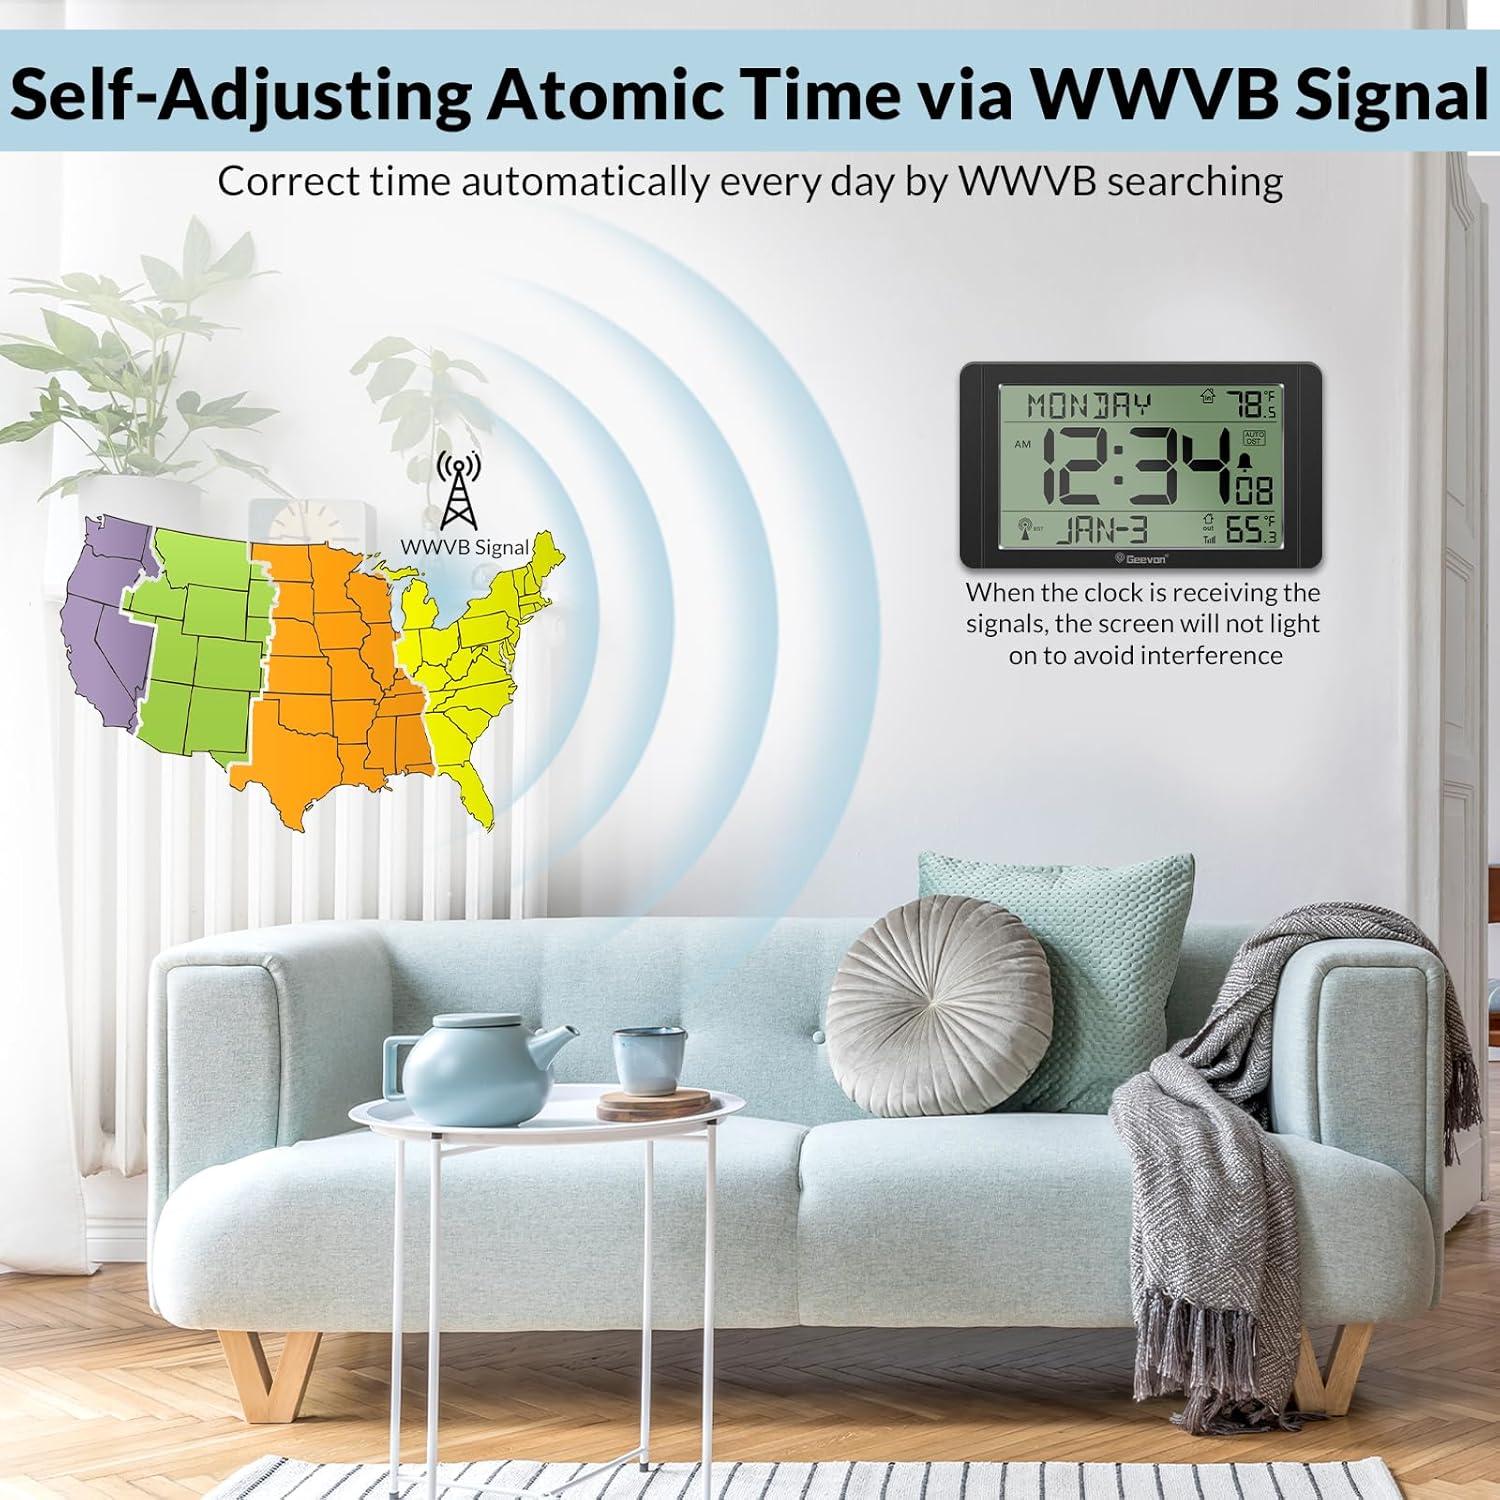
Figure 6: The clock receives WWVB atomic time signals for automatic time adjustment. Ensure your time zone is set correctly for accurate synchronization.
5. Operation
5.1 Setting Time Zone and Manual Time Adjustment
Even with atomic time, the time zone must be set manually.
- Locate the TIME ZONE button on the back of the clock.
- Press the TIME ZONE button repeatedly to cycle through the available US time zones (e.g., PST, MST, CST, EST). Select your local time zone.
- If atomic time synchronization fails or is not desired, you can manually set the time and date using the appropriate buttons (refer to the button layout diagram, typically labeled 'SET' or 'MODE' and arrow buttons).
5.2 Daylight Saving Time (DST)
The clock features automatic Daylight Saving Time adjustment.
- Locate the DST switch or button on the back of the clock.
- Ensure the DST function is enabled (ON) if your region observes Daylight Saving Time. The clock will automatically adjust for spring forward and fall back.
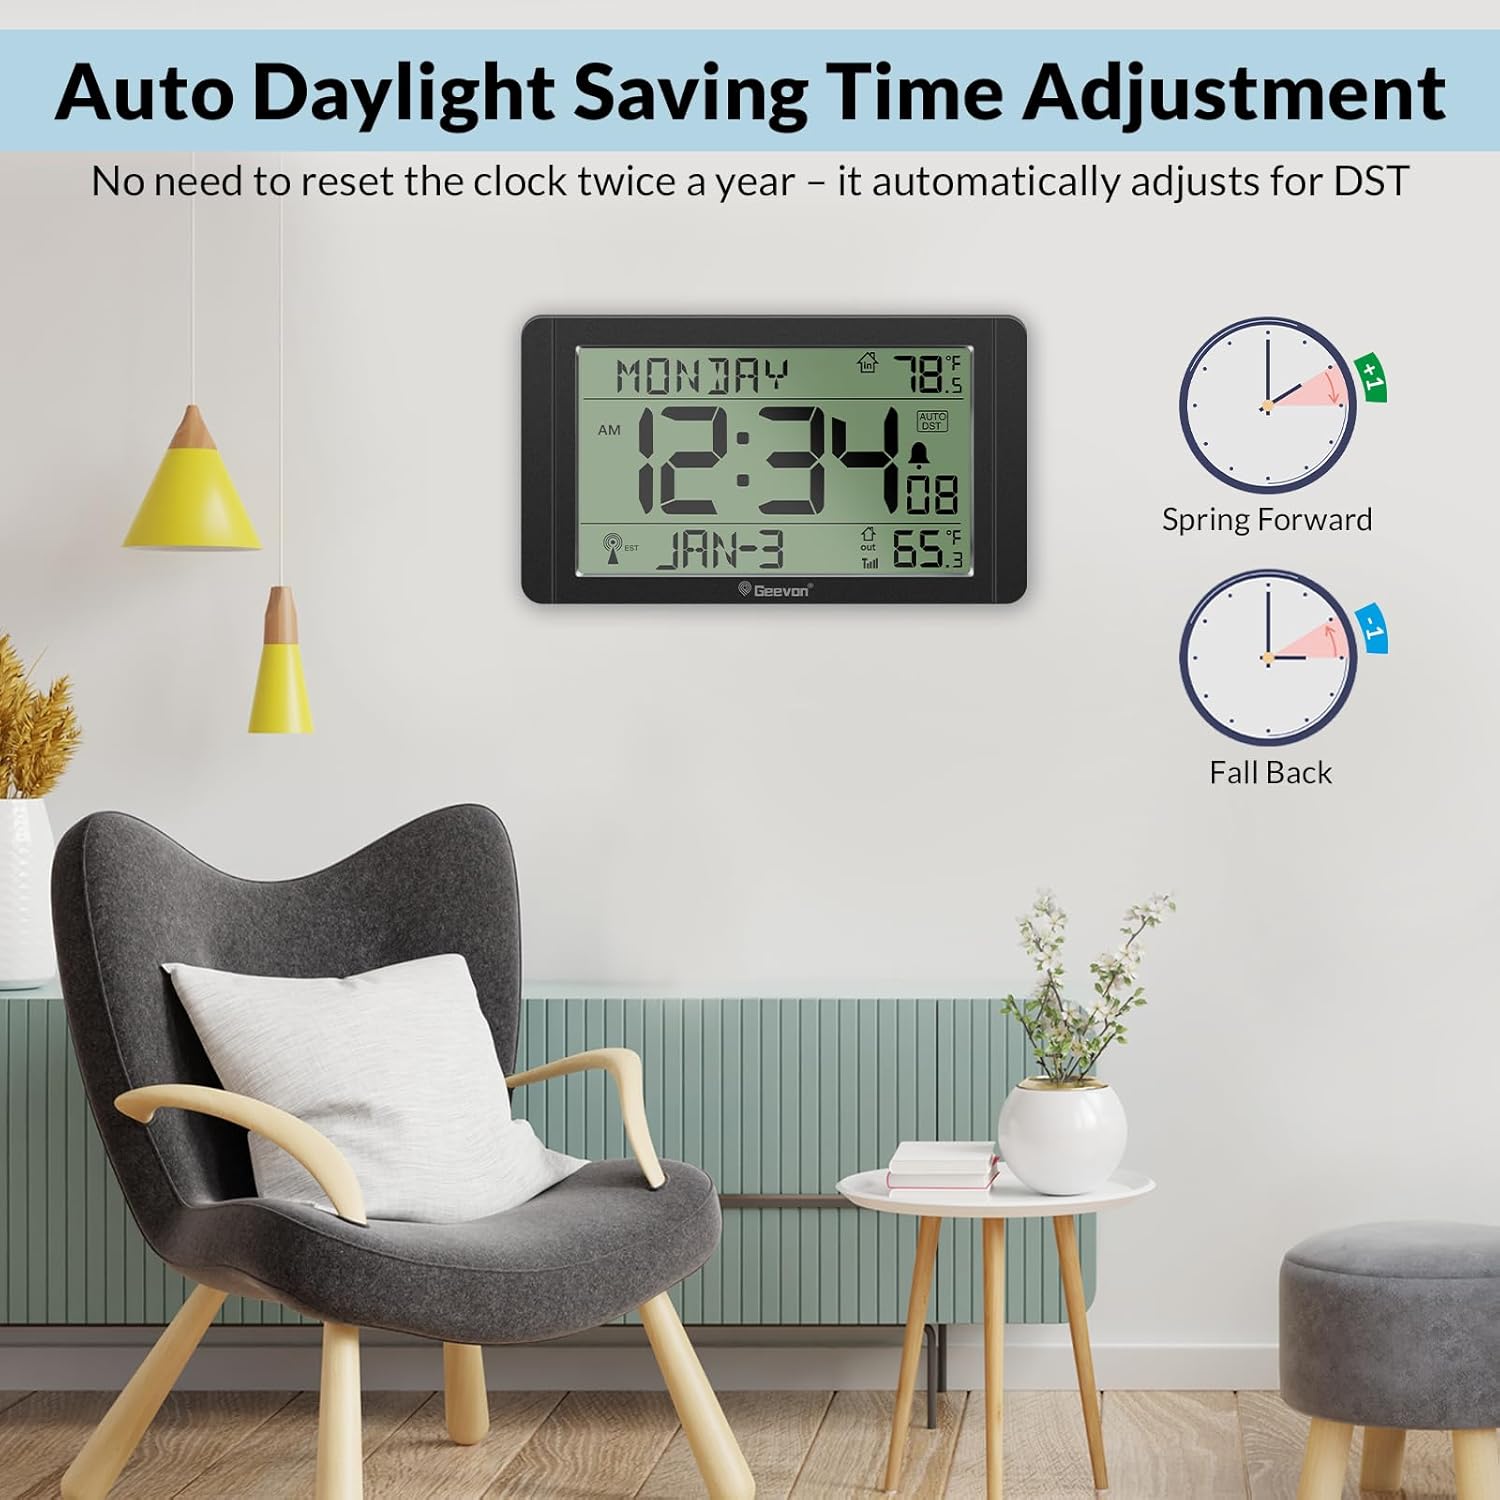
Figure 7: The clock automatically adjusts for Daylight Saving Time when the DST function is enabled.
5.3 Alarm and Snooze Function
The clock includes a gentle alarm with an 8-minute snooze feature.
- Setting Alarm: Use the ALARM SET button (or similar) and arrow buttons to set your desired alarm time.
- Activating/Deactivating Alarm: Use the ALARM ON/OFF button (or similar) to enable or disable the alarm. An alarm icon will appear on the display when active.
- Snooze: When the alarm sounds, press the large SNZ/LIGHT button on the top of the clock to activate the 8-minute snooze function.
- Turning Off Alarm: To turn off the alarm completely, press any button on the back of the clock (except the SNZ/LIGHT button) when the alarm is sounding.
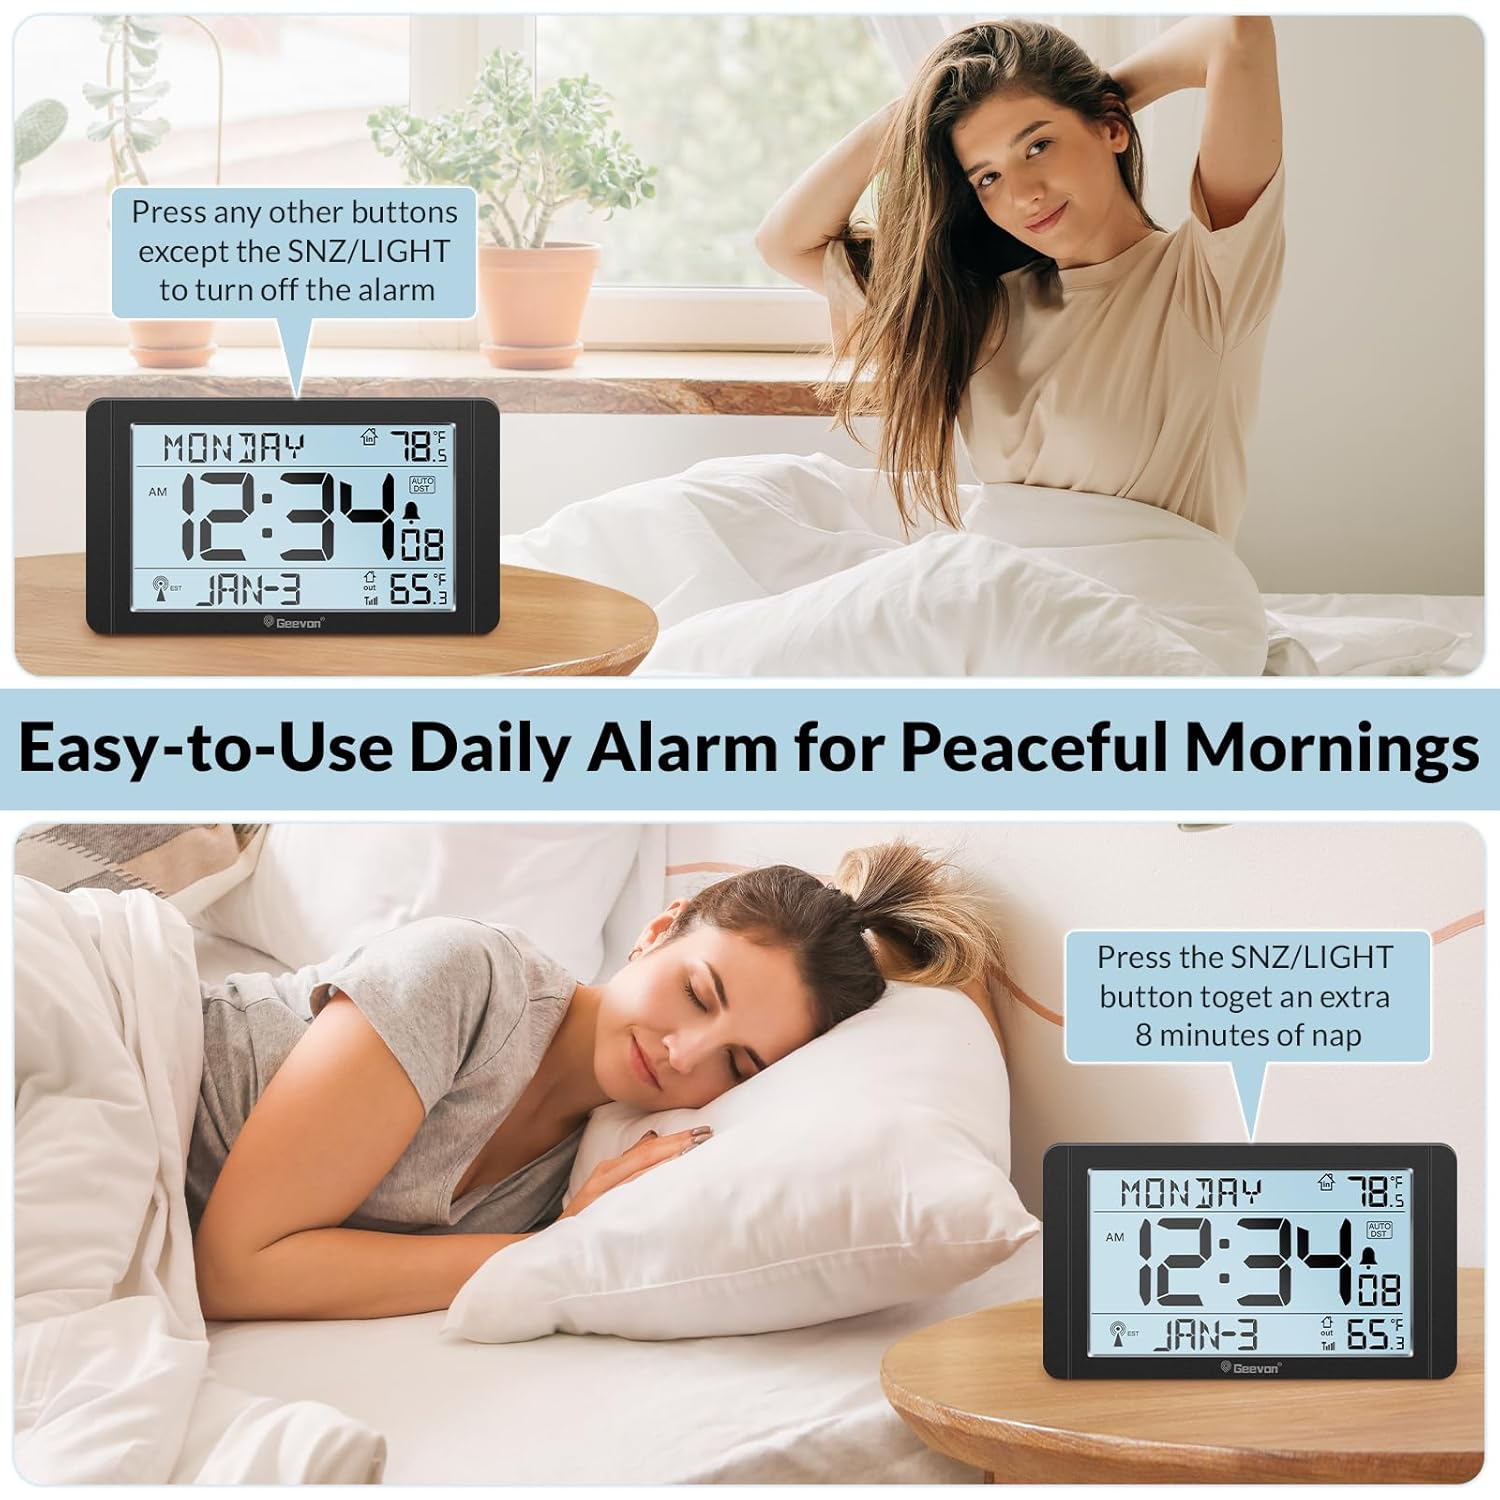
Figure 8: The alarm starts gently and increases in volume. Pressing the top SNZ/LIGHT button provides an 8-minute snooze.
5.4 Adjusting Display Brightness
The clock offers 4 levels of backlight brightness (Off, Low, Medium, High) when powered by the AC adapter.
- Press the SNZ/LIGHT button on the top of the clock to cycle through the brightness levels.
- When operating on battery power only, the backlight will illuminate for 10 seconds after pressing the SNZ/LIGHT button to conserve power.

Figure 9: The clock offers four adjustable brightness levels (Off, Low, Medium, High) for day and night comfort.
5.5 Indoor and Outdoor Temperature Display
The clock displays both indoor temperature (measured by the main unit) and outdoor temperature (received from the wireless sensor).
- The indoor temperature range is 14°F to 122°F (-10°C to 50°C).
- The outdoor temperature range is -40°F to 140°F (-40°C to 60°C).
- To switch between Celsius (°C) and Fahrenheit (°F), locate the °C/°F button on the back of the clock and press it.
- Note that there might be minor discrepancies between indoor and outdoor temperature readings due to sensor placement and environmental factors. The outdoor sensor's temperature reading may update slowly.
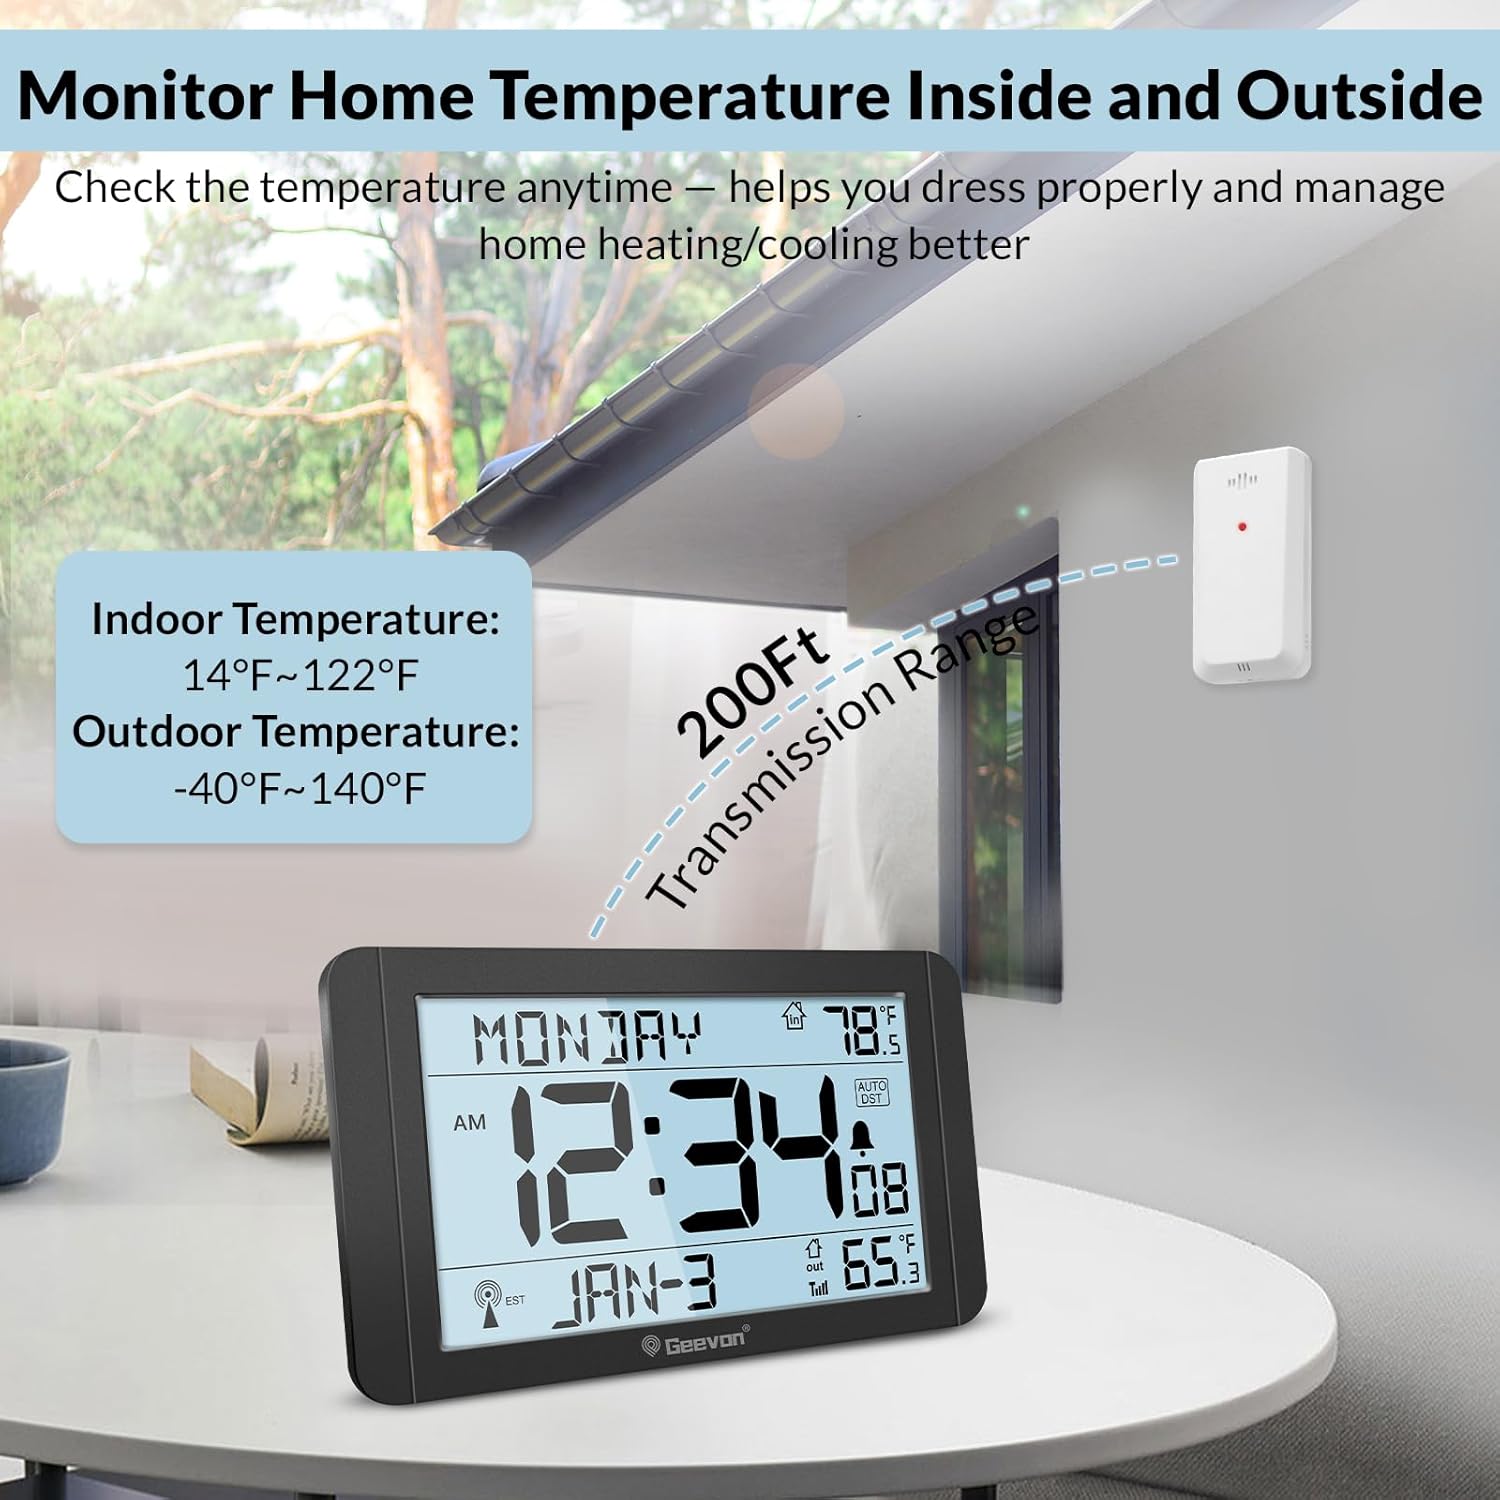
Figure 10: The clock displays both indoor and outdoor temperatures, with the outdoor sensor having a transmission range of up to 200 feet.
6. Placement
The Geevon Atomic Clock offers flexible placement options.
- Tabletop: Use the sturdy fold-out stand on the back of the clock to place it on a nightstand, desk, shelf, or kitchen counter.
- Wall Mount: Utilize the built-in wall mount hole on the back of the clock to hang it in a hallway, kitchen, or office.

Figure 11: The clock is suitable for various locations including bedside tables, offices, kitchens, and children's rooms.
7. Maintenance
7.1 Battery Replacement
- Main Clock Unit: If using battery backup, replace the 2 AA batteries when the low battery indicator appears on the display.
- Outdoor Sensor: Replace the 2 AAA batteries in the outdoor sensor when its low battery indicator appears.
- Always use new, non-rechargeable alkaline batteries for best performance.
7.2 Cleaning
Wipe the clock and sensor with a soft, dry cloth. Do not use abrasive cleaners or immerse the units in water.
8. Troubleshooting
- No Display / Faint Display: Ensure the AC adapter is securely plugged in or replace the AA batteries in the main unit. Adjust brightness using the SNZ/LIGHT button.
- Atomic Time Not Syncing:
- Verify your time zone is correctly set (refer to Section 5.1).
- Ensure the clock is placed away from electronic devices that may cause interference.
- Try placing the clock near a window for better signal reception.
- The clock attempts to sync overnight; allow up to 24-48 hours for initial synchronization.
- Outdoor Temperature Not Displaying / Incorrect:
- Replace the AAA batteries in the outdoor sensor.
- Ensure the sensor is within the 200-foot transmission range of the main unit and free from obstructions.
- Relocate the sensor to a different position to improve signal strength.
- Allow time for the sensor to transmit updated readings, as it may update slowly.
- Alarm Cannot Be Deactivated: To turn off the alarm completely, press any button on the back of the clock (except the SNZ/LIGHT button) when the alarm is sounding.
9. Specifications
| Model Number | US-25282 |
| Product Dimensions | 1.02 x 9.76 x 5.47 inches |
| Weight | 14.4 ounces |
| Power Source (Clock) | AC Adapter (included), 2 x AA batteries (not included) |
| Power Source (Sensor) | 2 x AAA batteries (not included) |
| Material | Acrylonitrile Butadiene Styrene (ABS) |
| Connectivity | Wireless (for outdoor sensor) |
| Indoor Temperature Range | 14°F to 122°F (-10°C to 50°C) |
| Outdoor Temperature Range | -40°F to 140°F (-40°C to 60°C) |
10. Warranty and Support
Geevon products are designed for reliability and performance. For warranty information or technical support, please refer to the contact details provided with your purchase or visit the official Geevon brand store online.
Online Support: Visit the Geevon Store on Amazon


