
Introduction
Thank you for choosing the Luqeeg Digital Camera. This compact and portable camera is designed to capture high-quality photos and videos with ease. Featuring a 48MP image resolution, 4K video capability, 8X digital zoom, and a 2.7-inch LCD screen, it is suitable for various photography needs. This manual provides essential information for setting up, operating, and maintaining your camera to ensure optimal performance.
Safety Information
- Do not expose the camera to water or moisture.
- Avoid dropping the camera or subjecting it to strong impacts.
- Keep the camera away from extreme temperatures.
- Do not attempt to disassemble or repair the camera yourself. Refer to qualified service personnel.
- Use only the specified charging cable and power source.
- Keep out of reach of small children.
Package Contents
Please check that all items are present in your package:
- 1 x Luqeeg Digital Camera
- 1 x USB Cable
- 1 x Storage Bag
- 1 x Hand Rope
- 1 x Instruction Manual (This document)

Figure 1: The Luqeeg Digital Camera shown with its included accessories: a USB cable, a storage bag, and a hand rope.
Camera Overview
Front View

Figure 2: Front view of the camera, highlighting the lens, built-in flash, and microphone.
- Lens: Captures images and videos.
- Flash: Provides illumination in low-light conditions.
- Microphone: Records audio during video capture.
Rear View
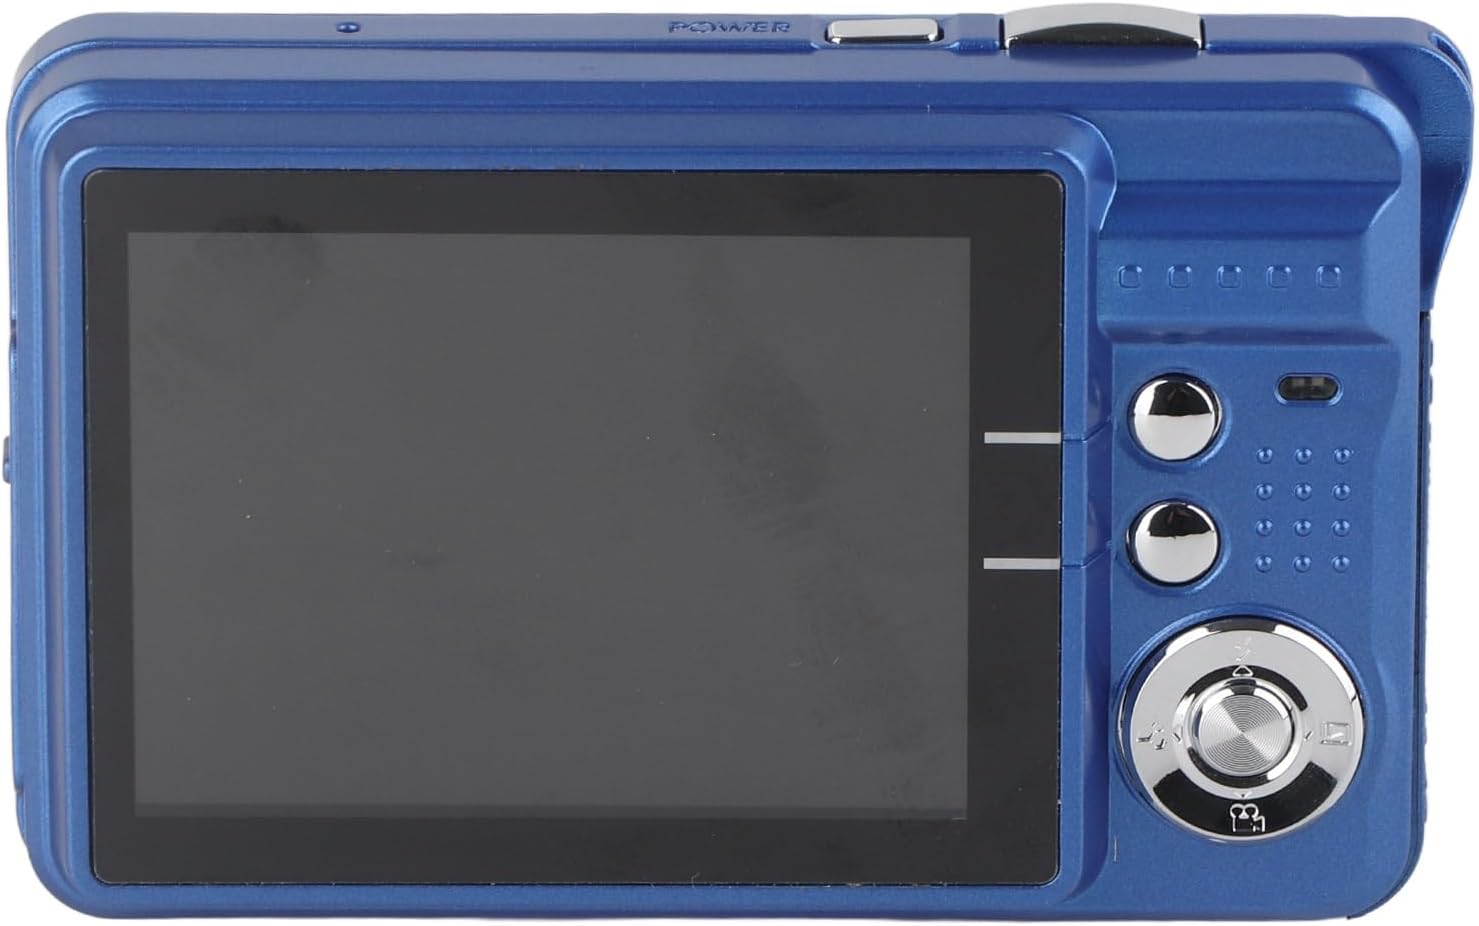
Figure 3: Rear view of the camera, showing the 2.7-inch LCD screen and control buttons.
- 2.7-inch LCD Screen: Displays live view, menu, and playback.
- Navigation Buttons: Used for menu navigation and settings adjustment.
- Shutter Button: Captures photos and starts/stops video recording.
- Zoom Lever (T/W): Adjusts digital zoom.
Setup
1. Charging the Battery
The camera features a built-in 550mAh lithium battery. Before first use, ensure the battery is fully charged.
- Connect the included USB cable to the camera's USB port.
- Connect the other end of the USB cable to a USB power adapter (not included) or a computer's USB port.
- The charging indicator light will illuminate. Once charging is complete, the light will change or turn off.
2. Inserting a Memory Card
The camera supports memory cards up to 128GB (not included). A memory card is required to save photos and videos.
- Locate the memory card slot on the side of the camera.
- Insert the memory card into the slot with the metal contacts facing the correct direction (refer to the diagram near the slot if available) until it clicks into place.
- To remove, gently press the card until it pops out.
3. Initial Power On
Press and hold the power button (usually located on the top or side) for a few seconds until the LCD screen illuminates.
Operating the Camera
1. Taking Still Images
- Hold the camera firmly and aim it so that your subject is visible on the 2.7-inch LCD screen.
- Setting Menu: Press the appropriate button (e.g., 'A' for flash or a dedicated 'scene' button) to adjust flash settings or select a scene mode. Other settings can be accessed and adjusted through the main menu.
- Using Zoom: Use the zoom lever. Push towards 'T' (Telephoto) to zoom in on a distant subject, or push towards 'W' (Wide-angle) for a broader view. The camera features 8X digital zoom.
- Press the Shutter button fully to capture the image.
2. Recording Videos
To record video, switch the camera to video mode (if applicable, usually via a mode button or menu option). Press the Shutter button once to start recording and again to stop.

Figure 4: The camera's 2.7-inch screen displaying a video playback icon, indicating video mode or playback.
3. Menu Navigation
Use the navigation buttons (up, down, left, right, OK/Set) to browse through the camera's menu options. The menu allows you to adjust various settings such as image resolution, video resolution, white balance, exposure, and more.
4. Playback Mode
To view your captured photos and videos, switch to playback mode (usually via a dedicated button or menu option). Use the navigation buttons to scroll through your media. Press the OK/Set button to view details or play videos.

Figure 5: The camera's 2.7-inch screen displaying a captured group photo, demonstrating image playback.
5. Built-in Fill Light
The camera includes a built-in fill light. This feature can be activated or deactivated as needed to provide additional illumination in low-light environments, helping to improve image quality.
Maintenance
Cleaning the Camera
- Use a soft, lint-free cloth to clean the camera body.
- For the lens and LCD screen, use a specialized lens cleaning cloth and solution. Avoid harsh chemicals.
- Gently wipe away dust and smudges.
Storage
When not in use, store the camera in the provided storage bag in a cool, dry place, away from direct sunlight and extreme temperatures.
Troubleshooting
| Problem | Possible Cause | Solution |
|---|---|---|
| Camera does not power on. | Battery is depleted. | Charge the battery fully. |
| Cannot take photos/videos. | No memory card inserted or card is full. | Insert a memory card or delete unnecessary files. |
| Images are blurry. | Camera shake, dirty lens, or subject too close/far. | Hold camera steady, clean lens, ensure proper distance. |
| Flash not working. | Flash is disabled or battery is low. | Enable flash in settings, charge battery. |
Specifications
| Feature | Detail |
|---|---|
| Photosensitive Component | CMOS 5MP processor |
| Image Resolution | 48MP (8000x6000), 30MP (6400x4800), 24MP (5600x4200), 20MP (5200x3900), 18MP (4896x3672), 16MP (4608x3456), 12MP (4000x3000), 8MP (3264x2448), 7MP (3072x2304), 5MP (2592x1944), 2MP (1600x1200) |
| Picture Format | JPEG |
| Video Resolution | 4K (3840x2160), 2.7K (2688x1520), FHD (1920x1080), HD (1280x720) |
| Video Format | AVI |
| Screen Size | 2.7 inches |
| Digital Zoom | 8x |
| Shutter | Electronic |
| Storage | Supports up to 128GB memory card (not included) |
| Battery | Built-in lithium battery, 550mAh |
| Item Weight | 5.4 ounces (approx. 153g) |
| Package Dimensions | 5.12 x 4.33 x 1.57 inches |
| Model Number | Luqeegqk3hdfwgce-13 |
Warranty and Support
For warranty information and customer support, please refer to the documentation included with your purchase or visit the official Luqeeg website. If you encounter any issues not covered in this manual, please contact customer service for assistance.