1. Introduction
Thank you for choosing the VEVOR 10 x 10 ft Outdoor Pergola. This manual provides essential information for the safe assembly, operation, and maintenance of your new pergola. Please read these instructions carefully before installation and retain them for future reference. This pergola is designed to provide a shaded area for outdoor spaces such as patios, lawns, gardens, and poolside areas.
2. Safety Information
- In heavy rain, pull one side of the canopy down to the lowest point, secure with the fastening clips, and use sandbags to prevent water accumulation on top.
- Always follow the installation manual for a quick and easy setup.
- Ensure the pergola is secured to a stable foundation for safety.
- Do not use the pergola in extreme weather conditions such as strong winds, heavy snow, or thunderstorms. Retract the canopy during stormy weather.
- Keep children and pets away from the assembly area.
- Regularly inspect all connections and fasteners to ensure they remain tight and secure.
3. Package Contents
Before beginning assembly, verify that all parts listed below are present and undamaged. If any parts are missing or damaged, please contact VEVOR customer support.

Figure 3.1: All components included in the package. This includes the canopy, frame set, installation hardware, and sandbags.
The package includes the canopy, frame set, installation hardware, and a detailed installation manual.
4. Setup and Assembly
Assembly of the VEVOR 10 x 10 ft Outdoor Pergola requires at least two people. Follow the step-by-step instructions provided in the included manual. Ensure all connections are secure before use.
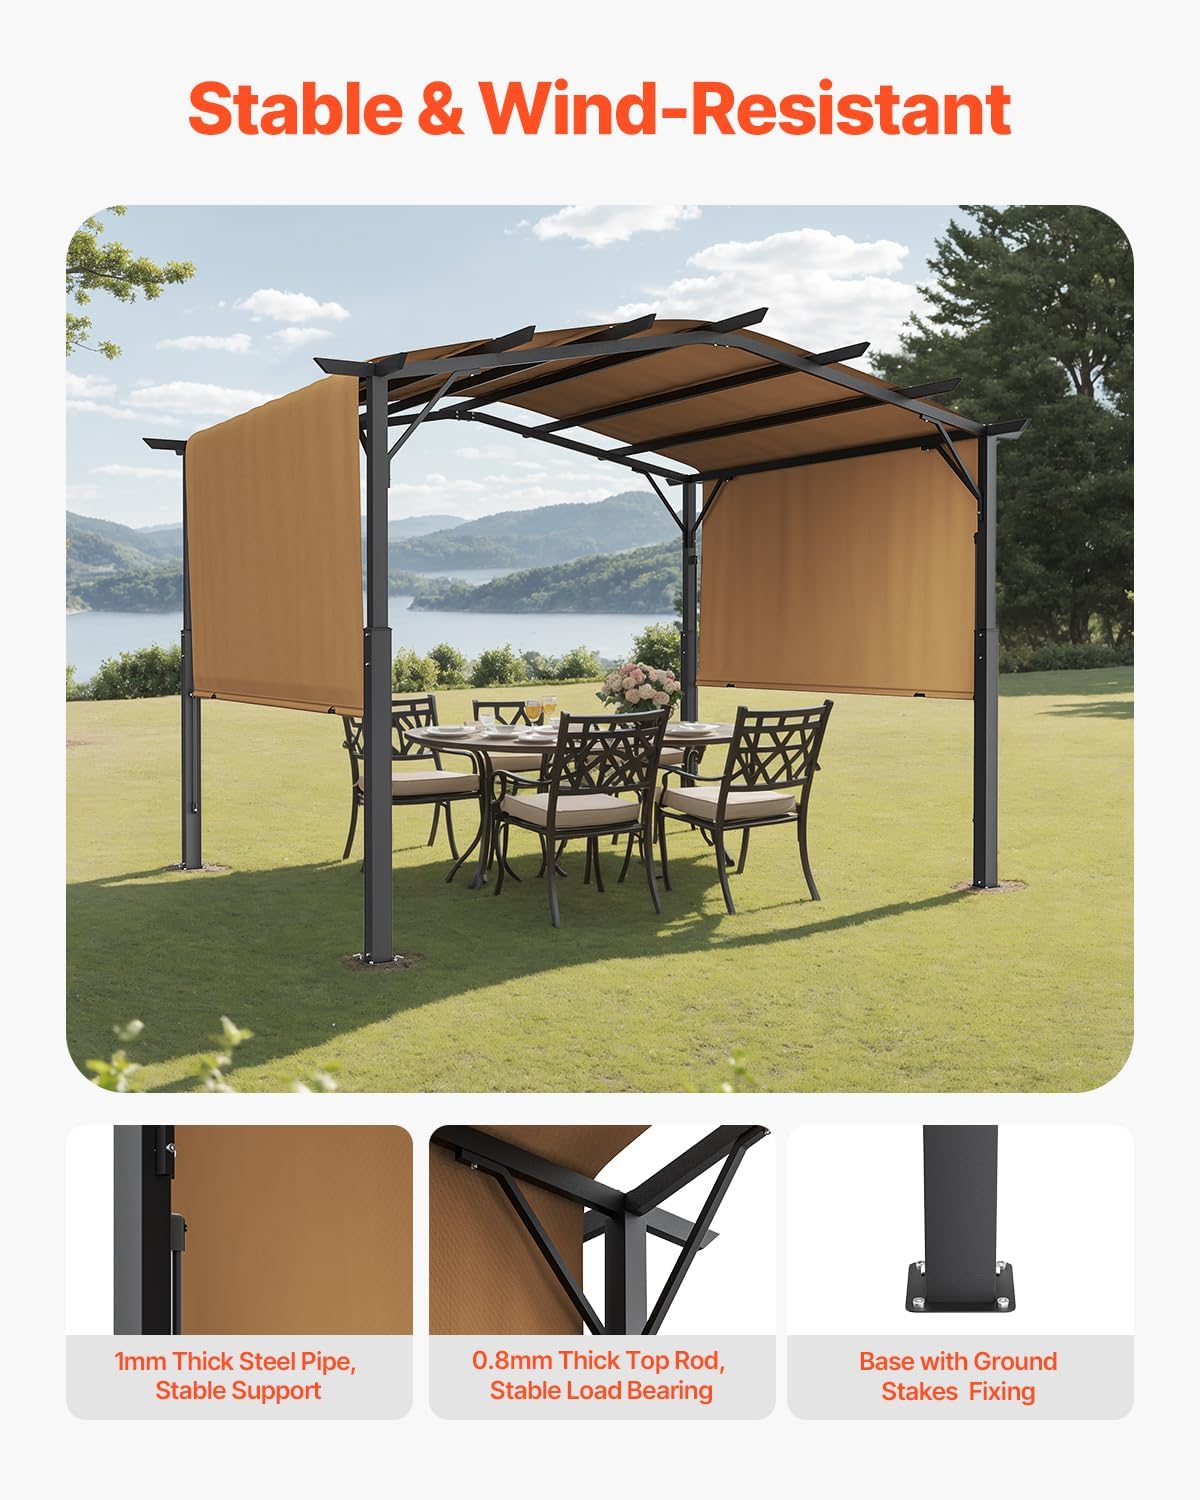
Figure 4.1: Fully assembled pergola with canopy extended.
4.1 Key Assembly Features
- Limit Holes and Plastic Limiters: These features assist in correctly aligning and securing frame components during assembly.
- Coded Posts: Each post is marked with a code to ensure correct orientation and placement.

Figure 4.2: Visual guide to easy installation features like limit holes and coded posts.
4.2 Structural Stability
The pergola features a powder-coated steel frame for durability and stability. The top rods are reinforced with plastic limit blocks, and strong base supports are included for enhanced stability. Ground stakes are provided for fixing the base.

Figure 4.3: Details of the stable and wind-resistant construction.
4.3 Assembly Video Guide
For a visual guide on the assembly process, please refer to the official installation video below:
Video 4.1: Official VEVOR guide on how to install the outdoor pergola, demonstrating the step-by-step assembly process.
5. Operating Instructions
5.1 Retractable Canopy Operation
The pergola features a retractable canopy that can be easily adjusted to control the amount of sun and shade. The canopy slides along rails, allowing for flexible positioning.

Figure 5.1: Mechanism for adjusting the retractable canopy.
- Sliding Handles: Use the two sided handles to easily slide the canopy up or down along the rails.
- Snap Lock: The canopy can be fixed at a desired length using the snap lock mechanism.
6. Maintenance
6.1 Canopy Care
The canopy is made from 180g polyester PA waterproof fabric, designed for durability and sun protection.

Figure 6.1: Detail of the durable and waterproof canopy fabric.
- Clean the canopy fabric with mild soap and water. Do not use harsh chemicals or abrasive cleaners.
- Ensure the canopy is dry before retracting for extended periods to prevent mildew.
- In heavy rain, follow the safety instructions to prevent water accumulation.
6.2 Frame Care
The frame is constructed from powder-coated Q235 carbon steel, which helps prevent rust and breakage.
- Wipe the frame with a damp cloth to remove dirt and debris.
- Inspect the frame periodically for any signs of rust or damage. Touch up any scratches with rust-resistant paint if necessary.
- Ensure all bolts and screws remain tightened.
7. Troubleshooting
| Problem | Possible Cause | Solution |
|---|---|---|
| Water accumulation on canopy | Canopy not properly angled during rain. | Pull one side of the canopy down to the lowest point and secure with fastening clips. Use sandbags to weigh down the low side. |
| Pergola instability / swaying | Loose connections; insufficient anchoring; strong winds. | Ensure all bolts and screws are tightened. Use ground stakes and sandbags for additional stability. Retract canopy in strong winds. |
| Canopy difficult to slide | Debris in sliding track; misaligned rails. | Clean the sliding tracks. Check for any obstructions or misalignments in the rails. |
| Parts do not fit during assembly | Incorrect orientation of parts; manufacturing defect. | Refer to the detailed manual and coded posts to ensure correct orientation. If parts are defective, contact customer support. |
8. Specifications

Figure 8.1: Product dimensions and key specifications.
| Feature | Detail |
|---|---|
| Brand | VEVOR |
| Model Number | L10ft*W10ft |
| Product Dimensions (External) | 120"L x 120"W x 95.98"H (10 ft L x 10 ft W x 8.3 ft H) |
| Internal Dimensions | 7.87 ft L x 7.87 ft W x 8 ft H |
| Floor Area | 100 Square Feet |
| Item Weight | 98.11 Pounds (44.5 kg) |
| Frame Material | Q235 Carbon Steel (Powder-Coated) |
| Canopy Material | 180g Polyester PA Waterproof Fabric |
| Water Resistance Level | Waterproof |
| Ultraviolet Light Protection | Yes |
| Assembly Required | Yes |
| Color | Beige Tarpaulin + Black Metal Parts |
9. Warranty and Support
For warranty information or technical support, please refer to the documentation included with your purchase or visit the official VEVOR website. Keep your purchase receipt as proof of purchase for any warranty claims.
VEVOR offers a 30-day easy return policy and customer support. For further assistance, please contact VEVOR customer service directly.


