1. Introduction
The RADIOMASTER XR4 Gemini Xrossband Dual-Band Receiver is designed for remote control applications, offering reliable signal reception through its dual-band capabilities. It supports ExpressLRS Gemini Xrossband (Gem-X) protocol, operating on both 2.4GHz and Sub-G 900MHz frequencies. This manual provides essential information for the proper setup, operation, and maintenance of your XR4 receiver.
2. Package Contents
Verify that all items listed below are included in your package:
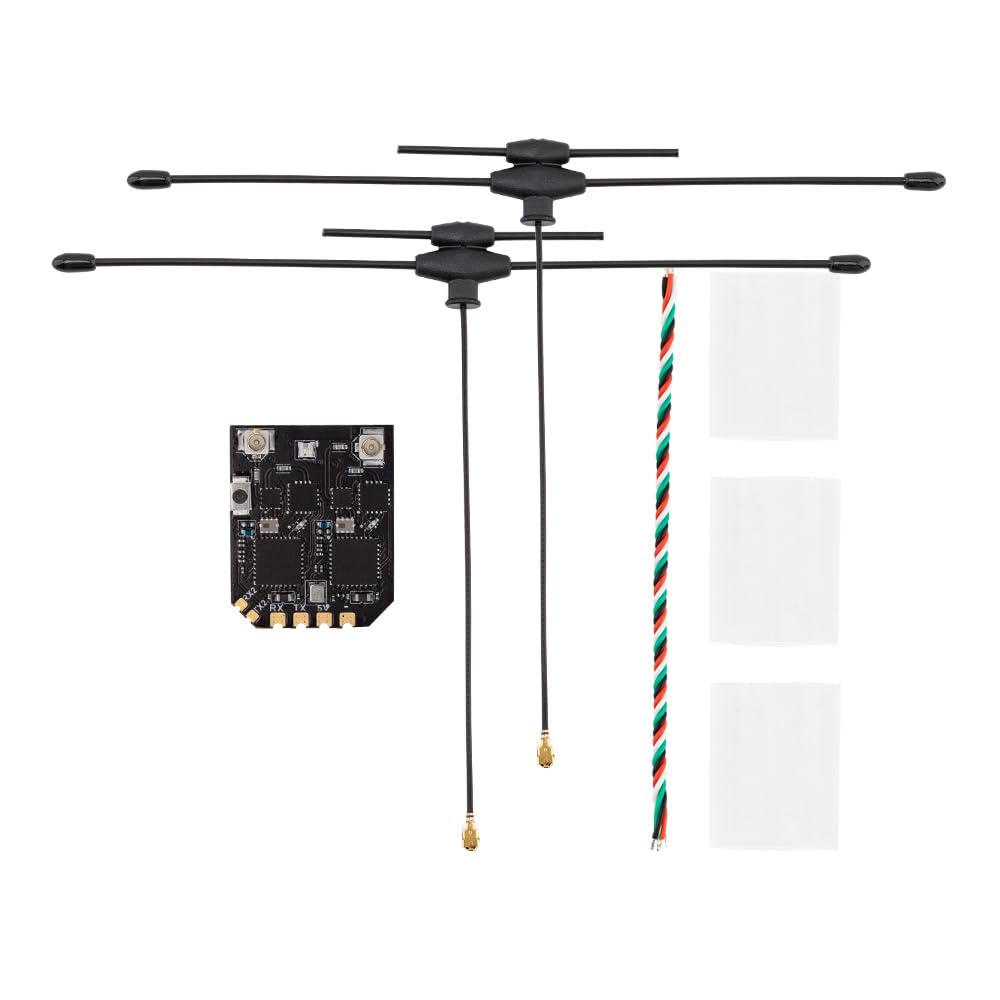
- 1 x XR4 Gemini Xrossband Dual-Band Receiver
- 2 x Dual-Band T-Antenna
- 1 x CRSF Wire
- 3 x Heat-Shrinkable Tube

This image displays the Radiomaster XR4 receiver board with its two dual-band T-antennas attached, illustrating the complete receiver assembly.
3. Features
- True Diversity & Dual-Band: Utilizes dual LR1121 RF transceivers for enhanced reliability.
- ExpressLRS Gemini Xrossband (Gem-X) Compatible: Supports 2.4GHz and Sub-G 900MHz bands.
- High-Performance MCU: Equipped with ESP32D4.
- Dual Semtech LR1121 Transceivers: Provides robust signal processing.
- Secondary UART Port: For advanced functionality and future expansion.
- Castled Pads: Facilitates easy soldering.
- Integrated Wi-Fi Module: Simplifies firmware updates and configuration via WebUI.
- Ultra-Low Latency & High Refresh Rate: Ensures stable RF link.

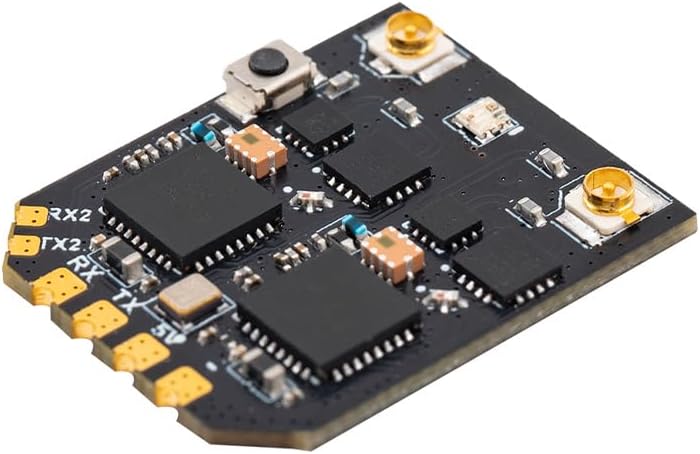
This image highlights the two Semtech LR1121 transceivers, which are central to the receiver's dual-band and true diversity capabilities.

This image shows a detailed view of the XR4 receiver board, specifically pointing out the additional UART port available for future expansion and advanced functionality.
4. Specifications
| Parameter | Value |
|---|---|
| MCU | ESP32D4 |
| RF Chip | LR1121 x 2 |
| RF Connector | IPEX-1 x 2 |
| Antenna | Dual-Band T Antenna x 2 (Included) |
| Frequency Range | 2.4GHz / Sub-G 900MHz |
| Telemetry Power | 100mW |
| Maximum Receive Refresh Rate | DK500Hz / K1000Hz |
| Minimum Receiver Refresh Rate | 50Hz |
| Working Voltage | DC 4.5-8.4V |
| Weight (without antenna) | 1.7g |
| Dimensions | 22mm x 18mm x 4mm |
| Firmware Version (pre-installed) | ExpressLRS v3.5.1 |
| FW Target | RadioMaster XR4 2.4/900 Gemini RX |
| Bus Interface 1 | CRSF |
| Bus Interface 2 | UART |
This image provides a clear top-down view of the XR4 receiver's circuit board, showing component layout and connection points.
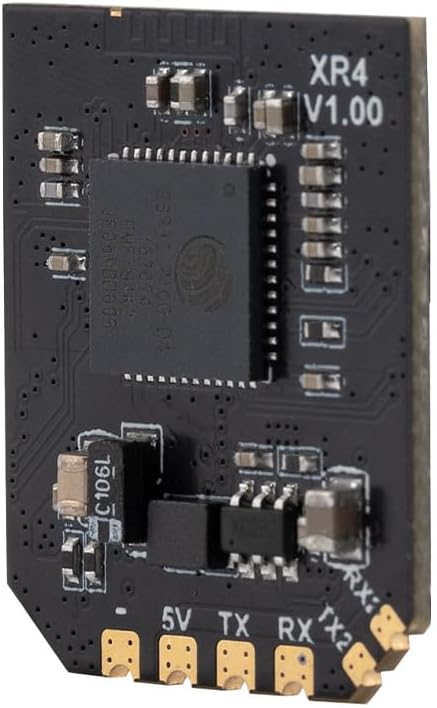
This image shows a side profile of the XR4 receiver board, with "XR4 V1.00" clearly visible, indicating the model and version.
5. Setup and Installation
5.1 Wiring Connections
The XR4 receiver uses standard CRSF protocol for communication. Connect the receiver to your flight controller or other compatible device using the provided CRSF wire. Ensure correct polarity for power connections (DC 4.5-8.4V).
- 5V: Power input (4.5-8.4V DC)
- GND: Ground
- TX: CRSF Transmit (connect to RX on flight controller)
- RX: CRSF Receive (connect to TX on flight controller)
- TX2/RX2: Secondary UART port for advanced functionality.
5.2 Antenna Installation
Connect the two dual-band T-antennas to the IPEX-1 connectors on the receiver board. Position the antennas at a 90-degree angle to each other for optimal signal diversity. Use the provided heat-shrinkable tubes to secure and protect the antenna connections.
This image shows an angled view of the XR4 receiver board, highlighting the IPEX-1 antenna connectors and the soldering pads for power and CRSF communication.
6. Operating Instructions
6.1 Binding Procedure (ExpressLRS)
The XR4 receiver comes pre-installed with ExpressLRS v3.5.1 firmware. To bind the receiver to your ExpressLRS transmitter module, follow these general steps:
- Ensure your transmitter module is running a compatible ExpressLRS firmware version.
- Power on the receiver. It will enter binding mode if it does not find a valid link. The LED on the receiver will typically flash rapidly.
- On your ExpressLRS transmitter, initiate the binding process. This is usually done via the Lua script or a dedicated bind button/menu option.
- Once bound, the receiver's LED will turn solid, indicating a successful connection.
- If binding fails, ensure your transmitter and receiver have matching ExpressLRS firmware versions and binding phrases (if configured).
6.2 Operating Modes: Gemini and Xrossband (Gem-X)
The XR4 receiver supports various operating modes, leveraging its dual RF circuits:
- Gemini 2.4GHz: Uses two 2.4GHz antennas for dual-frequency operation within the 2.4GHz band.
- Gemini Sub-G 900MHz: Uses two 900MHz antennas for dual-frequency operation within the Sub-G 900MHz band.
- Xrossband (Gem-X): Utilizes one Sub-G 900MHz antenna and one 2.4GHz antenna for dual-band operation, providing enhanced reliability across different frequency ranges.
The specific mode is typically configured via the ExpressLRS Lua script on your transmitter or through the receiver's WebUI.

This diagram visually explains the different antenna configurations and packet transmission methods for Gemini 2.4GHz, Gemini Sub-G 900MHz, and Xrossband (Gem-X) dual-band modes.
7. Firmware Updates
The XR4 receiver features an integrated Wi-Fi module for convenient firmware updates and configuration. To update the firmware:
- Power on the receiver.
- Connect to the receiver's Wi-Fi hotspot from your computer or mobile device. The network name will typically be "ExpressLRS RX" followed by a unique identifier.
- Open a web browser and navigate to http://10.0.0.1.
- Use the WebUI to flash new firmware or adjust settings. Refer to the official ExpressLRS documentation for detailed instructions on firmware flashing.
8. Maintenance
The XR4 receiver requires minimal maintenance. Keep the device clean and free from dust and moisture. Regularly inspect antenna connections for damage. Ensure proper heat dissipation if operating in enclosed spaces.
9. Troubleshooting
- No Link/LED Flashing:
- Ensure the receiver is powered correctly (4.5-8.4V).
- Verify the transmitter module is powered on and transmitting.
- Check if the receiver is in binding mode (rapid LED flash). If not, re-initiate binding.
- Confirm that the transmitter and receiver are running compatible ExpressLRS firmware versions.
- Check for correct binding phrase if one is set.
- Poor Range/Signal Quality:
- Inspect antennas for damage or improper connection.
- Ensure antennas are positioned optimally (e.g., 90 degrees to each other).
- Check for sources of interference near the receiver or antennas.
- Verify the selected operating mode (Gemini/Xrossband) is appropriate for your setup.
- Receiver Not Responding:
- Check all wiring connections (power, ground, CRSF TX/RX).
- Ensure the flight controller or connected device is configured correctly for CRSF protocol.
- Attempt a firmware re-flash if the receiver is unresponsive.
10. Safety Information
- Always ensure correct power polarity before connecting the receiver. Incorrect wiring can cause permanent damage.
- Operate RC equipment responsibly and within legal limits.
- Keep the receiver away from water, moisture, and extreme temperatures.
- Do not attempt to modify the receiver's hardware beyond specified connection points.
- Ensure proper ventilation to prevent overheating.
11. Warranty and Support
For warranty information and technical support, please refer to the official RADIOMASTER website or contact your authorized dealer. Keep your proof of purchase for warranty claims.