1. Introduction
This user manual provides comprehensive instructions for the installation, operation, and maintenance of your FJZKTEG 16MP PoE IP Camera. Please read this manual thoroughly before using the product to ensure proper functionality and safety.
The FJZKTEG 16MP PoE IP Camera is a high-performance surveillance device designed for both indoor and outdoor environments, featuring dual-lens panoramic viewing, high-resolution imaging, and robust vandal-proof construction.
2. Product Features
- High-Resolution Imaging: Available in 8MP and 16MP configurations, providing clear and detailed video footage for effective surveillance.
- PoE (Power over Ethernet) Support: Simplifies installation by allowing both power and data transmission over a single Ethernet cable.
- IK10 Vandal-Proof Design: Offers enhanced durability and resistance against external impacts, suitable for demanding environments.
- Dual-Lens 180° Panoramic View: Provides a wide field of view, minimizing blind spots and offering comprehensive area coverage.
- Integrated Spotlight: Enhances night vision capabilities, ensuring clear and bright images even in low-light conditions.
- IP67 Weatherproof Rating: Ensures reliable operation in various weather conditions, suitable for outdoor installation.
- Two-Way Audio: Enables communication through the camera.
3. Package Contents
Please check the package contents upon unboxing. If any items are missing or damaged, contact your vendor immediately.
- FJZKTEG 16MP PoE IP Camera (Model: f17heceecc90)
- Mounting Screws and Wall Plugs
- Waterproof Connector for Ethernet Cable
- Quick Start Guide (This Manual)
4. Safety Information
- Ensure the power supply voltage matches the camera's requirements (DC 12.0V/1A or PoE).
- Do not disassemble or modify the camera. Unauthorized modifications may void the warranty and pose safety risks.
- Avoid placing the camera in direct sunlight for prolonged periods or near heat sources.
- Handle the camera with care to prevent damage to the lens or internal components.
- For outdoor installation, ensure all cable connections are properly sealed to maintain the IP67 weatherproof rating.
5. Setup and Installation
5.1 Physical Installation
The camera can be installed on a ceiling, wall, or side surface. Choose a location that provides the desired viewing angle and is within reach of your network cable.
- Prepare the Mounting Surface: Use the provided mounting template (if included) to mark drill holes.
- Drill Holes: Drill holes according to the marks and insert wall plugs if mounting on masonry.
- Secure the Camera: Attach the camera base to the mounting surface using the provided screws.
- Connect Network Cable: Connect an Ethernet cable from your PoE switch or PoE injector to the camera's RJ45 port. Ensure the connection is secure and use the waterproof connector for outdoor installations.
- Adjust Viewing Angle: Loosen the adjustment screws (if applicable) to position the camera for the optimal 180° panoramic view. Tighten screws once adjusted.

Figure 5.1: Front view of the FJZKTEG 16MP PoE IP Camera, showing the dual lenses and integrated spotlights under the clear dome.

Figure 5.2: Illustration demonstrating the 180° panoramic viewing capability of the dual-lens camera, combining two separate views into one wide perspective.
5.2 Network Configuration
After physical installation, connect the camera to your network. The camera will typically obtain an IP address automatically via DHCP. You can access the camera's web interface using its IP address or a dedicated surveillance software.
- Discover Camera: Use a network scanner tool or the manufacturer's provided software to find the camera's IP address on your network.
- Access Web Interface: Open a web browser and enter the camera's IP address. Log in using the default credentials (refer to the quick start guide or manufacturer's website for default username/password).
- Change Default Password: For security, immediately change the default password upon first login.
- Configure Network Settings: Adjust IP address, subnet mask, gateway, and DNS settings if required for your network environment.
6. Operating the Camera
6.1 Live View and Recording
Once configured, you can view live footage and manage recordings through the web interface or compatible NVR/VMS software.
- Live Monitoring: Access the live view section to see real-time video from the camera.
- Recording Settings: Configure recording schedules (continuous, motion-triggered, or scheduled) and storage locations (e.g., NVR, NAS).
- Playback: Review recorded footage by selecting the date and time.

Figure 6.1: Comparison of night vision performance with the integrated spotlight turned on versus off, highlighting improved clarity and color with the spotlight active.
6.2 Advanced Features
- Motion Detection: Set up motion detection zones and sensitivity levels to trigger alerts or recordings.
- Smart Detection (Person/Vehicle/Animal): Configure advanced detection rules for specific object types to reduce false alarms.
- Email/Push Notifications: Set up notifications to be sent to your email or mobile device upon detection events.
- Two-Way Audio: Utilize the built-in microphone and speaker for audio monitoring and communication.
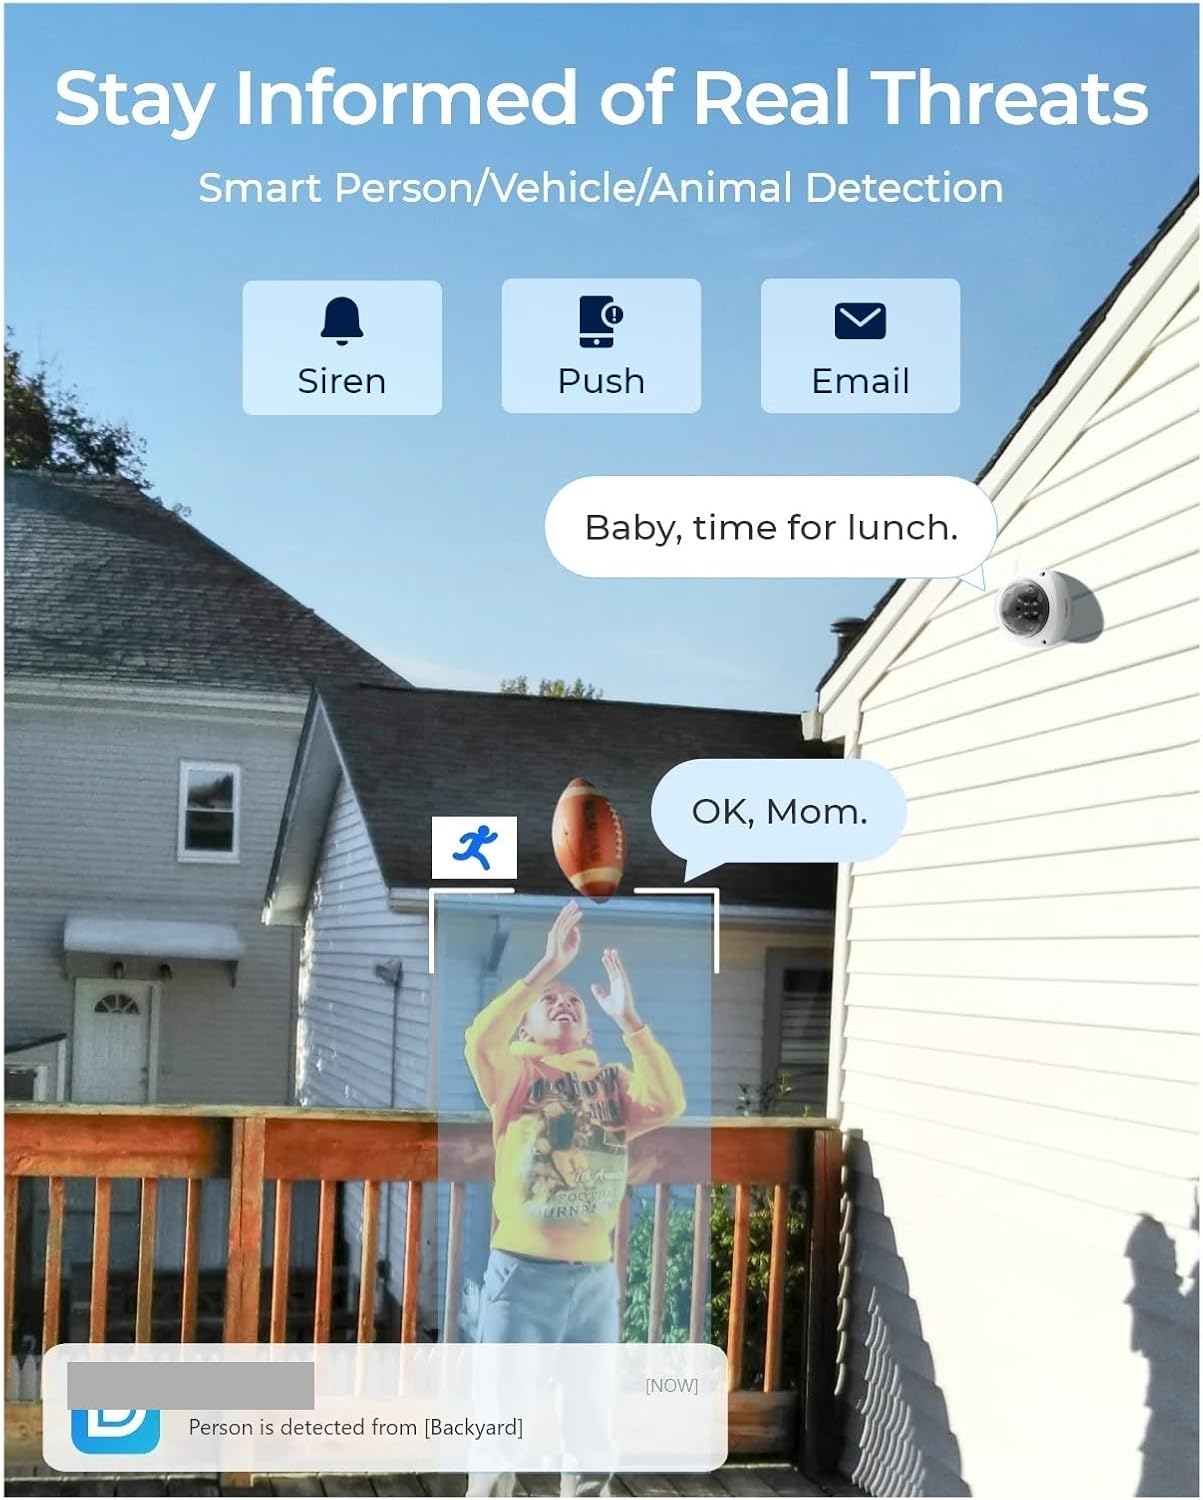
Figure 6.2: Depiction of the camera's smart detection capabilities, illustrating how it can identify persons, vehicles, or animals and trigger alerts such as sirens, push notifications, and emails.
7. Maintenance
- Lens Cleaning: Regularly clean the camera lens with a soft, dry cloth to ensure clear image quality. Avoid abrasive cleaners.
- Firmware Updates: Check the manufacturer's website periodically for firmware updates. Keeping the firmware updated ensures optimal performance and security.
- Cable Inspection: Periodically inspect all cables and connections for wear or damage, especially for outdoor installations.
- Environmental Check: Ensure the camera's operating environment remains within the specified temperature range (-10°C to 60°C).

Figure 7.1: Visual representation of the camera's IK10 vandal-proof and IP67 weatherproof ratings, indicating its resilience against physical impact and environmental elements like rain and temperature extremes.
8. Troubleshooting
| Problem | Possible Cause | Solution |
|---|---|---|
| No image/video feed | No power; Network cable disconnected; Incorrect IP address. | Check PoE connection or 12V power supply; Ensure Ethernet cable is securely connected; Verify camera's IP address and network settings. |
| Poor image quality | Dirty lens; Insufficient lighting; Incorrect resolution settings. | Clean the lens; Ensure adequate lighting or enable spotlight/IR; Adjust resolution settings in the camera's web interface. |
| Cannot access web interface | Incorrect IP address; Network connectivity issue; Firewall blocking access. | Verify IP address; Check network cable and router connection; Temporarily disable firewall to test. |
| Motion detection not working | Motion detection not enabled; Sensitivity too low; Incorrect detection zone. | Enable motion detection in settings; Increase sensitivity; Adjust detection zones. |
9. Specifications
| Feature | Detail |
|---|---|
| Model | f17heceecc90 |
| Megapixels | 8MP / 16MP (depending on variant) |
| Lens | 2.8mm |
| Viewing Angle | 180° Panoramic |
| Connectivity | RJ45 (PoE) |
| Power Supply | DC 12.0V/1A, With POE |
| Power Consumption | <12W |
| Operating Temperature | -10°C to 60°C (14°F to 140°F) |
| IP Rating | IP67 (Weatherproof) |
| Special Features | IK10 Vandal-proof, Color Night Vision, Spotlight, Two Way Audio |
| IR Distance | 30 meters |
| Dimensions (L x W x D) | 137 x 137 x 98.5 mm |
| Shell Material | Plastic |
| Installation | Ceiling, Side, Normal, Wall Mounted |
10. Warranty and Support
For warranty information and technical support, please refer to the official FJZKTEG website or contact your authorized dealer. Keep your purchase receipt as proof of purchase for warranty claims.
For further assistance, you may also refer to the online resources or FAQs provided by the manufacturer.