
1. Introduction
The Radiomaster XR2 Nano 2.4GHz ExpressLRS Receiver is a compact and high-performance receiver designed for remote control applications where space and weight are critical. It features an integrated tower antenna, an ESP32C3 microcontroller, and a Semtech LR1121 transceiver, offering reliable 2.4GHz ExpressLRS connectivity with advanced functionality.
2. Safety Information
Please refer to this instruction manual before use to ensure proper operation and to prevent damage to the device or associated equipment. Always ensure correct wiring and power supply to avoid electrical hazards.
3. Package Contents
Verify that all items listed below are included in your package:
- 1 * XR2 Nano 2.4GHz ExpressLRS Receiver
- 1 * CRSF Wire
- 3 * Heat-Shrinkable Tube
- 1 * Manual Card

Image: Package contents of the XR2 Nano receiver.
4. Product Features
- Integrated 2.4GHz Tower Antenna: Provides excellent reception within an ultra-compact design.
- ExpressLRS 2.4GHz Compatibility: Fully compatible with all ELRS 2.4GHz transmitters.
- Semtech LR1121 Transceiver: Utilizes a third-generation transceiver for enhanced reliability and responsiveness, supporting DK500Hz mode.
- ESP32C3 High-Performance MCU: Ensures efficient processing and stable operation.
- Built-in Wi-Fi Module: Simplifies firmware updates and configuration via a WebUI on PC or mobile devices.
- Secondary UART Port: Offers advanced functionality for custom setups.
- Castled Pads: Designed for easy and secure soldering.
- Ultra-Compact and Lightweight: Measures 16mm x 12mm x 6mm and weighs only 0.8g, ideal for space-constrained builds.

Image: Integrated tower antenna for compact design.

Image: Dimensions of the XR2 Nano receiver.

Image: Weight of the XR2 Nano receiver.
5. Specifications
| Item | Specification |
|---|---|
| Type | ISM2.4 |
| MCU | ESP32C3 |
| RF Chip | Semtech LR1121 |
| Antenna | Integrated 2.4GHz Tower Antenna |
| Frequency Range | 2.400 - 2.479GHz |
| Telemetry Power | 10mW |
| Maximum Packet Rate | DK500Hz |
| Minimum Packet Refresh Rate | 50Hz |
| Working Voltage | 5V |
| Weight | 0.8g |
| Dimensions (L x W x H) | 16mm x 12mm x 6mm |
| Firmware Version | ExpressLRS v3.5.1 (pre-installed) |
| FW Target | RadioMaster XR2 2.4 RX |
| Bus Interface 1 | CRSF |
| Bus Interface 2 | UART |
6. Setup
6.1 Wiring
The XR2 Nano receiver uses CRSF protocol for communication. Connect the included CRSF wire to the appropriate pads on your flight controller. The receiver features castled pads for easier soldering. Ensure correct polarity for power (5V) and ground, and proper connection for RX and TX lines.

Image: Top view of the XR2 Nano receiver board with labeled pads.
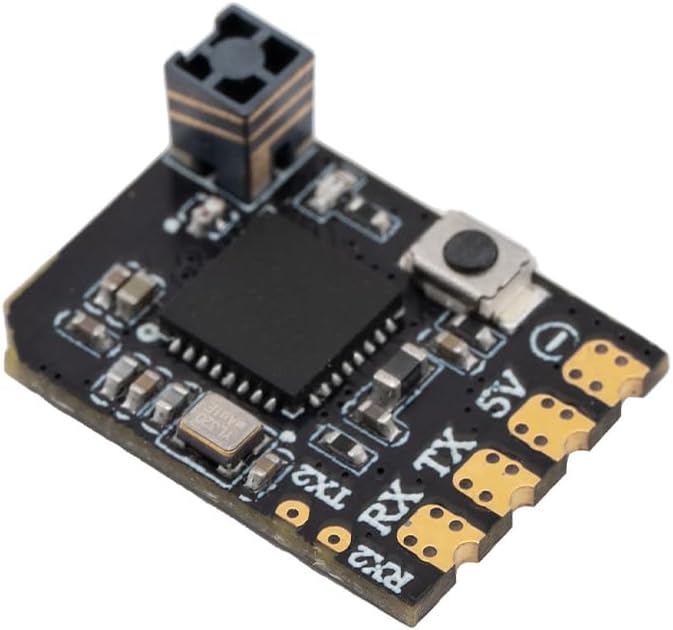
Image: Angled view of the XR2 Nano receiver.
6.2 Binding
To bind the XR2 Nano receiver to your ExpressLRS transmitter, follow these steps:
- Power on the receiver.
- Power off the receiver.
- Repeat steps 1 and 2 two more times.
- On the third power-up, the receiver's LED should flash rapidly, indicating it is in binding mode.
- On your ExpressLRS transmitter, navigate to the ELRS LUA script and select 'Bind'. The receiver should bind automatically.
- Alternatively, if the receiver enters Wi-Fi mode (slow flashing LED after binding attempts), you can connect to its Wi-Fi hotspot (SSID: 'ExpressLRS RX', Password: 'expresslrs') and access the WebUI (10.0.0.1) to set your binding phrase.
7. Operating Instructions
Once bound, the XR2 Nano receiver will establish a low-latency, high-refresh-rate connection with your ExpressLRS transmitter. The receiver is designed for optimal performance in micro drones, whoops, and fixed-wing models where its compact size and light weight are advantageous. Ensure your flight controller is configured to use the CRSF protocol for receiver input.
8. Firmware Update
The XR2 Nano receiver comes with ExpressLRS v3.5.1 pre-installed. For future updates, the built-in Wi-Fi module simplifies the process:
- Power on the receiver. If it does not automatically enter Wi-Fi mode (slow flashing LED), you may need to perform the binding power cycle sequence until it does.
- Connect your PC or mobile device to the receiver's Wi-Fi hotspot. The SSID is typically 'ExpressLRS RX' and the password is 'expresslrs'.
- Open a web browser and navigate to
10.0.0.1. - From the WebUI, you can upload new firmware files or configure settings.
9. Troubleshooting
- Receiver not binding: Ensure your transmitter is also running ExpressLRS firmware and is set to the correct frequency band (2.4GHz). Verify the binding procedure is followed correctly (three power cycles).
- No signal/telemetry: Check all wiring connections between the receiver and flight controller. Confirm the flight controller's UART is configured for CRSF protocol.
- Intermittent connection: Ensure the receiver is not obstructed by carbon fiber or other materials that can block RF signals. Check for potential interference sources.
- Wi-Fi connection issues: If you cannot connect to the receiver's Wi-Fi, ensure it is in Wi-Fi mode (slow flashing LED). Try restarting the receiver.
10. Maintenance
The XR2 Nano receiver requires minimal maintenance. Keep the device clean and free from dust and moisture. Avoid exposing it to extreme temperatures or physical shock. Regularly check solder joints for integrity, especially after crashes or heavy use.
11. Warranty and Support
For warranty information and technical support, please refer to the official Radiomaster website or contact your authorized dealer. Keep your proof of purchase for warranty claims.


