
AMECA 826-0981
Frymaster Ignitor with Gasket 826-0981 User Manual
Model: 826-0981
1. Introduction
This manual provides essential information for the installation, operation, maintenance, and troubleshooting of the AMECA Frymaster Ignitor with Gasket, part number 826-0981. This ignitor is designed for use with various Frymaster fryer models, including BIH152, BIH252, BIH352, BIH452, BIH52, BIH552, BIPH252/255, BIPH352/355, BIPH452/455, BIPH52/55, BIPH552, FH150, FMH50, FPH150, FPH50, FPPH355-SC, FPPH355CSD, FPPH455-SC, H50, H55, JBIH252, MH152, MH252, MH352, MH452, MH52, MH552, MJH150, MJH50, MPH152/155, MPH252/255, MPH352/355, MPH452/455, MPH52/55, and PH155CSD. Please read this manual thoroughly before proceeding with any procedures.
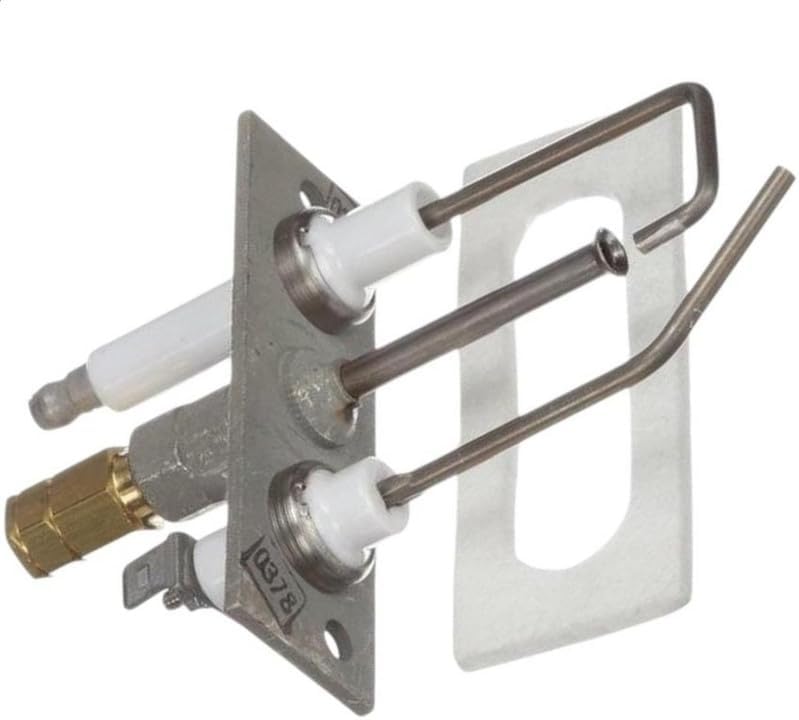
Figure 1: Overview of the Frymaster Ignitor with Gasket (Part 826-0981). This image displays the ignitor assembly, including the ceramic insulators, metal electrodes, and the mounting plate with a gasket.
2. Safety Information
Always observe the following safety precautions to prevent injury or damage to the equipment:
- Ensure the fryer is disconnected from all power sources and gas supply before attempting any installation or maintenance.
- Allow the fryer to cool completely before handling any components.
- Wear appropriate personal protective equipment (PPE), such as gloves and eye protection.
- Only qualified technicians should perform installation and service.
- Refer to the fryer's main service manual for specific safety procedures related to your Frymaster model.
3. Setup and Installation
This section outlines the general steps for replacing the ignitor. Specific procedures may vary slightly depending on the Frymaster fryer model.
3.1. Required Tools
- Screwdriver set (Phillips and flathead)
- Wrench set
- Multimeter (for testing, if necessary)
3.2. Installation Steps
- Preparation: Disconnect the fryer from the main power supply and shut off the gas valve. Allow the unit to cool down.
- Access: Locate the ignitor assembly within the fryer's burner compartment. This may require removing access panels.
- Disconnect Wiring: Carefully disconnect the electrical wiring connected to the old ignitor. Note the position of each wire for correct reinstallation.
- Remove Old Ignitor: Unscrew or unbolt the old ignitor assembly from its mounting bracket. Remove the old gasket.
- Install New Gasket: Place the new gasket (part # 32-1410, if replacing only the gasket) onto the mounting surface or the new ignitor. Ensure it is properly seated to create a gas-tight seal.
- Install New Ignitor: Position the new ignitor (part # 826-0981) with the gasket in place and secure it with the screws or bolts. Do not overtighten.
- Reconnect Wiring: Reconnect the electrical wiring to the new ignitor, ensuring all connections are secure and correctly matched.
- Test: Restore gas and power to the fryer. Perform a leak test on gas connections and then test the ignitor's operation by attempting to light the burner.
4. Operating Principles
The ignitor (part 826-0981) is a critical component in the ignition system of Frymaster fryers. It works by creating a spark to ignite the gas-air mixture in the burner. The ignitor typically consists of a ceramic insulator and metal electrodes. When power is applied, a high voltage discharge occurs between the electrodes, generating a spark that initiates combustion. A flame sensor (often integrated or nearby) then confirms the presence of a flame, allowing the gas valve to remain open.
Proper operation relies on clean electrodes and secure electrical connections. Any buildup or damage can impede spark generation and lead to ignition failures.
5. Maintenance
Regular maintenance of the ignitor ensures reliable operation and extends its lifespan.
5.1. Cleaning
- Periodically inspect the ignitor electrodes for carbon buildup or grease.
- Gently clean the electrodes with a soft brush or fine-grit sandpaper if necessary. Avoid harsh chemicals that could damage the ceramic.
- Ensure the ignitor and surrounding area are free from debris.
5.2. Inspection
- Check the ceramic insulator for cracks or chips. Damaged insulation can lead to arcing and ignition failure.
- Verify that all electrical connections to the ignitor are tight and free from corrosion.
- Inspect the gasket for signs of wear, cracking, or compression. Replace if compromised to prevent gas leaks.
6. Troubleshooting
This section provides common issues and their potential solutions related to the ignitor.
| Problem | Possible Cause | Solution |
|---|---|---|
| Burner does not ignite. | No spark from ignitor. | Check ignitor wiring. Clean or replace ignitor if electrodes are fouled or damaged. Verify power supply to ignitor module. |
| Intermittent ignition. | Weak spark or loose connections. | Inspect and tighten all electrical connections. Clean ignitor electrodes. Ensure proper gas pressure. |
| Gas smell near ignitor. | Leaking gasket or loose fitting. | Immediately shut off gas supply. Check and tighten ignitor mounting screws. Replace gasket (part # 32-1410) if damaged. Perform a leak test. |
| Ignitor sparks but burner doesn't light. | No gas flow or faulty flame sensor. | Verify gas supply is on. Check gas valve operation. Inspect and clean flame sensor. Consult fryer's main manual for gas system diagnostics. |
If troubleshooting steps do not resolve the issue, contact a qualified service technician or the manufacturer for assistance. Do not attempt repairs beyond your technical capability.
7. Specifications
- Part Number: 826-0981
- Description: Ignitor with Gasket for Natural Gas Fryers
- Compatible Gasket Part: 32-1410 (for gasket only replacement)
- Manufacturer: AMECA
- Compatible Fryer Models: BIH152, BIH252, BIH352, BIH452, BIH52, BIH552, BIPH252/255, BIPH352/355, BIPH452/455, BIPH52/55, BIPH552, FH150, FMH50, FPH150, FPH50, FPPH355-SC, FPPH355CSD, FPPH455-SC, H50, H55, JBIH252, MH152, MH252, MH352, MH452, MH52, MH552, MJH150, MJH50, MPH152/155, MPH252/255, MPH352/355, MPH452/455, MPH52/55, PH155CSD
8. Warranty and Support
For information regarding warranty coverage for the AMECA Frymaster Ignitor (part 826-0981), please refer to the original purchase documentation or contact the seller directly. Warranty terms typically cover manufacturing defects.
If you have any questions about compatible models, part numbers, or require technical assistance, please contact your supplier or a certified Frymaster service technician. Always provide the part number (826-0981) and your fryer's model number when seeking support.
Note: This ignitor is a replacement part. The overall warranty of your Frymaster appliance is separate and governed by its original manufacturer's terms.
Ask a question about this manual
Ask about setup, troubleshooting, compatibility, parts, safety, or missing instructions. Manuals+ will review the question and use this page’s manual context to help answer it.