
1. Introduction
Thank you for choosing the HIDALIFE HL-300K Keypad Door Lock. This manual provides detailed instructions for the installation, setup, operation, and maintenance of your new keyless entry system. Please read this manual thoroughly before installation and use to ensure proper function and safety.
2. What's Included
The package includes the following components:
- Exterior Assembly x1
- Interior Assembly x1
- Keys x3
- Strike & Box
- Screws
- User Manual x1
3. Product Overview
The HIDALIFE HL-300K Keypad Door Lock offers enhanced security and convenience with its advanced features:
- Anti-Peeping Password: Enter random digits before or after your actual code to prevent others from guessing your entry code.
- Easy Passage Mode: Allows the door to remain unlocked without requiring a code for temporary access.
- Smart Auto-Lock Customization: Set the door to automatically lock after a delay of 2 to 99 seconds.
- Keyless Entry: Supports up to 20 user codes for permanent access and temporary one-time passcodes.
- User-Friendly Keypad: Features a backlit keypad for visibility in low light and a silent mode for quiet operation.
- Universal Fit: Designed to fit standard doors with specific dimensions (2-1/8" hole, 2-3/8"/2-7/8" backset, 1-3/8"-2" door thickness). Not compatible with 1-1/2" door holes.
- Advanced Durability: Constructed from heavy-duty zinc alloy, tested for over 250,000 cycles (ANSI Grade 3). Offers 13+ months of 9V battery life with low-power alerts.
4. Installation
Follow these steps to install your HIDALIFE HL-300K Keypad Door Lock:
4.1. Check Door Dimensions
Ensure your door meets the following specifications for proper installation:
- Door Holes: 2-1/8" (54 mm)
- Door Thickness: 1-3/8" - 2" (35 mm - 50 mm)
- Backset: 2-3/8" (60 mm) or 2-3/4" (70 mm)
- Latch Hole: Rectangular (not compatible with rounded latch holes)

Image: This diagram illustrates the required door hole and thickness measurements, along with the acceptable rectangular latch hole type for the HL-300K lock. It also shows how to measure the backset.
4.2. Latch Installation Direction
Ensure the latch is installed with the fixed surface facing the direction of the door opening. The inclined surface should face the direction of closing the door.
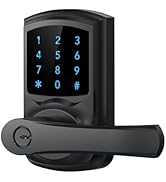
Image: This image shows the correct orientation for installing the latch, indicating which side should face the door opening direction.
4.3. General Installation Steps
For a visual guide on the installation process, please refer to the video below:
Video: This video provides a step-by-step guide on how to correctly install the Hidalife Keypad Door Lock.
A detailed installation guide is also available:
Video: This video offers a comprehensive overview of the Hidalife Keyless Entry Door Lock, including installation tips and features.
5. Setup & Programming
Proper setup and programming are crucial for the security and functionality of your lock.
5.1. Restore Default Settings
To restore the lock to its factory default settings:
- Remove the battery cover from the interior assembly.
- Press and hold the Reset Button for 5 seconds.
- You will hear 3 long beeps, indicating the restoration is complete.
The default Programming Code (PC) is 000000 (6 digits). The default User Code (UC) is 1234 (4 digits).
Video: This video demonstrates how to program the door lock code, including restoring default settings.
5.2. Change the Programming Code (PC)
It is highly recommended to change the default Programming Code immediately after installation. The first four numbers of the new PC must be different from any existing user codes.
- Enter your current 6-digit Programming Code, then press the Hidalife key.
- Wait for the Hidalife key to flash green and beep once.
- Press 1, then press the Hidalife key.
- Wait for the Hidalife key to flash green and beep once.
- Enter your new 6-digit Programming Code, then press the Hidalife key.
For a visual guide on changing the programming code, refer to the video below:
Video: This video demonstrates how to change the programming code for your Hidalife Keypad Door Lock.
5.3. Add User Codes (UC)
You can add up to 20 unique 4-digit user codes. User codes must be different from the first 4 numbers of the Programming Code.
- Enter your 6-digit Programming Code, then press the Hidalife key.
- Wait for the Hidalife key to flash green and beep once.
- Press 2, then press the Hidalife key.
- Wait for the Hidalife key to flash green and beep once.
- Enter your new 4-digit User Code, then press the Hidalife key.
5.4. Delete User Codes (UC)
To delete a specific user code:
- Enter your 6-digit Programming Code, then press the Hidalife key.
- Wait for the Hidalife key to flash green and beep once.
- Press 3, then press the Hidalife key.
- Wait for the Hidalife key to flash green and beep once.
- Enter the 4-digit User Code you wish to delete, then press the Hidalife key.
If you delete all user codes, the default user code (1234) will become active.
5.5. Add One-time Codes
One-time codes are valid for a single use and become invalid afterward. They must be different from any existing user codes.
- Enter your 6-digit Programming Code, then press the Hidalife key.
- Wait for the Hidalife key to flash green and beep once.
- Press asterisk (*), then press the Hidalife key.
- Wait for the Hidalife key to flash green and beep once.
- Enter the 4-digit One-time Code, then press the Hidalife key.
6. Operating Instructions
6.1. Unlocking with Keypad
To unlock the door using a user code:
- Enter your 4-digit User Code.
- Press the Hidalife key.
- Turn the knob to open the door.
6.2. Unlocking with Physical Key
In case of battery depletion or forgotten codes, you can always use the physical key:
- Insert the key into the keyhole.
- Turn the key 90 degrees to the left.
- Turn the knob to unlock the door.
6.3. Passage Mode
Passage Mode keeps the door unlocked for convenient access without needing a code.

Image: This image shows the switch for enabling and disabling Passage Mode, allowing the door to remain unlocked for convenience.
- Enable Passage Mode: On the interior assembly, turn the turnpiece 90 degrees to the right. The door will remain unlocked.
- Disable Passage Mode: Turn the turnpiece back to the vertical position. The door will then be locked.
6.4. Auto-Lock Delay Time
You can customize the auto-lock delay time between 2 and 99 seconds. The default delay is 5 seconds.
- Enter your 6-digit Programming Code, then press the Hidalife key.
- Wait for the Hidalife key to flash green and beep once.
- Press 7, then press the Hidalife key.
- Wait for the Hidalife key to flash green and beep once.
- Enter the desired delay time (2-99 seconds), then press the Hidalife key.
6.5. Silent Mode
Enable Silent Mode for quiet operation, ideal for late-night entries or shared living spaces.
- Enter your 6-digit Programming Code, then press the Hidalife key.
- Wait for the Hidalife key to flash green and beep once.
- Press 4, then press the Hidalife key.
- Wait for the Hidalife key to flash green and beep once.
For a visual guide on enabling/disabling Silent Mode, refer to the video below:
Video: This video demonstrates how to enable and disable Silent Mode on your Hidalife Keypad Door Lock.
6.6. Vacation Mode
Activate Vacation Mode for enhanced security when you are away. In this mode, only the Programming Code and physical key can unlock the door; all user codes are disabled.
- Enter your 6-digit Programming Code, then press the Hidalife key.
- Wait for the Hidalife key to flash green and beep once.
- Press 5, then press the Hidalife key.
- Wait for the Hidalife key to flash green and beep once.
6.7. Anti-Peeping Function
To protect your code from prying eyes, you can enter random digits before or after your actual 4-digit code. The lock will still recognize the correct sequence within the longer entry.

Image: This image illustrates the anti-peeping function, where random digits can be added before or after the actual code to enhance security.
7. Maintenance
7.1. Battery Replacement
The lock uses one 9V alkaline battery (not included). The lock will provide low-power alerts when the battery needs replacement. Replace the battery promptly to ensure continuous operation.

Image: This image highlights the 13+ month battery life and the indicator alert for low battery status.
7.2. Cleaning
Clean the keypad and lock body with a soft, damp cloth. Avoid using abrasive cleaners or solvents that could damage the finish.
8. Troubleshooting
If you encounter issues with your lock, try the following:
- Lock not responding: Check the battery level and replace if necessary.
- Code not working: Ensure you are entering the correct code and pressing the Hidalife key afterward. Try restoring default settings and reprogramming.
- Knob is hard to turn: Ensure the latch is installed correctly and the door frame is properly aligned.
9. Specifications
| Feature | Detail |
|---|---|
| Brand | HIDALIFE |
| Model Name | HL-300K |
| Lock Type | Keypad |
| Material | Zinc Alloy |
| Color | Matte Black |
| Item Dimensions L x W x H | 5.1 x 2.72 x 2.3 inches |
| Item Weight | 1.94 Pounds |
| Special Features | Anti-Peeping Password, Auto-Lock, Back-Lit Keypad, Unlock Switch |
| Control Method | Push Button |
| Batteries Required | Yes (1x 9V, not included) |
10. Warranty & Support
For any questions, technical support, or warranty inquiries, please contact us:
- Email: support@hidalife.com
- Please include your order number when contacting support.

