1. Introduction
The Awgem AS2 Battery Spot Welder is a portable, handheld device designed for efficient and precise spot welding of various battery types and metal sheets. Featuring an integrated design, LCD digital display, and dual operating modes with 99 adjustable gears, this tool simplifies battery pack assembly and repair tasks. It is suitable for welding nickel-plated sheets, stainless iron sheets, and stainless steel sheets, ensuring firm and aesthetically pleasing solder joints.
2. Package Contents
Please verify that all items listed below are included in your package:
- 1x Awgem AS2 Battery Spot Welder Host
- 2x Copper Welding Needles (Spare)
- 1x 2-meter Nickel Roll
- 1x Frosted Paper (Sandpaper)
- 1x Type-C Charging Cable

Image: Awgem AS2 Battery Spot Welder with all included accessories: the welder unit, spare copper needles, nickel strip, sandpaper, and Type-C charging cable.
3. Product Overview
The Awgem AS2 features an integrated design where the power supply and welding pen are combined into a single, compact unit. This allows for convenient one-handed operation, freeing your other hand to position the nickel strip.
3.1. LCD Digital Display
The device is equipped with an LCD digital display that provides real-time information and allows for easy adjustment of settings. Functions displayed include:
- Battery level and charging status
- Temperature abnormality icon
- Welding mode (Automatic/Manual)
- Preheat time (seconds/milliseconds)
- Welding output gear (power level)
- Welding output trigger time
- Internal temperature of the spot welding machine

Image: Detailed view of the Awgem AS2 LCD display, illustrating various function icons and readouts such as battery level, temperature, welding mode, preheat, gear, trigger, and internal temperature.
3.2. Integrated Design Advantage
Unlike traditional spot welders that require a separate welding pen, the AS2's integrated design enhances portability and ease of use, making welding tasks more manageable.
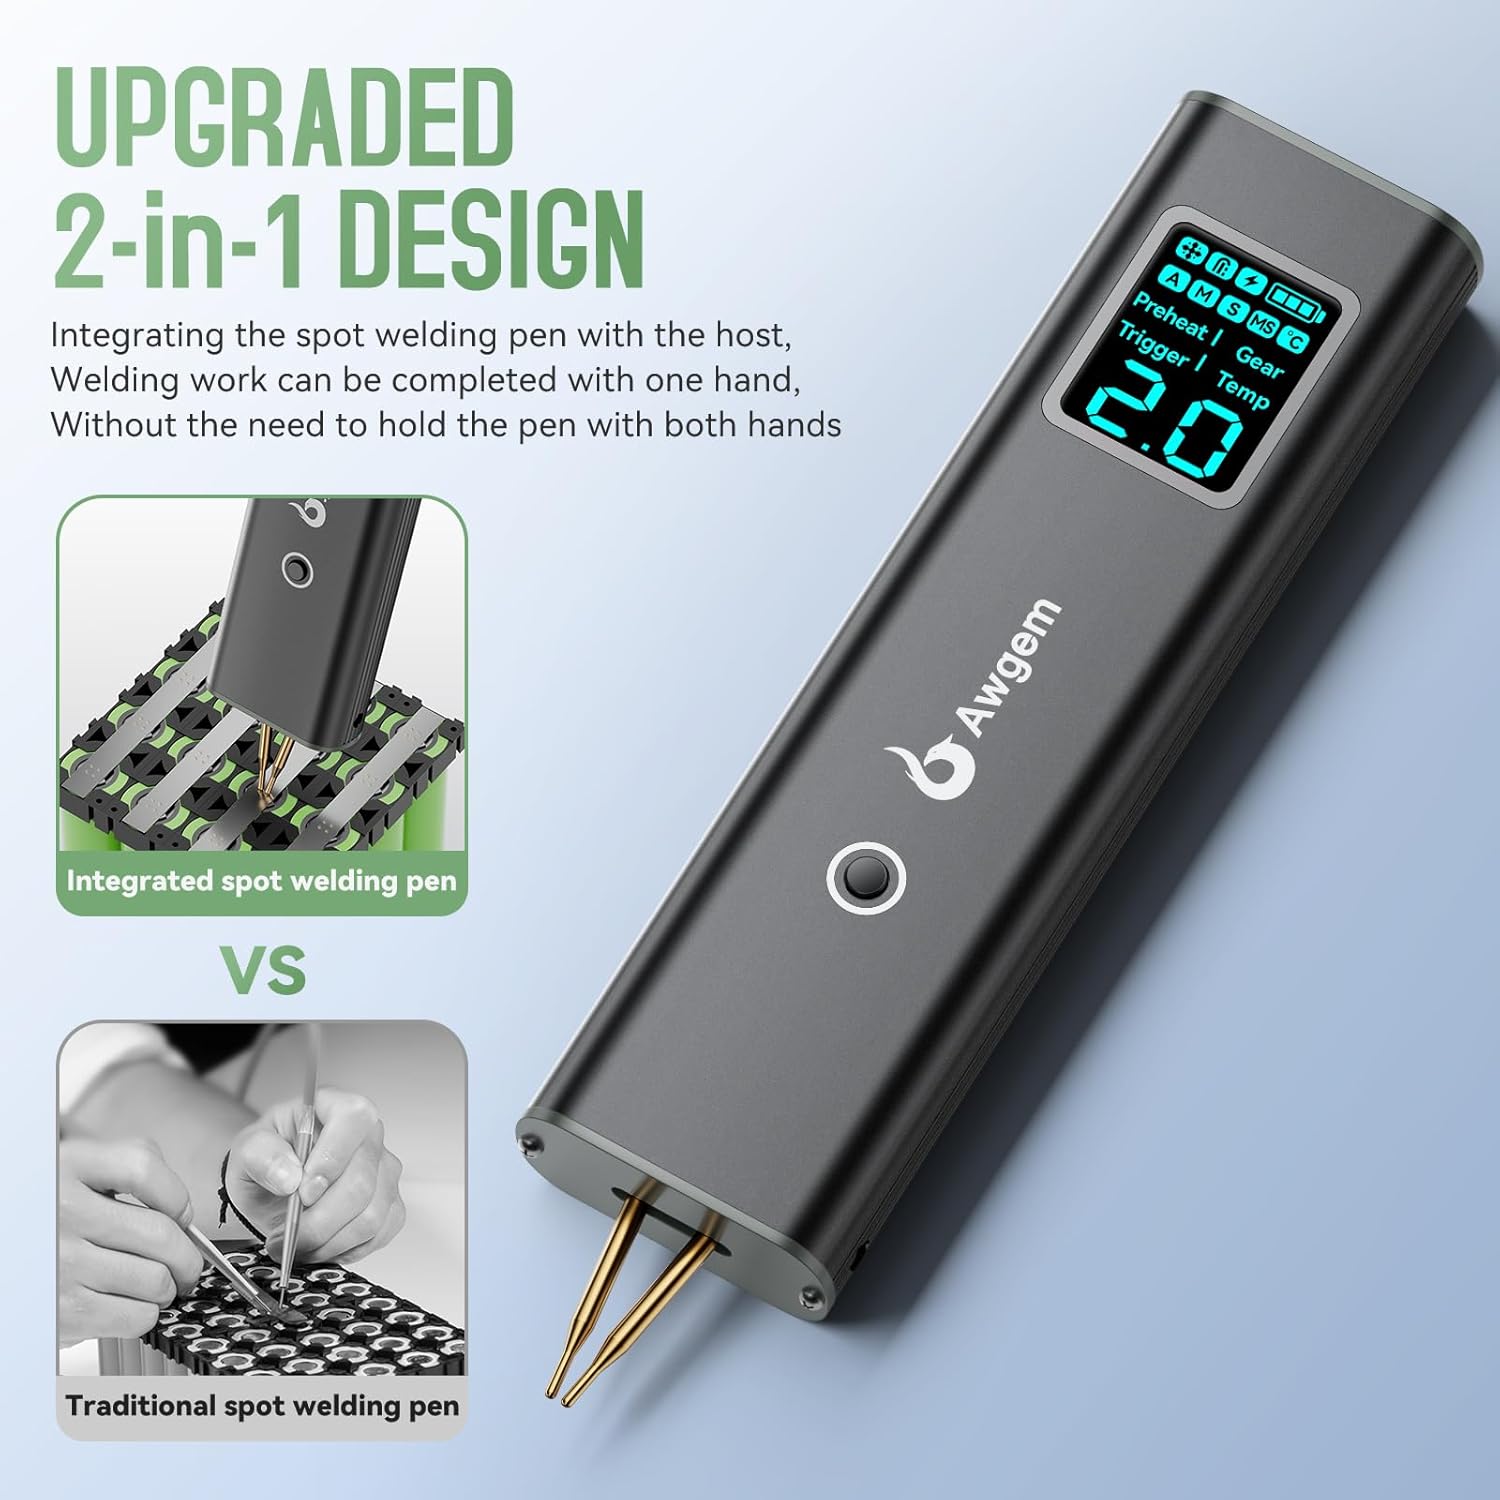
Image: Comparison showing the Awgem AS2's integrated spot welding pen design versus a traditional spot welding setup requiring two hands to hold separate pens.
3.3. Key Features
- 99-speed adjustment for precise control
- Automatic and Manual welding modes
- Rapid charging via Type-C port
- Digital display screen for clear information
- Drop resistance and voltage protection
- Temperature overheat protection
- Discharger and charge protection
- Short circuit protection

Image: Visual representation of the Awgem AS2's key features, including 90-speed adjustment, auto/manual modes, rapid charge, digital display, and various protection mechanisms.
4. Setup and Initial Use
4.1. Charging the Device
Before first use, fully charge the Awgem AS2 using the provided Type-C charging cable. Connect the cable to the Type-C charging port on the device and a suitable USB power adapter (not included). The LCD display will indicate charging status.
4.2. Power On/Off
To power on the device, long-press the ON/OFF/Gear Switching Key located on the side of the unit. Long-press again to power off.
4.3. Adjusting Welding Pins
The welding pins are interchangeable and their spacing can be adjusted to suit different welding requirements. Use a small screwdriver to loosen the screws, adjust the pin spacing, and then tighten the screws securely.

Image: Awgem AS2 showing its dimensions (157*43*20.5mm) and highlighting the manual spot welding key, adjustment key, digital display screen, and Type-C charging port.
5. Operating Instructions
5.1. Mode Selection (Automatic/Manual)
The Awgem AS2 supports both Automatic and Manual welding modes. To switch between modes, press and hold the main button (Welding Trigger). The LCD display will show 'A' for Automatic mode or 'M' for Manual mode.
- Automatic Mode: The welder will automatically detect contact with the nickel strip and trigger the weld.
- Manual Mode: A short press of the main button (Welding Trigger) is required to initiate a weld after positioning the pins.
5.2. Gear Adjustment (Welding Power)
The device offers 99 adjustable gears (power levels) to accommodate different material thicknesses (0.1mm to 0.2mm nickel sheet) and desired weld strength. Short press the Adjustment Key (located near the Type-C port) to cycle through the gear settings. Press and hold the Adjustment Key to switch between parameter options (e.g., preheat time, delay).

Image: Diagram illustrating the 90 adjustable speed gears for stable welding of 0.1mm to 0.2mm nickel sheets, with guidance on adjusting gear based on weld appearance.
5.3. Welding Process
- Prepare the Surface: Ensure the nickel strip and battery terminals are clean and free of rust or oxidation. Use the included frosted paper (sandpaper) if necessary.
- Position the Nickel Strip: Place the nickel strip firmly on the battery terminal.
- Position the Welder: Hold the Awgem AS2 at a 45°-60° angle, ensuring both copper needles firmly touch the nickel strip and the underlying battery terminal.
- Initiate Weld:
- In Automatic Mode, the weld will trigger automatically upon firm contact.
- In Manual Mode, short press the main button (Welding Trigger) to initiate the weld.
- Inspect the Weld: Check the weld joint for strength and appearance. Adjust the gear setting if the weld is too weak or too strong.

Image: A four-step visual guide demonstrating the easy operation of the Awgem AS2: long-press to power on, select gear and mode, position the nickel strip, and perform welding at a 45°-60° angle.
5.4. Welding Tips
- Practice on a large area of iron or stainless steel before welding batteries to ensure smooth operation.
- Clean the nickel strip flat and avoid overhang, as this can cause holes in the strip or damage the battery.
- The welding pins may oxidize after repeated use. Polish them with the included sandpaper before welding to maintain optimal performance.
- During and after welding, the soldering pin, nickel strip, and battery will generate heat. Do not touch them immediately to avoid burns.

Image: Important welding tips for the Awgem AS2, including practicing on scrap metal, cleaning surfaces, polishing pins, and exercising caution due to heat.
5.5. Applications
The Awgem AS2 is versatile and suitable for various spot welding applications, including:
- Cylindrical battery welding (e.g., 18650 cells)
- Mobile phone battery spot welding
- Button battery spot welding
- General sheet metal welding (nickel-plated, stainless iron, stainless steel)
- DIY battery pack assembly and repair

Image: The Awgem AS2 Mini Portable Battery Spot Welder being used to weld nickel strips onto cylindrical batteries, demonstrating its application in battery pack assembly.
Video: An official product video from Awgem demonstrating the features and usage of the Awgem AS2 Battery Spot Welder, including automatic and manual welding modes and various applications.
6. Maintenance
6.1. Cleaning
Regularly clean the welding pins and the device housing to prevent accumulation of debris and ensure optimal performance. Use a soft, dry cloth. Do not use abrasive cleaners or solvents.
6.2. Welding Pin Replacement
The copper welding needles are consumable parts and may wear down over time. Replace them when they become significantly worn or damaged to maintain welding quality. Use the provided spare needles and ensure they are securely fastened.
7. Troubleshooting
- Weak or No Weld:
- Ensure the battery is fully charged.
- Increase the welding gear (power level).
- Clean the welding pins and the nickel strip/battery terminals.
- Ensure both pins make firm, simultaneous contact with the workpiece.
- Verify the material thickness is within the 0.1mm-0.2mm range for nickel sheets.
- Excessive Sparking or Burn-through:
- Decrease the welding gear (power level).
- Ensure proper contact pressure; too much pressure can sometimes cause issues.
- Device Not Powering On:
- Ensure the battery is charged.
- Perform a long-press on the power button.
8. Specifications
| Manufacturer | Awgem |
| Model Number | AS2 |
| Item Weight | 4 ounces |
| Product Dimensions | 0.7 x 6.1 x 1.5 inches |
| Power Source | Battery Powered |
| Battery Type | Lithium Polymer (1 A battery included) |
| Material | Metal |
| Adjustable Gears | 99 |
| Weldable Material Thickness | 0.1mm - 0.2mm (Nickel Sheet) |
9. Warranty and Support
For warranty information, technical support, or service inquiries, please refer to the documentation provided with your purchase or contact Awgem customer service directly. Specific warranty terms and support channels may vary by region and retailer.


