Icango caddy G3
Icango caddy G3 Electric Golf Caddy User Manual
Model: G3
1. Introduction and Overview
The Icango caddy G3 Electric Golf Caddy is designed to enhance your golfing experience with advanced features like auto-follow technology, remote control, and a compact folding design. This manual provides comprehensive instructions for setup, operation, and maintenance to ensure optimal performance and longevity of your device.
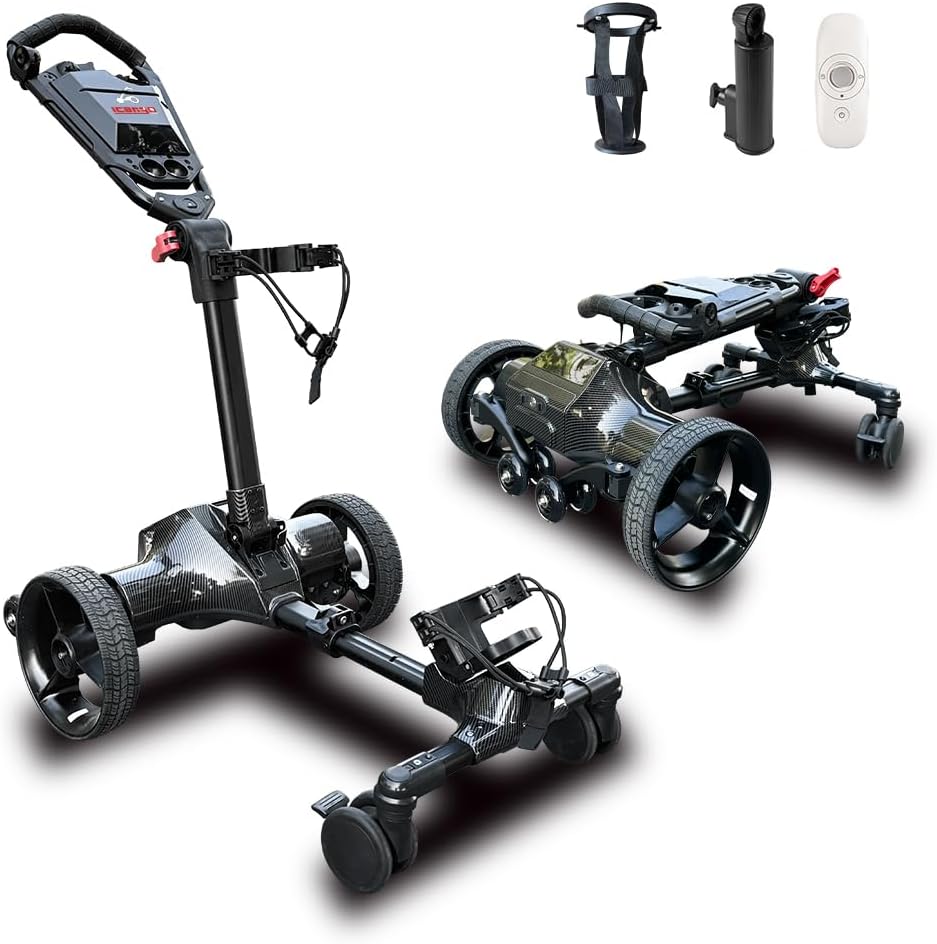
Figure 1: The Icango caddy G3 Electric Golf Cart, showcasing its versatile design and included accessories.
Key features include:
- Auto-Follow Technology: Your hands-free golfing companion that maintains a steady distance.
- Remote Control: Allows for precise control of the caddy's movement and speed.
- High-Capacity Battery: Supports 36-45 holes or up to 20 miles (32 km) on a single charge.
- 3-Motion Folding Design: Collapses to a compact size (15.7" H x 24" W x 27.6" L) for easy transport and storage.
- Ergonomic U-shaped Handle: Features a premium soft rubber grip for comfortable handling.
- Included Accessories: Comes with a cup holder and umbrella holder.

Figure 2: The G3 Electric Golf Cart demonstrating its auto-following capability on a golf course.
Video 1: An overview of the G3 Electric Golf Cart's auto-follow feature and battery life.
2. Product Components
Before assembly, ensure all components listed below are present in your package:

Figure 3: Contents of the Icango caddy G3 package.
- G3 Electric Golf Cart Main Unit
- Remote Controller
- Water Bottle Holder
- Tools (Hex keys, screws)
- Charging Cable and Charger
- User Manual
- Umbrella Holder
- Wheels (2 main, 2 auxiliary)
- Battery Pack
- Hubcaps
3. Setup and Assembly
Follow these steps to assemble your G3 Electric Golf Caddy. It features a quick installation design for convenience.
- Unpacking: Carefully remove all components from the packaging. Retain packaging for future storage or transport.
- Auxiliary Wheel Installation: Attach the auxiliary wheels to the designated points on the caddy's frame using the provided screws and tools. Ensure they are securely fastened. These wheels are crucial for stability, especially on inclines.
- Main Wheel Installation: Secure the main wheels to the caddy. Ensure the hubcaps are properly aligned and secured after attaching the wheels.
- Handlebar Assembly: Connect the handlebar section to the main body. Ensure the folding joints are correctly aligned and locked into place.
- Battery Insertion: Insert the battery pack into its compartment. Ensure it clicks securely into place.
- Accessory Attachment: Attach the cup holder and umbrella holder to the designated slots on the handlebar or frame as desired.
- Golf Bag Securement: Place your golf bag onto the caddy. Use the double leather strap and carabiner to securely fasten the golf bag to prevent movement during operation.

Figure 4: The G3 Electric Golf Cart ready for use, emphasizing its core functionalities.
Video 2: A step-by-step guide to installing and setting up the ICANGO G3 Electric Golf Cart.
4. Operating Instructions
The G3 Electric Golf Caddy offers multiple modes of operation for your convenience.
4.1 Auto-Follow Mode
To activate auto-follow mode, simply clip the smart remote to your waist. The caddy will automatically follow you, maintaining a consistent distance and adapting to your walking speed. This allows you to focus on your game without the need to push or pull the cart.

Figure 5: The G3 Electric Golf Cart in auto-follow mode, ready to accompany the golfer.
Video 3: A short demonstration of the G3 Electric Golf Cart's auto-follow feature.
4.2 Remote Control Operation
The included remote controller provides full command over the caddy's movements. It features a 360° operation lever for intuitive control and humanized buttons for various functions.
- Forward/Backward: Use the joystick or directional buttons to move the caddy.
- Turning: Steer the caddy left or right.
- Speed Control: Adjust the speed settings (e.g., three-gear speed cruise control).
- One-Click Recall: Summon the caddy back to your position with a single button press.

Figure 6: The G3 remote control and its corresponding mobile app interface, displaying control options and battery status.
4.3 Hand-Push Mode
For situations where remote or auto-follow is not preferred, the caddy can be easily operated in hand-push mode. The ergonomic handle ensures comfortable manual maneuvering.
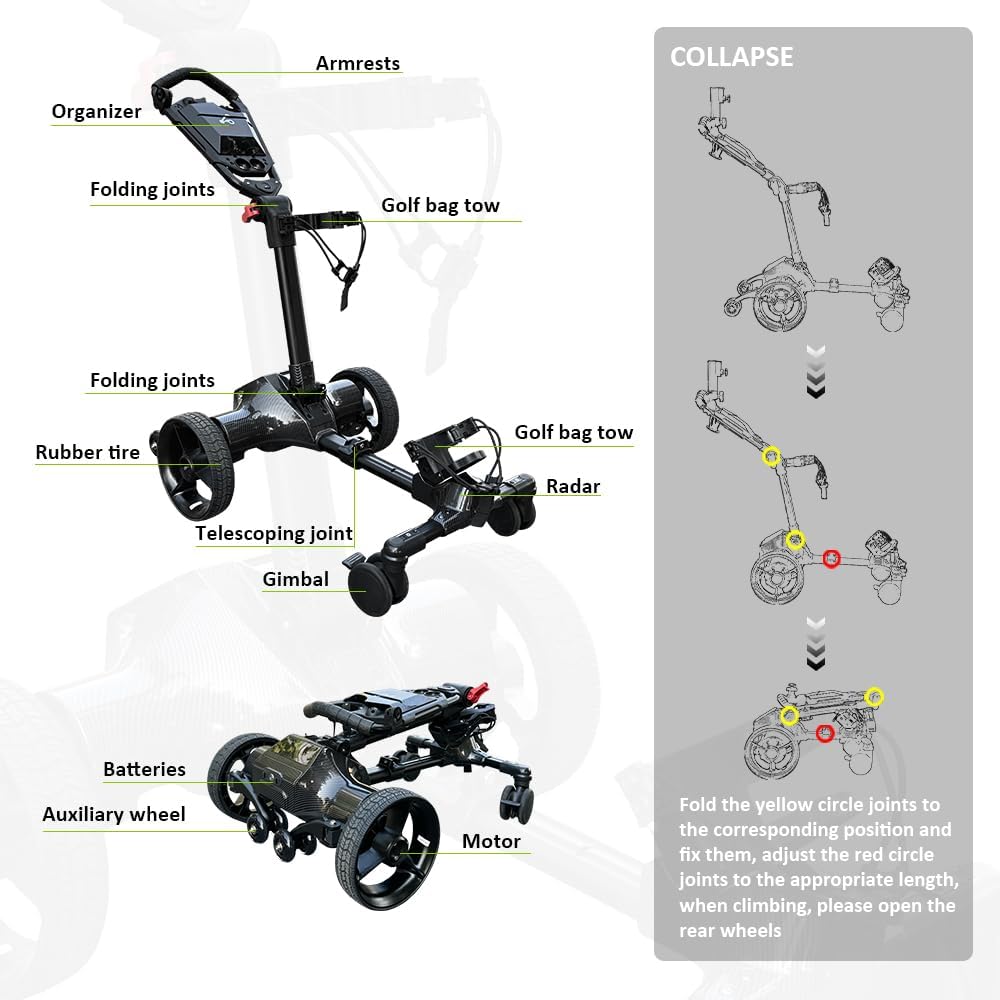
Figure 7: The three primary operational modes of the G3 Electric Golf Cart.
5. Battery Information and Charging
The G3 Electric Golf Caddy is equipped with a high-capacity battery designed for extended use. A full charge can support 36-45 holes or up to 20 miles (32 km) of travel.
- Charging: Connect the provided charger to the battery pack and a standard power outlet. The charging indicator will show the charging status.
- Battery Removal/Replacement: The battery can be quickly removed and replaced for convenience or charging off the unit.
- Battery Care: To maximize battery life, avoid fully discharging the battery regularly. Store the battery in a cool, dry place when not in use.
6. Folding and Storage
The G3 caddy features an innovative 3-motion folding mechanism, making it highly portable and easy to store.
- Folding the Armrest Section: Open the folding joint to adjust the angle of the armrest section, allowing it to collapse downwards.
- Folding the Support Bar: Open the second folding joint to collapse the main support bar.
- Adjusting Length: Open the telescopic joint to adjust the overall length of the caddy for the most compact form.
- Auxiliary Wheels: Ensure the foldable auxiliary wheels are retracted or folded when storing, unless needed for stability during transport.

Figure 8: The G3 Electric Golf Cart in its compact folded state with dimensions.
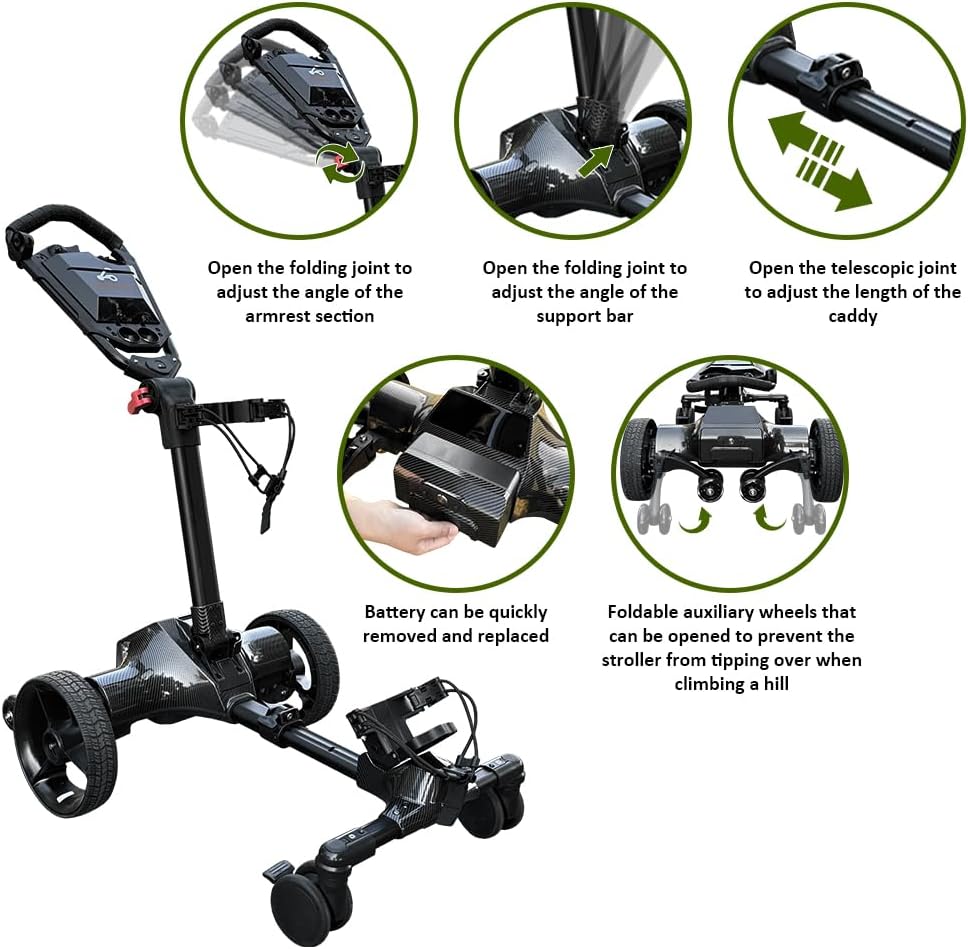
Figure 9: Visual guide to collapsing the G3 Electric Golf Cart.
The compact folded size fits easily in most car trunks, SUVs, and small storage spaces.
7. Maintenance
Regular maintenance ensures the longevity and optimal performance of your G3 Electric Golf Caddy.
- Cleaning: Wipe down the caddy with a damp cloth after each use to remove dirt and debris. Avoid using harsh chemicals.
- Wheel Inspection: Periodically check the wheels for wear and tear. Ensure they are free of debris and rotate smoothly.
- Joints and Fasteners: Inspect all folding joints and fasteners regularly to ensure they are tight and secure. Tighten any loose screws as needed.
- Battery Terminals: Keep battery terminals clean and free of corrosion.
- Storage: Store the caddy in a dry, covered area when not in use. If storing for an extended period, ensure the battery is partially charged (around 50%) and recharged every few months.
8. Troubleshooting
If you encounter any issues with your G3 Electric Golf Caddy, refer to the following common troubleshooting tips:
| Problem | Possible Cause | Solution |
|---|---|---|
| Caddy does not power on. | Battery is not charged or not properly inserted. | Ensure battery is fully charged and securely connected. Check power button. |
| Auto-follow disconnects frequently. | Interference, obstruction, or remote not properly positioned. | Ensure clear line of sight between remote and caddy. Avoid obstructions. Re-pair remote if necessary. |
| Caddy tips over on steep hills. | Auxiliary wheels not deployed or terrain too steep. | Ensure foldable auxiliary wheels are opened when climbing steep inclines. Avoid excessively steep terrain. |
| Golf bag not secure. | Straps not tightened or bag improperly placed. | Ensure golf bag is correctly seated and both leather straps with carabiners are tightly secured. |
If the issue persists after attempting these solutions, please contact customer support.
9. Specifications
| Feature | Detail |
|---|---|
| Model Name | G3 |
| Brand Name | Icango caddy |
| Item Weight | 42 Pounds |
| Color | Black |
| Material | Aluminum |
| Manufacturer | NERCH |
| Battery Endurance | 36-45 holes or up to 20 miles (32 km) |
| Folded Dimensions | 15.7" H x 24" W x 27.6" L (approx.) |
10. Warranty and Support
The Icango caddy G3 Electric Golf Caddy comes with a 1-year warranty from the date of purchase, covering manufacturing defects.
For technical support, troubleshooting assistance, or warranty claims, please contact our customer service team:
- Email: support@icangocaddy.com
- Phone: 1-800-XXX-XXXX (Available Monday-Friday, 9 AM - 5 PM EST)
- Website: www.icangocaddy.com
Please have your product model and purchase date ready when contacting support.
Related Documents - G3
 |
Cart Tek GRI-1500Li Lithium Golf Caddy User Manual Comprehensive user manual for the Cart Tek GRI-1500Li Lithium electric remote control golf caddy, covering setup, operation, maintenance, troubleshooting, and programming. |
 |
CaddyTrek CT-7031-UD User Manual: Operation, Maintenance, and Specifications Comprehensive user manual for the CaddyTrek CT-7031-UD robotic golf caddy. Covers unit operation, modes (Standby, Manual Push, RC, Follow, Marching, Grouping), handset commands, tracking tips, precautions, troubleshooting, maintenance procedures, and detailed specifications. |
 |
MGI Zip Navigator AT User Manual - All Terrain Golf Caddy Comprehensive user manual for the MGI Zip Navigator AT All Terrain golf caddy, covering assembly, operation, battery management, remote control, warranty, and maintenance. |
 |
Bat-Caddy X2 Pro Electric Golf Caddy User Manual Comprehensive user manual for the Bat-Caddy X2 Pro electric golf caddy, covering packing lists, parts, assembly instructions, control functions, operating procedures, maintenance, technical specifications, and frequently asked questions. Learn how to assemble, operate, and maintain your golf caddy for optimal performance and longevity. |
 |
Bat-Caddy X3R User Manual: Remote Controlled Electric Golf Caddy Guide Comprehensive user manual for the Bat-Caddy X3R remote-controlled electric golf caddy. Includes assembly, operation, maintenance, troubleshooting, and technical specifications. |
 |
Bat-Caddy X2 Pro Electric Golf Caddy User Manual Comprehensive user manual for the Bat-Caddy X2 Pro electric golf caddy, detailing assembly, operation, maintenance, technical specifications, and FAQs to enhance the golfing experience. |
Ask a question about this manual
Ask about setup, troubleshooting, compatibility, parts, safety, or missing instructions. Manuals+ will review the question and use this page’s manual context to help answer it.