
Introduction
Thank you for purchasing the FunFlix P1 Android 4K Supported Bluetooth 5G Wi-Fi LED Full HD Projector. This manual provides essential information for setting up, operating, and maintaining your projector. Please read it thoroughly before use to ensure optimal performance and safety.
Safety Information
- Power Supply: Use only the specified power adapter. Ensure the power outlet matches the projector's voltage requirements.
- Ventilation: Do not block the ventilation openings. Ensure adequate space around the projector for proper airflow to prevent overheating.
- Eye Protection: Do not look directly into the projector lens when the lamp is on. The bright light can cause eye damage.
- Placement: Place the projector on a stable, level surface. Avoid placing it in direct sunlight, near heat sources, or in environments with high humidity or dust.
- Cleaning: Disconnect the power before cleaning. Use a soft, dry cloth for the exterior and a lens cleaning cloth for the lens.
- Children and Pets: Keep the projector out of reach of children and pets to prevent accidents.
Package Contents
Verify that all items are present in the package:
- FunFlix P1 Projector
- Power Cable
- HDMI Cable
- AV Cable
- Remote Control
- Projector Lens Cap
Product Overview
Familiarize yourself with the components of your FunFlix P1 projector.
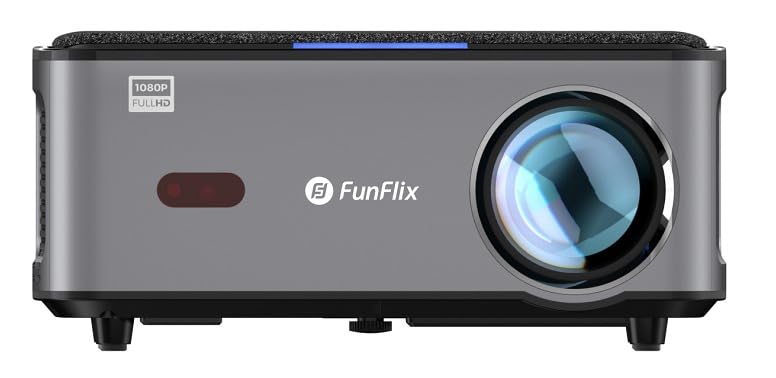
Figure 1: Front view of the FunFlix P1 Projector, showing the main lens and ventilation grilles.

Figure 2: Rear panel of the FunFlix P1 Projector, featuring the power input, RJ45 Ethernet port, IR receiver, two USB ports, AV input, and two HDMI inputs (HDMI1, HDMI2).

Figure 3: Top view of the FunFlix P1 Projector, displaying the integrated control panel with power, return, OK, and navigation buttons.

Figure 4: Bottom view of the FunFlix P1 Projector, showing the adjustable feet and mounting points for ceiling or wall installation.
Setup
1. Placement
Position the projector on a flat, stable surface or mount it to the ceiling/wall. Ensure the lens is perpendicular to the projection surface for the best image quality. The projector supports a maximum image size of 300 inches and a throw distance between 1.5 and 10 meters.
2. Power Connection
Connect the power cable to the projector's power input port and then plug it into a power outlet.
3. Initial Power On
Press the power button on the projector or the remote control to turn on the device. The projector will perform automatic focus and keystone correction upon startup.
4. Image Adjustment
- Automatic Focus & Keystone: The FunFlix P1 features automatic focus and keystone correction for quick setup.
- Manual Four-Corner Correction: For detailed adjustments, navigate to the settings menu to manually correct each corner of the image.
- Zoom Function: Adjust the image size by up to 50% using the zoom function in the settings, without moving the projector.
5. Network Connection (Wi-Fi)
Navigate to the Wi-Fi settings in the Android interface. Select your 5GHz Wi-Fi network and enter the password to connect to the internet.
6. Bluetooth Pairing
To connect external Bluetooth speakers or headphones, go to the Bluetooth settings. Enable Bluetooth, search for your device, and pair it.
Operating Instructions
1. Android Smart Interface
The FunFlix P1 runs on an Android operating system, providing access to various applications. Navigate the interface using the remote control. You can download additional applications from the app store.
2. Wireless Screen Mirroring
The projector supports wireless screen mirroring (AirPlay and Miracast) from Android, iOS (Apple), and Windows devices. Select the appropriate mirroring function from the projector's menu and follow the on-screen instructions on your device.
3. USB Media Playback
Insert a USB flash drive or hard disk into one of the two USB ports. The projector supports 4K video playback and can display documents such as Word, Excel, PowerPoint, and PDF files directly from the USB storage.
4. HDMI Input Usage
Connect external devices like gaming consoles, satellite receivers, or media sticks to the HDMI1 or HDMI2 ports. Use the input source selection on the remote control to switch to the desired HDMI input.
5. Audio Output
The projector has a built-in 5W speaker. For enhanced audio, connect external speakers via Bluetooth 5.0 as described in the setup section.
6. Mounting Options
The FunFlix P1 can be used on a tabletop or mounted to a ceiling or wall using compatible mounting brackets. The bottom of the projector includes mounting holes for this purpose.
Maintenance
1. Cleaning the Lens
Use a professional lens cleaning cloth or soft, lint-free cloth to gently wipe the projector lens. Avoid using abrasive cleaners or excessive force.
2. Cleaning the Exterior
Wipe the projector's exterior with a soft, dry cloth. For stubborn dirt, a slightly damp cloth can be used, followed by a dry cloth.
3. HEPA Filter Maintenance
The projector is equipped with a removable and replaceable high-efficiency HEPA filter. Regularly check and clean the filter to maintain optimal performance and prevent dust buildup. Refer to the filter compartment for removal and replacement instructions.
4. Lamp Life
The LED light source has an estimated operating life of 50,000 hours, requiring minimal lamp replacement.
Troubleshooting
| Problem | Possible Cause | Solution |
|---|---|---|
| No power | Power cable not connected; power outlet faulty. | Ensure power cable is securely connected. Test the power outlet with another device. |
| No image or blurry image | Lens cap on; focus not adjusted; keystone not corrected; incorrect input source. | Remove lens cap. Use automatic focus or adjust manually. Perform keystone correction. Select the correct input source (HDMI, USB). |
| No sound | Volume too low; external audio device not connected or selected; internal speaker disabled. | Increase volume. Check Bluetooth connection for external speakers. Ensure internal speaker is enabled in settings. |
| Wi-Fi connection issues | Incorrect password; out of range; router issues; temporary software glitch. | Verify Wi-Fi password. Move projector closer to router. Restart router and projector. Check for system updates. |
| Certain apps (e.g., Netflix) not working or low quality | Outdated Android OS; app compatibility issues; DRM limitations (L3 license). | Ensure apps are updated. For optimal streaming quality on platforms like Netflix, Max, or Prime, consider connecting an external L1 licensed TV Box (e.g., Amazon Fire Stick) via HDMI. The projector's internal Android system may have L3 DRM limitations. |
| Fan noise is noticeable | Normal operation; ventilation blocked; dust buildup. | Some fan noise is normal for cooling. Ensure ventilation is not blocked. Clean the HEPA filter. |
Specifications
| Feature | Detail |
|---|---|
| Brand | FunFlix |
| Recommended Uses | Home Cinema |
| Key Feature | Automatic Focus |
| Connectivity Technology | Ethernet, HDMI, USB, Wi-Fi |
| Display Resolution (Standard) | 1920 x 1080 (Full HD) |
| Maximum Display Resolution | 3840 x 2160 (4K Supported) |
| Display Type | LED |
| Form Factor | Portable |
| Mounting Type | Tabletop Mount, Ceiling Mount |
| Brightness | 8000 Lumens (8000 ANSI Lumens) |
| Compatible Devices | Smartphone, Laptop, Game Console, Tablet |
| Maximum Throw Distance | 10.0 meters |
| Light Source Operating Life | 50,000 Hours |
| Maximum Image Size | 300 Inches |
| Light Source Wattage | 150 Watts |
| Hardware Interface | HDMI, USB |
| Minimum Throw Distance | 1.5 meters |
| Video Encoding | H.265 |
| Included Components | AV Cable, Power Cable, HDMI Cable, Projector Lens Cap, Remote Control |
| Manufacturer | FunFlix |
Warranty Information
The FunFlix P1 Projector comes with a 2-year importer warranty. Please retain your proof of purchase for warranty claims. The warranty covers manufacturing defects under normal use conditions. It does not cover damage caused by misuse, accidents, unauthorized modifications, or improper maintenance.
Customer Support
If you encounter any issues or have questions regarding your FunFlix P1 Projector that are not addressed in this manual, please contact your retailer or the FunFlix customer support team. Refer to your purchase documentation for specific contact details.


