
XIAOVV P5 Plus
Xiaovv 4K Outdoor Security Camera User Manual
Brand: XIAOVV | Model: P5 Plus
1. Product Overview
The Xiaovv P5 Plus is a 4K outdoor solar-powered security camera designed for comprehensive surveillance. It features a dual-lens system for wider coverage, 360° PTZ capabilities, and advanced human detection with real-time alerts. Its wireless and solar-powered design ensures continuous operation without the need for frequent battery changes or external power sources.
Key Features
- Dual Lens, Dual Screen: Features a spherical camera and a sub-bullet camera for wider 4K resolution coverage. Allows automatic detection and tracking by the dome camera upon panoramic image selection.
- 100% Wireless & Solar Powered: Equipped with a 10000mAh high-capacity battery and a solar panel for continuous, uninterrupted power, providing 365 days of protection.
- Advanced PIR Detection & Real-time Alert: Utilizes sensitive PIR sensors and AI human motion detection to accurately identify human movement, reducing false alarms. Sends instant notifications and records video upon detection.
- 360° Panoramic Surveillance: Offers 355° horizontal and 90° vertical PTZ rotation for comprehensive monitoring without blind spots. Supports up to 5 customizable detection zones.
- 2-Way Audio & Intelligent Storage: Enables real-time communication with visitors. Supports multi-person sharing via QR code. Video can be stored on a micro SD card (up to 128GB, not included) or via encrypted cloud storage.

Figure 1.1: The Xiaovv P5 Plus 4K Outdoor Security Camera with its integrated solar panel, designed for wall mounting.
2. Setup Guide
2.1 Package Contents
Before beginning installation, please verify that all components are present in the package:
- Xiaovv P5 Plus Security Camera (1 unit)
- Solar Panel (integrated or separate, as per model design)
- Mounting Bracket
- Mounting Screws and Wall Plugs
- User Manual (this document)
- USB Charging Cable (for initial charge if needed)
2.2 Installation
The camera is designed for wall mounting. Choose a location that provides optimal sunlight exposure for the solar panel and a clear view of the area you wish to monitor.
- Select Mounting Location: Identify a sturdy wall or surface where the camera can be securely mounted. Ensure the solar panel receives direct sunlight for several hours daily.
- Mark Drill Holes: Use the mounting bracket as a template to mark the positions for drilling.
- Drill Holes: Drill holes at the marked positions. Insert wall plugs if mounting on masonry or drywall.
- Attach Mounting Bracket: Secure the mounting bracket to the wall using the provided screws.
- Mount Camera: Attach the camera assembly (with integrated solar panel) to the mounting bracket. Adjust the angle of the solar panel to maximize sun exposure.
- Initial Charge (Optional): Although solar-powered, it is recommended to fully charge the camera's internal battery via the USB port before first use, especially if the battery level is low.

Figure 2.1: Illustration of the camera mounted on a wall, showing the solar panel's angle adjustment for optimal sunlight and the camera's PTZ range.
2.3 App Connection
To control and monitor your camera, you need to connect it to your smartphone via the dedicated app.
- Download App: Search for the "Xiaovv" or specified companion app in your smartphone's app store (Google Play Store for Android, Apple App Store for iOS).
- Register/Log In: Open the app and create a new account or log in if you already have one.
- Add Device: Follow the in-app instructions to add your new camera. This typically involves scanning a QR code on the camera or manually selecting the device model.
- Connect to Wi-Fi: Ensure your smartphone is connected to a 2.4GHz Wi-Fi network. The app will guide you through connecting the camera to your home Wi-Fi network.
- Complete Setup: Once connected, you can name your camera and configure initial settings.
3. Operating Instructions
3.1 Live View and PTZ Control
Access the live video feed through the app. You can control the camera's pan (horizontal) and tilt (vertical) movements directly from your smartphone.
- Open the app and select your camera from the device list.
- Use the on-screen joystick or swipe gestures to move the camera lens.
- The dual-lens system allows for a wider field of view and automatic tracking.
3.2 Motion Detection and Alerts
The camera uses PIR sensors and AI to detect human motion and send alerts.
- Enable Motion Detection: Navigate to the camera settings in the app and ensure motion detection is enabled.
- Customize Detection Zones: Define specific areas within the camera's view (up to 5 zones) where you want motion detection to be active, reducing unnecessary alerts.
- Set Alert Sensitivity: Adjust the sensitivity of the PIR sensor to minimize false alarms from pets or environmental factors.
- Receive Notifications: When motion is detected, the camera will send real-time notifications to your smartphone and begin recording.
- Smart Siren: Configure the smart siren to activate automatically upon detection of intruders, deterring unwanted activity.

Figure 3.1: The camera's intelligent PIR detection system, capable of identifying human, pet, vehicle, and package movements.

Figure 3.2: An example of a real-time alert notification received on a smartphone when the camera detects an invasion.
3.3 Two-Way Audio
The built-in microphone and speaker allow for real-time two-way communication.
- From the live view, tap the microphone icon to speak through the camera.
- Tap the speaker icon to hear audio from the camera's vicinity.
3.4 Recording and Storage
The camera supports both local and cloud storage options for recorded video.
- Micro SD Card: Insert a micro SD card (up to 128GB, not included) into the designated slot on the camera for local storage of recordings.
- Cloud Storage: The camera supports encrypted cloud storage. Refer to the app for subscription details and activation.
- Playback: Access recorded footage through the app's playback feature, allowing you to review events by date and time.
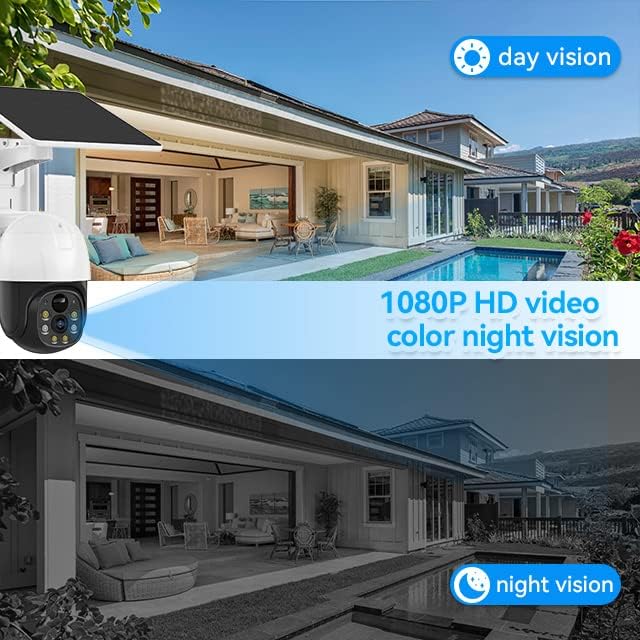
Figure 3.3: Comparison illustrating the camera's 1080P HD video quality during day vision and its capability for color night vision.
4. Maintenance
Regular maintenance ensures optimal performance and longevity of your security camera.
- Cleaning the Lens and Solar Panel: Periodically wipe the camera lens and solar panel with a soft, damp cloth to remove dust, dirt, or debris. This ensures clear video quality and efficient solar charging. Avoid abrasive cleaners.
- Battery Health: The camera's 10000mAh battery is designed for long life. Ensure the solar panel receives adequate sunlight to keep the battery charged. In prolonged periods of low sunlight, consider a manual charge via the USB port if the battery level drops significantly.
- Firmware Updates: Check the app regularly for available firmware updates. Updates often include performance improvements, bug fixes, and new features. Follow in-app instructions for updating.
- Environmental Protection: While the camera is IP65 weatherproof, extreme weather conditions (e.g., heavy snow, ice buildup) may temporarily affect performance. Ensure the camera is not obstructed by snow or ice.

Figure 4.1: Key features highlighting the camera's 100% wire-free design, IP65 waterproof rating, AI motion detection, 1080P color night vision, cloud/SD storage, and long battery life.
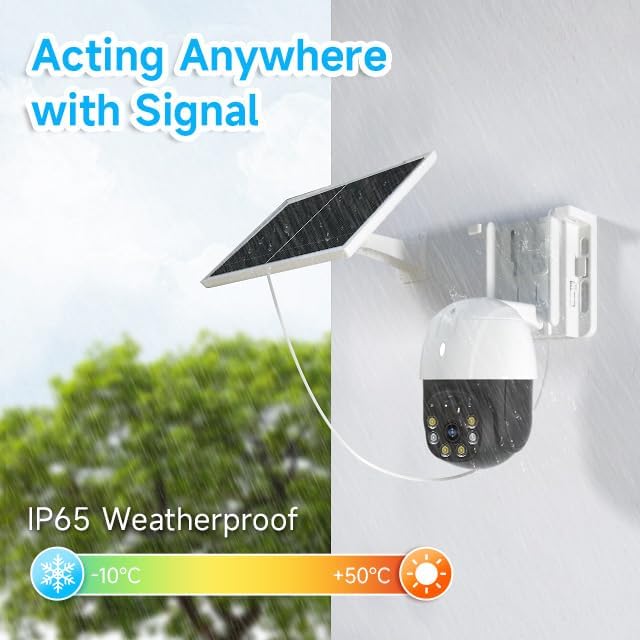
Figure 4.2: The camera's IP65 weatherproof rating, indicating its ability to operate in various outdoor conditions, including rain, and its operational temperature range from -10°C to +50°C.
5. Troubleshooting
If you encounter issues with your Xiaovv P5 Plus camera, refer to the following common problems and solutions:
| Problem | Solution |
|---|---|
| Camera not powering on. | Charge the camera fully using the USB cable. Ensure the solar panel is in direct sunlight and free of obstructions. |
| Cannot connect to Wi-Fi. | Verify Wi-Fi password. Ensure you are connecting to a 2.4GHz network. Move the camera closer to the router or use a Wi-Fi extender. |
| Frequent false motion alerts. | Adjust motion detection sensitivity in the app. Define specific detection zones to exclude irrelevant areas. |
| Poor video quality. | Clean the camera lens. Improve Wi-Fi signal strength. Ensure adequate lighting for optimal night vision performance. |
| Two-way audio not working. | Check audio settings in the app to ensure microphone and speaker are enabled. Verify app permissions on your smartphone. |
6. Technical Specifications
| Feature | Specification |
|---|---|
| Model Name | P5 Plus |
| Video Capture Resolution | 4K |
| Viewing Angle | 360 Degrees (PTZ: 355° horizontal, 90° vertical) |
| Night Vision Range | 33 Feet (Color Night Vision) |
| Power Source | Solar Powered (with 10000mAh Lithium Ion Battery) |
| Wireless Technology | Wi-Fi (2.4GHz) |
| Storage Options | Micro SD Card (up to 128GB), Cloud Storage |
| Special Features | 2-Way Audio, Built-In Light, Night Vision, PTZ Technology, Weather Proof (IP65), Human Detection, Spotlight Siren |
| Mounting Type | Wall Mount (Screw In) |
| Form Factor | Dome / Bullet (Dual Lens Design) |
| Included Components | Camera, Solar panel |
| Product Dimensions (L x W x H) | 18.49 x 18.49 x 18.49 cm |
| Item Weight | 1.48 kg |
| Indoor/Outdoor Usage | Outdoor |
| Compatible Devices | Smartphone (via app) |
| Country of Origin | China |
7. Warranty and Support
7.1 Warranty Information
The Xiaovv P5 Plus Security Camera comes with a 1-Year Warranty from the date of purchase. This warranty covers manufacturing defects and malfunctions under normal use. It does not cover damage caused by misuse, accidents, unauthorized modifications, or natural disasters.
Please retain your proof of purchase for warranty claims.
7.2 Customer Support
For technical assistance, troubleshooting beyond this manual, or warranty inquiries, please contact Xiaovv customer support. Refer to the product packaging or the official Xiaovv website for the most current contact information (email, phone, or support portal).
When contacting support, please have your product model (P5 Plus) and purchase details ready.
Related documentsP5 Plus


Ask a question about this manual
Ask about setup, troubleshooting, compatibility, parts, safety, or missing instructions. Manuals+ will review the question and use this page’s manual context to help answer it.