1. Introduction
Thank you for choosing the Allsmartlife 50-inch Flush Mount Ceiling Fan with Lights. This manual provides essential information for the safe installation, operation, and maintenance of your new ceiling fan. Please read these instructions thoroughly before beginning installation and retain them for future reference.
Important Safety Information
- Always disconnect power at the main fuse box or circuit breaker before installation or servicing.
- All wiring must be in accordance with national and local electrical codes. If you are unfamiliar with wiring, consult a qualified electrician.
- Ensure the installation site can support the fan's weight (approximately 13.5 pounds).
- Do not operate the fan with damaged blades or housing.
- Keep hands, clothing, and other objects away from the fan blades when the fan is in operation.

Figure 1: Allsmartlife 50-inch Flush Mount Ceiling Fan with Remote Control

Figure 2: Ceiling Fan in a Bedroom Setting
2. Package Contents
Verify that all components listed below are included in your package. If any parts are missing or damaged, please contact customer support.
- Ceiling Fan Motor Housing
- Fan Blades (5)
- Integrated LED Light Kit
- Remote Control
- Wall Mount Bracket for Remote
- Mounting Hardware (screws, wire nuts, etc.)
- Instruction Manual

Figure 3: Fan Dimensions and Blade Options
3. Installation Guide
Your Allsmartlife ceiling fan comes with pre-assembled parts to simplify installation. For detailed visual instructions, search for installation videos using the model number DY1172X on Google.
General Installation Steps:
- Power Disconnection: Before starting, ensure the power supply to the installation area is turned off at the circuit breaker.
- Mounting Bracket Installation: Secure the mounting bracket to the ceiling junction box. Ensure the junction box is adequately supported for the fan's weight.
- Wiring: Connect the fan's electrical wires to the household wiring according to the provided wiring diagram in the full manual. Use appropriate wire nuts.
- Fan Assembly: Attach the fan motor housing to the mounting bracket.
- Blade Attachment: Securely attach the five fan blades to the motor housing.
- Light Kit Installation: Connect and install the integrated LED light kit.
- Power Restoration: Once installation is complete and all connections are secure, restore power at the circuit breaker.

Figure 4: Aerodynamic Blade Design and Canopy Features
4. Operating Instructions
Your ceiling fan is controlled by the included remote control. Ensure the remote has fresh batteries installed.
Remote Control Functions:
- Fan ON/OFF: Turns the fan on or off.
- Fan Speed (1-6): Adjusts fan speed from 1 (lowest) to 6 (highest).
- Light ON/OFF: Controls the integrated LED light independently.
- Color Temperature (3CCT): Cycles through 3000K (Warm White), 4000K (Natural White), and 6500K (Daylight White).
- Brightness Adjustment: Increases or decreases light brightness from 10% to 100%.
- Sleep Mode: Activates a patented mode that varies fan frequency to simulate natural wind.
- Forward/Reverse: Changes the direction of blade rotation for seasonal use.
- Timer (1H/3H/6H): Sets the fan to turn off automatically after 1, 3, or 6 hours.

Figure 5: Remote Control Functionality Overview
Seasonal Operation (Forward/Reverse):
- Summer Mode (Downward Airflow): Press the reverse button to set blades to rotate counter-clockwise, creating a downward breeze for cooling.
- Winter Mode (Upward Airflow): Press the reverse button again to set blades to rotate clockwise, drawing warm air up and distributing it evenly without creating a direct draft.

Figure 6: Summer and Winter Airflow Modes
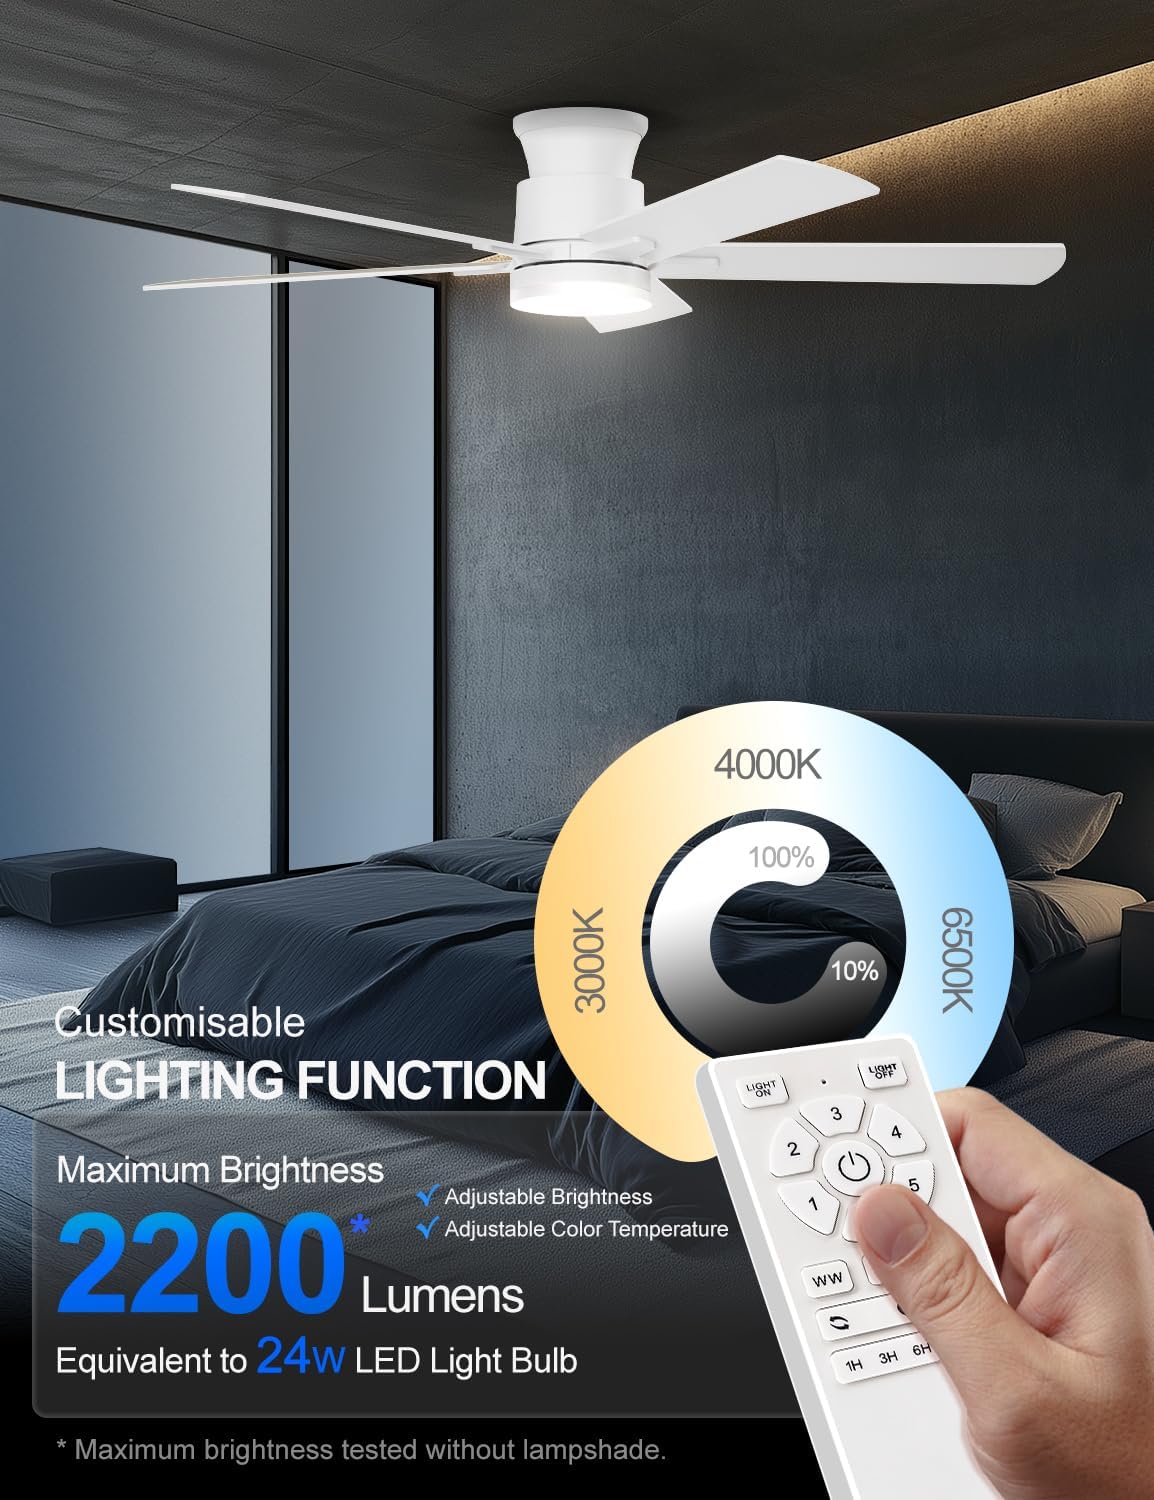
Figure 7: Customizable Lighting Functions
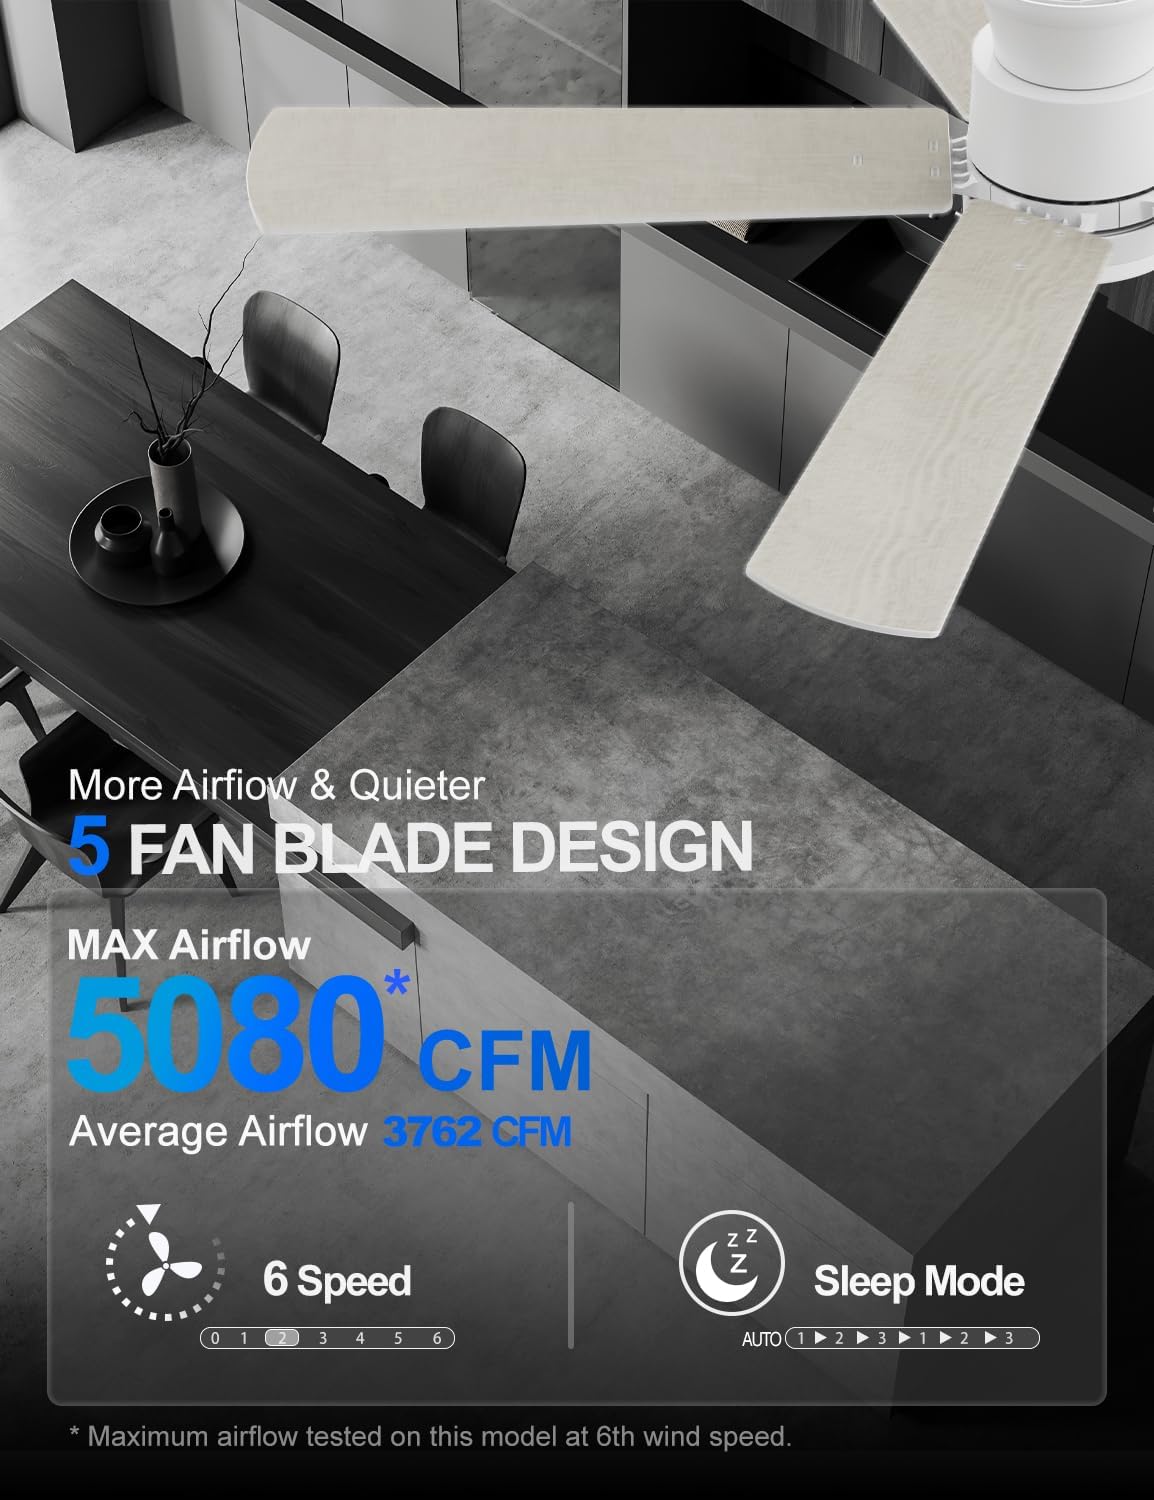
Figure 8: Airflow and Sleep Mode Features
5. Maintenance
Regular maintenance ensures optimal performance and extends the lifespan of your ceiling fan.
- Cleaning: Periodically clean the fan blades and motor housing with a soft, damp cloth. Do not use abrasive cleaners or solvents.
- Blade Inspection: Check fan blades for any cracks or damage. Replace damaged blades immediately.
- Tightness Check: Ensure all screws and connections are tight at least once a year.
- Light Source: The integrated LED light source is designed for long-term use and typically does not require replacement.
6. Troubleshooting
If you encounter issues with your fan, refer to the following common problems and solutions:
| Problem | Possible Cause | Solution |
|---|---|---|
| Fan does not start | No power supply Loose wire connections Remote control battery dead | Check circuit breaker/fuse Verify all wiring connections are secure Replace remote control batteries |
| Light does not work | Light switch off Loose wire connection Remote control battery dead | Ensure light is turned on via remote Check light kit wiring Replace remote control batteries |
| Fan wobbles | Loose blade screws Unbalanced blades Loose mounting bracket | Tighten all blade screws Ensure blades are evenly weighted and installed Check mounting bracket for secure installation |
| Remote control not responding | Battery dead Remote not paired (if applicable) Obstruction between remote and receiver | Replace batteries Refer to pairing instructions in the full manual Ensure clear line of sight |
7. Product Specifications
| Feature | Detail |
|---|---|
| Brand | Allsmartlife |
| Model Name | 1172X |
| Size | 50-inch |
| Color | Fresh White |
| Product Dimensions | 50"D x 50"W x 10.5"H |
| Item Weight | 13.5 pounds |
| Motor Type | Brushless DC Motor |
| Number of Blades | 5 |
| Fan Speeds | 6 |
| Air Flow Capacity | 3762 Cubic Feet Per Minute (CFM) |
| Light Type | Integrated LED |
| Brightness | Up to 2200 lumens (10%-100% adjustable) |
| Color Temperature | 3000K (Warm White), 4000K (Natural White), 6500K (Daylight White) |
| Control Method | Remote Control |
| Voltage | 120 Volts |
| Wattage | 32 watts |
| Indoor/Outdoor Usage | Indoor, Outdoor (with specific humidity and rain exposure guidelines) |
| Certification | ETL |

Figure 9: DC Brushless Motor Noise Comparison

Figure 10: Room Size Recommendation Guide

Figure 11: Guidelines for Outdoor Use
8. Warranty and Support
Allsmartlife offers a lifetime of free replacement service for parts. If you require any assistance, have questions, or need to claim warranty service, please contact our customer support team. We are committed to providing prompt and effective solutions.
For further support, please refer to the contact information provided with your purchase or visit the official Allsmartlife website.
