1. Introduction
This manual provides detailed instructions for the setup, operation, and maintenance of your VOKSUN 3378QX Wireless Weather Station. This device offers comprehensive weather monitoring, including indoor and outdoor temperature and humidity, weather forecasts, moon phases, and a DCF radio-controlled clock with alarm functions.

Image 1.1: Overview of VOKSUN Weather Station features.
2. Package Contents
Please check the package contents to ensure all items are present:
- VOKSUN 3378QX Weather Station Main Unit
- Wireless Outdoor Sensor (1 unit)
- Power Adapter (DC5V)
- User Manual
3. Product Overview
The VOKSUN 3378QX Weather Station consists of a main display unit and a wireless outdoor sensor.
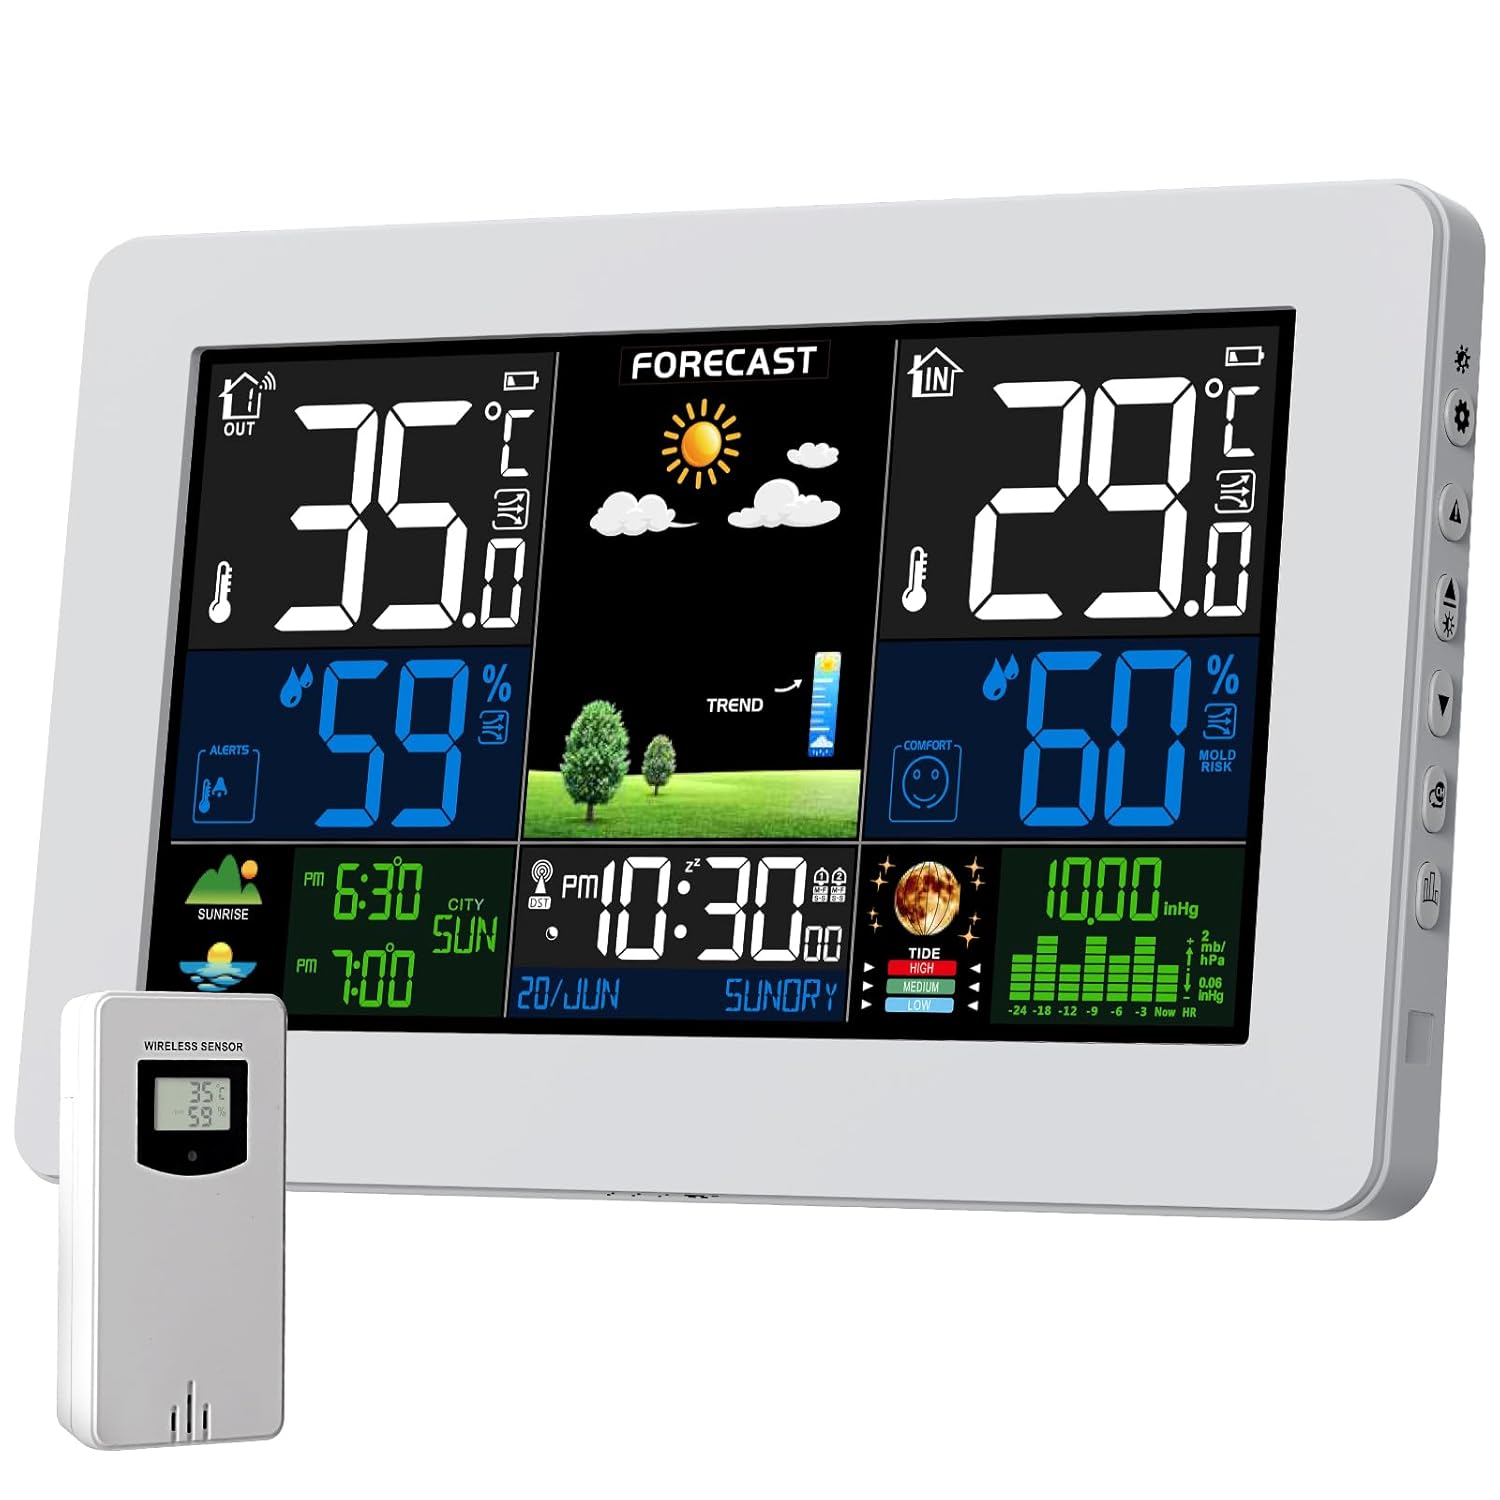
Image 3.1: Main unit and outdoor sensor.
The main unit features a large LCD screen displaying various data points. The outdoor sensor transmits temperature and humidity data wirelessly to the main unit.

Image 3.2: Product dimensions for the main unit and outdoor sensor.
The main unit measures approximately 20.5 cm x 13 cm x 3 cm. The wireless sensor measures approximately 3.74 inches (9.5 cm) in height and 1.96 inches (5 cm) in width.

Image 3.3: The weather station can be placed on a desk using its integrated stand or mounted on a wall.
The main unit can be positioned on a desk using its integrated stand or mounted on a wall.
4. Setup
4.1 Powering the Device
The weather station offers two power supply methods: DC5V adapter or batteries. The outdoor sensor operates solely on batteries.

Image 4.1: Powering the main unit via adapter or batteries.
Main Unit:
- Adapter Power: Connect the DC5V adapter to the main unit and a power outlet. The display will remain constantly lit. It is recommended to use the power adapter with backup batteries (not included) to retain settings during power outages.
- Battery Power (not included): Insert 2 x AA batteries into the main unit. To conserve power, the display will automatically turn off after 15 seconds. Touch any button to illuminate the screen temporarily.
Outdoor Sensor:
- Insert 2 x AA batteries (not included) into the outdoor sensor.

Image 4.2: Battery installation for the main unit and outdoor sensor.
4.2 Initial Setup and Sensor Pairing
- First, power on the main unit using either the adapter or batteries.
- Next, insert batteries into the outdoor sensor. The sensor will immediately begin transmitting data.
- The main unit will automatically search for the outdoor sensor. Once connected, the outdoor temperature and humidity will appear on the display.
- The weather station will automatically synchronize the date and time via DCF radio waves. This process typically takes a few minutes after startup. Ensure the station is placed in an area with good signal reception.

Image 4.3: The weather station automatically synchronizes time via DCF radio signal, covering a wide European area.
The automatic clock synchronization via DCF signal ensures accurate time display. You can select your time zone (e.g., from -2 to +2 hours relative to the DCF signal) to adjust for local time.
5. Operating Instructions
5.1 Display Overview
The large LCD screen provides a clear overview of all important weather data.

Image 5.1: The 7.5-inch HD LCD screen displays various weather parameters.
The display shows indoor and outdoor temperature and humidity, current time and date, weather forecast icons, moon phase, and barometric pressure.
5.2 Setting Time and Date Manually
While the DCF signal automatically sets the time, manual adjustment is possible if needed. Refer to the detailed instructions in your printed manual for specific button sequences.
5.3 Alarm Settings
The weather station supports two independent alarms. You can set alarms for weekdays, weekends, or both. A snooze function is also available, typically ranging from 5 to 60 minutes.

Image 5.2: The weather station features two alarms with snooze functionality.
5.4 Weather Forecast Calibration
The weather station calculates a forecast for the next 12 hours based on barometric pressure trends. For accurate local forecasts, a calibration period of 7 to 10 days is required.

Image 5.3: Weather forecast icons and a general representation of weather patterns.

Image 5.4: The weather station provides a 12-hour weather forecast, useful for planning activities.
5.5 Comfort and Mold Risk Display
The station displays a comfort index based on indoor temperature and humidity, indicating whether the environment is comfortable, too cold, or too hot. It also provides an alarm for mold risk.
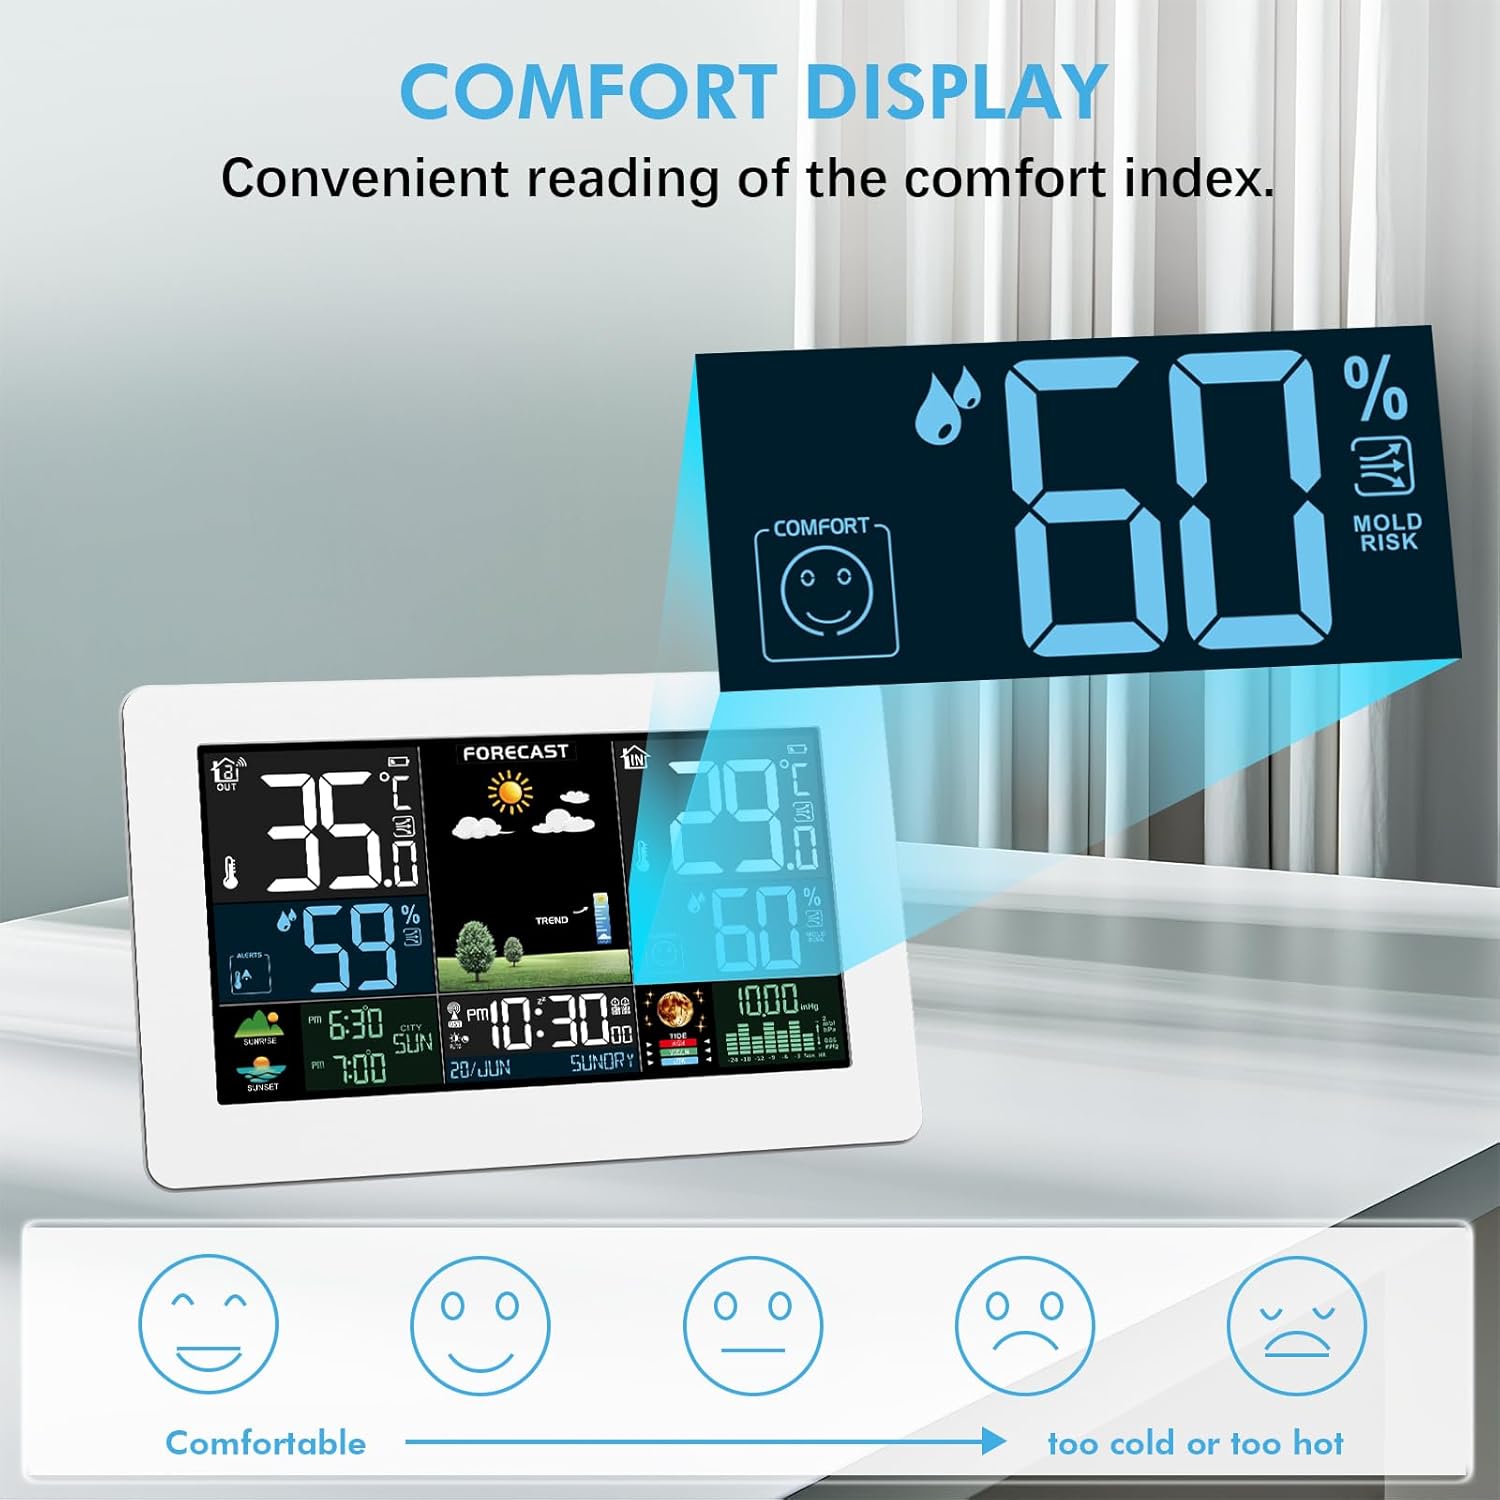
Image 5.5: Comfort index and mold risk are displayed for indoor conditions.

Image 5.6: The comfort indicator helps maintain an optimal indoor environment.
5.6 Moon Phase and Tide Display
The station displays the current moon phase and tide information.
5.7 Sunrise/Sunset Times
The device can display sunrise and sunset times. This feature may require manual input of your location's coordinates (latitude and longitude) for accuracy.
5.8 Temperature and Humidity Alarms
You can set alarms for specific indoor and outdoor temperature and humidity thresholds.

Image 5.7: The weather station provides temperature and humidity detection for various environments.
5.9 Frost Warning
The station features a frost warning. When the outdoor sensor temperature is between -1°C (+30°F) and +3°C (+37°F), the frost alarm activates, and a frost icon will flash.

Image 5.8: The frost warning feature alerts users to freezing conditions.
5.10 Backlight Adjustment
The display backlight is adjustable for improved readability in various lighting conditions. Refer to your manual for specific button controls.
5.11 Multiple Outdoor Sensors
The weather station supports up to three wireless outdoor sensors simultaneously. The transmission range can reach up to 60 meters (200 feet) in open areas.

Image 5.9: The weather station can connect to up to three outdoor sensors.

Image 5.10: Multiple sensors allow monitoring of different locations like a courtyard, bedroom, or basement.
To add additional sensors, ensure each is set to a different channel (CH1, CH2, CH3) and follow the pairing instructions in your manual.
5.12 Barometric Pressure Display
The weather station displays barometric pressure. You can view either absolute pressure (ABS PRESSURE) or relative pressure (REL PRESSURE). Relative pressure can be adjusted to your local altitude for more accurate readings.

Image 5.11: Understanding Relative (REL) and Absolute (ABS) Pressure readings.
6. Maintenance
- Cleaning: Wipe the display and unit with a soft, damp cloth. Do not use abrasive cleaners or solvents.
- Battery Replacement: Replace batteries in the outdoor sensor and main unit (if using battery power) when the low battery indicator appears on the display.
- Sensor Placement: For optimal performance, place the outdoor sensor in a shaded, dry location, protected from direct sunlight and precipitation.
7. Troubleshooting
| Problem | Possible Cause | Solution |
|---|---|---|
| No outdoor temperature/humidity reading. |
|
|
| Incorrect time display. |
|
|
| Display is dim or off (on battery power). |
|
|
8. Specifications
| Feature | Detail |
|---|---|
| Model Number | 3378QX |
| Product Dimensions (Main Unit) | 3 x 20.5 x 13 cm (approx. 620 grams) |
| Temperature Measurement Range (Indoor) | -9.9°C (+14°F) to +50°C (+122°F) |
| Temperature Measurement Range (Outdoor) | -40°C (-40°F) to +70°C (+158°F) |
| Humidity Measurement Range (Indoor & Outdoor) | 20%RH to 95%RH |
| Wireless Transmission Range | Up to 60 meters (200 feet) in open area |
| Supported Outdoor Sensors | Up to 3 (1 included) |
| Power Source (Main Unit) | DC5V Adapter or 2 x AA Batteries |
| Power Source (Outdoor Sensor) | 2 x AA Batteries |
| Special Features | Multi-function display, DCF Radio Clock, Alarm Clock, Moon Phase, Weather Forecast, Adjustable Backlight, Frost Warning, Mold Risk Alarm. |
9. Warranty and Support
For warranty information and technical support, please refer to the contact details provided with your purchase or visit the official VOKSUN website.


