1. Introduction
The iRobot Roomba 205 DustCompactor Combo is an advanced robotic cleaning device designed to vacuum and mop your floors efficiently. This model features an innovative mechanical dust compaction system, reducing the frequency of dustbin emptying, and a space-saving design that eliminates the need for an external automatic dirt disposal station. Equipped with LiDAR navigation, it intelligently maps your home and avoids obstacles for thorough cleaning.

Figure 1.1: The Roomba 205 DustCompactor Combo robot vacuum and mop, shown alongside the iRobot Home app interface on a smartphone.
This manual provides essential information for setting up, operating, maintaining, and troubleshooting your Roomba 205 DustCompactor Combo to ensure optimal performance and longevity.
2. Setup
2.1 Unpacking and Placement
- Carefully remove all components from the packaging.
- Choose a suitable location for the charging station. Ensure it is against a wall, on a level surface, and has at least 0.5 meters (1.6 feet) of clear space on either side and 1.2 meters (4 feet) in front.
- The compact design of the Roomba 205 allows it to fit under furniture and in tight spaces. Consider this when choosing its home location.

Figure 2.1: The Roomba 205 DustCompactor Combo is designed to be shorter, allowing it to clean under more furniture compared to models with external auto-empty stations.
2.2 Initial Charging
- Plug the charging station into a power outlet.
- Place your Roomba onto the charging station. The indicator light will confirm it is charging.
- Allow the robot to fully charge before its first use. This may take several hours.
2.3 Connecting to the iRobot Home App
- Download the iRobot Home app from your device's app store.
- Follow the in-app instructions to connect your Roomba to your home Wi-Fi network.
- While basic operation is possible via the robot's buttons, using the app is recommended to access all features, including smart mapping, scheduling, and custom cleaning preferences.

Figure 2.2: The iRobot Home app allows for scheduling and monitoring your robot's cleaning activities.
3. Operating Instructions
3.1 Starting a Cleaning Cycle
You can initiate a cleaning cycle using one of three methods:
- Robot Button: Press the CLEAN button on the robot.
- iRobot Home App: Tap the 'Clean' button within the app.
- Voice Assistant: Use a compatible voice assistant (Alexa, Siri, Google Assistant) by saying a command like "Alexa, ask Roomba to clean."

Figure 3.1: The Roomba 205 offers flexible control options for starting and managing cleaning tasks.
3.2 Cleaning Modes
The Roomba 205 DustCompactor Combo offers versatile cleaning options:
- Vacuum Only: For dry debris removal.
- Mop Only: For wet cleaning of hard floors.
- Vacuum & Mop: Simultaneous cleaning for comprehensive floor care.
You can select your preferred mode via the iRobot Home app. The robot features automatic carpet detection, ensuring it avoids rugs and carpets when in mopping mode.
3.3 Smart Mapping and Navigation
The integrated Clearview LiDAR technology allows the robot to quickly map your home, navigate efficiently, and avoid obstacles. This ensures a systematic cleaning path, even in dimly lit areas.

Figure 3.2: The Roomba's Clearview LiDAR enables smart mapping and efficient navigation, ensuring comprehensive coverage.
3.4 Customizing Cleaning
Through the iRobot Home app, you can:
- Schedule Cleans: Set daily routines for specific rooms or areas.
- Adjust Settings: Select the number of cleaning passes, suction power, and the amount of water supplied to the microfiber mop pad.
- Define Keep Out Zones: Create virtual boundaries to prevent the robot from entering specific areas.
4. Maintenance
Regular maintenance ensures your Roomba 205 operates effectively. Always turn off the robot and disconnect it from the charging station before performing any maintenance.
4.1 Dust Bin and Compaction System
The Roomba 205 features a mechanical dust compaction system that compresses debris, allowing for up to 60 days of cleaning without needing to empty the bin. When the bin is full, the app will notify you.
- To empty, remove the dust bin from the robot.
- Open the bin and dispose of the compacted debris.
- Rinse the dust bin with water as needed, ensuring it is completely dry before reinserting.
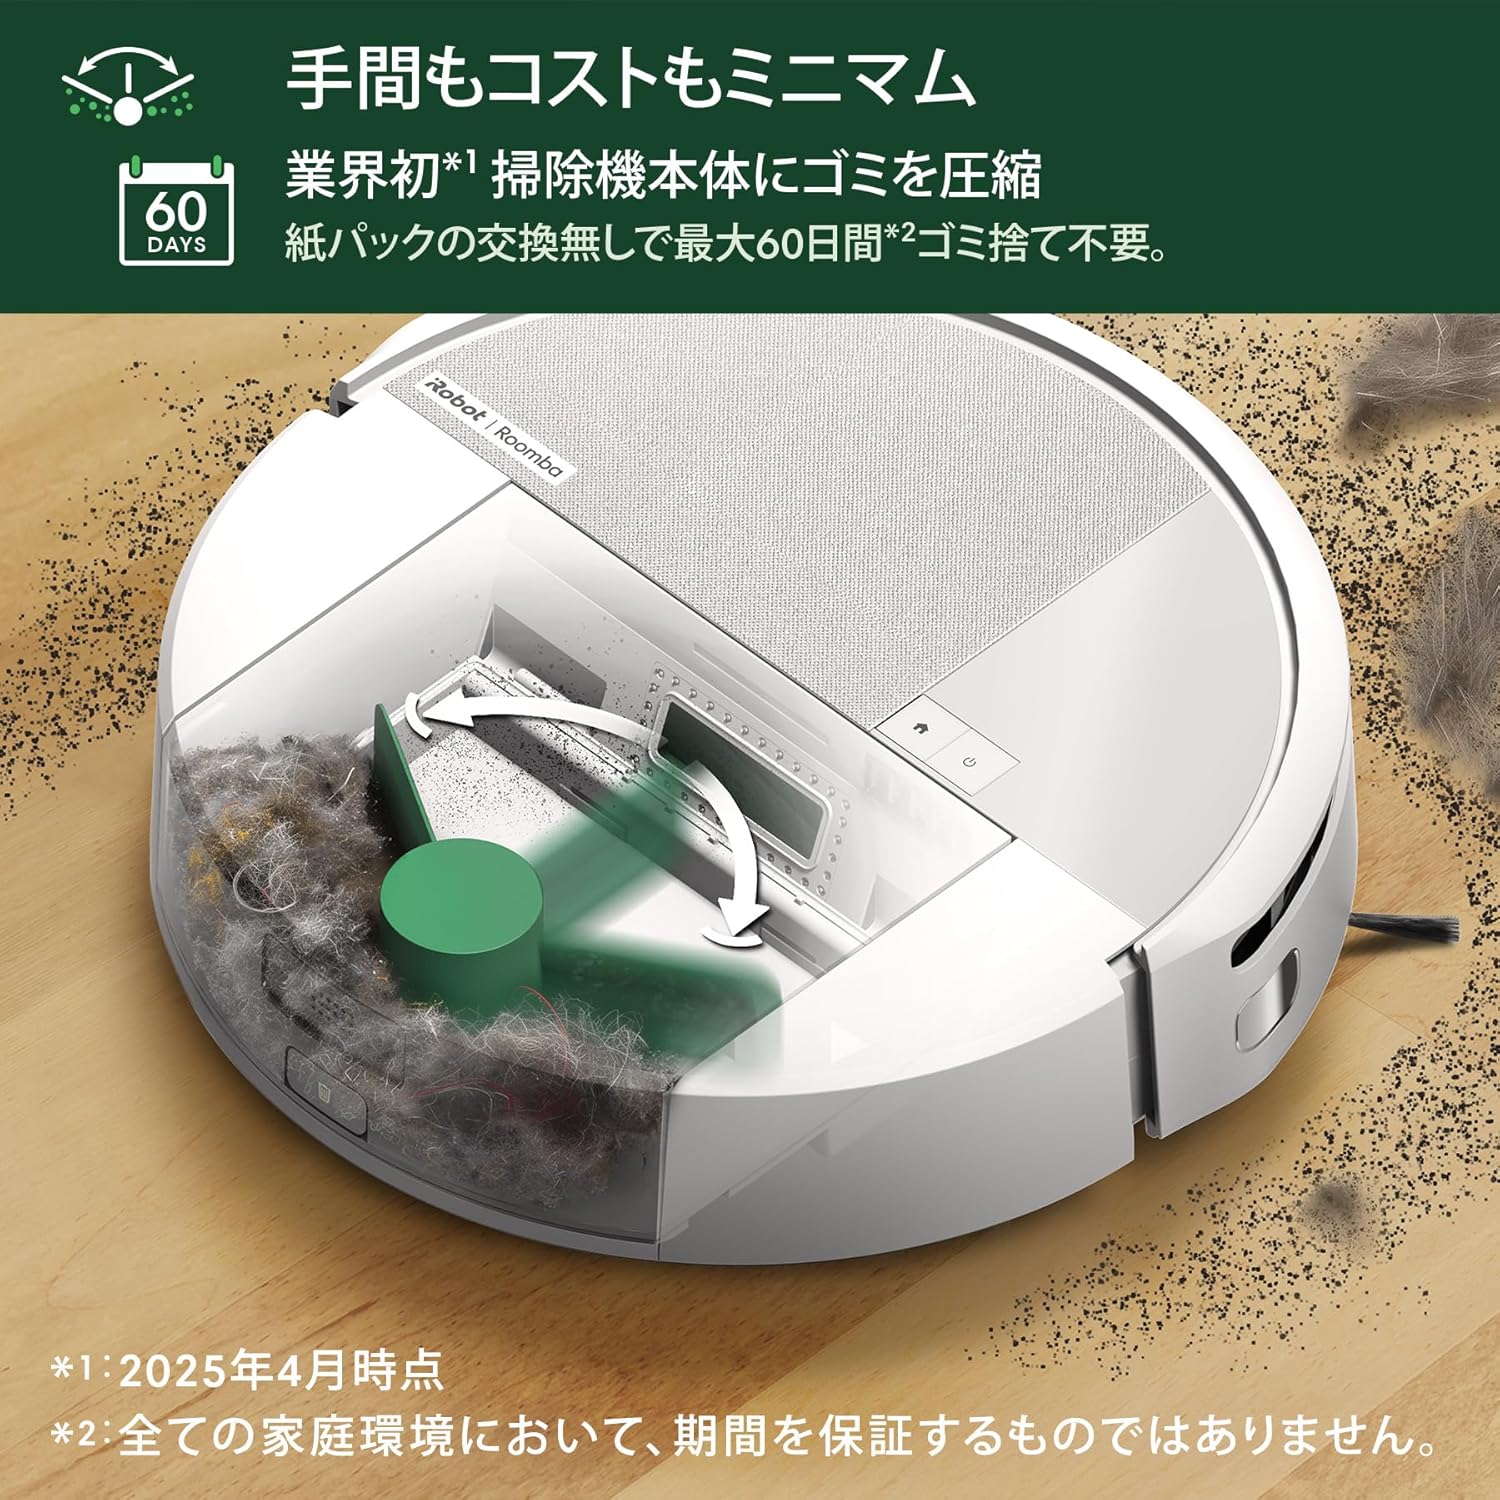
Figure 4.1: The internal dust compaction system reduces the frequency of emptying the dust bin.
4.2 Cleaning Brushes
The 4-stage cleaning system includes a power-lifting suction, a rubber single-action brush, and an edge-cleaning brush.
- Rubber Single-Action Brush: Regularly remove hair and debris tangled around the brush. The brush can be removed for easier cleaning.
- Edge-Cleaning Brush: Unscrew and remove the edge-cleaning brush. Clean off any accumulated hair or debris and reattach.

Figure 4.2: The flexible rubber brush is designed to effectively clean various floor types.
4.3 Mop Pad Care
The microfiber mop pad should be cleaned after each mopping cycle.
- Remove the mop pad from the robot.
- Wash the mop pad by hand or machine wash according to the instructions provided with the pad.
- Ensure the mop pad is completely dry before reattaching it to the robot.
4.4 Filter Maintenance
The filter should be cleaned regularly and replaced periodically to maintain optimal suction performance.
- Remove the filter from the dust bin.
- Tap the filter against a trash can to dislodge debris. Do not wash the filter with water.
- Replace the filter every few months, or as indicated by the iRobot Home app.
5. Troubleshooting
If your Roomba 205 encounters an issue, the iRobot Home app will often provide specific error messages and solutions. Here are some general troubleshooting tips:
- Robot Not Charging: Ensure the charging station is plugged in and the robot is properly docked. Clean the charging contacts on both the robot and the station.
- Robot Getting Stuck: Clear any loose cables, small objects, or thick rugs that might obstruct the robot's path. Use the app to set 'Keep Out Zones' for problematic areas.
- Poor Cleaning Performance: Check and clean the dust bin, brushes, and filter. Ensure the mop pad is clean and properly attached for mopping tasks.
- Navigation Issues: Clean the robot's sensors with a dry cloth. Ensure there are no significant changes in furniture layout that might confuse the mapping system.
- App Connectivity Problems: Ensure your Wi-Fi network is active and the robot is within range. Restart both the robot and your mobile device, then try reconnecting via the app.
For persistent issues, refer to the iRobot Home app's help section or contact iRobot customer support.
6. Specifications
| Feature | Specification |
|---|---|
| Manufacturer | iRobot |
| Model Number | L121260 |
| Product Dimensions (L x W x H) | 35.9 cm x 35.8 cm x 10.1 cm |
| Color | White |
| Weight | Approx. 5.65 kg |
| Power Source | Battery Powered |
| Battery Type | Lithium (included) |
| Navigation Technology | LiDAR Navigation |
| Cleaning Features | Edge Cleaning, Smart Mapping, Simultaneous Vacuuming & Mopping, Mechanical Dust Compaction |
7. Warranty and Support
Your iRobot Roomba 205 DustCompactor Combo purchased from Amazon.co.jp includes a 12-month manufacturer's warranty. This warranty applies only to products sold and shipped by Amazon.co.jp.
For products purchased from other sellers, please contact the respective seller for warranty and support information, as they may not be covered by the manufacturer's warranty.

Figure 7.1: Important information regarding manufacturer support and warranty coverage.
7.1 Customer Service and Data Privacy
iRobot is committed to customer satisfaction and data privacy. Our customer care representatives are specially trained to provide support when needed. iRobot prioritizes customer privacy and employs high-level data encryption technology to ensure the privacy and security of your data.
For assistance, please visit the official iRobot support website or contact their customer service directly.


