1. Product Overview
This manual provides detailed instructions for the installation and maintenance of your Muzata Modular Black Side Mount Cable Railing Kit. This kit is designed for decks and other level surfaces, offering a sleek and modern railing solution.
Kit Components
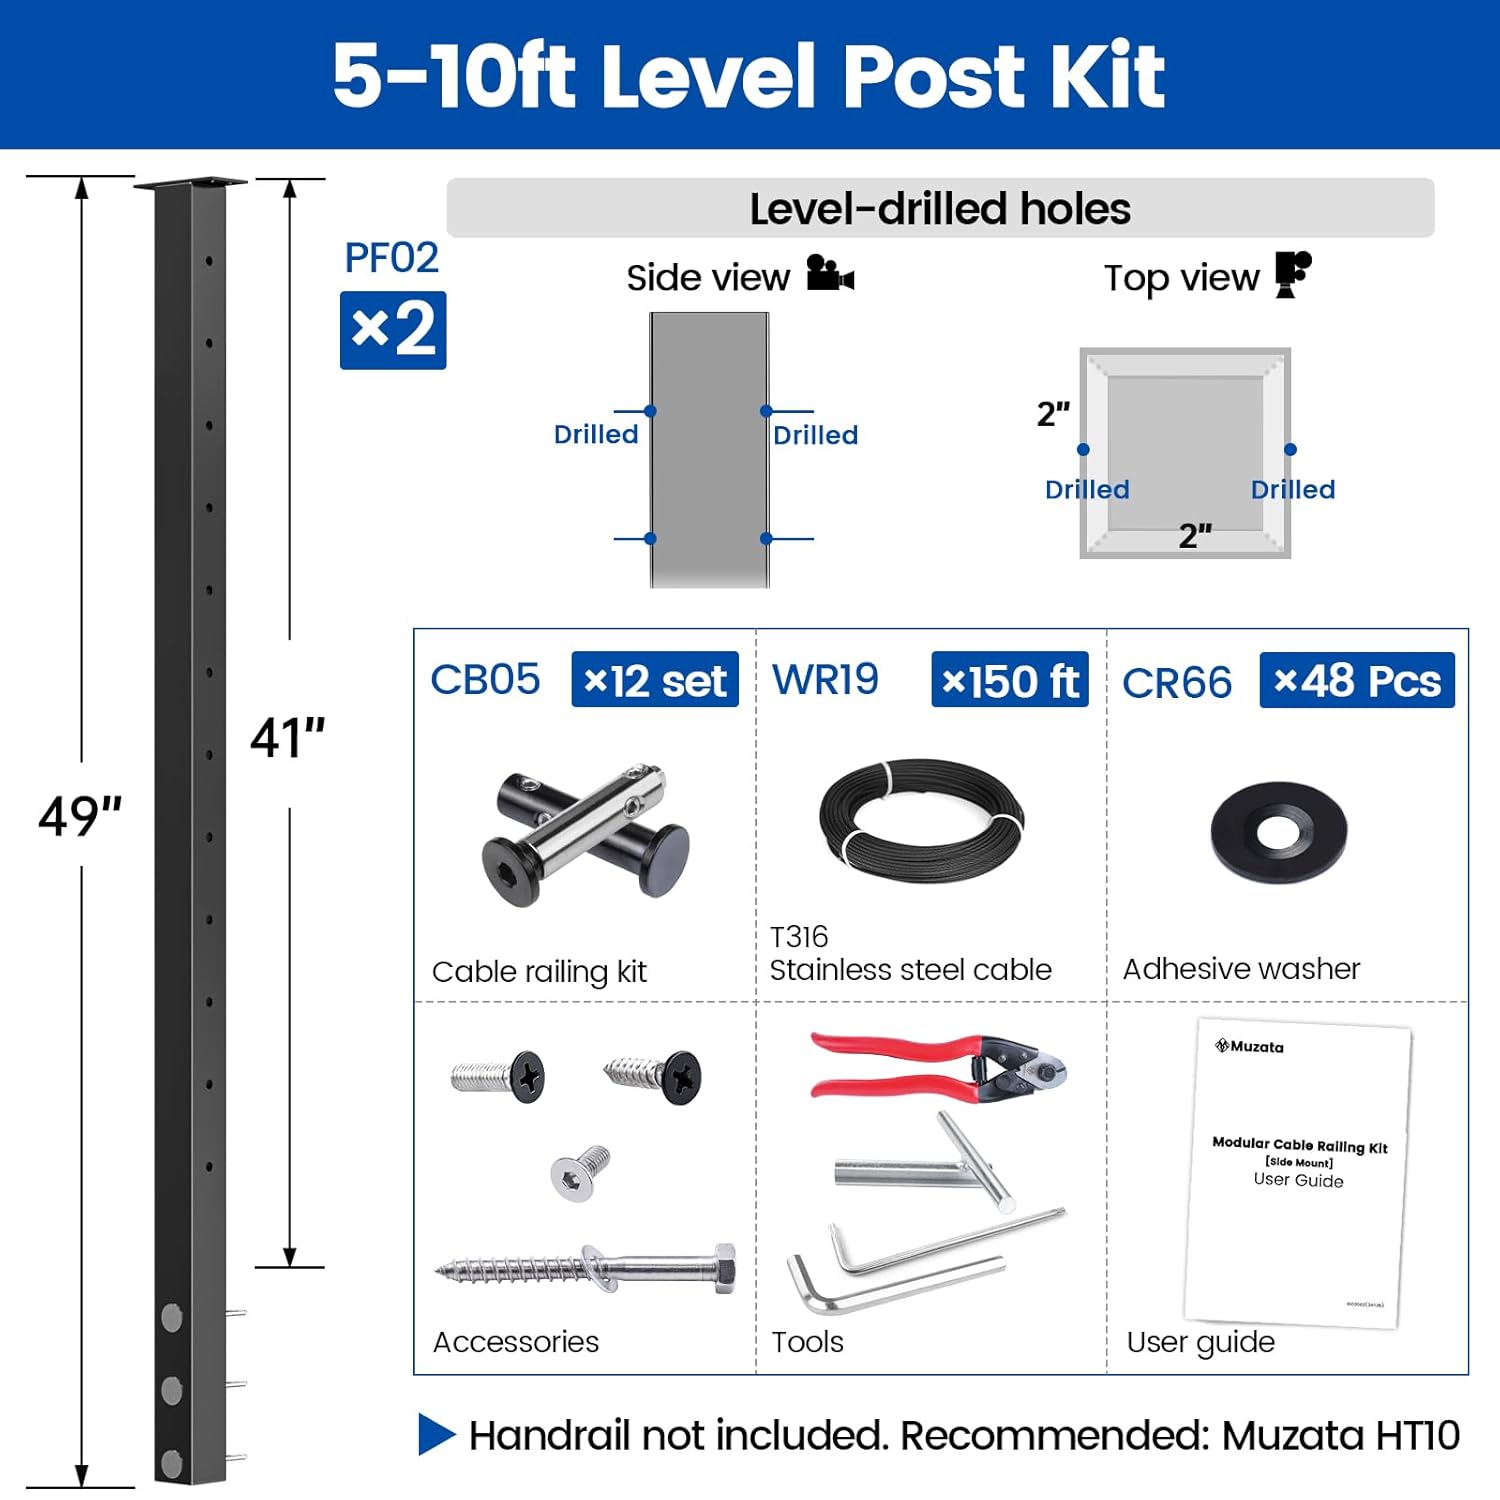
The 5-10ft Modular 42" Cable Railing Post Kit includes the following items:
- 2x Cable Railing Posts (PF02)
- Swageless Invisible Cable Railing Kit (CB05)
- Adhesive Washers (CR66)
- T316 Stainless Steel Wire Rope (WR19)
- Cable Cutter (CR12)
Note: Handrail is not included. Muzata HT10 handrail is recommended if needed.
2. Design and Planning
The Muzata Modular Cable Railing System offers flexible design options to suit various scenarios. It is crucial to plan your layout carefully before installation.
Modular Design Scenarios
The system allows for combinations of level posts, stair posts, and kits to create custom railing configurations for different areas such as level sections, corners, and stairs.

Length Selection Guide
Determine the required number of posts and kits based on the total length of your railing project. Ensure the distance between posts does not exceed 5 feet for optimal tension and stability.

Each tensioner set supports up to 20 feet of cable. The maximum distance between two posts is 5 feet.

3. Installation
This section outlines the installation process for the Muzata Modular Side Mount Cable Railing Kit. Follow these steps carefully for a secure and functional railing system.
Required Tools (Not Included)
- Drill
- 1/4" Drill Bit
- 5/32" Drill Bit
- M5 Drill Tap
- PH2 Screwdriver Bit
- Phillips Screwdriver
- Tape Measure
- Marker
- Safety Gloves
- Level
Side-Mount Posts Installation (Level Section)
The following video demonstrates the installation of side-mount posts for a level section.
Video 1: Detailed installation guide for Muzata Modular Side Mount Cable Railing Kit, covering post installation, handrail attachment, and cable infill for level and stair sections.
- Measure and set the distance between the spacer and the edge of the deck.
- Draw straight, level reference lines on the deck side to keep all posts aligned.
- Use a level to make sure the spacer is vertical.
- Secure the spacer to the deck side by tightening ST4.8x30mm lag screws into its two middle holes.
- Use a 1/4" drill bit to pre-drill the post mounting holes to a depth of approximately 3 1/4". Mount over 4" of solid blocking for secure installation.
- Place the M8 washers onto the ST8x80mm lag screws.
- Using a 13mm nut setter, drive the ST8 screws through the post and spacer into the pilot holes. Make sure the post is also vertical.
- Apply double-sided tape to the hole cap, then cover the two holes at the bottom of the post.
- Install the bottom stopper.
- Attach the fixed bracket to the top of the post using M6x12mm bolts, and tighten them with a 4mm Allen wrench.
- Repeat steps 3-10 until all level posts are installed.
Handrails Installation (Level Section)
This section details the installation of handrails for a level section.
- Determine the required length of each handrail based on the distance between adjacent posts. Cut the handrail if necessary.
- Place the handrails onto the posts temporarily. For handrail joints, center the handrail on the bracket to ensure precise drilling.
- Mark the screw hole positions on the handrails.
- Remove the handrails and drill holes using a 5/32" drill bit.
- Thread the holes using an M5 drill tap.
- For joints, insert the connector into the handrails first, then drill and thread through both pieces simultaneously. Install the seam ring over the handrail joint.
- Replace all the handrails onto the posts and align them with the holes.
- Secure the handrails to the posts using M5x16mm bolts.
- Attach the end cap to the open end.
- Repeat steps 1-9 until all handrails are installed.
Cable Infill Installation (Level Section)
This section covers the installation of the cable infill for a level section.
- Pass the cable through posts, while threading adhesive washers onto the cable for all posts.
- Insert the cable into the fixed end and tighten the set screws in sequence using a T10 bit wrench.
- Install the fixed end to the left end post.
- Pull the cable tight toward the right end post, mark Point A where it aligns with the outer face of the post, then cut the cable at Point A using a cable cutter.
- Measure 30mm from Point A and mark Point B, then cut the cable at Point B using a cable cutter.
- Insert the cable into the tensioner, then tighten the set screws in sequence using a T10 bit wrench.
- Tighten the tensioner in the right end post using a socket wrench and 5mm Allen wrench.
- Tear off the adhesive seal, stick the adhesive washers onto each post.
- Follow the sequence to install the remaining cable runs.
- Installation complete.
Side-Mount Posts Installation (Stair Section)
This section outlines the installation of side-mount posts for a stair section.
- Measure and set the distance between each spacer and the edge of the stair tread.
- Use a level to make sure the spacer is vertical.
- Secure the spacer to the stair side by tightening ST4.8x30mm lag screws into its two middle holes.
- Use a 1/4" drill bit to pre-drill the post mounting holes to a depth of approximately 3 1/4". Mount over 4" of solid blocking for secure installation.
- Fit the washers into the post from the inside.
- Attach POM rings to the ST8x80mm lag screws, then place the M8 washers onto them.
- Using a 13mm nut setter, drive the ST8 screws through the post and spacer into the pilot holes. Make sure the post is also vertical.
- Apply double-sided tape to the hole cap, then cover the two holes at the bottom of the post.
- Install the bottom stopper.
- Attach the bracket base to the post using M6x25mm bolts, and tighten them with a 5mm Allen wrench.
- Mount the bracket top onto the bracket base using M6x16mm bolt and secure it with a 4mm Allen wrench.
- Repeat steps 1-11 until all stair posts are installed.
Handrails Installation (Stair Section)
This section details the installation of handrails for a stair section.
- Determine the required length of each handrail based on the distance between adjacent posts. Cut the handrail if necessary.
- Place the handrails onto the posts temporarily. For handrail joints, center the handrail on the bracket to ensure precise drilling.
- Mark the screw hole positions on the handrails.
- Remove the handrails and drill holes using a 5/32" drill bit.
- Thread the holes using an M5 drill tap.
- For joints, insert the extension connector into the handrails first, then drill and thread through both pieces simultaneously. Install the seam ring over the handrail joint.
- Install the seam ring over the handrail joint.
- Loosen the bracket top.
- Secure the bracket top to the handrail using M5x16mm bolts.
- Attach the end cap to the open end.
- Replace all the handrails on top of the posts, then re-tighten the brackets.
Cable Infill Installation (Stair Section)
This section covers the installation of the cable infill for a stair section.
- Pass the cable through posts, while threading adhesive washers onto the cable for all posts.
- Put in the angle washer, then insert the cable into the fixed end and tighten the set screws in sequence using a T10 bit wrench.
- Install the fixed end to the end post.
- Pull the cable tight toward the other end post, mark Point A where it aligns with the outer face of the post, then cut the cable at Point A using a cable cutter.
- Measure 22mm from Point A and mark Point B, then cut the cable at Point B using a cable cutter.
- Insert the cable into the tensioner, then tighten the set screws in sequence using a T10 bit wrench.
- Insert the angle washer, then tighten the tensioner in the end post using a socket wrench and 5mm Allen wrench.
- Tear off the adhesive seal, stick the adhesive washers onto each post.
- Follow the sequence to install the remaining cable runs.
- Installation complete.
4. Quality and Durability
Muzata products are manufactured using high-quality materials and undergo rigorous testing to ensure durability and performance.
Four-Layer Process
The black powder-coated finish on the posts and components is applied through a four-layer process:
- Degreasing: Removes oil and contaminants.
- Derusting: Eliminates rust on the surface.
- Phosphating: Provides corrosion protection.
- Spraying: Applies the protective coating.

Testing Standards
- 72 Hours Acid Salt Spray Test: Shows no corrosion or rusting.
- 500 Hours Anti-UV Test: Surface shows no fading or cracking.
5. Specifications
| Attribute | Value |
|---|---|
| Item Thickness | 2 Inches |
| Item Form | Rod |
| Number of Items | 1 |
| Package Dimensions | 50 x 8 x 5 inches |
| Item Weight | 22 pounds |
| Manufacturer | Muzata |
| ASIN | B0DPLTF7NZ |
| Date First Available | December 5, 2024 |
| Material | Stainless Steel 304 |
| Brand | Muzata |
| Color | Black |
| Shape | Rectangular |
| Item Diameter | 2 Inches |
6. Warranty and Support
Muzata is committed to providing quality products and professional service. For any inquiries regarding product functionality, installation, or after-sales support, please contact Muzata directly.
You can reach Muzata for free design assistance or after-sales service by clicking "Visit the Muzata Store" on the product page or by searching for "Muzata + model number" for specific components.