1. Introduction
The YuLinca 6-Port 10G Web Managed Switch is designed to provide high-speed, reliable network connectivity for demanding environments. This switch features 4x 2.5G RJ45 ports, 1x 10G RJ45 port, and 1x 10G SFP+ slot, offering flexible options for connecting various network devices. With advanced Layer 2 (L2) management capabilities, a fanless metal design, and support for seamless bandwidth upgrades, it is an ideal solution for Network Attached Storage (NAS), gaming, and 8K streaming applications.

Figure 1: Overview of the YuLinca 6-Port 10G Web Managed Switch, highlighting its 2.5G and 10G ports, web management, fanless design, fiber connectivity, and wall-mountable features.
2. Setup
2.1 Unpacking and Inspection
Carefully unpack the switch and verify that all components are present: the YuLinca 6-Port 10G Web Managed Switch unit and its power adapter.
2.2 Physical Placement
The switch can be placed on a desktop or mounted on a wall. Ensure the chosen location provides adequate ventilation to prevent overheating. The fanless design ensures quiet operation.
2.3 Power Connection
Connect the provided 12V/1A power adapter to the DC input port on the switch and then plug it into a standard electrical outlet. The PWR LED indicator will illuminate when power is supplied.
2.4 Network Connections
Connect your network devices using Ethernet cables. The switch features:
- 4x 2.5G RJ45 Ports: For connecting devices requiring 2.5 Gigabit Ethernet speeds, such as high-performance workstations, NAS devices, or WiFi 6 Access Points. These ports also support 1000M (1 Gigabit) speeds.
- 1x 10G RJ45 Port: For connecting to a 10 Gigabit Ethernet device or an uplink to a core network. This port supports 10G, 5G, 2.5G, and 1000M speeds.
- 1x 10G SFP+ Slot: For fiber optic connections using compatible 1G or 10G SFP+ modules, suitable for long-distance or high-bandwidth uplinks.
Ensure you use appropriate Ethernet cable types (CAT5e, CAT6, or CAT6A) for the desired speeds to ensure optimal performance.
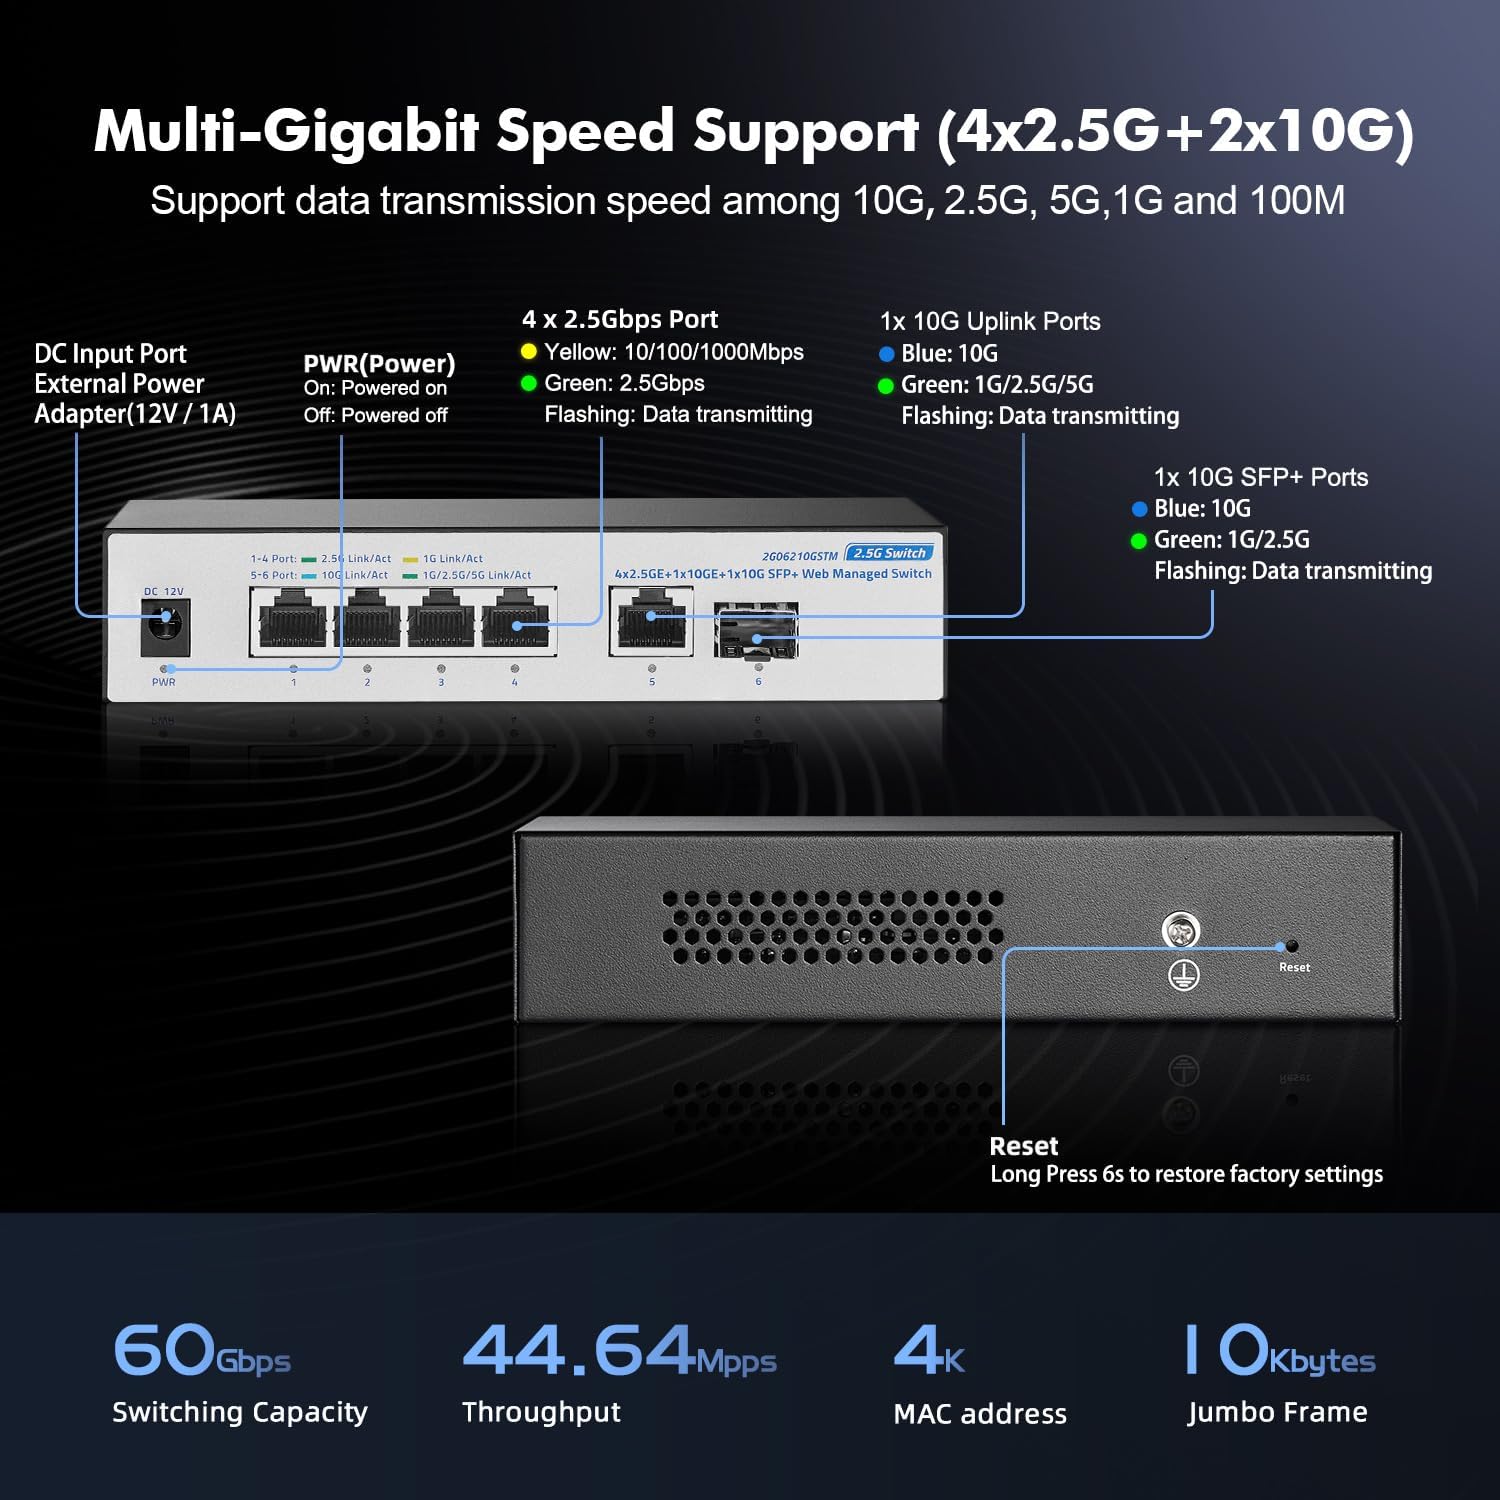
Figure 2: Rear panel of the switch showing the DC input, 2.5G RJ45 ports, 10G RJ45 port, 10G SFP+ slot, and the reset button. LED indicators for power and link/activity are also visible.
2.5 Initial Web Interface Access
To access the web management interface:
- Connect a computer to any of the switch's RJ45 ports.
- Configure your computer's network adapter to be in the same subnet as the switch's default IP address (e.g., set your computer's IP to 192.168.2.10 with a subnet mask of 255.255.255.0).
- Open a web browser and enter the default IP address of the switch: 192.168.2.1
- Enter the default login credentials:
Username: admin
Password: admin
3. Operating
3.1 LED Indicators
The LEDs on the switch provide visual status information:
- PWR (Power) LED: Indicates the power status of the device. Solid light means the device is powered on.
- Link/Act LEDs (for 2.5G RJ45 ports): Yellow indicates 10/100/1000Mbps link/activity. Green indicates 2.5Gbps link/activity. A flashing light signifies data transmission.
- Link/Act LEDs (for 10G RJ45 and SFP+ ports): Blue indicates 10G link/activity. Green indicates 1G/2.5G/5G link/activity. A flashing light signifies data transmission.
3.2 Auto-Sensing Ports
All RJ45 ports on the switch support auto-negotiation, automatically detecting the speed of the connected device (100Mbps, 1Gbps, 2.5Gbps, 5Gbps, or 10Gbps) and adjusting accordingly for optimal performance.
3.3 Fanless Design
The switch features a fanless design, ensuring silent operation. This makes it suitable for noise-sensitive environments such as home offices, studios, or living rooms.
4. Web Management
The web-based management interface allows for comprehensive configuration, monitoring, and troubleshooting of the switch without requiring Command Line Interface (CLI) expertise.

Figure 3: Screenshot of the switch's web management interface, showing device information and port status.
4.1 Key L2 Configurations
The web interface provides access to various Layer 2 features, including but not limited to:
- VLAN (Virtual Local Area Network): Segment your network into smaller, isolated broadcast domains to improve security and performance.
- QoS (Quality of Service): Prioritize network traffic to ensure critical applications (e.g., VoIP, video conferencing) receive sufficient bandwidth.
- Security: Configure various security settings to protect your network from unauthorized access.
- Multicast: Efficiently manage multicast traffic, such as IP television (IPTV) or video streaming.
- Static Aggregation / LACP (Link Aggregation Control Protocol): Combine multiple physical ports into a single logical link to increase bandwidth and provide link redundancy.
- MAC Address Table: View and manage the MAC address entries learned by the switch.
- Diagnostics: Utilize built-in diagnostic tools to monitor network status and troubleshoot issues.
- EEE (Energy Efficient Ethernet): Reduce power consumption during periods of low data activity.
- IGMP (Internet Group Management Protocol): Optimize multicast traffic delivery.
- Jumbo Frame: Support for larger Ethernet frames to improve throughput for large data transfers.
- STP/RSTP (Spanning Tree Protocol/Rapid Spanning Tree Protocol): Prevent network loops and ensure network redundancy.

Figure 4: Diagram illustrating various L2 Lite software features supported by the switch.
4.2 Saving Configuration
After making any changes in the web management interface, it is crucial to save the configuration. Failure to save will result in the loss of your settings if the switch is rebooted or loses power.
5. Performance and Connectivity
The YuLinca 6-Port 10G Web Managed Switch is engineered for high-performance networking.
5.1 Bandwidth
The switch offers a substantial 60Gbps switching capacity, ensuring smooth data flow even under heavy network loads. The 2x 10G uplink ports provide high-speed connectivity for demanding applications.
5.2 Cable Compatibility
To achieve optimal speeds, use the recommended Ethernet cable types:
- CAT5e Cable: Supports up to 2.5G speeds.
- CAT6 Cable: Supports up to 10G speeds over distances up to 55 meters.
- CAT6A Cable: Supports 10G speeds over longer distances.

Figure 5: Cable compatibility chart for 100M, 1G, 2.5G, 5G, and 10G speeds, along with support for 1G and 10G SFP modules.
5.3 Speed Enhancement
Upgrading to a 2.5G or 10G network with this switch can significantly improve data transfer speeds, especially for multimedia files on NAS or with WiFi 6 Access Points.

Figure 6: Illustration demonstrating 2.5 times faster data transfer with a 2.5G switch compared to a Gigabit switch, improving WiFi AP and NAS performance.
5.4 Application Scenarios
This switch is versatile and reliable for various high-bandwidth applications:
- 4K/8K Streaming: Ensures smooth, buffer-free streaming of ultra-high-definition content.
- Gaming PCs: Provides low-latency, high-speed connections for competitive online gaming.
- NAS (Network Attached Storage): Accelerates file transfers and backups to and from NAS devices.
- WiFi 6 APs & Servers: Supports the full potential of WiFi 6 access points and high-performance servers.

Figure 7: Examples of multiple application scenarios benefiting from a 2.5G network, such as online gaming, home entertainment, small and home offices, and instant transfers for workstations.
6. Maintenance
6.1 Factory Reset
To restore the switch to its factory default settings, locate the reset button on the device (refer to Figure 2). With the switch powered on, use a paperclip or a similar pointed object to press and hold the reset button for approximately 6 seconds. The switch will then reboot with its default configuration.
6.2 Cleaning
Keep the switch clean and free from dust. Use a soft, dry cloth to wipe the exterior. Avoid using liquid cleaners or solvents. The fanless design reduces dust accumulation internally, but regular external cleaning is recommended.
6.3 Firmware Updates
Periodically check the official YuLinca website for available firmware updates. Firmware updates can provide new features, performance improvements, and security enhancements. Follow the instructions provided with the firmware update package carefully.
7. Troubleshooting
This section addresses common issues you might encounter with your YuLinca 6-Port 10G Web Managed Switch.
7.1 No Power
- Ensure the power adapter is securely connected to the switch's DC input port and a functional power outlet.
- Verify the power outlet is active by plugging in another device.
- Check the PWR LED on the switch; if it's off, there's no power.
7.2 No Link or Activity on a Port
- Confirm that the Ethernet cable is properly connected to both the switch port and the connected device.
- Check the Link/Act LED for the specific port. If it's off, there's no link.
- Ensure the connected device (e.g., computer, NAS) is powered on and its network adapter is enabled.
- Try using a different Ethernet cable to rule out a faulty cable.
- Test the port with another known working device.
7.3 Slow Network Speed
- Verify that you are using the correct Ethernet cable type for the desired speed (e.g., CAT6 or CAT6A for 10G connections).
- Ensure that both the switch port and the connected device's network adapter are configured for the expected speed (e.g., 2.5G or 10G). Check the Link/Act LED color for speed indication.
- Check for network congestion or high CPU usage on connected devices.
- Access the web management interface to review port statistics and diagnostics for potential issues.
7.4 Cannot Access Web Interface
- Ensure your computer's IP address is configured to be in the same subnet as the switch's default IP (192.168.2.1). For example, set your computer's IP to 192.168.2.10 with a subnet mask of 255.255.255.0.
- Confirm you are entering the correct default IP address (192.168.2.1) in your web browser.
- Try clearing your browser's cache or using a different web browser.
- Temporarily disable any firewall software on your computer that might be blocking access.
- If the switch's IP address was changed and forgotten, or if the default credentials do not work, perform a factory reset (refer to Section 6.1).
7.5 Configuration Changes Not Saved
- Always click the "Save Configuration" or equivalent button within the web management interface after making any changes. Changes are typically stored in volatile memory until explicitly saved to non-volatile memory.
8. Specifications
| Brand | YuLinca |
| Model Number | 4x2.5G + 10G Eth + 10G SFP Managed |
| Number of Ports | 6 (4x 2.5G RJ45, 1x 10G RJ45, 1x 10G SFP+) |
| Interface Type | RJ45, SFP+ |
| Data Transfer Rate | 60 Gigabits Per Second (Switching Capacity) |
| Included Components | Managed Switch |
| Color | Black |
| Item Weight | 1.1 pounds |
| Package Dimensions | 6.89 x 4.72 x 2.87 inches |
| Compatible Devices | Desktop, Gaming Console, Laptop, Printer, Server |
9. Warranty and Support
For detailed warranty information, technical assistance, or customer support, please visit the official YuLinca website or contact their customer service department through the contact information provided with your product or on their website. Please have your product model number and purchase details ready when seeking support.


