
1. Introduction
This manual provides detailed instructions for the operation and maintenance of your GREATEN AP 300 Pro Electronic Wind Instrument. Please read this manual thoroughly before use to ensure proper functionality and to maximize your musical experience.

Figure 1: The GREATEN AP 300 Pro Electronic Wind Instrument.
2. What's in the Box
Upon unboxing your AP 300 Pro, please verify that all the following items are included:
- AP 300 Pro EWI Instrument
- Carrying Case
- USB Cable
- Mouthpiece Cap
- Spare Mouthpiece
- Neck Strap
- Screwdriver
- User Manual

Figure 2: Included accessories and components with the AP 300 Pro.
Video 1: An unboxing demonstration of the GREATEN AP 300 Pro, showcasing all included items.
3. Product Overview
Familiarize yourself with the various parts and controls of your AP 300 Pro instrument.
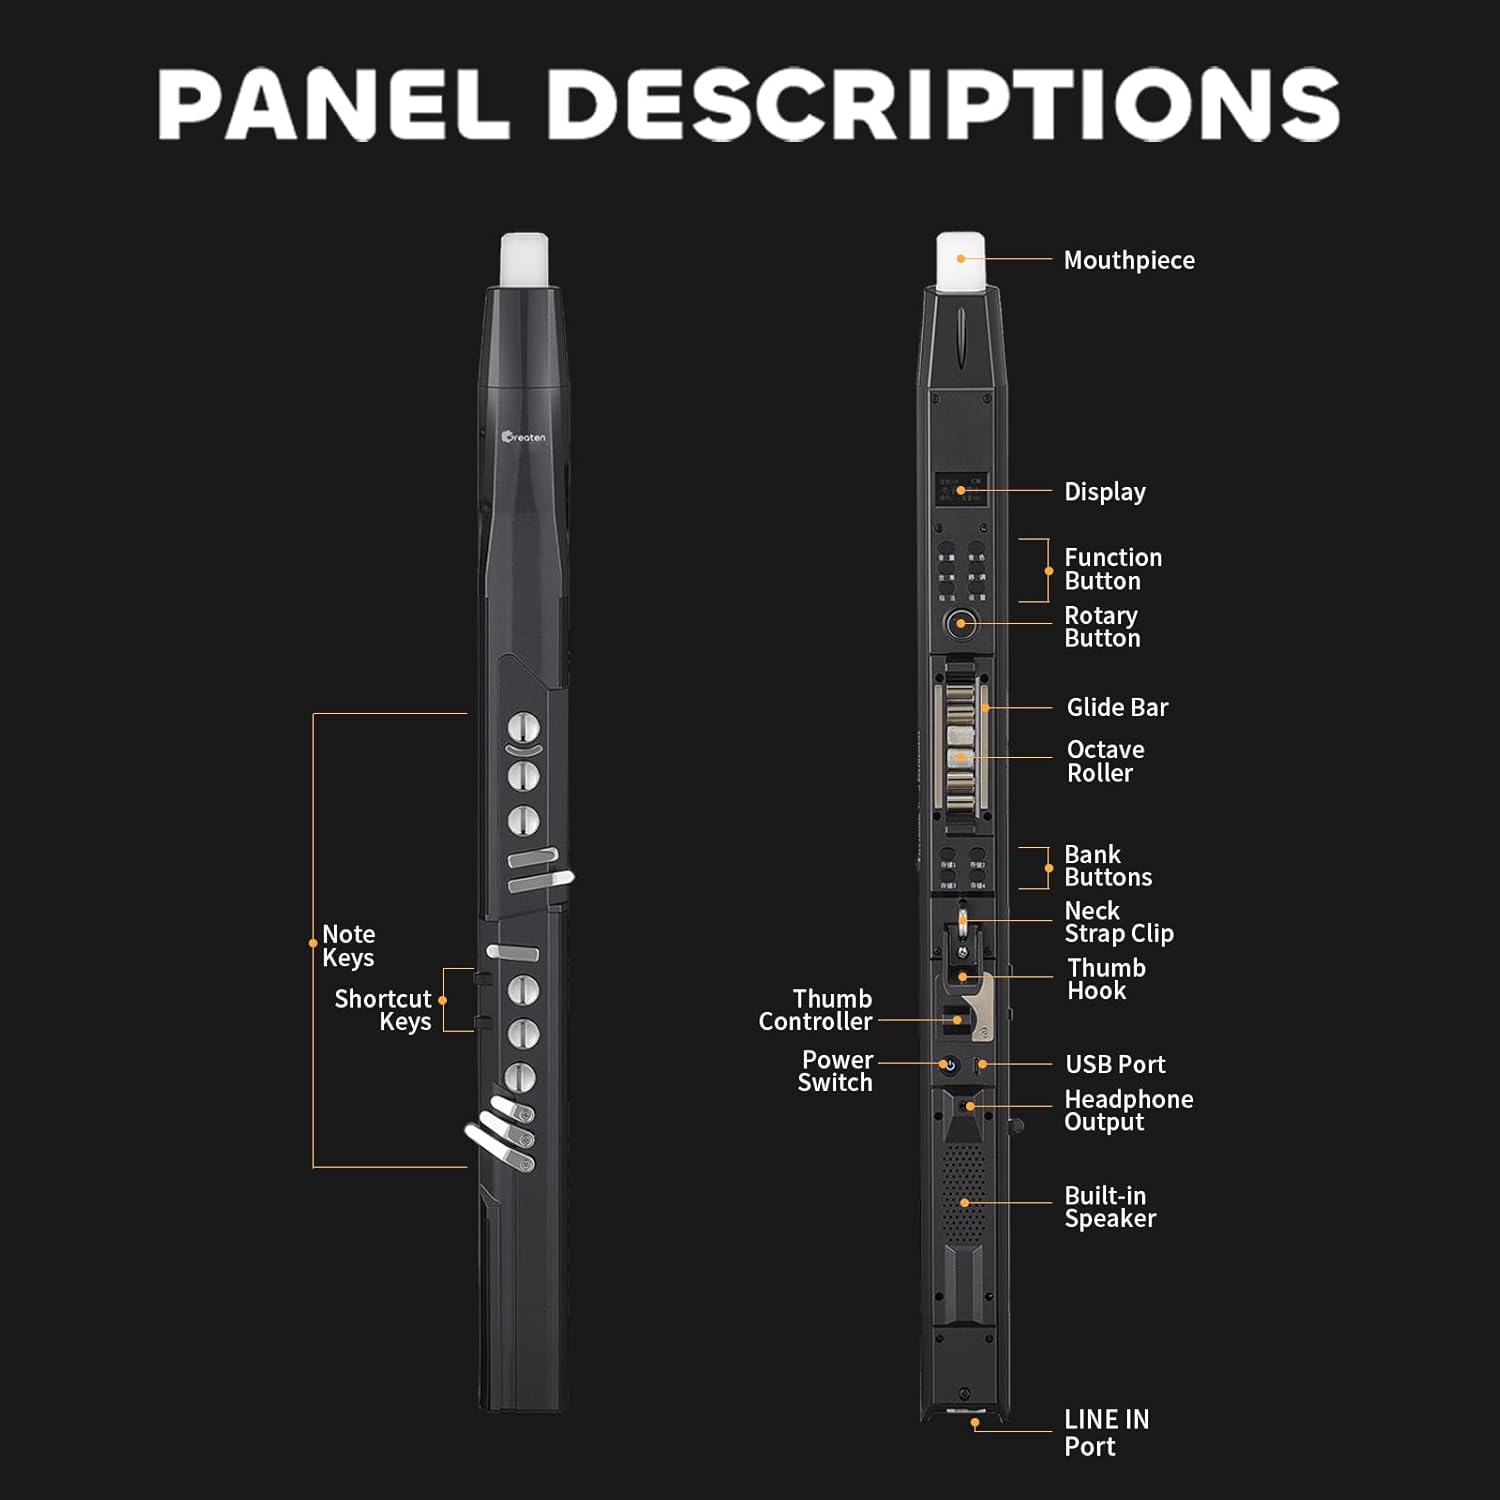
Figure 3: Detailed view of the AP 300 Pro's components and control panel.
- Mouthpiece: The part where you blow into the instrument. It comes with a silicone tip for protection and comfort.
- Display: An LCD screen providing a clear view of selected parameters, such as chosen tones, remaining volume, and key settings.
- Function Button: Used to access various settings and menus.
- Rotary Button: For navigating menus and adjusting parameter values.
- Glide Bar: Allows for smooth pitch transitions (portamento).
- Octave Roller: Used to easily set and switch octaves.
- Bank Buttons: Four buttons (Bank 1-4) for quick one-touch access to stored custom settings.
- Neck Strap Clip & Thumb Hook: For attaching the neck strap and providing a secure grip. The thumb hook is adjustable.
- Thumb Controller: Used for pitch bends and other expressive controls.
- Power Switch: To turn the instrument on and off.
- USB Port (DC 5V): For charging the internal battery and for OTG recording/MIDI connections.
- Headphone Output: 3.5mm jack for silent practice with headphones or connecting to external speakers.
- Built-in Speaker: For direct audio output from the instrument.
- LINE IN Port: For connecting external audio sources.
4. Initial Setup
4.1 Charging the Battery
The AP 300 Pro is equipped with a 6000mAh rechargeable battery, providing up to 6 hours of use. To charge, connect the provided USB cable to the USB port (DC 5V) on the instrument and to a compatible USB power source.
4.2 Attaching the Neck Strap
Attach the neck strap to the neck strap clip and thumb hook for comfortable and secure playing. The thumb hook's position can be adjusted using the provided screwdriver to suit your hand size and playing style.

Figure 4: Adjusting the thumb hook and thumb controller for ergonomic playing.
4.3 Powering On/Off
Press and hold the Power Switch button until the LCD screen illuminates to turn the instrument on. To power off, press and hold the Power Switch button again until the screen turns off.
5. Operating Instructions
5.1 Playing Notes and Fingering
The AP 300 Pro features 8 different fingering options. Users with a basic understanding of musical instruments can select the correct fingering and begin playing immediately. The instrument uses touch-sensitive keys, so no need to press hard.
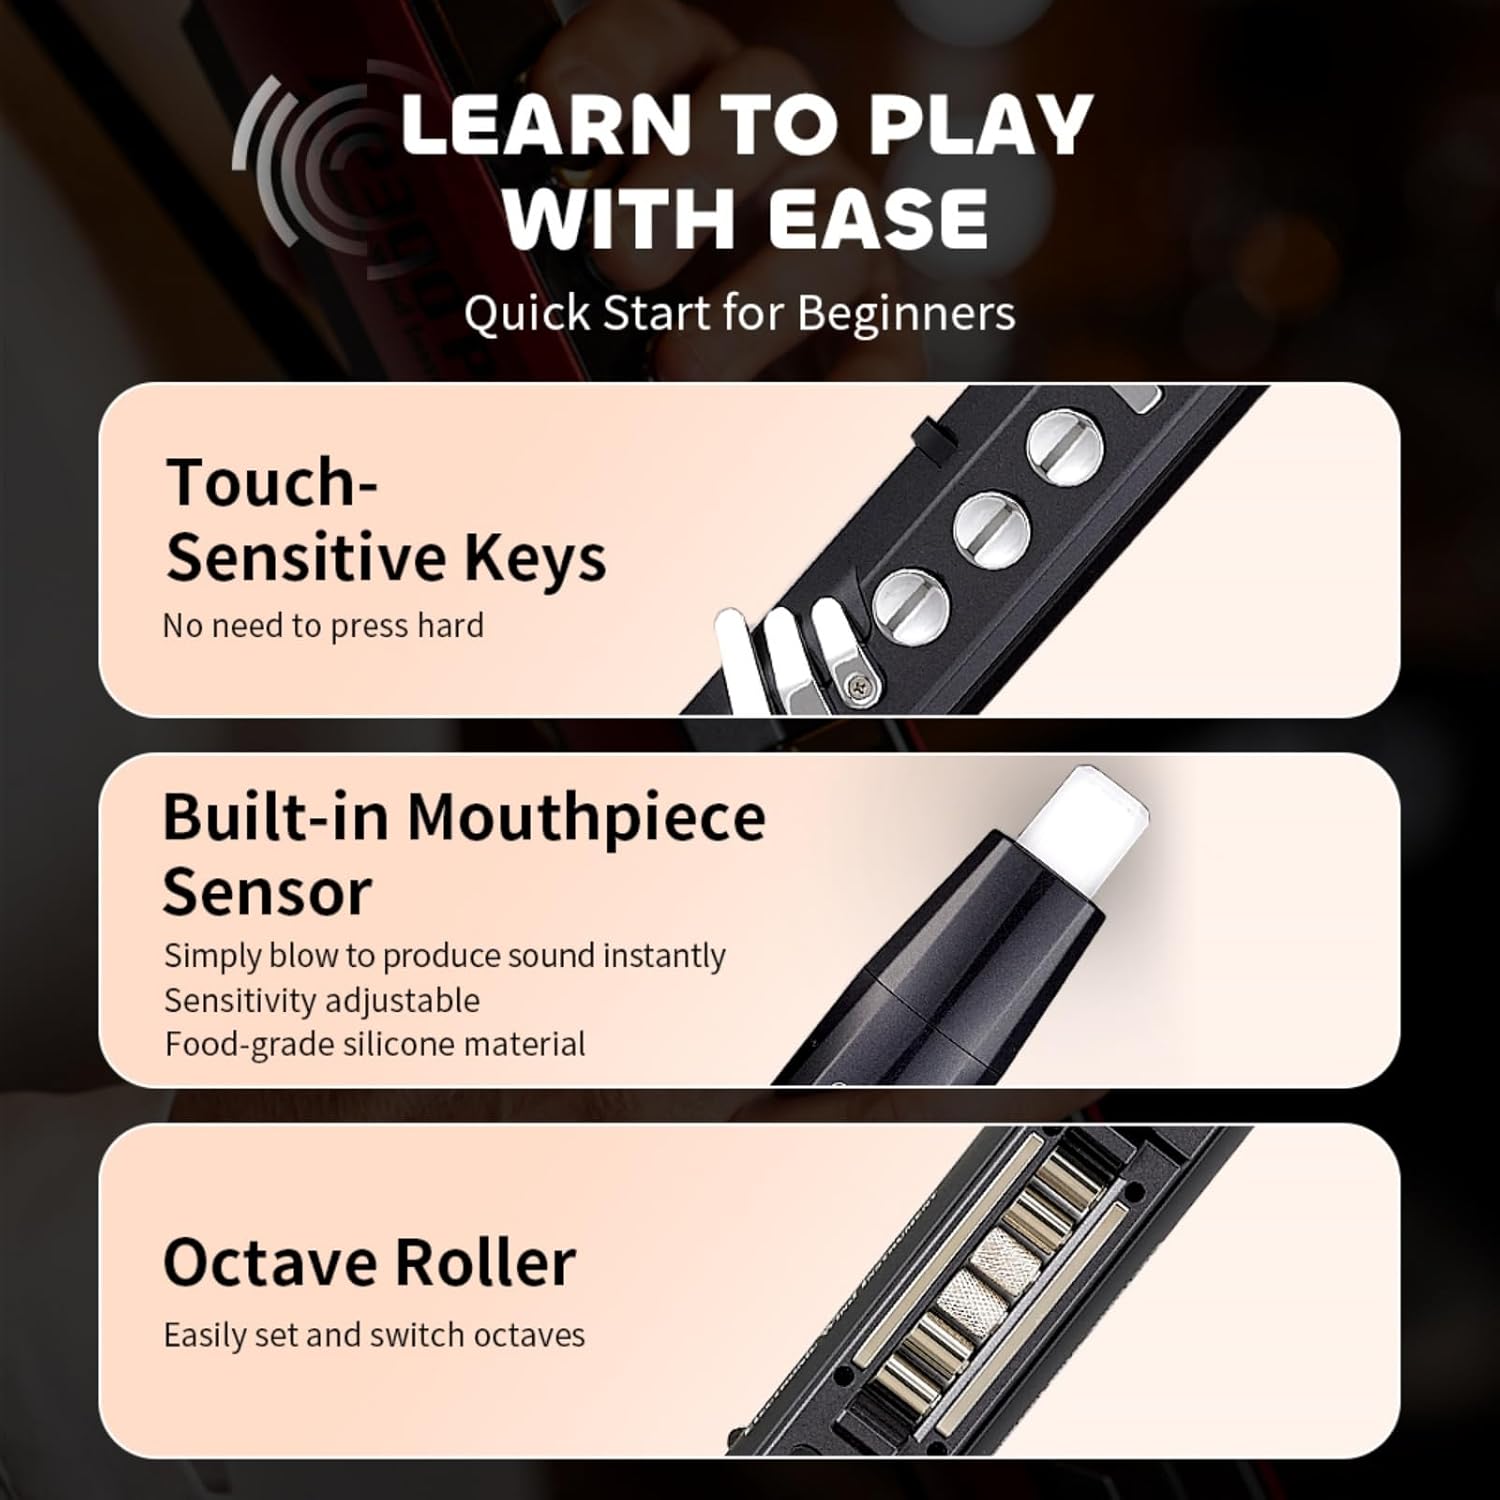
Figure 5: Key features for intuitive playing, including touch-sensitive keys and an adjustable mouthpiece sensor.
5.2 Selecting Tones
The AP 300 Pro comes with 108 global tones. Use the Function Button and Rotary Button to navigate through the tone selection menu on the LCD display.

Figure 6: The clear LCD display facilitates tone selection and parameter visualization.
Video 2: A demonstration of the AP 300 Pro's display and tone selection process.
5.3 Dual-Mode Bluetooth Connectivity
The instrument supports both Bluetooth Audio and Bluetooth MIDI. Connect your phone or tablet to play backing tracks and perform along with seamless, zero-latency audio. The Bluetooth MIDI feature allows wireless MIDI connections for expanded creative possibilities.

Figure 7: The instrument's dual-mode Bluetooth capabilities for versatile connectivity.

Figure 8: MIDI control enables users to send and receive MIDI signals for instrument and software control.
5.4 Built-in OTG Recording
The built-in OTG recording function allows for high-quality recording by preventing external noise interference, ensuring the captured sound remains clear.

Figure 9: The built-in OTG recording allows for effortless recording without extra devices.
Video 3: A tutorial demonstrating the OTG recording functionality of the AP 300 Pro.
5.5 Storage Function
The AP 300 Pro allows for four independent tone libraries, enabling users to store preferred settings for quick and easy one-touch access using the Bank Buttons.

Figure 10: Easily save and recall your favorite tones, fingerings, and effects using the bank buttons.
6. Advanced Techniques
6.1 Portamento
Achieve smooth transitions between notes by sliding your thumb up or down on the Glide Bar.

Figure 11: Slide up or down on the glide bar to perform portamento.
6.2 Pitch Bends
Use the Thumb Controller to bend notes up and down, adding expressive nuances to your playing.

Figure 12: Use the thumb controller to bend notes up and down.
6.3 Vibrato
The AP 300 Pro offers three vibrato modes with adjustable sensitivity:
- FREE Vibrato Mode: Create vibrato by gently biting the mouthpiece repeatedly.
- Bite Vibrato Mode: Hold the mouthpiece with a steady bite to produce vibrato. Release it to stop the effect.
- Auto Vibrato Mode: Produces vibrato automatically after holding a long note.

Figure 13: Choose from three vibrato modes with adjustable sensitivity.
Video 4: A tutorial on setting the growling effect for saxophone tones.
7. Important Notes
Please read the following information before use:

Figure 14: Key settings and recommendations for optimal use and learning.
- BREATH SETTING: The higher the value, the easier it is to blow. Adjust this based on personal preference and playing style.
- Key Response Sensitivity: Adjust the "SPEED" parameter in the menu for preferred response level. A higher value provides quicker key response.
- Vibrato Modes: For best results, when using bite vibrato modes, do not bite the mouthpiece too deeply.
- Fingering Settings: Select your preferred fingering system through the "FINGER" option in the menu.
- Reverb Setting: Adjust the "REVERB" option in the menu. A higher value increases the reverb effect.
- For Beginners: It's recommended to turn off both "FUNC" under the "FX" button and the "SEMIT" option. This helps prevent accidental activation of semitone keys and provides a smoother learning experience.
8. Maintenance
To ensure the longevity and optimal performance of your AP 300 Pro, follow these maintenance guidelines:
- Mouthpiece Cleaning: Regularly clean the silicone mouthpiece tip with a soft, damp cloth. Ensure it is dry before reattaching.
- Moisture Management: As with any wind instrument, moisture can accumulate. The instrument is designed to allow moisture to exit through a small hole at the bottom. Periodically wipe away any moisture.
- General Cleaning: Wipe the body of the instrument with a soft, dry cloth to remove dust and fingerprints. Avoid using harsh chemicals or abrasive materials.
- Storage: When not in use, store the instrument in its provided carrying case to protect it from dust, impacts, and extreme temperatures.
- Battery Care: For long-term storage, ensure the battery is partially charged (around 50%) to maintain battery health. Avoid fully discharging or overcharging for extended periods.
9. Troubleshooting
If you encounter any issues with your AP 300 Pro, please refer to the following common solutions:
- No Sound: Ensure the instrument is powered on, volume is up, and headphones/external speakers are correctly connected and powered. Check the selected tone is not set to silent.
- Difficulty Producing Sound: Adjust the BREATH SETTING in the menu to a higher value. Ensure the mouthpiece is properly sealed with your lips.
- Keys Not Responding: Check the Key Response Sensitivity setting. A higher value provides quicker response. Ensure your fingers are making proper contact with the touch-sensitive keys.
- Accidental Semitone Activation (for beginners): Turn off "FUNC" under the "FX" button and the "SEMIT" option as recommended in the Important Notes section.
- Bluetooth Connectivity Issues: Ensure Bluetooth is enabled on both the instrument and your device. Try restarting both devices and re-pairing.
- Moisture Drips: This is normal due to condensation. Ensure the instrument is regularly wiped clean, especially around the moisture exit hole.
10. Specifications
| Feature | Detail |
|---|---|
| Model Number | AP 300 Pro |
| Item Weight | 1.79 pounds |
| Product Dimensions | 25.4 x 2.36 x 2.36 inches |
| Body Material | Aluminum, Plastic, Copper |
| Color | Red |
| Connector Type | Bluetooth |
| Instrument Key | A |
| Battery Capacity | 6000mAh (up to 6 hours use) |
| Tones | 108 Global Tones |
| Fingering Options | 8 |
11. Warranty and Support
For warranty information and customer support, please refer to the documentation included with your purchase or visit the official GREATEN website. Keep your proof of purchase for any warranty claims.


