
1. Introduction
Thank you for choosing the Tornado TPYAB-12ABG Portable Air Conditioner. This unit is designed to provide efficient cooling, heating, dehumidification, and fan-only operation for your indoor spaces. Please read this manual thoroughly before installation and operation to ensure proper use and maintenance.
2. Important Safety Information
Always follow basic safety precautions when using electrical appliances to reduce the risk of fire, electric shock, and injury.
- This appliance is for indoor use only.
- Ensure the power supply matches the voltage specified on the unit's rating label (220-240V~ 50Hz).
- Do not operate the unit with a damaged cord or plug.
- Keep the unit away from naked flames or direct heat sources.
- Do not block air inlets or outlets. Maintain at least 30 cm clearance around the unit.
- Always unplug the unit before cleaning or performing any maintenance.
- Do not insert objects into the air outlets.
- Supervise children to ensure they do not play with the appliance.
3. Product Overview
The Tornado TPYAB-12ABG is a versatile portable air conditioner featuring 12000 BTU cooling capacity (3500W) and 3299W heating capacity. It includes Wi-Fi connectivity for smart control and operates as a heat pump for efficient year-round climate control.
3.1 Control Panel
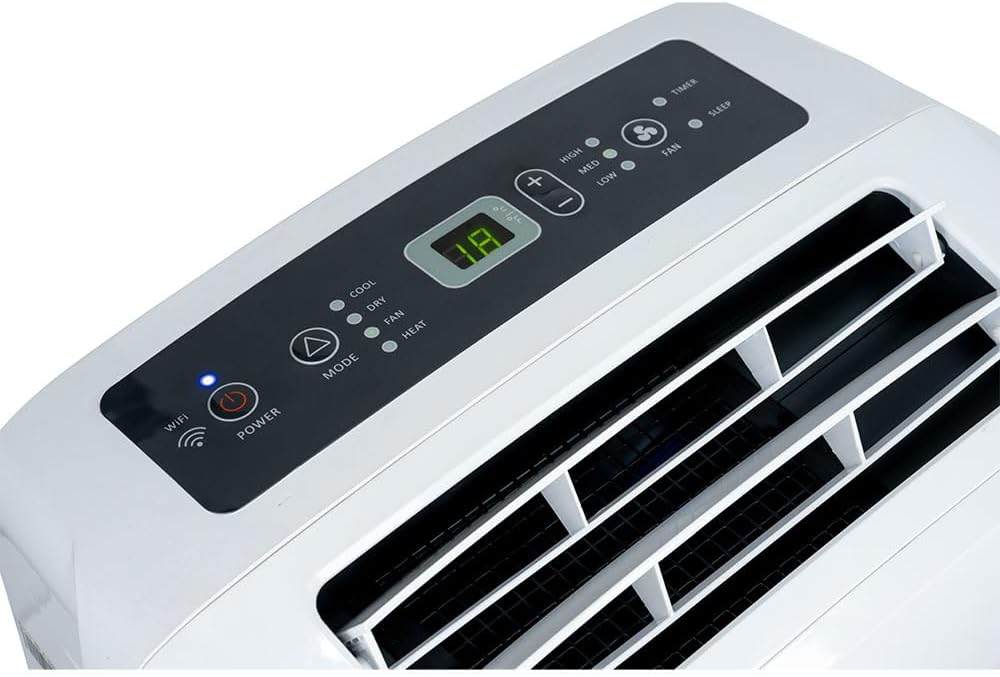
This image shows the top control panel of the unit, featuring the digital temperature display, mode indicators (Cool, Dry, Fan, Heat), fan speed settings (High, Med, Low), and function buttons for Power, Mode, Timer, and Sleep. The Wi-Fi indicator light is also visible.
3.2 Remote Control

This image shows the white remote control unit, featuring a small LCD screen and various buttons for controlling the air conditioner's functions, including power, mode, temperature adjustment, fan speed, timer, and special functions like 'Smart', 'iFeel', and 'Sleep'.
4. Setup and Installation
Follow these steps to set up your portable air conditioner.
4.1 Unpacking
- Carefully remove the unit and all accessories from the packaging.
- Check for any damage during transit. If damaged, contact your retailer.
- Keep the packaging for future storage or transport.
4.2 Exhaust Hose and Window Kit Installation

This image presents the accessories included for window installation, consisting of the adjustable window slider kit and the flexible exhaust hose with its connectors.

This image displays the back of the portable air conditioner, showing the connection point for the exhaust hose and the hose itself extending from the unit. Vents for air intake and exhaust are also visible.
- Attach the exhaust hose connector to the rear outlet of the air conditioner. Twist clockwise until secure.
- Connect the other end of the exhaust hose to the window kit adapter.
- Adjust the window slider kit to fit your window opening.
- Place the window kit in the open window and close the window to secure it.
- Insert the window kit adapter with the exhaust hose into the opening of the window kit.
- Ensure the exhaust hose is as straight and short as possible to maximize efficiency. Avoid sharp bends.
4.3 Power Connection
- Place the unit on a flat, stable surface.
- Plug the power cord into a grounded 220-240V~ 50Hz electrical outlet.
- Do not use extension cords or multi-plugs.
5. Operating Instructions
Your portable air conditioner can be operated via the control panel on the unit or the remote control.
5.1 Power On/Off
- Press the Power button on the control panel or remote control to turn the unit on or off.
5.2 Mode Selection
Press the Mode button to cycle through the available modes:
- Cool Mode: For cooling the room. Set your desired temperature using the temperature adjustment buttons.
- Heat Mode: For heating the room. Set your desired temperature.
- Dry Mode (Dehumidify): For reducing humidity. The fan will operate at a low speed.
- Fan Mode: For air circulation without cooling or heating.
5.3 Temperature Adjustment
- In Cool or Heat mode, use the Temperature Up (▲) or Temperature Down (▼) buttons to set the desired room temperature. The adjustable range is typically 18°C to 32°C (64°F to 90°F).
5.4 Fan Speed
- Press the Fan Speed button to select between High, Medium, or Low fan speeds. This function is available in Cool, Heat, and Fan modes.
5.5 Timer Function
- Timer On: Set a time for the unit to automatically turn on.
- Timer Off: Set a time for the unit to automatically turn off.
5.6 Sleep Mode
- Activate Sleep Mode for quieter operation and gradual temperature adjustment during sleep.
5.7 Wi-Fi Connectivity
The unit is Wi-Fi enabled, allowing control via a smartphone application. Refer to the separate Wi-Fi setup guide for detailed instructions on connecting your device to the unit's network.
6. Maintenance
Regular maintenance ensures optimal performance and extends the lifespan of your air conditioner.
6.1 Air Filter Cleaning
The air filter should be cleaned every two weeks or more frequently depending on usage and air quality.
- Unplug the unit from the power outlet.
- Locate and remove the air filter from the back or side of the unit.
- Wash the filter with warm, soapy water. Rinse thoroughly.
- Allow the filter to air dry completely before reinserting it. Do not expose to direct sunlight.
6.2 Water Drainage
During cooling and dehumidifying operations, water will accumulate inside the unit. The unit has a self-evaporative system, but in high humidity conditions, manual drainage may be required.
- Unplug the unit.
- Place a shallow pan or tray under the drainage port at the bottom rear of the unit.
- Remove the drain plug to allow water to flow out.
- Once drained, replace the drain plug securely.
6.3 Storage
When storing the unit for an extended period:
- Drain all accumulated water.
- Clean the air filter.
- Run the unit in Fan mode for a few hours to dry the internal components.
- Unplug the power cord and coil it neatly.
- Cover the unit with a plastic bag or cloth to protect it from dust.
- Store in a dry, cool place.
7. Troubleshooting
Refer to this section for common issues and their solutions.
| Problem | Possible Cause | Solution |
|---|---|---|
| Unit does not turn on. | No power, power cord unplugged, circuit breaker tripped. | Check power connection, reset circuit breaker. |
| Unit not cooling/heating effectively. | Air filter dirty, exhaust hose blocked/leaking, room too large, windows/doors open. | Clean air filter, check exhaust hose for proper installation, ensure room is sealed. |
| Display shows "FT" in heating mode. | This code typically indicates a defrosting cycle or a sensor fault. | Allow the unit to complete its defrost cycle. If the issue persists, unplug the unit for 5 minutes and restart. If still present, contact customer support. |
| Wi-Fi connection issues. | Incorrect Wi-Fi settings, router too far, app issues. | Ensure correct Wi-Fi password, move unit closer to router, restart router, reinstall app. Refer to Wi-Fi setup guide. |
| Unit is noisy. | Unit not on a level surface, fan obstruction. | Place unit on a flat surface, check for obstructions in fan area. |
8. Technical Specifications
| Feature | Specification |
|---|---|
| Model Number | TPYAB-12ABG |
| Cooling Capacity | 12000 BTU / 3500W |
| Heating Capacity | 3299W |
| Power Supply | 220-240V~ 50Hz |
| Dimensions (W x D x H) | 46 cm x 39.6 cm x 86.5 cm |
| Weight | 27.5 kg |
| Material | Acrylic |
| Wi-Fi Enabled | Yes |
9. Warranty Information
This Tornado TPYAB-12ABG Portable Air Conditioner comes with a 2 Year Limited Warranty from the date of purchase. This warranty covers manufacturing defects in materials and workmanship under normal use. It does not cover damage resulting from misuse, accident, alteration, or unauthorized repair.
Please retain your proof of purchase for warranty claims.
10. Customer Support
If you have any questions, require technical assistance, or need to make a warranty claim, please contact Tornado customer support through your retailer or the official Tornado website. Provide your model number (TPYAB-12ABG) and proof of purchase when contacting support.
