1. Introduction
The INKBIRDPLUS Split-Type Temperature Controller (Model JK-TC810) is a versatile digital thermostat designed for precise temperature management. It features a split design with a separate display unit and power outlet, offering flexible installation and ease of use. This controller supports both heating and cooling modes, periodic timing control, and includes high/low temperature alarms. It is suitable for a wide range of applications, including greenhouses, reptile habitats, incubators, refrigeration units, and home brewing.
2. Product Overview
The INKBIRDPLUS JK-TC810 consists of a main control unit with an LCD display and a separate power outlet unit, connected by a 2.7-meter control cable. A temperature probe is also included for accurate measurement.

Image: The INKBIRDPLUS Split-Type Temperature Controller, showing the main display unit, the UK plug power outlet, and the temperature probe.
Key Features:
- Split-Type Design: Separate display and outlet for flexible placement.
- Heating/Cooling Modes: Automatically switches between modes based on set temperatures.
- 4 Timer Modes: Cycle timer, countdown ON, countdown OFF, and countdown ON/OFF.
- Backlit LCD Screen: Clear visibility of parameters in various lighting conditions.
- Temperature Calibration: Allows for fine-tuning of temperature readings.
- Memory Function: Retains settings after power loss.
- Wide Temperature Range: Operates from -40°C to 120°C (-40°F to 248°F).

Image: An illustration detailing the main features of the controller, including split-type design, heating/cooling, periodic timing, temperature calibration, backup memory, and backlit LCD screen.
3. Setup
- Unpack: Carefully remove all components from the packaging.
- Connect Probe: Insert the temperature probe into the designated port on the main control unit.
- Position Probe: Place the temperature probe in the environment where temperature needs to be monitored and controlled. Ensure it is not directly exposed to heating or cooling elements to get an accurate reading.
- Plug In: Connect the power outlet unit to a standard UK electrical socket. The main control unit will power on and display the current temperature.
- Connect Appliance: Plug your heating or cooling appliance (e.g., heater, fan, incubator) into the power outlet unit of the controller.
4. Operating Instructions
4.1 Basic Temperature Control
The controller operates in two main modes: Heating and Cooling. The mode is determined by the relationship between the Start Temperature (ON) and Stop Temperature (OFF).
- Heating Mode: When Start Temp < Stop Temp. The appliance will turn ON when the measured temperature drops below the Start Temp and turn OFF when it reaches the Stop Temp.
- Cooling Mode: When Start Temp > Stop Temp. The appliance will turn ON when the measured temperature rises above the Start Temp and turn OFF when it drops to the Stop Temp.

Image: Visual representation of the controller used in both heating (e.g., with a space heater) and cooling (e.g., with an air conditioner) scenarios, demonstrating its versatility.
4.2 Setting Temperatures
- Press the SET button once. The Start Temperature (ON) will flash.
- Use the UP/CLK and DOWN buttons to adjust the desired Start Temperature.
- Press the SET button again. The Stop Temperature (OFF) will flash.
- Use the UP/CLK and DOWN buttons to adjust the desired Stop Temperature.
- Press the SET button a third time to confirm and exit the setting mode, or wait a few seconds for it to auto-save.
4.3 Timing Modes
The controller offers four timing modes for advanced control. Press the MODE button repeatedly to cycle through these options (F01, F02, F03, F04).
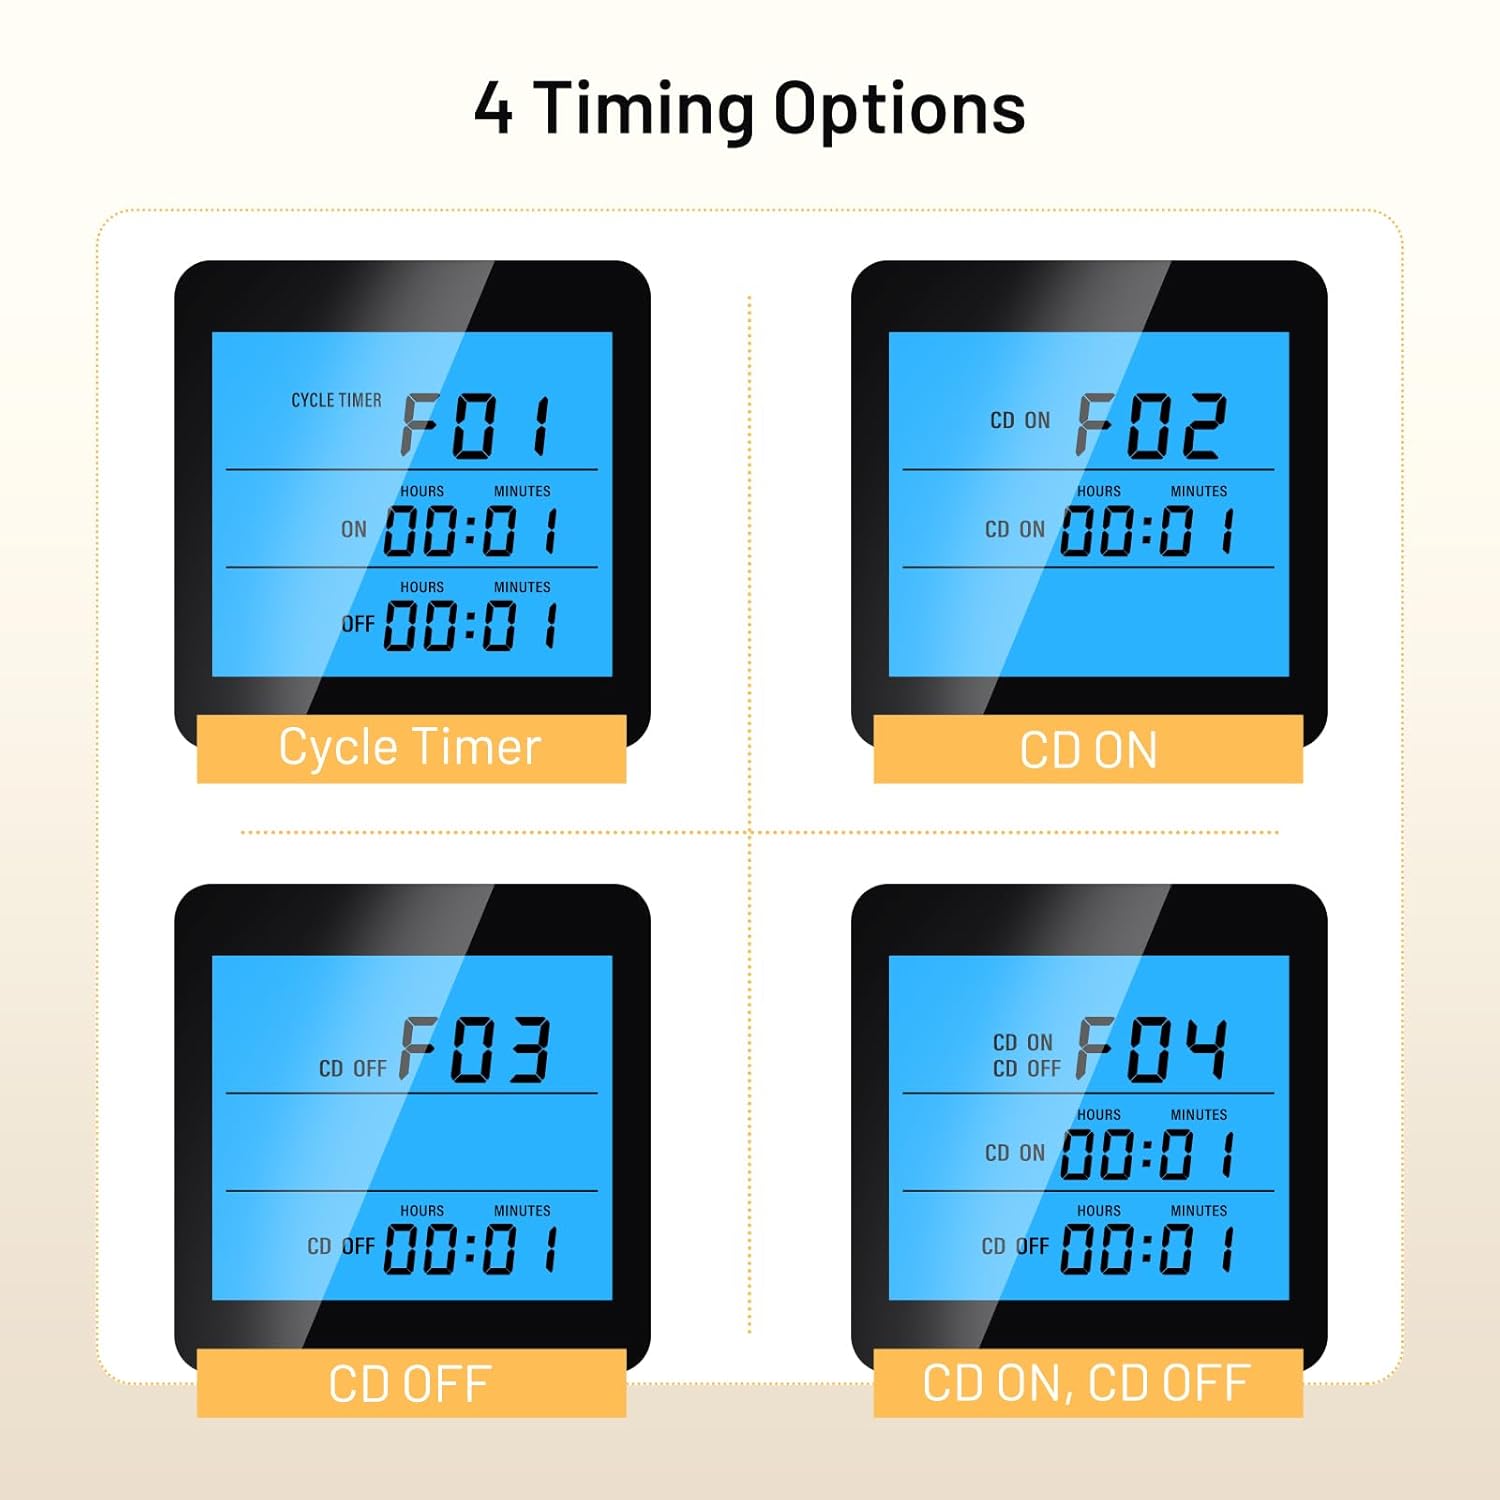
Image: Display examples of the four timing modes (F01 Cycle Timer, F02 CD ON, F03 CD OFF, F04 CD ON, CD OFF) on the controller's LCD screen.
- F01: Cycle Timer (ON/OFF Cycle): Set an ON duration and an OFF duration for the appliance to cycle repeatedly.
- F02: Countdown ON: Set a countdown time after which the appliance will turn ON and stay ON.
- F03: Countdown OFF: Set a countdown time after which the appliance will turn OFF and stay OFF.
- F04: Countdown ON, Countdown OFF: Set a countdown for the appliance to turn ON, and then another countdown for it to turn OFF.
To set the times for each mode, select the desired mode using the MODE button, then press SET and use UP/CLK and DOWN to adjust the hours and minutes.
4.4 Temperature Calibration
If the measured temperature deviates from a known accurate thermometer, you can calibrate the controller:
- With the device powered on, press and hold the SET button for approximately 3 seconds to enter the advanced settings menu.
- Use UP/CLK or DOWN to navigate to the temperature calibration setting (refer to the on-screen indicator or specific symbol in the full manual).
- Press SET to select, then use UP/CLK or DOWN to adjust the calibration value. A positive value increases the displayed temperature, a negative value decreases it.
- Press SET to confirm and exit, or wait for auto-save.
4.5 Backlight Settings
The backlight duration can be adjusted for energy saving or continuous visibility. Access this setting through the advanced settings menu (press and hold SET for 3 seconds) and adjust the backlight timer as needed.
5. Maintenance
- Cleaning: Wipe the controller and probe with a soft, dry cloth. Do not use abrasive cleaners or immerse the units in water.
- Probe Care: Ensure the temperature probe is clean and free from debris for accurate readings. Avoid bending or damaging the probe cable.
- Storage: When not in use, store the controller in a dry, cool place away from direct sunlight and extreme temperatures.
6. Troubleshooting
| Problem | Possible Cause | Solution |
|---|---|---|
| Controller not powering on | No power to the outlet; faulty unit | Check the power socket; ensure the unit is properly plugged in. If issues persist, contact support. |
| Inaccurate temperature reading | Probe dirty or damaged; calibration needed; probe placed incorrectly | Clean the probe; perform temperature calibration (Section 4.4); reposition the probe away from direct heat/cold sources. |
| Appliance not turning ON/OFF as expected | Incorrect Start/Stop temperature settings; wrong mode (heating/cooling); appliance not plugged in or faulty | Verify Start and Stop temperature settings (Section 4.2); ensure the appliance is functional and correctly plugged into the controller's outlet. |
| Timing function not working | Incorrect timing mode selected or parameters set incorrectly | Review and adjust timing mode settings (Section 4.3). |
7. Specifications
| Feature | Specification |
|---|---|
| Model Number | JK-TC810 |
| Temperature Control Range | -40°C to 120°C (-40°F to 248°F) |
| Plug Type | UK Plug |
| Item Weight | 256 Grams |
| Product Dimensions | 15.5D x 8W x 8H Centimeters |
| Control Cable Length | 2.7 meters (approx.) |
| Display | Backlit LCD |
8. Warranty and Support
INKBIRDPLUS products are designed for reliability and performance. This product comes with a standard manufacturer's warranty against defects in materials and workmanship. Please refer to the warranty card included with your purchase for specific terms and conditions.
For technical support, troubleshooting assistance, or warranty claims, please contact INKBIRDPLUS customer service through their official website or the retailer from whom you purchased the product. Keep your purchase receipt as proof of purchase.
9. Applications
The INKBIRDPLUS Split-Type Temperature Controller is suitable for a wide array of temperature-sensitive environments:

Image: A collage illustrating diverse applications for the temperature controller, such as home brewing, refrigeration, aquariums, reptile enclosures, e-bike charging, incubation, and general home temperature control.
- Home Brewing & Fermentation: Maintain precise temperatures for yeast activity.
- Refrigeration: Control cooling units for specific storage needs.
- Aquariums: Regulate water temperature for aquatic life.
- Reptile Habitats: Create optimal thermal environments for reptiles.
- Incubation: Ensure stable temperatures for egg hatching or cultures.
- Greenhouses: Manage climate for plant growth.
- General Home Use: Control various heating or cooling devices.


