1. Introduction
The Creality Falcon Desktop Smoke Purifier is designed to provide a cleaner and safer working environment when operating laser engravers, particularly the Creality Falcon A1. This device efficiently filters smoke, dust, and harmful particles generated during laser engraving and cutting processes, ensuring improved air quality in your workspace. Please read this manual thoroughly before using the product to ensure proper operation and maintenance.

Figure 1: Front view of the Creality Falcon Desktop Smoke Purifier, showing the control panel with power and flow buttons.
2. Safety Information
- Always operate the smoke purifier in a well-ventilated area.
- Ensure the power supply matches the specifications listed on the device.
- Do not block the air intake or exhaust vents during operation.
- Keep the device away from water or other liquids to prevent electric shock.
- Regularly inspect the power cord for any damage. Do not use if damaged.
- Replace filters as recommended to maintain optimal performance and air quality.
- Keep out of reach of children and pets.
- Do not attempt to disassemble or repair the unit yourself. Contact authorized service personnel for assistance.
3. Product Features
The Creality Falcon Desktop Smoke Purifier incorporates several key features for effective and safe operation:
- Perfect Compatibility: Designed to work seamlessly with the Creality Falcon A1 Laser Engraver, ensuring safe DIY laser operations at home.
- Dual Exhaust Pipe Interfaces: Equipped with interfaces to support dual-size exhaust pipes, offering flexible setup options.
- Powerful Motor: Features a robust motor for rapid and efficient smoke and particle filtration, delivering strong suction performance.
- Adjustable Speeds: Offers 3-level speed adjustments, allowing users to select the optimal airflow for various engraving and cutting tasks while maintaining low noise operation (as low as 58dB).
- Dual-Layer Efficient Filtration System: Captures debris and purifies air layer by layer, achieving up to 99.97% purification of 0.03µm particles. This system includes:
- Activated Carbon Filter: With a honeycomb structure, it filters 99.97% of 0.03µm particles and absorbs harmful gases and unpleasant odors.
- Pre-filter: Traps larger visible particles, such as accumulated dust, extending the life of the activated carbon filter.
- Exquisite and Solid Integrated Frame: Constructed with 1.0mm sheet metal for a stable, reliable, and wobble-resistant design.
- Industrial Non-Slip Feet: Provides shock absorption and anti-slip stability during operation.
- Compact Mini Size: Space-saving design suitable for desktop use, offering powerful performance in a small footprint.

Figure 2: Illustration of the dual-layer filtration system, showing the pre-filter and activated carbon filter components.

Figure 3: Graph illustrating the noise levels at different speed settings for the smoke purifier compared to other models.
4. Setup Guide
4.1 Unpacking and Inspection
Carefully remove all components from the packaging. Verify that all parts are present and undamaged. Retain packaging for future storage or transport.
4.2 Component Identification
- Creality Falcon Desktop Smoke Purifier Unit
- Power Adapter
- Exhaust Hose (if included)
- Filter Cartridge (pre-installed or separate)
4.3 Initial Setup
- Placement: Place the smoke purifier on a stable, flat surface near your laser engraver. Ensure there is adequate space around the unit for proper airflow.
- Connect Exhaust Hose: Connect one end of the exhaust hose to the outlet on the smoke purifier and the other end to the exhaust port of your Creality Falcon A1 Laser Engraver. Ensure connections are secure to prevent smoke leakage.
- Power Connection: Insert the power adapter into the power input port on the smoke purifier, then plug the adapter into a suitable AC100V-AC240V power outlet.

Figure 4: The smoke purifier connected via an exhaust hose to a laser engraver, demonstrating a typical setup.
5. Operating Instructions
5.1 Powering On/Off
- To power on the device, press the ON/OFF button located on the front panel. The indicator light will illuminate.
- To power off the device, press the ON/OFF button again. The indicator light will turn off.
5.2 Adjusting Fan Speed
- The smoke purifier features 3 adjustable fan speeds.
- Press the FLOW button to cycle through the speed settings (Speed 1, Speed 2, Speed 3).
- Select the appropriate speed based on the intensity of smoke and fumes generated by your laser engraver. Higher speeds provide stronger suction.
Figure 5: The control panel of the smoke purifier, highlighting the ON/OFF (red) and FLOW (green) buttons for operation.
6. Maintenance
6.1 Filter Replacement
The filter cartridge should be replaced regularly to ensure optimal filtration performance. The frequency of replacement depends on usage intensity and the type of materials being processed. Replace the filter when you notice a decrease in suction power or an increase in odors.
- Unfasten the Latch and Remove the Cover: Ensure the device is powered off and unplugged. Locate the latches on the sides of the purifier. Unfasten them and carefully lift off the top cover.
- Take Out the Used Filter Cartridge: Gently lift and remove the old filter cartridge from its compartment. Dispose of the used filter responsibly according to local regulations.
- Insert the New Replacement Cartridge: Place the new filter cartridge into the compartment, ensuring it is seated correctly and securely.
- Close the Cover and Start Using It: Replace the top cover and fasten the latches securely. Plug in the device and power it on to resume operation.
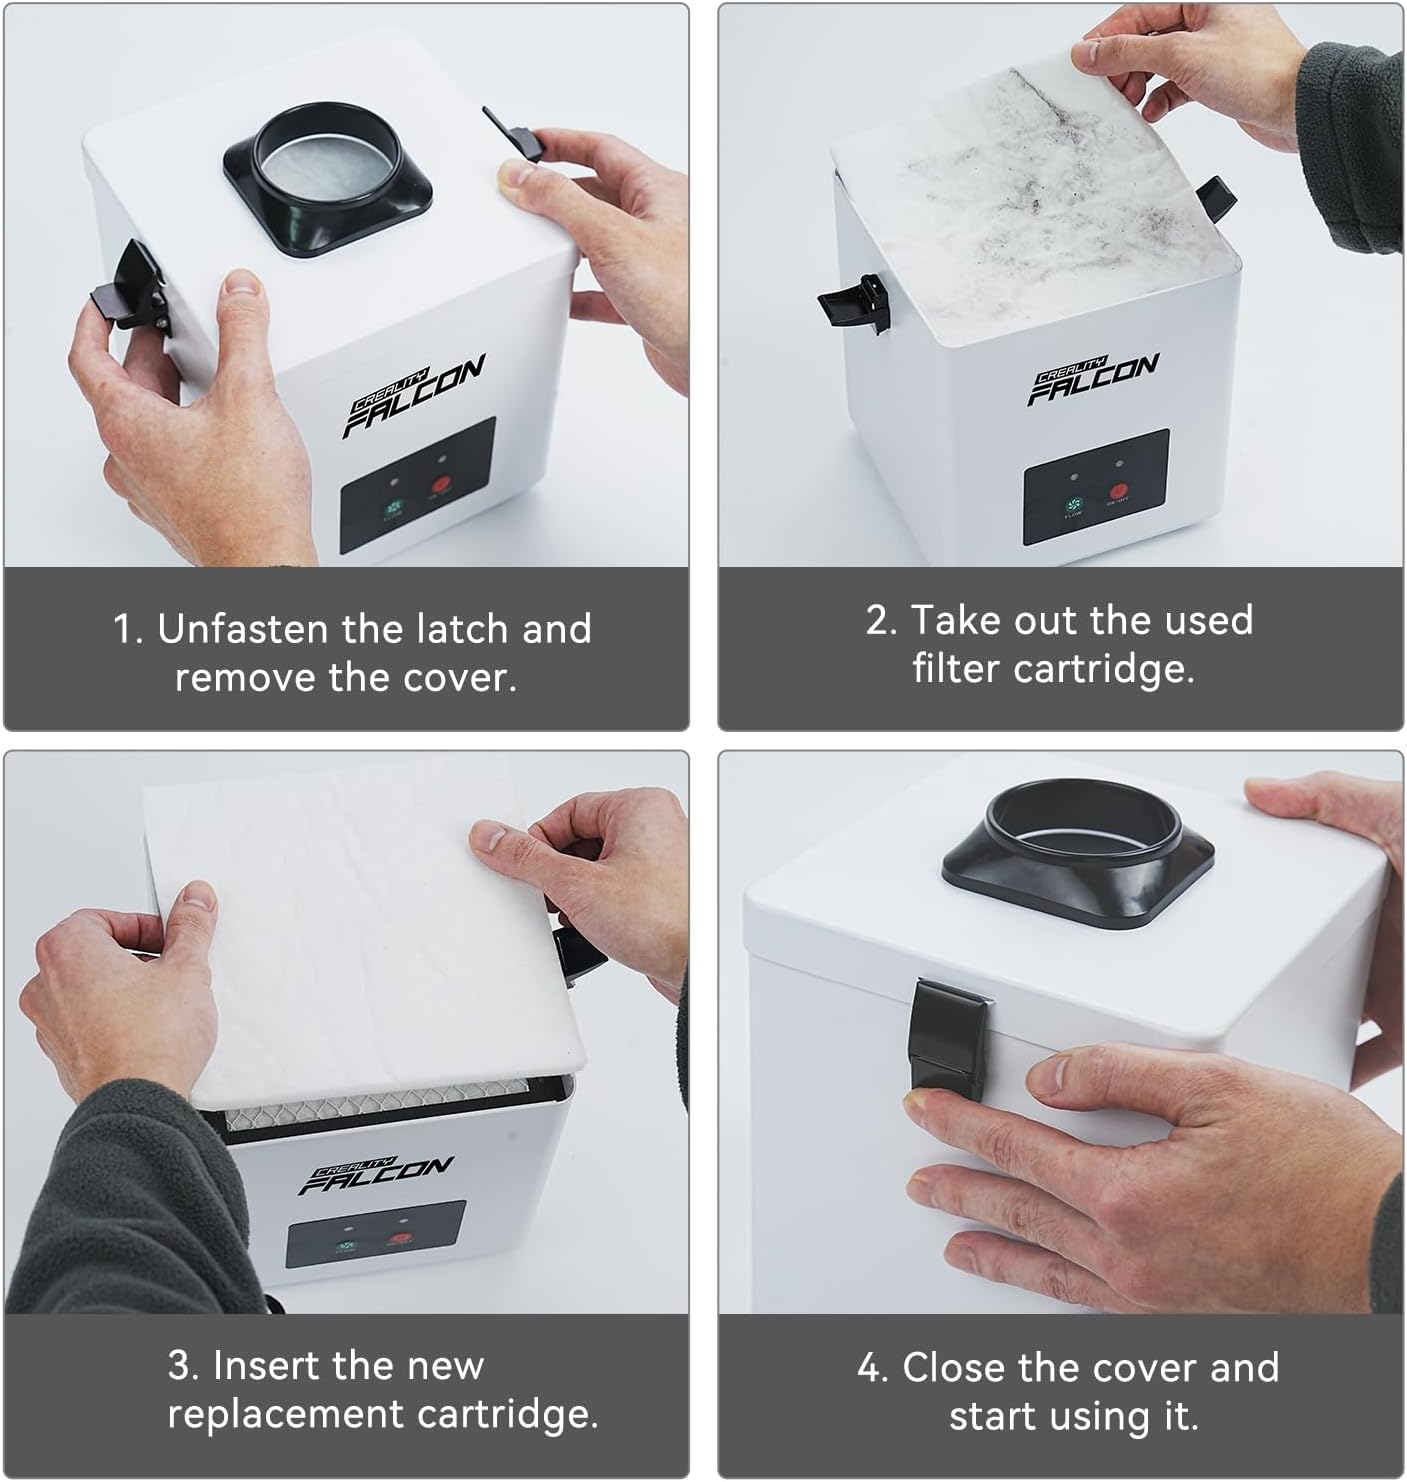
Figure 6: Step-by-step visual guide for replacing the filter cartridge in the smoke purifier.
6.2 Cleaning
- Wipe the exterior of the unit with a soft, dry cloth.
- Do not use abrasive cleaners or solvents.
- Ensure the device is unplugged before cleaning.
7. Troubleshooting
| Problem | Possible Cause | Solution |
|---|---|---|
| Device does not power on. | No power supply; Power cord loose or damaged; Power button not pressed. | Check power outlet; Ensure power cord is securely connected; Press the ON/OFF button firmly. |
| Low airflow or poor filtration. | Filter cartridge is clogged or needs replacement; Exhaust hose is blocked or kinked; Fan speed is too low. | Replace the filter cartridge; Check and clear any obstructions in the hose; Increase the fan speed using the FLOW button. |
| Unusual noise during operation. | Device not on a stable surface; Internal obstruction; Fan malfunction. | Place the device on a flat, stable surface; Check for any foreign objects near the fan intake/exhaust; If noise persists, contact customer support. |
8. Specifications
| Attribute | Detail |
|---|---|
| Product Dimensions | 7.3 x 7.3 x 8 inches (18.5 x 18.5 x 20.3 cm) |
| Item Model Number | 4008060326 |
| Item Weight | 9.39 Pounds (4.26 Kilograms) |
| Color | Grey |
| Brand | Creality |
| Filtration Efficiency | 99.97% for 0.03µm particles |
| Noise Level | As low as 58dB |
| Power Input | AC100V-AC240V |
9. Warranty and Customer Support
For warranty information, please refer to the warranty card included with your product or visit the official Creality website. If you encounter any issues or require technical assistance, please contact Creality customer support through their official channels or the retailer from whom you purchased the product.
You can find more information and support resources on the Creality Official Store on Amazon.


