1. Introduction
Thank you for choosing the ASUS VA249QGS Professional Monitor. This 24-inch (23.8-inch visible) IPS Full HD monitor is designed for professional use, offering a 120 Hz refresh rate, Adaptive-Sync technology, and a rapid 1ms response time. It features a blue light filter for eye comfort, and versatile connectivity options including VGA, HDMI, and DisplayPort. Its ergonomic design ensures a comfortable viewing experience.

Figure 1.1: Front view of the ASUS VA249QGS Professional Monitor.

Figure 1.2: Angled view of the ASUS VA249QGS Professional Monitor.
2. Safety Information
- Always disconnect the power cord from the wall outlet before cleaning the monitor.
- Do not expose the monitor to rain or moisture.
- Do not open the monitor casing. There are no user-serviceable parts inside.
- Use only the power adapter and cables supplied with your monitor.
- Ensure proper ventilation. Do not block any ventilation openings on the monitor.
- Avoid placing the monitor in direct sunlight or near heat sources.
3. Package Contents
Please check your package for the following items. If any item is missing or damaged, contact your retailer immediately.
- ASUS VA249QGS Monitor
- Power Cord
- HDMI Cable
- DisplayPort Cable
- VGA Cable
- Quick Start Guide
- Warranty Card
4. Setup
4.1 Assembling the Monitor Stand
- Place the monitor face down on a soft, clean surface to prevent scratches.
- Attach the stand base to the stand neck and secure it with the captive screw.
- Align the stand assembly with the mounting holes on the back of the monitor and push until it clicks into place.
4.2 Connecting the Monitor
Connect the necessary cables to the corresponding ports on the monitor and your computer.

Figure 4.1: Rear view of the monitor with port connections.

Figure 4.2: Available connectivity options.
- Power Connection: Connect the power cord to the monitor's power input and then to a power outlet.
- Video Connection:
- HDMI: Connect an HDMI cable from your computer's HDMI output to the monitor's HDMI input.
- DisplayPort: Connect a DisplayPort cable from your computer's DisplayPort output to the monitor's DisplayPort input.
- VGA: Connect a VGA cable from your computer's VGA output to the monitor's VGA input.
- Audio Connection: If desired, connect an audio cable from your computer's audio output to the monitor's Audio-in port, or connect headphones to the Earphone Jack.
- USB Hub: Connect the USB upstream cable from your computer to the monitor's USB upstream port to enable the monitor's USB hub functionality.
4.3 VESA Wall Mount Installation
The monitor supports VESA wall mount standard (100x100mm) for space-saving installation. Refer to your wall mount kit's instructions for detailed installation steps. Ensure the stand is removed before mounting.

Figure 4.3: Example of Mini-PC Kit attachment, demonstrating VESA mounting points.
5. Operating the Monitor
5.1 Powering On/Off
Press the power button located on the monitor to turn it on or off. The power indicator light will illuminate when the monitor is on.
5.2 On-Screen Display (OSD) Menu
The OSD menu allows you to adjust various settings of your monitor. Use the joystick or buttons on the monitor's bezel to navigate the menu.
- Navigation: Move the joystick up/down/left/right to navigate through menu options.
- Selection: Press the joystick inward to select an option or confirm a setting.
- Exit: Move the joystick left to go back to the previous menu or exit the OSD.
5.3 Key Features and Settings
5.3.1 Ergonomic Adjustments
The monitor features tilt, swivel, pivot, and height adjustment functions for optimal viewing comfort.

Figure 5.1: Monitor tilt adjustment range.
5.3.2 Adaptive-Sync Technology
Adaptive-Sync (VRR) technology eliminates screen tearing and choppy frame rates to give you seamless visuals and smooth gameplay. This feature is automatically enabled when a compatible graphics card is detected.

Figure 5.2: Smooth motion with Adaptive-Sync.
5.3.3 ASUS Eye Care Technologies (Flicker-Free & Blue Light Filter)
ASUS Eye Care monitors feature TÜV Rheinland-certified Flicker-Free and Low Blue Light technologies to ensure a comfortable viewing experience, reducing eye strain during prolonged use.

Figure 5.3: Flicker-Free technology in action.
5.3.4 ASUS DisplayWidget Center
The ASUS DisplayWidget Center software allows users to easily modify monitor settings via an intuitive interface on their PC, providing convenient control over display parameters.

Figure 5.4: ASUS DisplayWidget Center interface.
5.3.5 Wide Viewing Angle
The IPS panel provides a wide 178° viewing angle, ensuring consistent color and image quality from almost any perspective.

Figure 5.5: 178° wide viewing angle.
6. Maintenance
- Cleaning the Screen: Gently wipe the screen with a soft, lint-free cloth. For stubborn marks, dampen the cloth with a mild, non-abrasive screen cleaner. Do not spray cleaner directly onto the screen.
- Cleaning the Casing: Use a soft, dry cloth to wipe the monitor casing. Avoid using strong detergents or abrasive cleaners.
- Ventilation: Ensure the ventilation openings on the monitor are not blocked to prevent overheating.
- Power Off: Always turn off the monitor and unplug it from the power outlet when not in use for extended periods.
7. Troubleshooting
| Problem | Possible Cause | Solution |
|---|---|---|
| No image on screen | Power cable not connected; Video cable not connected; Incorrect input source selected. | Ensure power and video cables are securely connected. Press the OSD menu button to select the correct input source (HDMI, DisplayPort, VGA). |
| Image is blurry or distorted | Incorrect resolution; Cable issue. | Set the display resolution to 1920x1080. Check the video cable for damage or replace it. |
| No sound | Audio cable not connected; Volume too low; Muted. | Ensure audio cable is connected (if using monitor speakers/headphone jack). Adjust volume via OSD or computer settings. Check if muted. |
| Flickering screen | Refresh rate mismatch; Cable issue. | Ensure refresh rate is set to 120Hz in your computer's display settings. Check or replace video cable. |
8. Specifications
| Feature | Description |
|---|---|
| Model Name | ASUS VA249QGS |
| Panel Size | 23.8 inches (60.5 cm) |
| Panel Type | IPS |
| Resolution | 1920 x 1080 (Full HD) |
| Aspect Ratio | 16:9 |
| Refresh Rate | 120 Hz |
| Response Time | 1ms MPRT |
| Contrast Ratio | 2000:1 (Typical) |
| Viewing Angle | 178° (H)/178° (V) |
| Surface Treatment | Anti-glare |
| Connectivity | 1x HDMI, 1x DisplayPort, 1x VGA, Earphone Jack, Audio-in, USB Hub (4 ports) |
| Special Features | Blue Light Filter, Flicker-Free, Frameless Design, Adaptive-Sync, Ergonomic Stand (Tilt, Swivel, Pivot, Height Adjustment) |
| VESA Wall Mounting | 100 x 100 mm |
| Energy Efficiency Class | D |
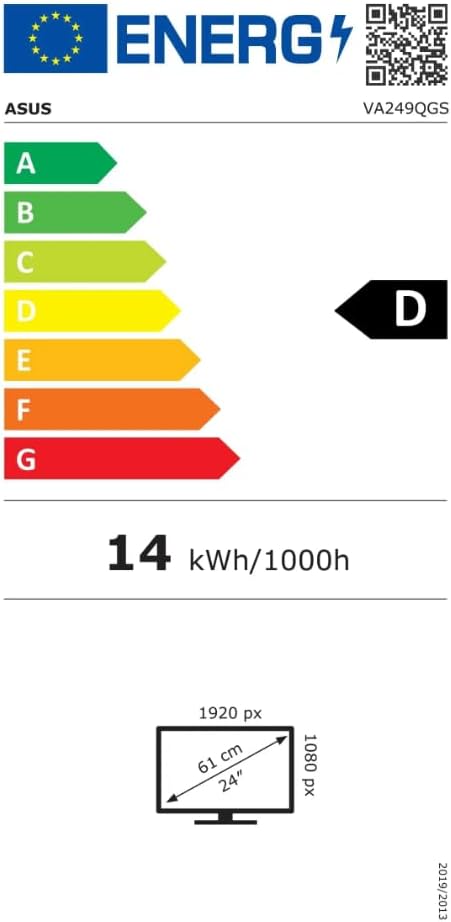
Figure 8.1: Energy Efficiency Label for ASUS VA249QGS.
For more details, refer to the EPREL database: https://eprel.ec.europa.eu/qr/2205871
9. Warranty and Support
9.1 Warranty Information
ASUS monitors typically come with a limited warranty. Please refer to the warranty card included in your package for specific terms and conditions, including warranty period and coverage details for your region.
9.2 Customer Support
For technical support, service, or general inquiries, please contact ASUS customer service through the following channels:
- ASUS Service & Support Website: https://www.asus.com/support/
- Email: servicecenter_emea@asus.com
- Telephone: +49 (0)21025389557 (Note: This number is for Germany, please check the ASUS support website for your local contact number.)
When contacting support, please have your monitor's model number (VA249QGS) and serial number ready.


