1. Introduction
Thank you for choosing the Nilox Mini Portable Air Compressor. This device is designed for convenient and efficient inflation of various items, including bicycle, car, motorcycle, and scooter tires, as well as sports balls. It features a built-in 4000 mAh battery, an LCD display for precise pressure control, and an integrated LED flashlight for visibility in low-light conditions. Please read this manual carefully before use to ensure proper operation and maintenance.
2. Product Overview
2.1 Components
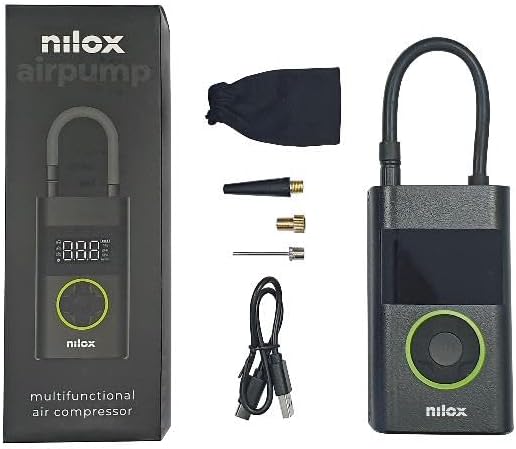
Image: The Nilox Mini Portable Air Compressor shown with its packaging, USB-C charging cable, and various inflation adapters.
- Nilox Mini Portable Air Compressor Unit
- Inflation Hose
- USB Type-C Charging Cable
- Various Inflation Adapters (e.g., Presta valve adapter, needle for balls)
- Storage Pouch
2.2 Key Features
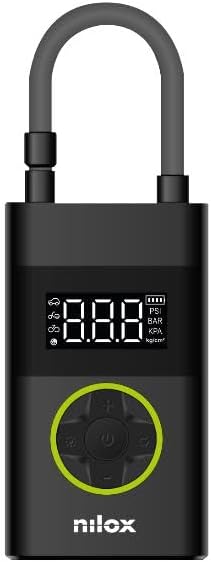
Image: Front view of the Nilox Mini Portable Air Compressor, highlighting the digital LCD display and the circular control panel with power, mode, and adjustment buttons.
- Maximum Pressure: 150 PSI (10 Bar) for versatile inflation.
- Integrated Battery: 4000 mAh for cordless operation.
- Power Bank Function: Recharge external devices via Type-C port.
- LCD Display: Digital screen for real-time pressure monitoring and setting.
- LED Flashlight: Dual integrated LED lights for illumination.
- Compact and Lightweight: Weighs approximately 439g for easy portability.
3. Setup
3.1 Charging the Device
- Connect the provided USB Type-C cable to the charging port on the compressor.
- Connect the other end of the USB cable to a compatible USB power adapter (not included) or a power source.
- The LCD display will indicate charging status. Ensure the device is fully charged before first use for optimal battery life.
3.2 Attaching the Inflation Hose and Adapters
- Screw the inflation hose securely onto the air outlet port of the compressor.
- Select the appropriate adapter for the item you wish to inflate (e.g., Schrader valve for cars/bikes, Presta valve adapter for certain bikes, needle adapter for balls).
- Screw the selected adapter onto the end of the inflation hose.
4. Operating Instructions
4.1 Powering On/Off
- Press and hold the power button (usually the center button on the control panel) to turn the compressor on.
- The LCD display will illuminate, showing the current pressure.
- To turn off, press and hold the power button again. The device will also automatically shut off after a period of inactivity.
4.2 Setting the Desired Pressure
- With the compressor powered on, press the 'Mode' button (often indicated by an icon like a car, bike, or ball) to cycle through different inflation modes (e.g., car, motorcycle, bicycle, ball). Each mode may have a default pressure range.
- Use the '+' and '-' buttons to adjust the target pressure to your desired value. The unit of pressure (PSI, BAR, KPA, kg/cm²) can usually be changed by a dedicated button or by holding the mode button.
4.3 Inflation Process
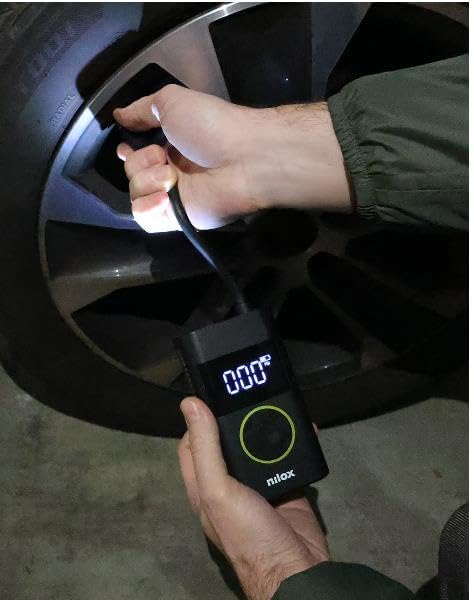
Image: A person holding the Nilox Mini Portable Air Compressor, which displays '000', while the attached hose is connected to a car tire valve for inflation. The integrated LED light is active.
- Connect the inflation hose with the correct adapter to the item's valve.
- The LCD display will show the current pressure of the item.
- Set your desired target pressure as described in section 4.2.
- Press the power button once to start inflation. The compressor will automatically stop when the target pressure is reached.
- Carefully disconnect the hose from the valve and then from the compressor.
4.4 Power Bank Function
- The 4000 mAh battery allows the compressor to function as a power bank.
- Connect your device (e.g., smartphone) to the compressor's Type-C port using a compatible cable.
- The compressor will begin charging your device.
4.5 LED Flashlight
- Press the dedicated LED light button (if available) or a specific combination of buttons to turn the LED flashlight on or off.
- The LED light provides illumination for use in dark environments.
5. Maintenance
- Cleaning: Wipe the compressor's exterior with a soft, damp cloth. Do not use harsh chemicals or immerse the device in water.
- Storage: Store the compressor in a cool, dry place, away from direct sunlight and extreme temperatures.
- Battery Care: To prolong battery life, charge the device regularly, even if not in frequent use. Avoid completely draining the battery.
- Hose and Adapters: Ensure the inflation hose and adapters are clean and free from debris before and after each use.
6. Troubleshooting
- Device not turning on: Ensure the battery is charged. Connect to a power source and try again.
- Compressor not inflating: Check that the hose and adapter are securely connected to both the compressor and the item's valve. Verify that the target pressure is set above the current pressure.
- Inaccurate pressure reading: Ensure the hose is properly connected and there are no leaks. Recalibrate if a calibration option is available (refer to specific device instructions if applicable).
- Slow inflation: Check for blockages in the hose or adapter. Ensure the battery is sufficiently charged.
- Overheating: If the device feels excessively hot, turn it off and allow it to cool down before further use. Avoid continuous operation for extended periods.
7. Specifications
| Feature | Specification |
|---|---|
| Brand | Nilox |
| Model Number | NXAIRPUMP |
| Maximum Pressure | 150 PSI |
| Battery Capacity | 4000 mAh |
| Battery Type | Lithium-ion |
| Power Source | Battery Powered |
| Charging Port | USB Type-C |
| Special Features | Quick Inflation, Power Bank Function, LED Light, LCD Display |
| Item Weight | Approximately 556 g |
| Package Dimensions | 21 x 9 x 6 cm |
8. Warranty and Support
For warranty information or technical support, please refer to the warranty card included with your product or visit the official Nilox website. You may also contact Nilox customer service directly for assistance with product issues or inquiries.


