1. Introduction
The Lamomo COB LED Strip Lights Pro provide uniform, dimmable warm white illumination suitable for various indoor and outdoor applications. This manual contains essential instructions for the safe installation, operation, and maintenance of your LED strip lights. Please read this manual thoroughly before use and retain it for future reference.
2. Package Contents
Verify that all items listed below are included in your package:
- COB LED Strip Light (16.4 Ft / 5 Meters)
- Remote Control
- Power Adapter
- Quick Connect Cord
- Plastic Mounting Clips (10 pieces)
- Screws
- Instruction Manual
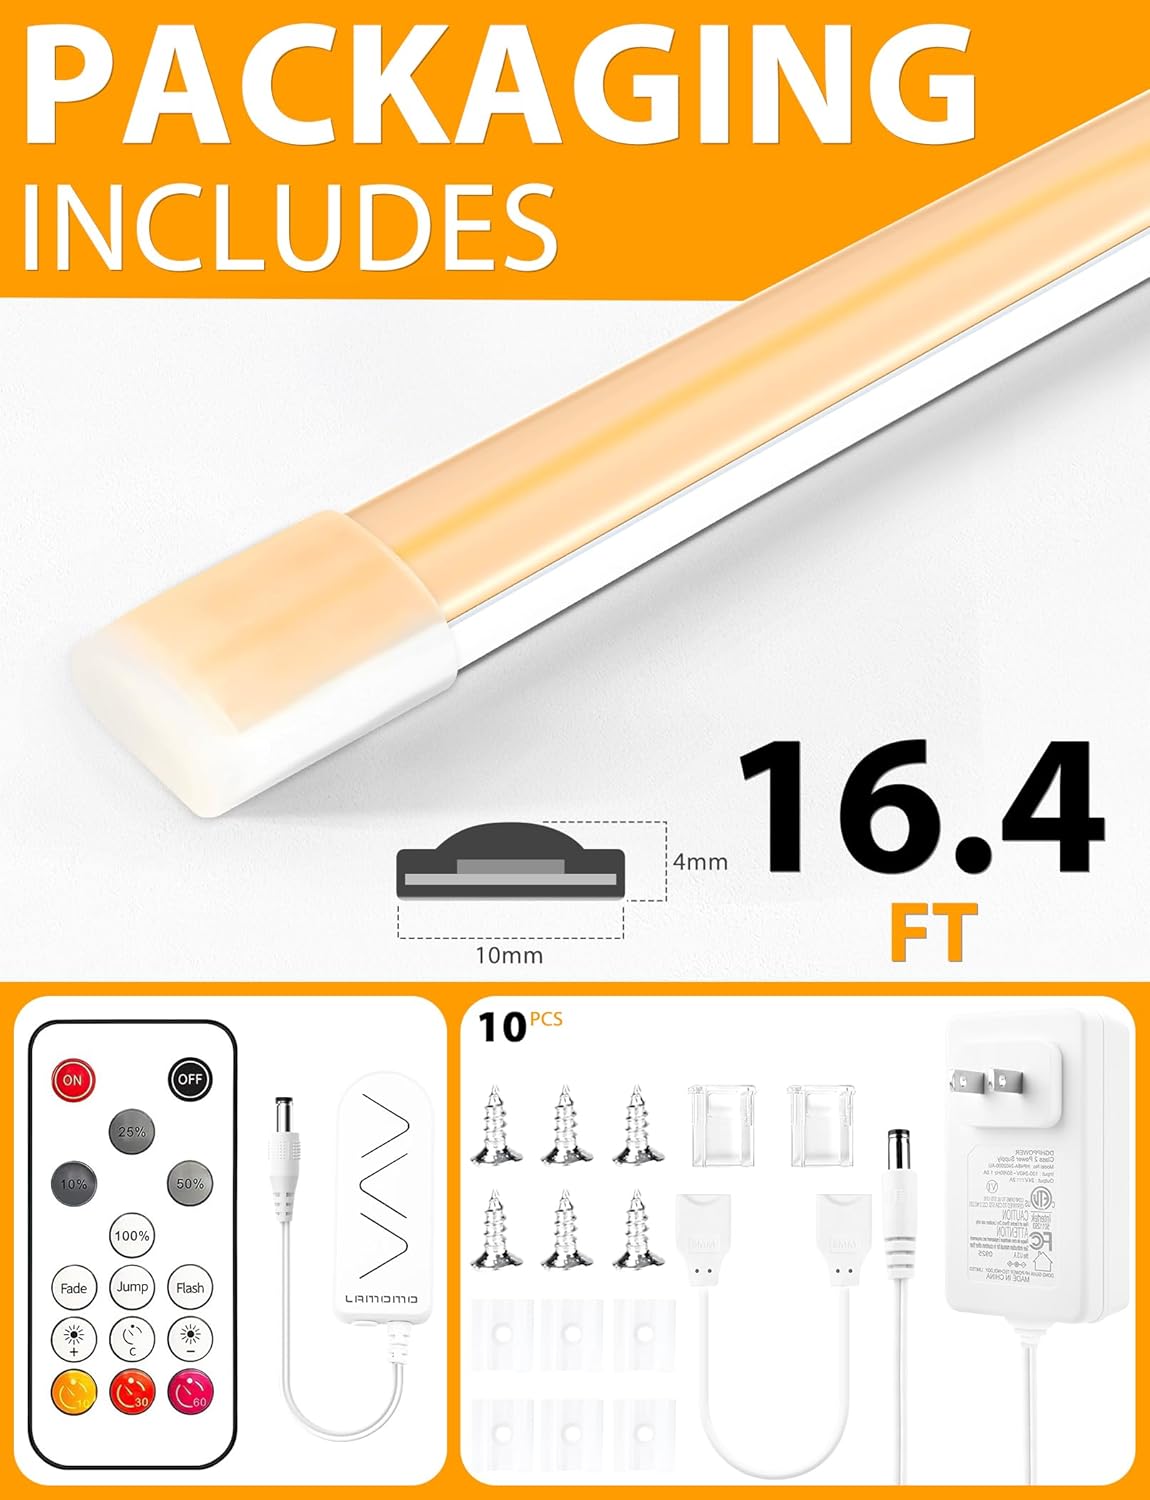
Figure 2.1: Included components in the Lamomo COB LED Strip Light package.
3. Safety Information
Please observe the following safety precautions to prevent injury or damage to the product:
- Ensure the power supply is disconnected before installation or maintenance.
- The LED strip operates on 24V low voltage, which enhances safety during use.
- The LED strip itself is IP65 waterproof, making it suitable for indoor and outdoor use. However, the power plug and end caps are not waterproof and must be protected from moisture.
- Do not expose the power adapter or remote control to water or extreme temperatures.
- Avoid bending the strip sharply at angles less than 180 degrees to prevent damage to the internal components.
- Do not connect the strip directly to 120V/240V AC power without the provided power adapter.
- Keep out of reach of children.
4. Setup and Installation
Follow these steps for proper installation of your LED strip lights:
4.1 Planning the Installation
- Measure the desired length for your lighting application.
- Identify a suitable location for the power adapter, ensuring it is protected from water if installing outdoors.
4.2 Cutting the LED Strip (Optional)
The LED strip can be cut to your desired length at designated cut marks, typically every 1 cm (0.39 inches). Look for small black lines or scissor icons on the strip.
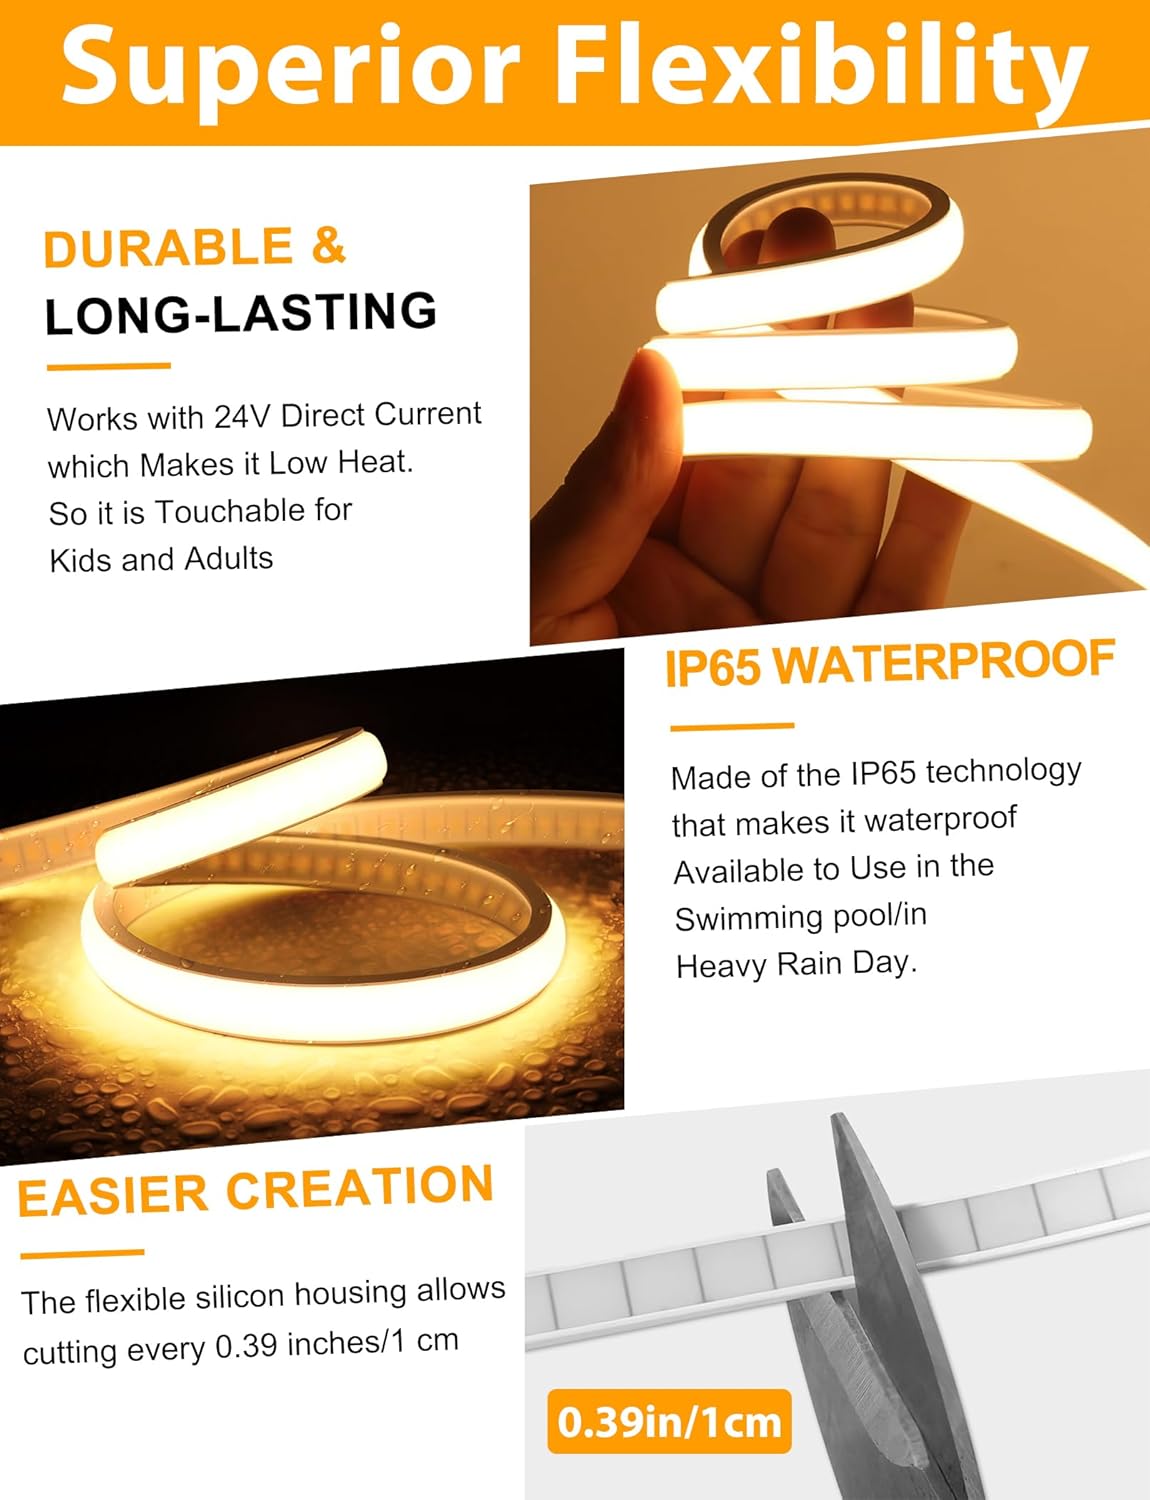
Figure 4.1: The LED strip can be cut every 1 cm (0.39 inches) at designated marks.
4.3 Mounting the LED Strip
- Secure the plastic mounting clips to your desired surface using the provided screws. Space the clips evenly to ensure the strip is held firmly.
- Carefully slide the COB LED strip into the installed plastic clips. The flexible silicone housing allows for bending to accommodate corners and curves.
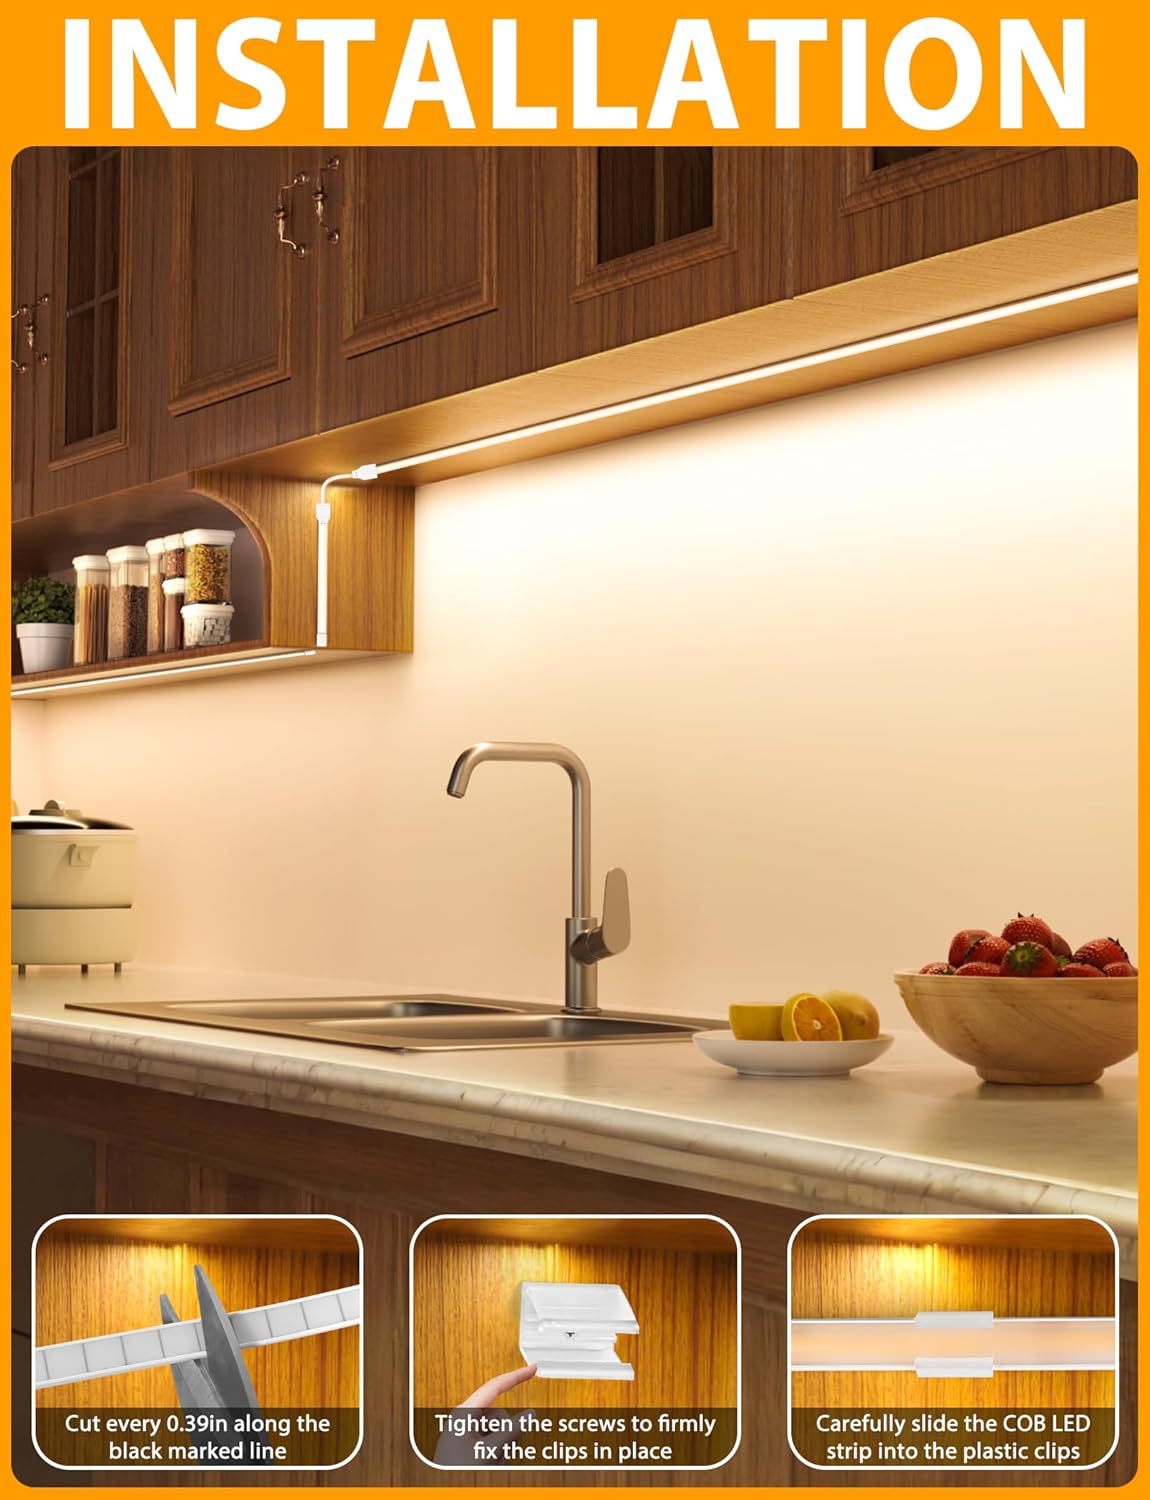
Figure 4.2: Installation steps: Cut the strip, fix clips, and slide the strip into place.
4.4 Connecting the Power
- Connect the quick connect cord to the end of the LED strip.
- Connect the quick connect cord to the power adapter.
- Plug the power adapter into a standard electrical outlet.

Figure 4.3: The 7-inch quick connect cord for connecting the strip to the power adapter.
5. Operation
The Lamomo COB LED Strip Lights Pro are controlled using the included 15-key remote control.
5.1 Remote Control Functions
- Power ON/OFF: Press the ON or OFF button.
- Dimming: Use the 100%, 75%, 50%, 10% buttons for preset brightness levels, or the +/- buttons for gradual adjustment (0%-100%).
- Lighting Modes: Select from Fade, Jump, or Flash for dynamic lighting effects.
- Timer Function: Set the lights to turn off automatically after 10 minutes, 30 minutes, or 60 minutes.
- Memory Function: The lights will retain the last brightness and mode setting when turned off and on again.

Figure 5.1: Remote control for dimming the LED strip lights from 0% to 100%.

Figure 5.2: The timer function allows setting the lights to turn off after 10, 30, or 60 minutes.
5.2 Control Options
The remote control supports both one-to-many and many-to-one control configurations:
- One-to-Many Control: A single remote can control multiple LED strip lights (e.g., A, B, C) if they are within range.
- Many-to-One Control: Multiple remotes can be used to control a single LED strip light.

Figure 5.3: Illustration of one-to-many and many-to-one control capabilities.
6. Maintenance
The Lamomo COB LED Strip Lights Pro require minimal maintenance.
- Cleaning: Gently wipe the LED strip with a soft, dry cloth to remove dust. For stubborn dirt, a slightly damp cloth can be used, ensuring no moisture enters the non-waterproof components (power plug, end caps).
- Inspection: Periodically check the strip and connections for any signs of damage or wear.
- Storage: If storing the lights for an extended period, ensure they are clean, dry, and coiled loosely to prevent damage.
7. Troubleshooting
If you encounter issues with your LED strip lights, refer to the following common problems and solutions:
| Problem | Possible Cause | Solution |
|---|---|---|
| Lights do not turn on | No power supply; loose connection; remote battery depleted. | Check power outlet; ensure all connections are secure; replace remote battery. |
| Remote not responding | Remote battery depleted; obstruction between remote and receiver; remote too far. | Replace remote battery; remove obstructions; move closer to the receiver (within 99ft). |
| Lights flicker or dim unexpectedly | Unstable power supply; damaged strip section. | Ensure stable power source; inspect strip for physical damage. |
| Section of strip not lighting up | Damage to that section; improper cut. | If cut, ensure it was at a designated mark. If damaged, the section may need replacement. |
8. Specifications
| Model Number | 300D-WW-5M-US-1 |
| Light Color | Warm White |
| Color Temperature | 3000 Kelvin |
| Length | 16.4 Ft (5 Meters / 196.85 Inches) |
| Light Source Type | COB LED |
| Number of LEDs | 1500 (for 16.4Ft) |
| Voltage | 24 Volts |
| Wattage | 48 Watts |
| Water Resistance Level | IP65 (LED strip only) |
| Controller Type | Remote Control |
| Material | Silicone |
| Indoor/Outdoor Usage | Indoor, Outdoor |
9. Warranty and Support
For warranty information and customer support, please refer to the product packaging or contact Lamomo customer service directly. Details can typically be found on the manufacturer's official website or through your point of purchase.


