
1. Introduction
This instruction manual provides essential information for the proper installation, function, and maintenance of the AMECA Needle & Seat Kit. This kit is designed as a replacement component for specific Briggs & Stratton carburetor models, ensuring correct fuel flow and preventing common carburetor issues.
2. Product Overview
The needle and seat assembly is a critical component within a carburetor's float bowl. It regulates the flow of fuel into the bowl, maintaining a consistent fuel level for optimal engine performance. A properly functioning needle and seat prevent both fuel starvation and flooding.
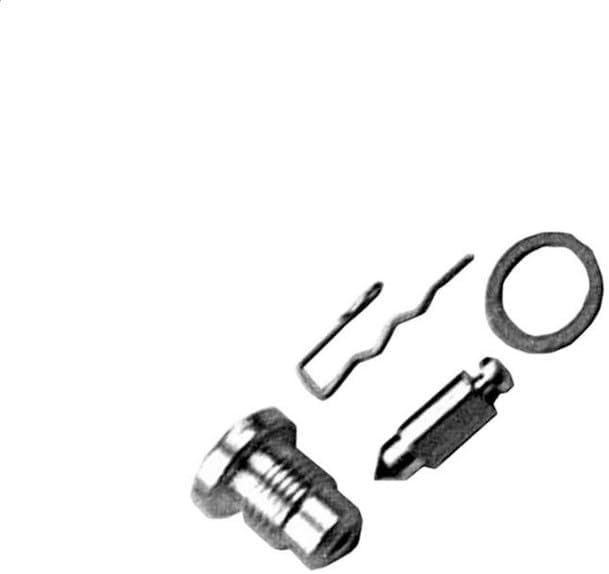
Figure 1: Components of the AMECA Needle and Seat Kit. This image displays the individual components included in the AMECA Needle and Seat Kit: the needle, the seat, a retaining clip, and a gasket.
3. Compatibility
This AMECA Needle & Seat Kit is compatible with the following Briggs & Stratton carburetor part numbers and engine series:
- Briggs & Stratton Part Numbers: 293962, 297102
- Briggs & Stratton Engine Series: 140000, 170000, 190000 and higher
- Fuel Compatibility: Designed to be compatible with E-20 or E-85 ethanol fuel blends.
Always verify the correct part number for your specific engine model before installation.
4. Setup and Installation
Installation of the needle and seat kit requires careful attention to detail. If you are unsure about any step, it is recommended to consult a qualified service technician.
4.1 Safety Precautions
- Ensure the engine is cool before beginning work.
- Disconnect the spark plug wire to prevent accidental starting.
- Work in a well-ventilated area.
- Have a fire extinguisher readily available.
- Drain fuel from the fuel tank and carburetor float bowl into an approved container before disassembly.
4.2 Required Tools (Typical)
- Screwdrivers (flathead and Phillips)
- Wrenches or sockets
- Pliers
- Clean rags
- Carburetor cleaner (optional, for cleaning)
4.3 Installation Steps (General Guide)
- Remove Air Filter and Housing: Access the carburetor by removing the air filter and its housing.
- Disconnect Fuel Line: Clamp or pinch the fuel line and disconnect it from the carburetor.
- Remove Carburetor: Disconnect any linkages, springs, and mounting bolts, then carefully remove the carburetor from the engine.
- Disassemble Float Bowl: Invert the carburetor and remove the screws holding the float bowl in place. Carefully remove the float bowl.
- Remove Old Needle and Seat: Locate the float pin. Remove the float pin, then carefully remove the float and the old needle. The old seat may be pressed into the carburetor body; use a small pick or screwdriver to carefully remove it if necessary.
- Clean Carburetor: Thoroughly clean the carburetor body, especially the seat area, with carburetor cleaner. Ensure all passages are clear and free of debris.
- Install New Seat: Carefully press the new seat into its designated bore in the carburetor body. Ensure it is seated flush and correctly oriented.
- Install New Needle and Float: Attach the new needle to the float (if applicable, some needles clip on). Reinstall the float and secure it with the float pin. Ensure the float moves freely.
- Reassemble Carburetor: Install the new gasket (if provided) and reattach the float bowl. Tighten screws evenly.
- Reinstall Carburetor: Mount the carburetor back onto the engine, reconnect linkages, springs, and the fuel line.
- Reattach Air Filter: Reinstall the air filter housing and air filter.
- Reconnect Spark Plug: Reconnect the spark plug wire.
- Refill Fuel: Add fresh fuel to the tank.
- Test Engine: Start the engine and check for proper operation and any fuel leaks.
5. Operating Principle
Once installed, the needle and seat assembly works in conjunction with the carburetor float. As fuel enters the float bowl, the float rises. When the fuel reaches a predetermined level, the float pushes the needle into the seat, effectively sealing the fuel inlet and stopping further fuel flow. As the engine consumes fuel, the float level drops, lifting the needle from the seat and allowing more fuel to enter. This continuous cycle maintains a stable fuel level in the float bowl, crucial for consistent engine performance.
6. Maintenance
Proper maintenance of your engine's fuel system, including the carburetor, will extend the life of the needle and seat kit.
- Use Fresh Fuel: Stale fuel, especially ethanol-blended fuel, can degrade over time and leave deposits that can stick the needle or corrode the seat.
- Fuel Stabilizer: Use a high-quality fuel stabilizer if the engine will be stored for an extended period.
- Regular Cleaning: Periodically inspect and clean the carburetor float bowl and needle/seat area, especially if the engine experiences fuel-related issues.
- Fuel Filter: Ensure your engine has a clean, functional fuel filter to prevent debris from reaching the carburetor and interfering with the needle and seat.
7. Troubleshooting
If your engine exhibits fuel-related problems after installing or with an existing needle and seat, consider the following:
- Engine Flooding / Fuel Leaks: This often indicates the needle is not seating properly. Check for debris on the needle or seat, a worn needle tip, a damaged seat, or an improperly adjusted/stuck float.
- Engine Starvation / No Fuel: The needle might be stuck in the closed position, or the float might be stuck. Check for debris, a bent float arm, or a clogged fuel filter.
- Erratic Engine Performance: Inconsistent fuel levels due to a partially sticking needle or float can lead to surging or rough running.
Always ensure all connections are secure and there are no other fuel system issues (e.g., clogged fuel lines, faulty fuel pump) before focusing solely on the needle and seat.
8. Specifications
- Product Type: Carburetor Needle & Seat Kit
- Brand: AMECA
- Compatible Briggs & Stratton Part Numbers: 293962, 297102
- Compatible Briggs & Stratton Engine Series: 140000, 170000, 190000 and higher
- Fuel Compatibility: E-20, E-85 Ethanol Fuel
9. Warranty Information
Warranty information for this AMECA product is not provided in the available documentation. Please refer to the product packaging or contact the seller directly for details regarding warranty coverage.
10. Customer Support
For technical assistance or inquiries regarding this AMECA Needle & Seat Kit, please contact the retailer or manufacturer through the contact information provided at the point of purchase. Ensure you have your product details and purchase information ready.