Important Safety Information
Please read and understand all safety warnings and instructions before setting up and using your tent. Failure to follow these instructions may result in injury or damage to the product.
- Keep away from open flames: Do not use or store flammable liquids, gases, or other combustible materials inside or near the tent. Keep all flame and heat sources away from the tent fabric.
- Ventilation: Ensure adequate ventilation to prevent suffocation and carbon monoxide poisoning. Do not use fuel-burning devices inside the tent.
- Weather conditions: Avoid setting up the tent in extreme weather conditions such as strong winds, heavy rain, or lightning storms. Disassemble the tent and seek shelter in severe weather.
- Site selection: Choose a flat, clear area free of sharp objects, rocks, and debris. Avoid setting up under trees with dead branches.
- Children's safety: Keep children away from the tent during setup and takedown. Do not allow children to play with tent components unsupervised.
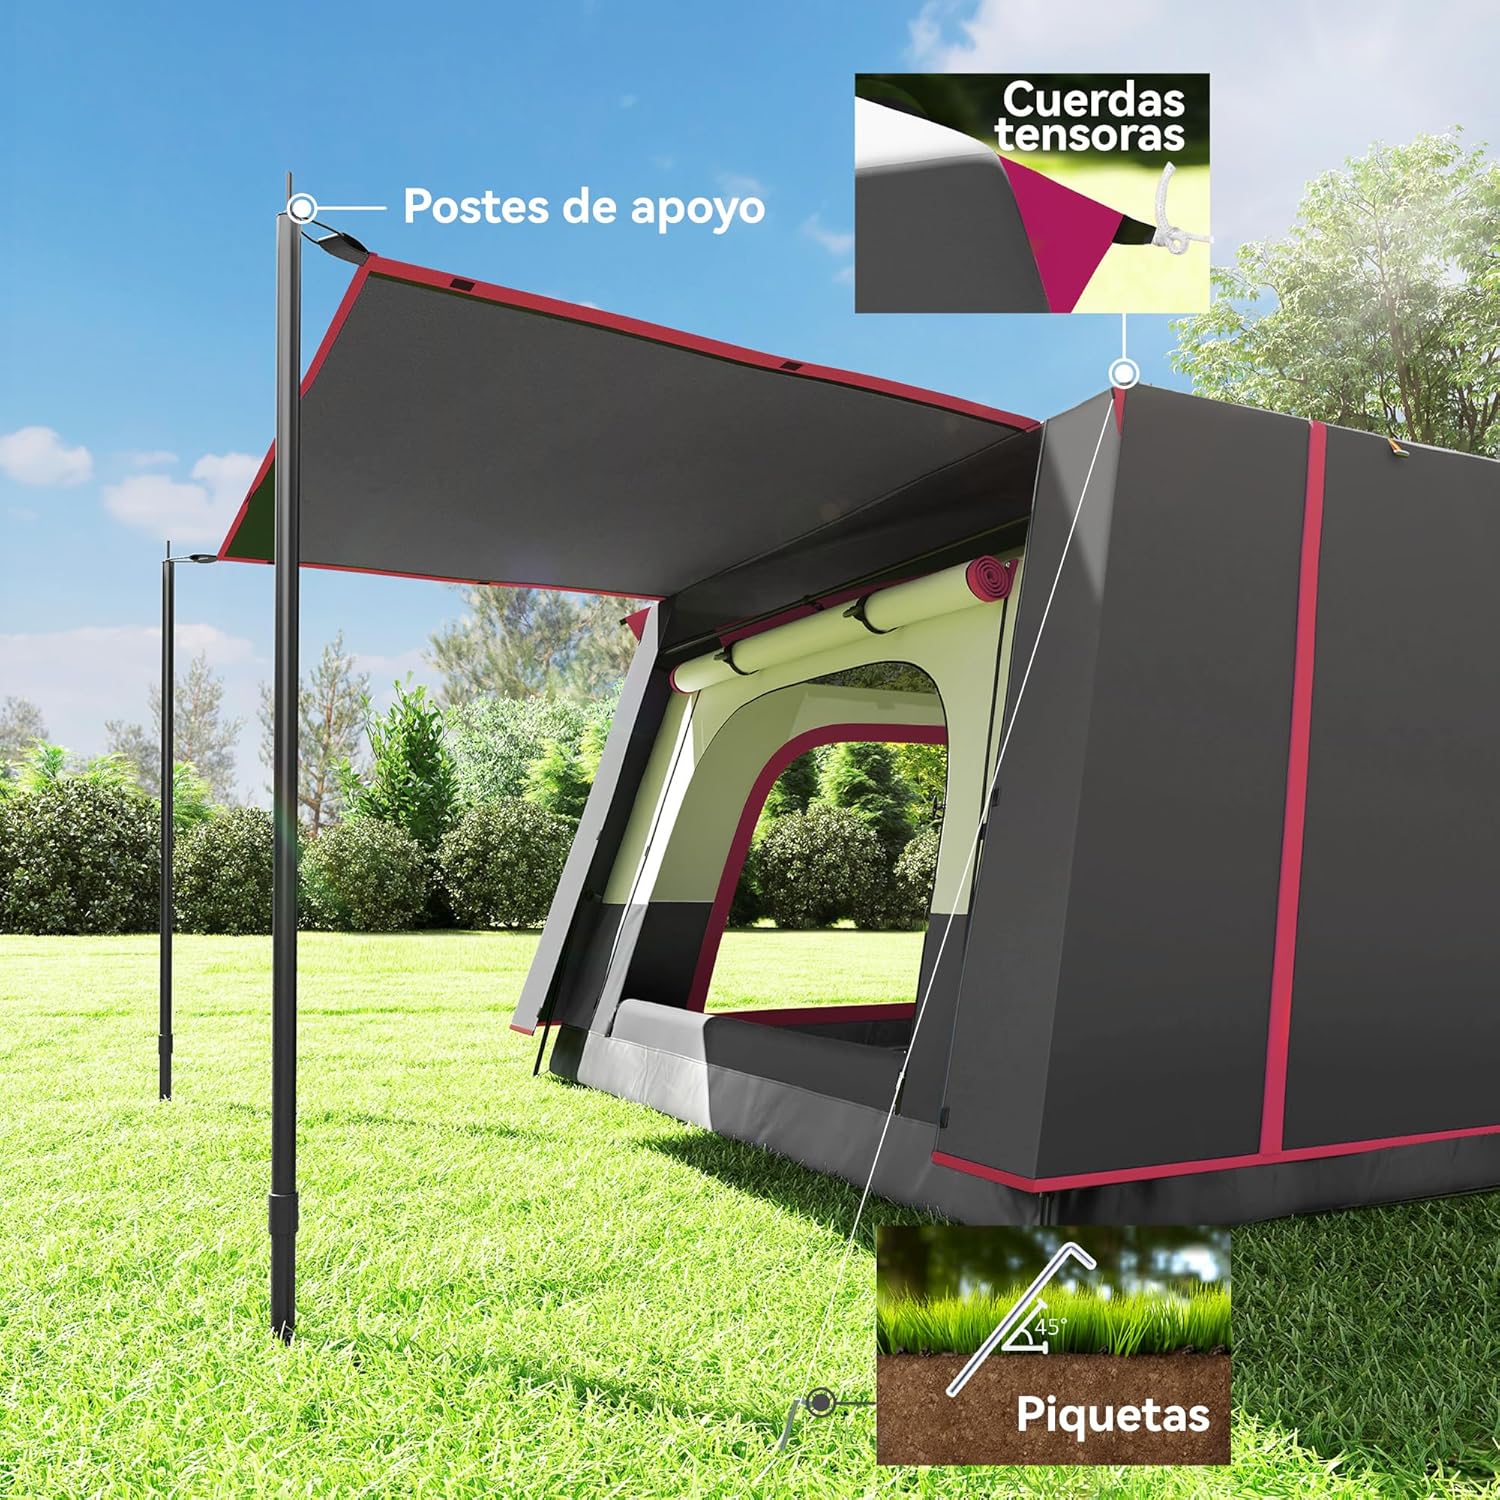
- Structural integrity: Ensure all poles are properly assembled and secured, and all guy ropes and stakes are firmly anchored to prevent collapse.
Package Contents
Verify that all components are present before beginning assembly:
- Tent Body (Inner Tent and Outer Rainfly)
- Support Poles (various lengths and types)
- 12 x Tent Stakes
- 8 x Guy Ropes
- Carry Bag
- Lamp Hook (integrated or separate)
- Windows (integrated mesh)

Setup Instructions
Assembly typically requires 2-3 people for optimal ease and stability.
Step 1: Choose a Location and Unpack
Select a flat, dry area free of sharp objects. Unroll the tent body and lay it flat on the ground, spreading out the inner tent first.

Step 2: Assemble the Poles
Connect the pole sections by inserting them into each other. Identify the different pole types (e.g., fiberglass for the roof, metal for vertical supports) and their corresponding sleeves on the tent.
Step 3: Insert Poles into Sleeves
Carefully slide the assembled poles through the fabric sleeves on the tent body. Ensure poles are fully seated in the corner pins or grommets.
Step 4: Raise the Tent Structure
With assistance, lift the tent structure by raising the poles. This will give the tent its basic shape. Secure the base of the tent to the ground using the provided stakes.

Step 5: Attach the Rainfly (Outer Layer)
Drape the rainfly over the tent body, aligning it with the tent's shape. Secure the rainfly to the tent poles and base using the attached buckles, hooks, or ties. Ensure the rainfly is taut to prevent water pooling.

Step 6: Secure with Guy Ropes and Stakes
Extend all guy ropes and secure them firmly to the ground with stakes. Adjust the tensioners on the guy ropes to make the tent stable and resistant to wind.
Step 7: Configure Interior Rooms
The tent features two separate rooms and a living area. Use the internal dividers (if applicable) to create the desired configuration. Ensure the sewn-in floor is flat and free of wrinkles.


Operating Instructions
Ventilation
The tent is equipped with mesh windows on the sides and rear, as well as multiple doors, to ensure excellent airflow. Open these features as needed to maintain comfort and reduce condensation.

Entry and Exit
Utilize the multiple doors for convenient entry and exit, especially when multiple occupants are present, to avoid disturbing others.
Lamp Hook Usage
A practical hook is provided inside the tent for hanging a camping lamp or light source, offering safe and convenient illumination during the night.
Maintenance
- Cleaning: Clean the tent with a soft brush or sponge and mild soap. Do not use harsh detergents or bleach. Rinse thoroughly with water.
- Drying: Always ensure the tent is completely dry before packing it away to prevent mildew and odor. Air dry in a shaded area.
- Storage: Store the tent in its carry bag in a cool, dry place, away from direct sunlight and extreme temperatures.
- Pole Care: Inspect poles for damage before and after each use. Clean any dirt or sand from pole sections.
- Zipper Care: Keep zippers clean and lubricated with a silicone-based spray to ensure smooth operation.
Troubleshooting
- Condensation: Ensure proper ventilation by opening mesh windows and doors. Condensation is natural and can be reduced by increasing airflow.
- Water Leaks: Check that the rainfly is properly positioned and taut. Ensure all zippers are fully closed. In heavy rain, some minor seepage can occur, but significant leaks may indicate improper setup or damage.
- Tent Not Standing Firmly: Verify that all poles are correctly inserted and secured. Ensure all stakes are driven fully into the ground and guy ropes are properly tensioned.
- Difficulty Assembling Poles: Ensure pole sections are aligned correctly and not forced. Some poles may require gentle twisting to connect.
Specifications
| Feature | Detail |
|---|---|
| Model Number | A20-475V00RD |
| Overall Dimensions | 430 x 305 x 195 cm (Length x Width x Height) |
| Sleeping Room Dimensions | 200 x 142 x 195 cm (each room) |
| Living Area Dimensions | 285 x 205 x 195 cm |
| Capacity | 5 Persons |
| Waterproof Rating | 3000 mm (Outer Layer) |
| UV Protection | UPF 30+ |
| Weight | 16 kg |
| Material | Polyester fabric, Metal poles (main structure), Fiberglass poles (roof) |
Warranty Information
Outsunny products are designed for quality and durability. This product comes with a standard manufacturer's warranty against defects in materials and workmanship. Please retain your proof of purchase for any warranty claims.
For specific warranty terms and conditions, please refer to the documentation provided at the time of purchase or visit the official Outsunny website.
Customer Support
If you have any questions, require assistance with assembly, or encounter any issues with your Outsunny tent, please contact our customer support team.
Contact Information:
- Website: www.aosom.es (as the manufacturer is SPANISH AOSOM)
- Email: Refer to your purchase documentation for specific email support.
- Phone: Refer to your purchase documentation for specific phone support.
Please have your model number (A20-475V00RD) and proof of purchase ready when contacting support.


