1. Introduction
Thank you for choosing the Vpcok Direct Ice Maker. This appliance is designed to provide you with a convenient and efficient way to produce ice cubes for various uses, from refreshing beverages to keeping food cool. Please read this manual thoroughly before operating the ice maker to ensure safe and optimal performance. Keep this manual for future reference.
2. Safety Instructions
- Ensure the appliance is placed on a stable, level surface away from direct sunlight and heat sources.
- Do not immerse the appliance, power cord, or plug in water or other liquids.
- Unplug the ice maker from the power outlet before cleaning or when not in use.
- Do not operate the appliance with a damaged cord or plug. Contact customer service for repair.
- This appliance is for household use only. Do not use outdoors.
- Keep children away from the ice maker during operation.
- Only use potable water in the water reservoir.
- Allow the appliance to stand upright for at least 12 hours before first use if it has been tilted or inverted during transport. This allows the refrigerant to settle.
3. Product Overview and Components
Familiarize yourself with the parts of your Vpcok Direct Ice Maker:
- Control Panel with LED Indicators (Add Water, Ice Full, Power, S/L Size)
- Ice Basket
- Water Reservoir (1.5L capacity)
- Ice Scoop
- Transparent Lid
- Portable Handle (detachable)
- Drain Plug (at the bottom)

Image: The Vpcok Direct Ice Maker, showcasing its compact design, transparent lid, control panel, and included ice scoop. A glass of iced coffee is also shown, demonstrating a typical use case.

Image: A detailed view of the ice maker's control panel, highlighting the "ADD WATER", "ICE FULL", "POWER", "ON/OFF CLEAN", and "SELECT" buttons, along with their corresponding LED indicators for easy operation.
4. Setup
- Unpacking: Carefully remove the ice maker from its packaging. Remove all packing materials, including any tape or protective films.
- Initial Cleaning: Before first use, clean the interior of the ice maker. Remove the ice basket and wipe the interior with a soft cloth dampened with warm water and a mild detergent. Rinse thoroughly and dry.
- Placement: Place the ice maker on a flat, stable surface. Ensure there is adequate ventilation around the unit (at least 10 cm clearance on all sides). Avoid placing it near heat sources or in direct sunlight.
- Refrigerant Settling: If the ice maker was tilted during transport, let it stand upright for at least 12 hours before plugging it in. This allows the refrigerant to settle properly, preventing damage to the compressor.
- Power Connection: Plug the power cord into a grounded electrical outlet.
5. Operating Instructions
Follow these steps to produce ice:
- Fill Water Reservoir: Open the top cover and remove the ice basket. Pour potable water into the water reservoir up to the MAX fill line. Do not overfill.
- Power On and Select Size: Press the "ON/OFF CLEAN" button on the control panel to turn on the ice maker. The "POWER" indicator will light up. Press the "SELECT" button to choose your desired ice cube size: "S" for small or "L" for large.
- Ice Production: The ice maker will begin its ice-making cycle. The first batch of ice cubes will typically be ready in 6-12 minutes, depending on the selected size and ambient temperature. The machine can produce up to 12 kg of bullet-shaped ice cubes in 24 hours.
- Ice Full/Add Water Indicators:
- If the "ICE FULL" indicator lights up, the ice basket is full. The machine will automatically stop ice production. Remove ice from the basket to resume operation.
- If the "ADD WATER" indicator lights up, the water reservoir is low. Add more water to continue ice production.
- Collecting Ice: Use the provided ice scoop to remove ice from the basket.
- Turning Off: Press the "ON/OFF CLEAN" button again to turn off the ice maker.

Image: An illustration detailing the ice maker's efficiency: 12kg of ice in 24 hours, 9 ice cubes produced in 6-8 minutes, and a 1.5L water reservoir capacity.

Image: A visual representation of the two available ice cube sizes: Small (2.5cm x 2.0cm) suitable for juices/milk, and Large (3.0cm x 2.5cm) suitable for whiskey/beer/seafood.
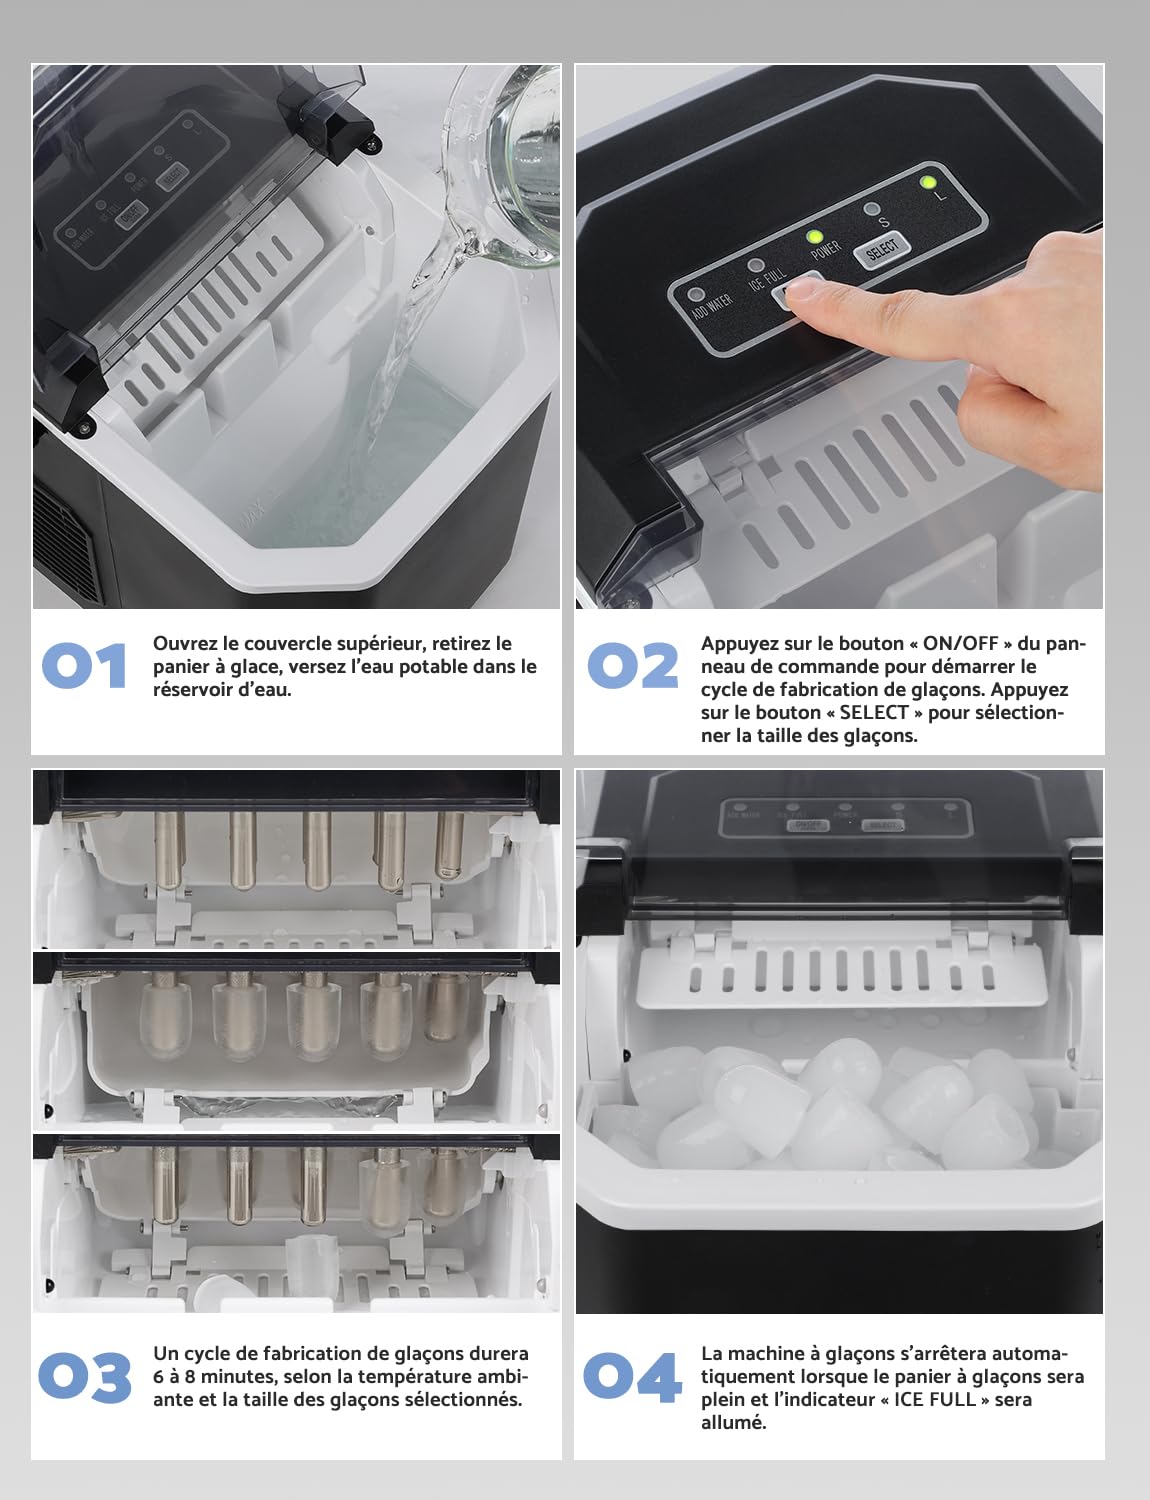
Image: A step-by-step guide showing how to operate the ice maker: 1. Open lid and fill water, 2. Press ON/OFF and SELECT size, 3. Ice production cycle (6-8 minutes), 4. Machine stops when ice is full or water is low.
6. Maintenance
6.1. Automatic Cleaning Function
The ice maker features an automatic self-cleaning function:
- Ensure the water reservoir is filled with clean water.
- Press and hold the "ON/OFF CLEAN" button for 5 seconds. The machine will enter the self-cleaning mode, which typically lasts for 30 minutes.
- Once the cleaning cycle is complete, drain the water from the reservoir using the drain plug at the bottom of the unit.

Image: A visual representation of the ice maker's automatic cleaning function, showing water swirling within the reservoir to clean internal components. The process takes approximately 30 minutes.
6.2. Manual Cleaning and Draining
- Regular Cleaning: For best results and hygiene, clean the ice maker regularly, especially if it's not used frequently.
- Draining Water: When not in use for an extended period, or after cleaning, drain all water from the reservoir. Locate the drain plug at the bottom of the unit, place a container underneath, and remove the plug to allow water to flow out. Re-insert the plug securely once drained.
- Exterior Cleaning: Wipe the exterior of the ice maker with a soft, damp cloth. Do not use harsh chemicals or abrasive cleaners.
- Ice Basket and Scoop: Wash the ice basket and scoop with warm, soapy water, rinse thoroughly, and dry before storing.
7. Troubleshooting
| Problem | Possible Cause | Solution |
|---|---|---|
| Ice maker not producing ice. | No water in reservoir; power issue; ambient temperature too high. | Fill water reservoir; check power connection; ensure proper ventilation and lower room temperature. |
| "ADD WATER" indicator is on. | Water level is too low. | Add potable water to the reservoir up to the MAX line. |
| "ICE FULL" indicator is on. | Ice basket is full. | Remove ice from the basket. |
| Ice cubes are too small or clumpy. | Water temperature too high; machine needs more time; mineral buildup. | Use colder water; allow more time for subsequent cycles; perform a cleaning cycle. |
| Unusual noise during operation. | Normal compressor noise; fan obstruction; unit not level. | Some noise is normal; check for obstructions around fan vents; ensure unit is on a level surface. |
8. Specifications
| Feature | Detail |
|---|---|
| Model Number | HZB-12/G |
| Brand | Vpcok Direct |
| Dimensions (L x W x H) | 29.4 cm (Depth) x 22.2 cm (Width) x 29 cm (Height) |
| Weight | 6.4 kg |
| Water Reservoir Capacity | 1.5 Liters |
| Ice Production Capacity | Up to 12 kg / 24 hours |
| Ice Production Time | 6-12 minutes per cycle (9 cubes) |
| Power Consumption | 95 Watts |
| Voltage | 220 Volts |
| Noise Level | Approximately 35dB |

Image: A diagram illustrating the compact dimensions of the ice maker (22.2cm width, 29.4cm depth, 29cm height) and the ice scoop (7.5cm width, 18.7cm height, 4.0cm depth), emphasizing its space-saving design.

Image: A graph comparing the ice maker's low noise level (35dB) to other common sounds like whispering (30dB), talking (42dB), oven (50dB), and robot vacuum (60dB), highlighting its quiet operation.
9. Warranty and Support
Vpcok Direct is committed to providing high-quality products and comprehensive customer service. If you encounter any issues with your ice maker, please do not hesitate to contact us. Refer to your purchase documentation for specific warranty terms and contact information.
For assistance, please contact Vpcok Direct customer support through the platform where you purchased the product or via the contact details provided in your product packaging.


